Archive for October 12, 2018

Working with MongoDB Stitch Through Existing Drivers โ€“ Python & PyMongo

If you are developing an app using Java, Swift, or JavaScript then the Stitch SDK is the best way to access MongoDB Stitch from your frontend application code โ€“ getting to your data and accessing your Stitch Services and Functions becomes child’s play.

But, what if you are developing in another language – perhaps running on an app server? Luckily, MongoDB Stitch now supports the MongoDB wire protocol โ€“ meaning that you can continue to work with your favorite MongoDB drivers (such as PyMongo) and tools such as the mongo shell.

After enabling connection string access, connecting to your Stitch app from your application is business as usual โ€“ just use the connection string you’re shown in the Stitch UI (replacing the username and password with one of your existing Stitch users). This example is for Python, but the pattern is the same for other languages:

>>> import pymongo
>>> from pymongo import MongoClient
>>> client = MongoClient('mongodb://andrewxxxxmorgan%40gmail.com:\
      my_password@stitch.mongodb.com:27020/?authMechanism=PLAIN&\
      authSource=%24external&ssl=true&\
      appName=imported_trackme-etjzr:mongodb-atlas:local-userpass')

Inserting a document should seem very familiar (note that I’m including an owner_id attribute so that the app can take advantage of Stitch’s data access controls):

>>> db = client.trackme
>>> collection = db.comments

>>> comment = {
    "author" : "Andrew Morgan",
    "comment" : "Using Stitch from Python โ€“ who knew?!",
    "owner_id" : "5bacd4e7698a67f72dfdb44c"
}
>>> collection.insert_one(comment)

<pymongo.results.InsertOneResult object at 0x102b362d8>

Connecting to MongoDB Stitch using the MongoDB Python Driver

However, Stitch is about more just than accessing MongoDB data. I’ve created a (stupidly) simple Stitch (morning) Function to show how you can execute Stitch Functions through MongoDB drivers:

>>> db.command("callFunction", "morning", arguments=['Billy'])

u'ok': 1, u'response': {u'message': u'Good Morning Billy from andrewxxxxxxorgan@gmail.com'}}

Creating your first Stitch app? Start with one of the Stitch tutorials.

Want to learn more about MongoDB Stitch? Read the white paper.


Working with MongoDB Stitch Through the mongo Shell โ€“ MongoDB Wire Protocol Support

The Stitch SDK is the best way to access MongoDB Stitch from your frontend application code โ€“ getting to your data and accessing your Stitch Services and Functions becomes child’s’ play.

However, those already using MongoDB may have existing backend code and tools that work with MongoDB. MongoDB Stitch now supports the MongoDB wire protocol โ€“ meaning that you can continue to work with your favorite tools (including the mongo shell) and drivers while benefiting from Stitch’s quick and simple data access control and hosted JavaScript functions.

After enabling connection string access, connecting to your Stitch app from the mongo shell is business as usual โ€“ just use the connection string you’re shown in the Stitch UI:

mongo "mongodb://andrewjamXXXXX%40gmail.com:gXXXX@stitch.mongodb.com:27020\
    /?authMechanism=PLAIN&authSource=%24external&ssl=true&\
    appName=imported_trackme-xxxxz:mongodb-atlas:local-userpass" --norc

Once connected, adding a document through Stitch should feel very familiar:

db.comments.insert({
    owner_id: "5bacd4e7698a67f72dfdb44c",
    author: "Andrew Morgan",
    comment: "Stitch wire protocol support rocks!"
})

MongoDB Stitch wire protocol

However, Stitch is about more than accessing MongoDB data. I’ve created a (stupidly) simple Stitch (morning) Function to show how you can test your Stitch app:

exports = function(name){
  return {message: "Good Morning " + name + " from " 
             + context.user.data.email};
};

From the mongo shell, I can now test that function:

db.runCommand({ callFunction: "morning", arguments: ["Billy"] })
{
    "ok" : 1,
    "response" : {
        "message" : "Good Morning Billy from greetings@clusterdb.com"
    }
}

Creating your first Stitch app? Start with one of the Stitch tutorials.

Want to learn more about MongoDB Stitch? Read the white paper.


MongoDB Stitch Authentication Triggers

MongoDB Stitch makes it a breeze to use third-party services such as Google or Facebook to authenticate your app’s users. This is great for your users as it means they don’t need to go through the tedious process of having to provide all of their details to yet another application/service โ€“ it also means one less password to remember.

While delegating the authentication process makes your app secure and straightforward to use, you may still want to customize the process for your users. For example, if someone is registering for the first time, then you probably want to send them a welcome email. When a user deregisters, there may be regulations (such as GDPR) that mandate you delete all of their data.

This is where Stitch Authentication Triggers come to the fore. The model is very simple; you register a Stitch Function with any authentication event (register (create), login, deregister (delete)), then add JavaScript code to that function to perform the required actions.

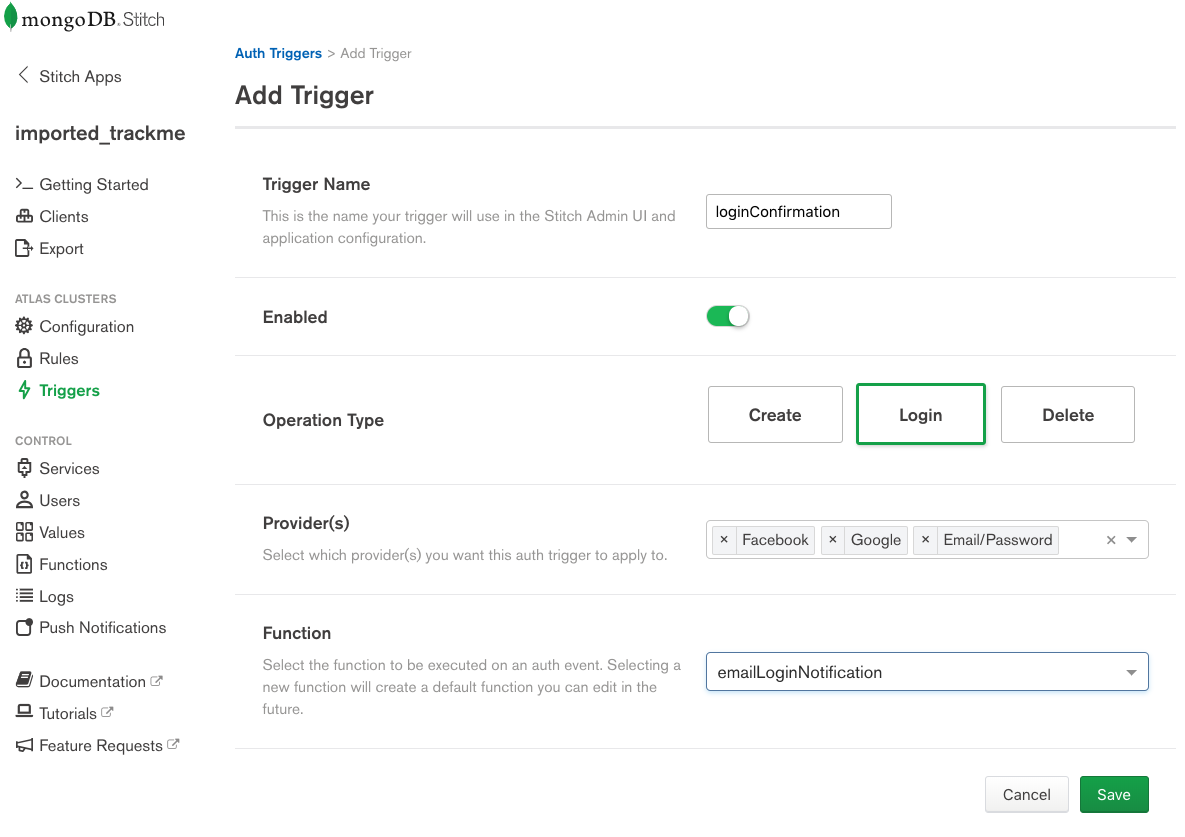
Simply create the trigger through the Stitch UI (in this case, to send the user an email every time they log in):

MongoDB Stitch Authentication Trigger

and implement the function (emailLoginNotification) that receives the authentication event and sends the email using the AWS SES service:

exports = function(event){
   var aws = context.services.get('AWS');
   var input = {
      Destination: {
         ToAddresses: [event.user.data.email]
      },
      Message: {
         Body: {
            Html: {
               Charset:"UTF-8",
               Data:   "This is a message to confirm that " 
                + event.user.data.name 
                + " (" + event.user.data.email
                + ") has just logged into TrackMe"
            }
         },
         Subject: {
               Charset:"UTF-8",
               Data:   "TrackMe Login"
         }
      },
      Source: context.values.get('fromEmail')
   };
   try {
      aws.ses().SendEmail(input).then(function (result){
         console.log(JSON.stringify(result));
      });
   } catch(error) {
      console.log(JSON.stringify(error));
   }
};

Creating your first Stitch app? Start with one of the Stitch tutorials.

Want to learn more about MongoDB Stitch? Read the white paper.