Archive for andrew

Replication and auto-failover made easy with MySQL Utilities

MySQL utilities in Workbench

Utilities in MySQL Workbench

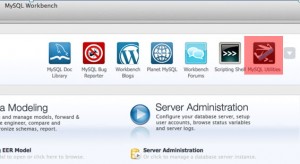
If you’re a user of MySQL Workbench then you may have noticed a pocket knife icon appear in the top right hand corner – click on that and a terminal opens which gives you access to the MySQL utilities. In this post I’m focussing on the replication utilities but you can also refer to the full MySQL Utilities documentation.

What I’ll step through is how to uses these utilities to:

  • Set up replication from a single master to multiple slaves
  • Automatically detect the failure of the master and promote one of the slaves to be the new master
  • Introduce the old master back into the topology as a new slave and then promote it to be the master again

Tutorial Video

Before going through the steps in detail here’s a demonstration of the replication utilities in action…

To get full use of these utilities you should use the InnoDB storage engine together with the Global Transaction ID functionality from the latest MySQL 5.6 DMR.

Do you really need/want auto-failover?

For many people, the instinctive reaction is to deploy a fully automated system that detects when the master database fails and then fails over (promotes a slave to be the new master) without human intervention. For many applications this may be the correct approach.

There are inherent risks to this though – What if the failover implementation has a flaw and fails (after all, we probably don’t test this out in the production system very often)? What if the slave isn’t able to cope with the workload and makes things worse? Is it just a transitory glitch and would the best approach have been just to wait it out?

Following a recent, high profile outage there has been a great deal of debate on the topic between those that recommend auto-failover and those that believe it should only ever be entrusted to a knowledgeable (of the application and the database architecture) and well informed (of the state of the database nodes, application load etc.) human. Of course, if the triggering of the failover is to be left to a human then you want that person to have access to the information they need and an extremely simple procedure (ideally a single command) to execute the failover. Probably the truth is that it all depends on your specific circumstances.

The MySQL replication utilities aim to support you whichever camp you belong to:

  • In the fully automated mode, the utilities will continually monitor the state of the master and in the event of its failure identify the best slave to promote – by default it will select the one that is most up-to-date and then apply any changes that are available on other slaves but not on this one before promoting it to be the new master. The user can override this behaviour (for example by limiting which of the slaves are eligible for promotion). The user is also able to bind in their own programs to be run before and after the failover (for example, to inform the application).
  • In the monitoring mode, the utility still continually checks the availability of the master, and informs the user if it should fail. The user then executes a single command to fail over to their preferred slave.

Step 1. Make sure MySQL Servers are configured correctly

For some of the utilities, it’s important that you’re using Global Transaction IDs; binary logging needs to be enabled; may as well use the new crash-safe slave functionality… It’s beyond the scope of this post to go through all of those and so instead I’ll just give example configuration files for the 5 MySQL Servers that will be used:

my1.cnf

[mysqld]
binlog-format=ROW
log-slave-updates=true
gtid-mode=on
disable-gtid-unsafe-statements=true # Use enforce-gtid-consistency from 5.6.9+
master-info-repository=TABLE
relay-log-info-repository=TABLE
sync-master-info=1
datadir=/home/billy/mysql/data1
server-id=1
log-bin=util11-bin.log
report-host=utils1
report-port=3306
socket=/home/billy/mysql/sock1
port=3306

my2.cnf

[mysqld]
binlog-format=ROW
log-slave-updates=true
gtid-mode=on
disable-gtid-unsafe-statements=true # Use enforce-gtid-consistency from 5.6.9+
master-info-repository=TABLE
relay-log-info-repository=TABLE
sync-master-info=1
datadir=/home/billy/mysql/data2
server-id=2
log-bin=util12-bin.log
report-host=utils1
report-port=3307
socket=/home/billy/mysql/sock2
port=3307

my3.cnf

[mysqld]
binlog-format=ROW
log-slave-updates=true
gtid-mode=on
disable-gtid-unsafe-statements=true # Use enforce-gtid-consistency from 5.6.9+
master-info-repository=TABLE
relay-log-info-repository=TABLE
sync-master-info=1
datadir=/home/billy/mysql/data3
server-id=3
log-bin=util2-bin.log
report-host=utils2
report-port=3306
socket=/home/billy/mysql/sock3
port=3306

my4.cnf

[mysqld]
binlog-format=ROW
log-slave-updates=true
gtid-mode=on
disable-gtid-unsafe-statements=true # Use enforce-gtid-consistency from 5.6.9+
master-info-repository=TABLE
relay-log-info-repository=TABLE
master-info-file=/home/billy/mysql/master4.info
datadir=/home/billy/mysql/data4
server-id=4
log-bin=util4-bin.log
report-host=utils2
report-port=3307
socket=/home/billy/mysql/sock4
port=3307

my5.cnf

[mysqld]
binlog-format=ROW
log-slave-updates=true
gtid-mode=on
disable-gtid-unsafe-statements=true # Use enforce-gtid-consistency from 5.6.9+
datadir=/home/billy/mysql/data5
master-info-repository=TABLE
relay-log-info-repository=TABLE
sync-master-info=1
#master-info-file=/home/billy/mysql/master5.info
server-id=5
log-bin=util5-bin.log
report-host=utils2
report-port=3308
socket=/home/billy/mysql/sock5
port=3308

The utilities are actually going to be run from a remote host and so it will be necessary for that host to access each of the MySQL Servers and so a user has to be granted remote access (note that the utilities will automatically create the replication user):

[billy@utils1 ~]$ mysql -h 127.0.0.1 -P3306 -u root -e "grant all on *.* to root@'%' with grant option;"
[billy@utils1 ~]$ mysql -h 127.0.0.1 -P3307 -u root -e "grant all on *.* to root@'%' with grant option;"
[billy@utils2 ~]$ mysql -h 127.0.0.1 -P3306 -u root -e "grant all on *.* to root@'%' with grant option;"
[billy@utils2 ~]$ mysql -h 127.0.0.1 -P3307 -u root -e "grant all on *.* to root@'%' with grant option;"
[billy@utils2 ~]$ mysql -h 127.0.0.1 -P3308 -u root -e "grant all on *.* to root@'%' with grant option;"

OK – that’s the most painful part of the whole process out of the way!

Set up replication

While there are extra options (such as specifying what username/password to use for the replication user or providing a password for the root user) I’m going to keep things simple and use the defaults as much as possible. The following commands are run from the MySQL Utilities terminal – just click on the pocket-knife icon in MySQL Workbench.

mysqlreplicate --master=root@utils1:3306 --slave=root@utils1:3307
# master on utils1: ... connected.
# slave on utils1: ... connected.
# Checking for binary logging on master...
# Setting up replication...
# ...done.

mysqlreplicate --master=root@utils1:3306 --slave=root@utils2:3306
# master on utils1: ... connected.
# slave on utils2: ... connected.
# Checking for binary logging on master...
# Setting up replication...
# ...done.

mysqlreplicate --master=root@utils1:3306 --slave=root@utils2:3307
# master on utils1: ... connected.
# slave on utils2: ... connected.
# Checking for binary logging on master...
# Setting up replication...
# ...done.

mysqlreplicate --master=root@utils1:3306 --slave=root@utils2:3308
# master on utils1: ... connected.
# slave on utils2: ... connected.
# Checking for binary logging on master...
# Setting up replication...
# ...done.

That’s it, replication has now been set up from one master to four slaves.

You can now check that the replication topology matches what you intended:

mysqlrplshow --master=root@utils1 --discover-slaves-login=root;
# master on utils1: ... connected.
# Finding slaves for master: utils1:3306

# Replication Topology Graph
utils1:3306 (MASTER)
   |
   +--- utils1:3307 - (SLAVE)
   |
   +--- utils2:3306 - (SLAVE)
   |
   +--- utils2:3307 - (SLAVE)
   |
   +--- utils2:3308 - (SLAVE)

Additionally, you can also check that any of the replication relationships is correctly configure:

mysqlrplcheck --master=root@utils1 --slave=root@utils2
# master on utils1: ... connected.
# slave on utils2: ... connected.
Test Description                                                     Status
---------------------------------------------------------------------------
Checking for binary logging on master                                [pass]
Are there binlog exceptions?                                         [pass]
Replication user exists?                                             [pass]
Checking server_id values                                            [pass]
Is slave connected to master?                                        [pass]
Check master information file                                        [pass]
Checking InnoDB compatibility                                        [pass]
Checking storage engines compatibility                               [pass]
Checking lower_case_table_names settings                             [pass]
Checking slave delay (seconds behind master)                         [pass]
# ...done.

Including the -s option would have included the output that you’d expect to see from SHOW SLAVE STATUSG on the slave.

Automated monitoring and failover

The previous section showed how you can save some serious time (and opportunity for user-error) when setting up MySQL replication. We now look at using the utilities to automatically monitor the state of the master and then automatically promote a new master from the pool of slaves. For simplicity I’ll stick with default values wherever possible but note that there are a number of extra options available to you such as:

  • Constraining which slaves are eligible for promotion to master; the default is to take the most up-to-date slave
  • Binding in your own scripts to be run before or after the failover (e.g. inform your application to switch master?)
  • Have the utility monitor the state of the servers but don’t automatically initiate failover

Here is how to set it up:

mysqlfailover --master=root@utils1:3306 --discover-slaves-login=root --rediscover

MySQL Replication Failover Utility
Failover Mode = auto     Next Interval = Wed Aug 15 13:19:30 2012

Master Information
------------------
Binary Log File    Position  Binlog_Do_DB  Binlog_Ignore_DB
util11-bin.000001  2586

Replication Health Status
+---------+-------+---------+--------+------------+---------+
| host    | port  | role    | state  | gtid_mode  | health  |
+---------+-------+---------+--------+------------+---------+
| utils1  | 3306  | MASTER  | UP     | ON         | OK      |
| utils1  | 3307  | SLAVE   | UP     | ON         | OK      |
| utils2  | 3306  | SLAVE   | UP     | ON         | OK      |
| utils2  | 3307  | SLAVE   | UP     | ON         | OK      |
| utils2  | 3308  | SLAVE   | UP     | ON         | OK      |
+---------+-------+---------+--------+------------+---------+

Q-quit R-refresh H-health G-GTID Lists U-UUIDs

mysqlfailover will then continue to run, refreshing the state – just waiting for something to go wrong.

Rather than waiting, I kill the master MySQL Server:

mysqladmin -h utils1 -P3306 -u root shutdown

Checking with the still-running mysqlfailover we can see that it has promoted utils1:3307.

MySQL Replication Failover Utility
Failover Mode = auto     Next Interval = Wed Aug 15 13:21:13 2012

Master Information
------------------
Binary Log File    Position  Binlog_Do_DB  Binlog_Ignore_DB
util12-bin.000001  7131

Replication Health Status
+---------+-------+---------+--------+------------+---------+
| host    | port  | role    | state  | gtid_mode  | health  |
+---------+-------+---------+--------+------------+---------+
| utils1  | 3307  | MASTER  | UP     | ON         | OK      |
| utils2  | 3306  | SLAVE   | UP     | ON         | OK      |
| utils2  | 3307  | SLAVE   | UP     | ON         | OK      |
| utils2  | 3308  | SLAVE   | UP     | ON         | OK      |
+---------+-------+---------+--------+------------+---------+

Q-quit R-refresh H-health G-GTID Lists U-UUIDs

Add the recovered MySQL Server back into the topology

After restarting the failed MySQL Server, it can be added back into the mix as a slave to the new master:

mysqlreplicate --master=root@utils1:3307 --slave=root@utils1:3306
# master on utils1: ... connected.
# slave on utils1: ... connected.
# Checking for binary logging on master...
# Setting up replication...
# ...done.

The output from mysqlfailover (still running) confirms the addition:

MySQL Replication Failover Utility
Failover Mode = auto     Next Interval = Wed Aug 15 13:24:38 2012

Master Information
------------------
Binary Log File    Position  Binlog_Do_DB  Binlog_Ignore_DB
util12-bin.000001  7131

Replication Health Status
+---------+-------+---------+--------+------------+---------+
| host    | port  | role    | state  | gtid_mode  | health  |
+---------+-------+---------+--------+------------+---------+
| utils1  | 3307  | MASTER  | UP     | ON         | OK      |
| utils1  | 3306  | SLAVE   | UP     | ON         | OK      |
| utils2  | 3306  | SLAVE   | UP     | ON         | OK      |
| utils2  | 3307  | SLAVE   | UP     | ON         | OK      |
| utils2  | 3308  | SLAVE   | UP     | ON         | OK      |
+---------+-------+---------+--------+------------+---------+

Q-quit R-refresh H-health G-GTID Lists U-UUIDs

If it were important that the recovered MySQL Server be restored as the master then it is simple to manually trigger the promotion (after quitting out of mysqlfailover):

mysqlrpladmin --master=root@utils1:3307 --new-master=root@utils1:3306 --demote-master 
  --discover-slaves-login=root switchover

# Discovering slaves for master at utils1:3307
# Checking privileges.
# Performing switchover from master at utils1:3307 to slave at utils1:3306.
# Checking candidate slave prerequisites.
# Waiting for slaves to catch up to old master.
# Stopping slaves.
# Performing STOP on all slaves.
# Demoting old master to be a slave to the new master.
# Switching slaves to new master.
# Starting all slaves.
# Performing START on all slaves.
# Checking slaves for errors.
# Switchover complete.
#
# Replication Topology Health:
+---------+-------+---------+--------+------------+---------+
| host    | port  | role    | state  | gtid_mode  | health  |
+---------+-------+---------+--------+------------+---------+
| utils1  | 3306  | MASTER  | UP     | ON         | OK      |
| utils1  | 3307  | SLAVE   | UP     | ON         | OK      |
| utils2  | 3306  | SLAVE   | UP     | ON         | OK      |
| utils2  | 3307  | SLAVE   | UP     | ON         | OK      |
| utils2  | 3308  | SLAVE   | UP     | ON         | OK      |
+---------+-------+---------+--------+------------+---------+
# ...done.

As always, we’d really appreciate people trying this out and giving us feedback!


MySQL Cluster 7.2.8 Released

The binary version for MySQL Cluster 7.2.8 has now been made available at http://www.mysql.com/downloads/cluster/ (GPL version) or https://support.oracle.com/ (commercial version).

A description of all of the changes (fixes) that have gone into MySQL Cluster 7.2.8 (compared to 7.2.7) is available from the 7.2.8 Change log.


MySQL Cluster 7.1.23 has been released

The binary & source versions for MySQL Cluster 7.1.23 have now been made available at https://www.mysql.com/downloads/cluster/7.1.html#downloads (GPL version) or https://support.oracle.com/ (commercial version).

A description of all of the changes (fixes) that have gone into MySQL Cluster 7.1.23 (compared to 7.1.22) are available from the 7.1.23 Change log.


MySQL Cluster 7.2.7 released

The binary version for MySQL Cluster 7.2.7 has now been made available at http://www.mysql.com/downloads/cluster/ (GPL version) or https://support.oracle.com/ (commercial version).

A description of all of the changes (fixes) that have gone into MySQL Cluster 7.2.7 (compared to 7.2.6) are available from the 7.2.7 Change log.


Optimizing Performance of the MySQL Cluster Database – White Paper update

Engineering threads within a Data Node

Engineering threads within a Data Node

A new version of the white paper “Guide to Optimizing Performance of the MySQL Cluster Database” has been released; download it here.

This paper steps you through:

  • Identifying if your application is a good fit for MySQL Cluster
  • Measuring performance and identifying problem performance areas to address
  • Optimizing performance:
    • Access patterns
    • Using Adaptive Query Localization for complex Joins
    • Distribution aware applications
    • Batching operations
    • Schema optimizations
    • Query optimization
    • Parameter tuning
    • Connection pools
    • Multi-Threaded Data Nodes
    • Alternative APIs
    • Hardware enhancements
    • Miscellaneous
  • Scaling MySQL Cluster by Adding Nodes

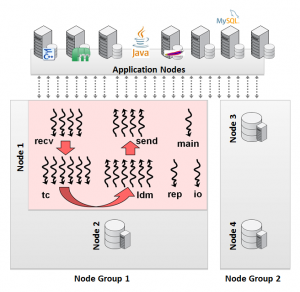
As well as the kind of regular updates that are needed from time to time, this version includes the extra opportunities for optimizations that are available with MySQL Cluster 7.2 such as faster joins and engineering the threads within a multi-threaded data node.

As a reminder, I’ll be covering much of this material in an upcoming webinar.

MySQL Connect


MySQL Cluster : Delivering Breakthrough Performance (upcoming webinar)

MySQL Cluster partitioning key

MySQL Cluster partitioning key

I’ll be presenting a webinar covering MySQL Cluster performance on Thursday, July 26. As always, the webinar will be free but you’ll need to register here – you’ll then also receive a link to the charts and a recording of the session after the event.

The replay of this webinar is now available from here.

Here’s the agenda (hoping that I can squeeze it all in!):

  • Introduction to MySQL Cluster
  • Where does MySQL Cluster fit?
  • Benchmarks:
    • ANALYZE TABLE
    • Access patterns
    • AQL (fast JOINs)
    • Distribution aware
    • Batching
    • Schema optimisations
    • Connection pooling
    • Multi-threaded data nodes
    • High performance NoSQL APIs
    • Hardware choices
    • More tips
  • The measure/optimise loop
  • Techniques to boost performance
  • Scaling out
  • Other useful resources

The session starts at 9:00 am UK time / 10:00 am Central European time.


MySQL Connect & Oracle OpenWorld 2012

Oracle OpenWorld 2012

Oracle OpenWorld 2012

I’m lucky enough to be involved in a number of sessions across Oracle OpenWorld as well as the (new for this year) MySQL Connect session that precedes it. MySQL Connect runs on Saturday 29th and Sunday 30th September and the Oracle OpenWorld on through Thursday October 4th.

The sessions I’ll be involved with are:

  • MySQL Cluster – From Zero to One Billion in Five Easy Steps: Of course it takes more than five steps to scale to more than one billion queries per minute, but the new configuration features of MySQL Cluster make it much simpler to provision and deploy MySQL Cluster on-premises or in the cloud, automatically optimized for your target use case. This BoF session is designed to give you a demo of the new features, showing how you can use them to quickly build your own proof of concept and then take that into production. The MySQL Cluster Engineering team will be on hand to answer your questions and also listen to the requirements you have for current or future MySQL Cluster projects. This is Birds-of-a-Feather session and is part of the MySQL Connect conference.
  • Developing High-Throughput Services with NoSQL APIs to InnoDB and MySQL Cluster: Ever-increasing performance demands of Web-based services have generated significant interest in providing NoSQL access methods to MySQL (MySQL Cluster from Oracle and the InnoDB storage engine of MySQL), enabling users to maintain all the advantages of their existing relational databases while providing blazing-fast performance for simple queries. Get the best of both worlds: persistence; consistency; rich SQL queries; high availability; scalability; and simple, flexible APIs and schemas for agile development. This session describes the memcached connectors and examines some use cases for how MySQL and memcached fit together in application architectures. It does the same for the newest MySQL Cluster native connector, an easy-to-use, fully asynchronous connector for Node.js. This is a conference session and is part of the MySQL Connect conference.
  • Introduction to MySQL High-Availability Solutions: Databases are the center of today’s Web and enterprise applications, storing and protecting an organization’s most valuable assets and supporting business-critical applications. Just minutes of downtime can result in dissatisfied customers and significant loss of revenue. Ensuring database high availability is therefore a top priority for any organization. Attend this session to learn more about delivering high availability for MySQL-based services. It covers

    • The cause, effect, and impact of downtime
    • A methodology for mapping applications to the right high-availability solution
    • An overview of MySQL high availability, from replication to virtualization, clustering, and multisite redundancy
    • Operational best practices to ensure business continuity

    This is a conference session and is part of Oracle OpenWorld.

Early bird pricing is available for the MySQL Connect until 13th July – same date for Oracle OpenWorld.


MySQL Cluster running on Raspberry Pi

MySQL Cluster running on Raspberry Pi

MySQL Cluster running on Raspberry Pi

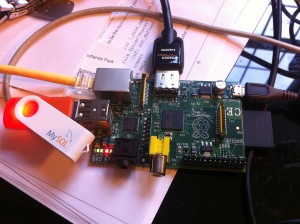
I start a long weekend tonight and it’s the kids’ last day of school before their school holidays and so last night felt like the right time to play a bit. This week I received my Raspberry Pi – if you haven’t heard of it then you should take a look at the Raspberry Pi FAQ – basically it’s a ridiculously cheap ($25 or $35 if you want the top of the range model) ARM based PC that’s the size of a credit card.

A knew I had to have one to play with but what to do with it? Why not start by porting MySQL Cluster onto it? We always claim that Cluster runs on commodity hardware – surely this would be the ultimate test of that claim.

I chose the customised version of Debian – you have to copy it onto the SD memory card that acts as the storage for the Pi. Once up and running on the Pi, the first step was to increase the size of the main storage partition – it starts at about 2 Gbytes – using gparted. I then had to compile MySQL Cluster – ARM isn’t a supported platform and so there are no pre-built binaries. I needed to install a couple of packages before I could get very far:

sudo apt-get update
sudo apt-get install cmake
sudo apt-get install libncurses5-dev

Compilation initially got about 80% through before failing and so if you try this yourself then save yourself some time by applying the patch from this bug report before starting. The build scripts wouldn’t work but I was able to just run make…

make
sudo make install

As I knew that memory was tight I tried to come up with a config.ini file that cut down on how much memory would be needed (note that 192.168.1.122 is the Raspberry Pi while 192.168.1.118 is an 8GByte Linux x86-64 PC – doesn’t seem a very fair match!):

[ndb_mgmd]
hostname=192.168.1.122
NodeId=1

[ndbd default]
noofreplicas=2
DataMemory=2M
IndexMemory=1M
DiskPageBufferMemory=4M
StringMemory=5
MaxNoOfConcurrentOperations=1K
MaxNoOfConcurrentTransactions=500
SharedGlobalMemory=500K
LongMessageBuffer=512K
MaxParallelScansPerFragment=16
MaxNoOfAttributes=100
MaxNoOfTables=20
MaxNoOfOrderedIndexes=20

[ndbd]
hostname=192.168.1.122
datadir=/home/pi/mysql/ndb_data
NodeId=3

[ndbd]
hostname=192.168.1.118
datadir=/home/billy/my_cluster/ndbd_data
NodeId=4

[mysqld]
NodeId=50

[mysqld]
NodeId=51

[mysqld]
NodeId=52

[mysqld]
NodeId=53

[mysqld]
NodeId=54

Running the management node worked pretty easily but then I had problems starting the data nodes – checking how much memory I had available gave me a hint as to why!

pi@raspberrypi:~$ free -m
             total       used       free     shared    buffers     cached
Mem:           186         29        157          0          1         11
-/+ buffers/cache:         16        169
Swap:            0          0          0

OK – so 157 Mbytes of memory available and no swap space, not ideal and so the next step was to use gparted again to create swap partitions on the SD card as well a massive 1Gbyte on my MySQL branded USB stick (need to persuade marketing to be a bit more generous with those). A quick edit of /etc/fstab and a restart and things were looking in better shape:

pi@raspberrypi:~$ free -m
             total       used       free     shared    buffers     cached
Mem:           186         29        157          0          1         11
-/+ buffers/cache:         16        169
Swap:         1981          0       1981

Next to start up the management node and 1 data node on the Pi as well as a second data node on the Linux server “ws2” (I want High Availability after all – OK so running the management node on the same host as a data node is a single point of failure)…

pi@raspberrypi:~/mysql$ ndb_mgmd -f conf/config.ini --configdir=/home/pi/mysql/conf/ --initial
pi@raspberrypi:~/mysql$ ndbd
billy@ws2:~$ ndbd -c 192.168.1.122:1186

I could then confirm that everything was up and running:

pi@raspberrypi:~$ ndb_mgm -e show
Connected to Management Server at: localhost:1186
Cluster Configuration
---------------------
[ndbd(NDB)]     2 node(s)
id=3    @192.168.1.122  (mysql-5.5.22 ndb-7.2.6, Nodegroup: 0, Master)
id=4    @192.168.1.118  (mysql-5.5.22 ndb-7.2.6, Nodegroup: 0)

[ndb_mgmd(MGM)] 1 node(s)
id=1    @192.168.1.122  (mysql-5.5.22 ndb-7.2.6)

[mysqld(API)]   5 node(s)
id=50 (not connected, accepting connect from any host)
id=51 (not connected, accepting connect from any host)
id=52 (not connected, accepting connect from any host)
id=53 (not connected, accepting connect from any host)
id=54 (not connected, accepting connect from any host)

Cool!

Next step is to run a MySQL Server so that I can actually test the Cluster – if I tried running that on the Pi then it caused problems (157 Mbytes of RAM doesn’t stretch as far as it used to) – on ws2:

billy@ws2:~/my_cluster$ cat conf/my.cnf
[mysqld]
ndbcluster
datadir=/home/billy/my_cluster/mysqld_data
ndb-connectstring=192.168.1.122:1186

billy@ws2:~/my_cluster$ mysqld --defaults-file=conf/my.cnf&

Check that it really has connected to the Cluster:

pi@raspberrypi:~/mysql$ ndb_mgm -e show
Connected to Management Server at: localhost:1186
Cluster Configuration
---------------------
[ndbd(NDB)]     2 node(s)
id=3    @192.168.1.122  (mysql-5.5.22 ndb-7.2.6, Nodegroup: 0, Master)
id=4    @192.168.1.118  (mysql-5.5.22 ndb-7.2.6, Nodegroup: 0)

[ndb_mgmd(MGM)] 1 node(s)
id=1    @192.168.1.122  (mysql-5.5.22 ndb-7.2.6)

[mysqld(API)]   5 node(s)
id=50   @192.168.1.118  (mysql-5.5.22 ndb-7.2.6)
id=51 (not connected, accepting connect from any host)
id=52 (not connected, accepting connect from any host)
id=53 (not connected, accepting connect from any host)
id=54 (not connected, accepting connect from any host)

Finally, just need to check that I can read and write data…

billy@ws2:~/my_cluster$ mysql -h 127.0.0.1 -P3306 -u root
mysql> CREATE DATABASE clusterdb;USE clusterdb;
Query OK, 1 row affected (0.24 sec)

Database changed
mysql> CREATE TABLE simples (id INT NOT NULL PRIMARY KEY) engine=ndb;
120601 13:30:20 [Note] NDB Binlog: CREATE TABLE Event: REPL$clusterdb/simples
Query OK, 0 rows affected (10.13 sec)

mysql> REPLACE INTO simples VALUES (1),(2),(3),(4);
Query OK, 4 rows affected (0.04 sec)
Records: 4  Duplicates: 0  Warnings: 0

mysql> SELECT * FROM simples;
+----+
| id |
+----+
|  1 |
|  2 |
|  4 |
|  3 |
+----+
4 rows in set (0.09 sec)

OK – so is there any real application to this? Well, probably not other than providing a cheap development environment – imagine scaling out to 48 data nodes, that would cost $1,680 (+ the cost of some SD cards)! More practically might be management nodes – we know that they need very few resources. As a reminder – this is not a supported platform!


MySQL Cluster Manager 1.1.6 released

MySQL Cluster Manager 1.1.6 is now available to download from My Oracle Support.

Details on the changes can will be added to the MySQL Cluster Manager documentation . Please give it a try and let me know what you think.

Note that if you’re not a commercial user then you can still download MySQL Cluster Manager 1.1.5 from the Oracle Software Delivery Cloud and try it out for free. Documentation is available here.


MySQL 5.6 Replication – webinar replay

MySQL 5.6 Replication - Global Transaction IDs

MySQL 5.6 Replication - Global Transaction IDs

On Wednesday (16th May 2012), Mat Keep and I presented on the new replication features that are previewed as part of the latest MySQL 5.6 Development Release.

The replay for that webinar (together with the chart deck) is now available from here.

In addition, there were a huge number of great questions raised and we had a couple of  key engineers answering them on-line – view the Q&A transcript here.

A reminder of the topics covered in the webinar…

MySQL 5.6 delivers new replication capabilities which we will discuss in the webinar:

  • High performance with Multi-Threaded Slaves and Optimized Row Based Replication
  • High availability with Global Transaction Identifiers, Failover Utilities and Crash Safe Slaves & Binlog
  • Data integrity with Replication Event Checksums
  • Dev/Ops agility with new Replication Utilities, Time Delayed Replication and more