Archive for andrew

MySQL HA Solutions – webinar replay

If you were unable to attend the live webinar (or you want to go back and listen to it again) then it’s now available to view on-line here.

Databases are the center of today’s web and enterprise applications, storing and protecting an organization’s most valuable assets and supporting business-critical applications. Just minutes of downtime can result in significant lost revenue and dissatisfied customers. Ensuring database highly availability is therefore a top priority for any organization. Tune into this webcast to learn more.

The session discusses:

  1. Causes, effect and impact of downtime
  2. Methodologies to map applications to HA solution
  3. Overview of MySQL HA solutions
  4. Operational best practices to ensure business continuity


Enhanced conflict resolution with MySQL Cluster active-active replication

Detecting conflicts

Part of the latest MySQL Cluster Development Milestone Release (MySQL Cluster 7.2.1 – select the “Development Release” tab at http://dev.mysql.com/downloads/cluster/#downloads) is a couple of enhancements to the conflict detection and resolution mechanism for active-active (multi-master) replication. While MySQL Cluster has had conflict detection for years it has now been made much more complete and a lot easier to use:

  • No changes needed to the application schema
  • Entire conflicting transaction is rolled back together with any dependent transactions

The focus of this post will be to step through how to use this feature – while it will also attempt to explain how it works at a high level, you should refer to the following posts for the design details and philosophy: Eventual consistency with MySQL & Eventual Consistency – detecting conflicts.

What is a conflict?

MySQL Cluster allows bi-directional replication between two (or more) clusters. Replication within each cluster is synchronous but between clusters it is asynchronous which means the following scenario is possible:

Conflict with asynchronous replication
Site A Replication Site B
x == 10 x == 10
x = 11 x = 20
— x=11 –> x == 11
x==20 <– x=20 —


In this example a value (column for a row in a table) is set to 11 on site A and the change is queued for replication to site B. In the mean time, an application sets the value to 20 on site B and that change is queued for replication to site A. Once both sites have received and applied the replicated change from the other cluster site A contains the value 20 while site B contains 11 – in other words the databases are now inconsistent.

How MySQL Cluster 7.2 implements eventual consistency

There are two phases to establishing consistency between both clusters after an inconsistency has been introduced:

  1. Detect that a conflict has happened
  2. Resolve the inconsistency

Detecting the conflict

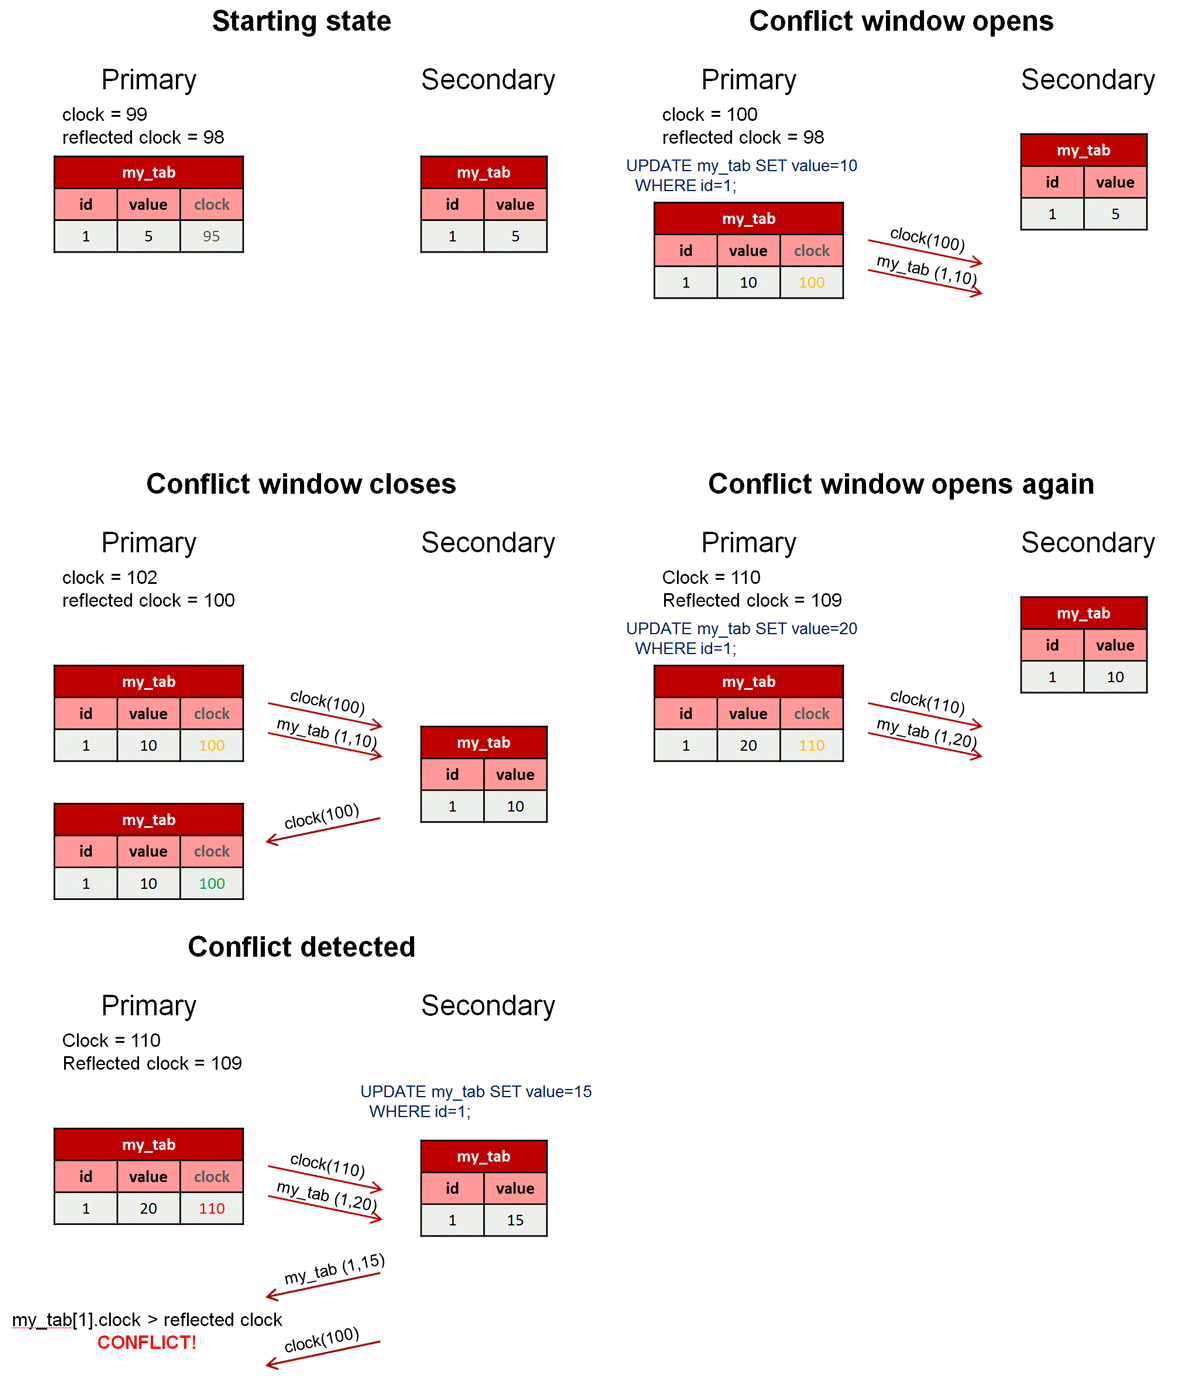
The following animation illustrates how MySQL Cluster 7.2 detects that an inconsistency has been introduced by the asynchronous, active-active replication:
Detecting conflicts

While we typically consider the 2 clusters in an active-active replication configuration to be peers, in this case we designate one to be the primary and the other the secondary. Reads and writes can still be sent to either cluster but it is the responsibility of the primary to identify that a conflict has arisen and then remove the inconsistency.

A logical clock is used to identify (in relative terms) when a change is made on the primary – for those who know something of the MySQL Cluster internals, we use the index of the Global Checkpoint that the update is contained in. For all tables that have this feature turned on, an extra, hidden column is automatically added on the primary – this represents the value of the logical clock when the change was made.

Once the change has been applied on the primary, there is a “window of conflict” for the effected row(s) during which if a different change is made to the same row(s) on the secondary then there will be an inconsistency. Once the slave on the secondary has applied the change from the primary, it will send a replication event back to the slave on the primary, containing the primary’s clock value associated with the changes that have just been applied on the secondary. (Remember that the clock is actually the Global Checkpoint Index and so this feature is sometimes referred to as Reflected GCI). Once the slave on the primary has received this event, it knows that all changes tagged with a clock value no later than the reflected GCI are now safe – the window of conflict has closed.

If an application modifies this same row on the secondary before the replication event from the primary was applied then it will send an associated replication event to the slave on the primary before it reflects the new GCI. The slave on the primary will process this replication event and compare the clock value recorded with the effected rows with the latest reflected GCI; as the clock value for the conflicting row is higher the primary recognises that a conflict has occured and will launch the algorithm to resolve the inconsistency.

Resolving the inconsistency

In earlier releases of MySQL Cluster (or if choosing to use the original algorithm in MySQL Cluster 7.2) you had a choice of simply flagging the primary key of the conflicting rows or backing out one of the changes to the conflicting rows. Using the new NDB$EPOCH_TRANS function, the primary will overwrite the data in the secondary for the effected row(s) and any other rows that were updated in the same transaction (even if they are in tables for which conflict detection has not been enabled).

In fact the algorithm goes a step further and if there were subsequent transactions on the secondary that wrote to the conflicting rows then all of the changes from those dependent transactions on the secondary will be backed-out as well.

Worked example

In this section, we step through how to setup the active-active replication, with the new conflict detection/resolution feature enabled and then test it out by manually introducing some conflicting transations.

Set-up MySQL Clusters and basic active-acative replication
Hosts used for active-active replication tests

Hosts used for replication

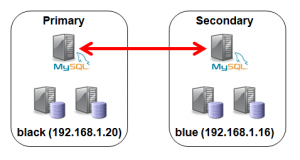
To keep things simple, just two hosts are used; “black” will contain all nodes for the primary cluster and “blue” will contain all nodes for the secondary. As an extra simplification a single MySQL Server in each cluster will act as both the master and the slave.

This post will quickly show the configuration files and steps to get the 2 clusters up and running but for a better understanding of these steps you can refer to Deploying MySQL Cluster over multiple hosts.

config.ini (black):

[ndb_mgmd]
hostname=localhost
datadir=/home/billy/my_cluster/data
nodeid=1

[ndbd default]
noofreplicas=2
datadir=/home/billy/my_cluster/data

[ndbd]
hostname=localhost
nodeid=3

[ndbd]
hostname=localhost
nodeid=4

[mysqld]
nodeid=50

config.ini (blue):

[ndb_mgmd]
hostname=localhost
datadir=/home/billy/my_cluster/data
nodeid=1

[ndbd default]
noofreplicas=2
datadir=/home/billy/my_cluster/data

[ndbd]
hostname=localhost
nodeid=3

[ndbd]
hostname=localhost
nodeid=4

[mysqld]
nodeid=50

my.cnf for primary cluster (black):

[mysqld]
ndbcluster
datadir=/home/billy/my_cluster/data
server-id=8
log-bin=black-bin.log 
ndb-log-transaction-id=1
binlog-format=ROW
ndb-log-update-as-write=0

my.cnf for secondary cluster (blue):

[mysqld]
ndbcluster
datadir=/home/billy/my_cluster/data
server-id=9
log-bin=blue-bin.log
ndb-log-transaction-id=1
binlog-format=ROW
ndb-log-update-as-write=0
ndb-log-apply-status=1

Note that the options set in the my.cnf file are very important – if any of these are missing then things will not work as expected.

Start up primary cluster (black):

billy@black:~/my_cluster$ ndb_mgmd --initial
   -f conf/config.ini --configdir=/home/billy/my_cluster/conf/
billy@black:~/my_cluster$ ndbd --initial
billy@black:~/my_cluster$ ndb_mgm -e show # wait for ndbds to finish starting
Connected to Management Server at: localhost:1186
Cluster Configuration
---------------------
[ndbd(NDB)]     2 node(s)
id=3    @127.0.0.1  (mysql-5.5.15 ndb-7.2.1, Nodegroup: 0, Master)
id=4    @127.0.0.1  (mysql-5.5.15 ndb-7.2.1, Nodegroup: 0)

[ndb_mgmd(MGM)] 1 node(s)
id=1    @127.0.0.1  (mysql-5.5.15 ndb-7.2.1)

[mysqld(API)]   3 node(s)
id=50 (not connected, accepting connect from any host)

billy@black:~/my_cluster$ mysqld --defaults-file=conf/my.cnf &

Start up secondary cluster (blue):

billy@blue:~/my_cluster$ ndb_mgmd --initial
   -f conf/config.ini --configdir=/home/billy/my_cluster/conf/
billy@blue:~/my_cluster$ ndbd --initial
billy@blue:~/my_cluster$ ndb_mgm -e show # wait for ndbds to finish starting
Connected to Management Server at: localhost:1186
Cluster Configuration
---------------------
[ndbd(NDB)]     2 node(s)
id=3    @127.0.0.1  (mysql-5.5.15 ndb-7.2.1, Nodegroup: 0, Master)
id=4    @127.0.0.1  (mysql-5.5.15 ndb-7.2.1, Nodegroup: 0)

[ndb_mgmd(MGM)] 1 node(s)
id=1    @127.0.0.1  (mysql-5.5.15 ndb-7.2.1)

[mysqld(API)]   3 node(s)
id=50 (not connected, accepting connect from any host)

billy@blue:~/my_cluster$ mysqld --defaults-file=conf/my.cnf &

Both clusters are now running and replication can be activated for both sites:

billy@black:~/my_cluster$ mysql -u root --prompt="black-mysql> "
black-mysql> CREATE USER repl_user@192.168.1.16;
black-mysql> GRANT REPLICATION SLAVE ON *.* TO repl_user@192.168.1.16
                 IDENTIFIED BY 'billy';
billy@blue:~/my_cluster$ mysql -u root --prompt="blue-mysql> "
blue-mysql> CREATE USER repl_user@192.168.1.20;
blue-mysql> GRANT REPLICATION SLAVE ON *.* TO repl_user@192.168.1.20
                 IDENTIFIED BY 'billy';
blue-mysql> CHANGE MASTER TO MASTER_HOST='192.168.1.20',
    -> MASTER_USER='repl_user',
    -> MASTER_PASSWORD='billy',
    -> MASTER_LOG_FILE='',
    -> MASTER_LOG_POS=4;
blue-mysql> START SLAVE;
black-mysql> CHANGE MASTER TO MASTER_HOST='192.168.1.16',
    -> MASTER_USER='repl_user',
    -> MASTER_PASSWORD='billy',
    -> MASTER_LOG_FILE='',
    -> MASTER_LOG_POS=4;
black-mysql> START SLAVE;

Set up enhanced conflict detection & resolution

The first step is to identify the tables that need conflict detection enabling. Each of those tables then has to have an entry in the mysql.ndb_replication table where they’re tagged as using the new NDB$EPOCH_TRANS() function – you could also choose to use NDB$EPOCH(), in which case only the changes to conflicting rows will be backed-out rather than the full transactions. A few things to note:

  • This must be done before creating the application tables themselves
  • Should only be done on the primary
  • By default the table doesn’t exist and so the very first step is to create it
black-mysql> CREATE TABLE mysql.ndb_replication  (
    ->     db VARBINARY(63),
    ->     table_name VARBINARY(63),
    ->     server_id INT UNSIGNED,
    ->     binlog_type INT UNSIGNED,
    ->     conflict_fn VARBINARY(128),
    ->     PRIMARY KEY USING HASH (db, table_name, server_id)
    -> )   ENGINE=NDB
    -> PARTITION BY KEY(db,table_name);
black-mysql> REPLACE INTO mysql.ndb_replication VALUES ('clusterdb', 'simple1', 8, 0,
'NDB$EPOCH_TRANS()');
black-mysql> REPLACE INTO mysql.ndb_replication VALUES ('clusterdb', 'simple2', 8, 0,
'NDB$EPOCH_TRANS()');
black-mysql> REPLACE INTO mysql.ndb_replication VALUES ('clusterdb', 'simple3', 8, 0,
'NDB$EPOCH_TRANS()');

For each of these tables you should also create an exceptions table which will record any conflicts that have resulted in changes being rolled back; the format of these tables is rigidly defined and so take care to copy the types exactly; again this only needs doing on the primary:

black-mysql> CREATE DATABASE clusterdb;USE clusterdb;
black-mysql> CREATE TABLE simple1$EX (server_id INT UNSIGNED,
               master_server_id INT UNSIGNED, master_epoch BIGINT UNSIGNED,
               count INT UNSIGNED, id INT NOT NULL, PRIMARY KEY(server_id,
               master_server_id, master_epoch, count)) ENGINE=NDB;
black-mysql> CREATE TABLE simple2$EX (server_id INT UNSIGNED,
               master_server_id INT UNSIGNED, master_epoch BIGINT UNSIGNED,
               count INT UNSIGNED, id INT NOT NULL, PRIMARY KEY(server_id,
               master_server_id, master_epoch, count)) ENGINE=NDB;
black-mysql> CREATE TABLE simple3$EX (server_id INT UNSIGNED,
               master_server_id INT UNSIGNED, master_epoch BIGINT UNSIGNED,
               count INT UNSIGNED, id INT NOT NULL, PRIMARY KEY(server_id,
               master_server_id, master_epoch, count)) ENGINE=NDB;

Finally, the application tables themselves can be created (this only needs doing on the primary as they’ll be replicated to the secondary):

black-mysql> CREATE TABLE simple1 (id INT NOT NULL PRIMARY KEY, value INT) ENGINE=ndb;
black-mysql> CREATE TABLE simple2 (id INT NOT NULL PRIMARY KEY, value INT) ENGINE=ndb;
black-mysql> CREATE TABLE simple3 (id INT NOT NULL PRIMARY KEY, value INT) ENGINE=ndb;

Everything is now set up and the new configuration can be tested to ensure that conflicts are detected and the correct updates are rolled back.

Testing enhanced active-active replication and conflict detection

The first step is to add some data to our new tables (note that at this point replication is running and so they only need to be created on the primary) and then update 1 row to make sure that it is replicated to the secondary:

black-mysql> REPLACE INTO simple1 VALUES (1,10);
black-mysql> REPLACE INTO simple2 VALUES (1,10);
black-mysql> REPLACE INTO simple3 VALUES (1,10);
black-mysql> UPDATE simple1 SET value=12 WHERE id=1;
blue-mysql> USE clusterdb;
blue-mysql> SELECT * FROM simple1;
+----+-------+
| id | value |
+----+-------+
|  1 |    12 |
+----+-------+

It is important that the NDB$EPOCH_TRANS() function rolls back any transactions on the secondary that involve a conflict (as well as subsequent, dependent transactions that modify the same rows); to do this manually the simplest approach is to stop the slave IO thread on the secondary thread in order to increase the size of the window of conflict (which is otherwise very short). Once the slave IO thread has been stopped a change is made to table simple1 on the primary and then the secondary makes a (conflicting) change to the same row as well as making a change to table simple2 in the same transaction. A second transaction on the primary will change a row in simple3 – as it doesn’t touch any rows that have been involved in a conflict then that change should stand.

blue-mysql> STOP SLAVE IO_THREAD;
black-mysql> UPDATE simple1 SET value=13 WHERE id=1;
blue-mysql> BEGIN; # conflicting transaction
blue-mysql> UPDATE simple1 SET value=20 WHERE id=1;
blue-mysql> UPDATE simple2 SET value=20 WHERE id=1;
blue-mysql> COMMIT;
blue-mysql> UPDATE simple3 SET value=20 WHERE id=1; # non conflicting
blue-mysql> SELECT * FROM simple1;
+----+-------+
| id | value |
+----+-------+
|  1 |    20 |
+----+-------+
blue-mysql> SELECT * FROM simple2;
+----+-------+
| id | value |
+----+-------+
|  1 |    20 |
+----+-------+
blue-mysql> SELECT * FROM simple3;
+----+-------+
| id | value |
+----+-------+
|  1 |    20 |
+----+-------+

If you now check the exception tables then you can see that the primary (black) has received the changes from the secondary (blue) and because the first transaction updated the same row in simple1 during its window of conflict it has recorded that the change needs to be rolled back – this will happen as soon as the replication thread is restarted on the secondary:

black-mysql> SELECT * FROM simple1$EX;
+-----------+------------------+---------------+-------+----+
| server_id | master_server_id | master_epoch  | count | id |
+-----------+------------------+---------------+-------+----+
|         8 |                9 | 1494648619009 |     3 |  1 |
+-----------+------------------+---------------+-------+----+

black-mysql> SELECT * FROM simple2$EX;
+-----------+------------------+---------------+-------+----+
| server_id | master_server_id | master_epoch  | count | id |
+-----------+------------------+---------------+-------+----+
|         8 |                9 | 1494648619009 |     1 |  1 |
+-----------+------------------+---------------+-------+----+

black-mysql> SELECT * FROM simple3$EX;
Empty set (0.05 sec)
blue-mysql> START SLAVE IO_THREAD;
blue-mysql> SELECT * FROM simple1;
+----+-------+
| id | value |
+----+-------+
|  1 |    13 |
+----+-------+

blue-mysql> SELECT * FROM simple2;
+----+-------+
| id | value |
+----+-------+
|  1 |    10 |
+----+-------+

blue-mysql> SELECT * FROM simple3;
+----+-------+
| id | value |
+----+-------+
|  1 |    20 |
+----+-------+

These are the results we expect – simple1 has the value set by the primary with the subsequent change on the secondary rolled back; simple2 was not updated by the primary but the change on the secondary was rolled back as it was made in the same transaction as the conflicting update to simple1. The change on the secondary to simple3 has survived as it was made outside of any conflicting transaction and the change was not dependent on any conflicting changes. Finally just confirm that the data is identical on the primary:

black-mysql> SELECT * FROM simple1;
+----+-------+
| id | value |
+----+-------+
|  1 |    13 |
+----+-------+

black-mysql> SELECT * FROM simple2;
+----+-------+
| id | value |
+----+-------+
|  1 |    10 |
+----+-------+

black-mysql> SELECT * FROM simple3;
+----+-------+
| id | value |
+----+-------+
|  1 |    20 |
+----+-------+

Statistics are provided on the primary that record that 1 conflict has been detected, effecting 1 transaction and that it resulted in 2 row changes being rolled back:

black-mysql> SHOW STATUS LIKE 'ndb_conflict%';
+------------------------------------------+-------+
| Variable_name                            | Value |
+------------------------------------------+-------+
| Ndb_conflict_fn_max                      | 0     |
| Ndb_conflict_fn_old                      | 0     |
| Ndb_conflict_fn_max_del_win              | 0     |
| Ndb_conflict_fn_epoch                    | 0     |
| Ndb_conflict_fn_epoch_trans              | 1     |
| Ndb_conflict_trans_row_conflict_count    | 1     |
| Ndb_conflict_trans_row_reject_count      | 2     |
| Ndb_conflict_trans_reject_count          | 1     |
| Ndb_conflict_trans_detect_iter_count     | 1     |
| Ndb_conflict_trans_conflict_commit_count | 1     |
+------------------------------------------+-------+

We’re anxious to get feedback on this feature and so please go ahead and download MySQL Cluster 7.2.1 and let us know how you get on through the comments for this post.


MySQL Cluster 7.1.17 available


The binary version for MySQL Cluster 7.1.17 has now been made available at http://www.mysql.com/downloads/cluster/ (GPL version) or https://support.oracle.com/ (commercial version)

A description of all of the changes (fixes) that have gone into MySQL Cluster 7.1.17 (compared to 7.1.15a) can be found by combining the summaries from the official MySQL Cluster documentation for Cluster – 7.1.16 Change log & 7.1.17 Change log.


Setting per-server threshold in MySQL Enterprise Monitor

I was speaking with a MySQL customer last week and he had a feature request for MEM. He wants different servers to have different threshold values for certain MEM advisor rules and suggests that users be allowed to override the thresholds when scheduling the rule against a server – just as you can with the refresh interval. At the moment they work around this by creating multiple duplicates of the same rule and then set different thresholds in each. This is a good feature request but in the mean-time this post explains an alternate workaround – having the rules act on thresholds that are defined within the databases of the individual serves.

Step 1. Create a new threshold table in each MySQL Server

The table should be created and then a row added for each rule that needs a per-server threshold:

mysql> create database clusterdb;use clusterdb;
mysql> CREATE TABLE thresholds (name VARCHAR(50) NOT NULL PRIMARY KEY, 
       scale_percentage INT);
mysql> REPLACE INTO thresholds VALUES ('connect_usage_excessive',50);

The scale_percentage value will be used in the new MEM rule as a scaling factor for the info, warning and critical threshold levels.
Note that if using MySQL Cluster then you have the option as to whether each MySQL Server in the Cluster has its own set of thresholds (create the table with the InnoDB storage engine) or if they share the same thresholds (create the table with the ndbcluster storage engine).

Step 2. Add custom data collector(s)

First of all, check that you have permissions to edit the custom.xml file – on Windows this will be stored in a location such as C:Program FilesMySQLEnterpriseAgentsharemysql-monitor-agentitems

Change permissions for custom.xml if needed


For each rule that needs a variable threshold, add a new class:

<class>
     <namespace>mysql</namespace>
     <classname>connection_usage_excessive</classname>
     <query><![CDATA[SELECT scale_percentage AS 
         connection_usage_excessive_scale_percentage
         FROM clusterdb.thresholds 
         WHERE name='connect_usage_excessive']]></query>
     <attributes>
          <default counter="false" type="INTEGER"/>
     <attribute name="connection_usage_excessive_scale_percentage"/>
     </attributes>
</class>

This custom.xml files should be copied to every server. For this data collector to be picked up by MEM, simply restart the agent(s).

Step 3. Copy and extend the rule

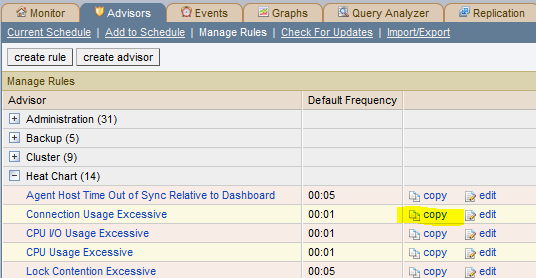
From the “Advisors/Manage Rules” tab of the MEM browser click on the copy icon next to the rule you want to apply per-server thresholds to and then edit that rule.

Create a copy of the advisor rule


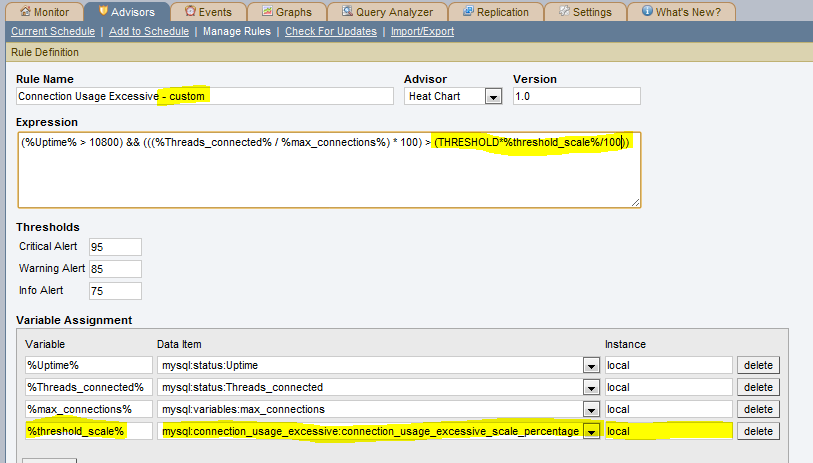
When editing the rule, add a new variable “%threshold_scale%” which uses the new data collector you’ve just created and then in the expression apply that as a percentage to factor the threshold.

Apply the threshold scaler within the rule

Step 4. Schedule the rule

You can now go ahead and schedule this rule against each of the servers – and the threshold will automatically be scaled appropriately for each server.

Schedule new rule against each server


Further MySQL Cluster additions to MySQL Enterprise Monitor

Data Node Restarted alert

About 11 months ago I described the MySQL Cluster functionality that was added to MySQL Enterprise Monitor 2.3; this new post is intended to just bring this up to date – briefly describing the new graph and advisors which have been added since then (up to and including MEM 2.3.7).

Cluster Data Node Has Been Restarted

This new alert flags when a data node has been restarted (by default it alerts on any data node that has started in the last 10 minutes but you can change that interval if you wish). If you manually perform a restart (e.g. as part of a rolling upgrade) then you can safely ignore this alert (or you may even want to temporarily unschedule it first). However if the restart was spontaneous then this can be an early warning for you to take a look at the error logs and address any issues before the situation worsens.

Cluster DiskPageBuffer Hit Ratio Is Low (& associated graph)

The Disk Page Buffer is a cache on each data node which is used when using disk-based tables. Like any cache, the higher the hit rate the better the performance. Tuning the size of this cache can have a significant effect on your system – the new graph helps you see the results of your changes and the alert warns you when the ration falls below an acceptable level (this could happen for example temporarily after a data node restart or permanently when the active data set grows).

The ndbinfo database has a new table “diskpagebuffer” which contains the raw information needed to calculate the cache hit ration and it is the source of the data for the new alert and graph. If you wanted to calculate the cache hit ratio for yourself directly from this table then you can use the following query:

mysql> SELECT node_id, page_requests_direct_return AS hit, 
 page_requests_wait_io AS miss,  100*page_requests_direct_return/
 (page_requests_direct_return+page_requests_wait_io) AS hit_rate 
  FROM ndbinfo.diskpagebuffer;

+---------+------+------+----------+
| node_id | hit  | miss | hit_rate |
+---------+------+------+----------+
| 3       | 6    | 3    | 66.6667  |
| 4       | 10   | 3    | 76.9231  |
+---------+------+------+----------+

The alert is first raised (info level) when the hit rate falls bellow 97%, the warning level is raised at 90% and the critical level at 80%. Again, you can alter any of these thresholds.

The new graph simply displays how the hit rate varies over time so that you can spot trends.

As a reminder you can get more information on the original set of alerts and graphs here.


MySQL Cluster Webinar on Wednesday: What’s New in MySQL Cluster 7.2.1 Development Milestone Release

There’s a webinar this Wednesday (9 am Pacific; 5 pm UK; 6 pm CET) that explains what’s new in the MySQL Cluster Development Milestone Release – register here for free access.

Join this session to learn about the latest enhancements to the MySQL Cluster database, enabling even more of the latest generation of web, telecoms and embedded applications to take advantage of high write scalability, SQL and NoSQL interfaces and 99.999% availability.

New capabilities include:

  •  70x higher JOIN performance for the latest generation of web applications using Adaptive Query Localization, enabling real-time analytics across live data sets
  • New NoSQL interface via memcached to further enhance developer flexibility and productivity
  • Simplified global scalability with multi-site clusters and enhanced Active/Active replication
  • Integration with the MySQL 5.5 release, enabling users to fully exploit the latest capabilities of both the InnoDB and MySQL Cluster storage engines within a single application
  • Streamlined cluster provisioning and maintenance

The 2nd Development Milestone Release of MySQL Cluster 7.2.1 was announced at Oracle OpenWorld 2011. This release is now available for download and evaluation under the GPL license. This session will help to get you started with this latest release.


MySQL Cluster material from Oracle Open World 2011

For those people that weren’t able to attend the MySQL Cluster demo or sessions at this year’s Oracle Open World (or even for those that did) and would like copies of the material, links are provided here.


MySQL Cluster 7.1.15a is available


The binary version for MySQL Cluster 7.1.15a has now been made available at http://www.mysql.com/downloads/cluster/ (GPL version) or https://edelivery.oracle.com/ (commercial version)

A description of all of the changes (fixes) that have gone into MySQL Cluster 7.1.15a (compared to 7.1.15) can be found in the official MySQL Cluster documentation for Cluster 7.1.15a Change log.


MySQL Cluster Manager 1.1.2 – creating a Cluster is now trivial

MySQL Cluster Manager 1.1.2 is now available to download and try from Oracle E-Delivery (select “MySQL Database” as the product pack). Something that’s new and really cool in the new version is that you can download a version of MCM that actually includes the MySQL Cluster software itself and then you can have MCM automatically define, create and start a single-host cluster deployment for you with just the command “mcmd –bootstrap”. This post aims to show that it’s really as simple as that!

I’ve been playing with Windows recently and so I’ll use that for this example but things would be very similar on other platforms.

Step 1 Download from E-Delivery and extract the zip file

Step2 Start your first cluster!

PS D:AndrewDocumentsMySQLmcm> binmcmd --bootstrap
MySQL Cluster Manager 1.1.2 started
Connect to MySQL Cluster Manager by running "D:AndrewDocumentsMySQLmcmbinmcm" -a NOVA:1862
Configuring default cluster 'mycluster'...
Starting default cluster 'mycluster'...
Cluster 'mycluster' started successfully
 ndb_mgmd NOVA:1186
 ndbd NOVA
 ndbd NOVA
 mysqld NOVA:3306
 mysqld NOVA:3307
 ndbapi *
Connect to the database by running "D:AndrewDocumentsMySQLmcmclusterbinmysql" -h NOVA -P 3306 -u root

That’s it!

Just to prove it you can now go ahead and start using the database (note that I connect with the command suggested by MCM but in this case I had to shift the quotes…

PS C:UsersAndrew> D:"AndrewDocumentsMySQLmcmclusterbinmysql" -h NOVA -P 3306 
mysql> CREATE DATABASE clusterdb;
mysql> USE clusterdb;
mysql> CREATE TABLE towns (name VARCHAR(30) NOT NULL PRIMARY KEY) ENGINE=NDBCLUSTER;
mysql> REPLACE INTO towns VALUES ('Maidenhead'), ('Marlow');
mysql> SELECT * FROM towns;
+------------+
| name       |
+------------+
| Maidenhead |
| Marlow     |
+------------+

So how much simpler is this than doing it by hand? 

With MCM bootstrap:

  • Packages to download & install: 1
  • Config files to create/edit: 0
  • Commands to run: 1
Without MCM:
  • Packages to download & install: 1 if using tar-ball, up to 13 if using RPMs
  • Config files to create/edit: 3
  • Commands to run: 12


MySQL with Windows Server 2008 R2 Failover Clustering

Windows Server 2008 R2 Failover Clustering

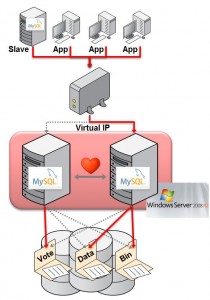
Oracle has announced support for running MySQL on Windows Server Failover Clustering (WSFC); with so many people developing and deploying MySQL on Windows, this offers a great option to add High Availability to MySQL deployments if you don’t want to go as far as deploying MySQL Cluster.

This post will give a brief overview of how to set things up but for all of the gory details a new white paper MySQL with Windows Server 2008 R2 Failover Clustering is available – please give me any feedback. I will also be presenting on this at a free webinar on Thursday 15th September (please register in advance) as well at an Oracle OpenWorld session in San Francisco on Tuesday 4th October (Tuesday, 01:15 PM, Marriott Marquis – Golden Gate C2) – a good opportunity to get more details and get your questions answered.

It sometimes surprises people just how much MySQL is used on Windows, here are a few of the reasons:

  • Lower TCO
    • 90% savings over Microsoft SQL Server
    • If your a little skeptical about this then try it out for yourself with the MySQL TCO Savings Calculator
  • Broad platform support
    • No lock-in
    • Windows, Linux, MacOS, Solaris
  • Ease of use and administration
    • < 5 mins to download, install & configure
    • MySQL Enterprise Monitor & MySQL WorkBench
  • Reliability
    • 24×7 Uptime
    • Field Proven
  • Performance and scalability
    • MySQL 5.5 delivered over 500% performance boost on Windows.
  • Integration into Windows environment
    • ADO.NET, ODBC & Microsoft Access Integration
    • And now, support for Windows Server Failover Clustering!
Probably the most common form of High Availability for MySQL is MySQL (asynchronous or semi-synchronous replication) and the option for the highest levels of availability is MySQL Cluster. We are in the process of rolling out a number of solutions that provide levels of availability somewhere in between MySQL Replication and MySQL Cluster; Oracle VM Template for MySQL Enterprise Edition was the first (overview, webinar replay, white paper) and WSFC is the second.


Solution Overview

MySQL with Windows Failover Clustering requires at least 2 servers within the cluster together with some shared storage (for example FCAL SAN or iSCSI disks). For redundancy, 2 LANs should be used for the cluster to avoid a single point of failure and typically one would be reserved for the heartbeats between the cluster nodes.

The MySQL binaries and data files are stored in the shared storage and Windows Failover Clustering ensures that at most one of the cluster nodes will access those files at any point in time (hence avoiding file corruptions).

Clients connect to the MySQL service through a Virtual IP Address (VIP) and so in the event of failover they experience a brief loss of connection but otherwise do not need to be aware that the failover has happened other than to handle the failure of any in-flight transactions.

Target Configuration

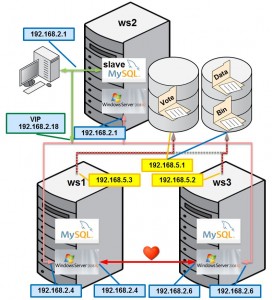
This post will briefly step through how to set up and use a cluster and this diagrams shows how this is mapped onto physical hardware and network addresses for the lab used later in this post. In this case, iSCSI is used for the shared storage. Note that ideally there would be an extra subnet for the heartbeat connection between ws1 and ws3.

This is only intended to be an overview and the steps have been simplified refer to the white paper for more details on the steps.

Prerequisites

  • MySQL 5.5 & InnoDB must be used for the database (note that MyISAM is not crash-safe and so failover may result in a corrupt database)
  • Windows Server 2008 R2
  • Redundant network connections between nodes and storage
  • WSFC cluster validation must pass
  • iSCSI or FCAL SAN should be used for the shared storage

Step 1 Configure iSCSI in software (optional)

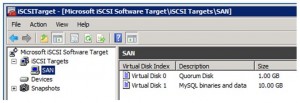
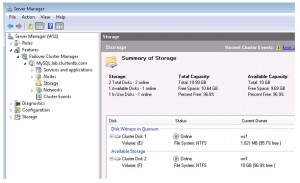
Create 2 clustered disks

This post does not attempt to describe how to configure a highly available, secure and performant SAN but in order to implement the subsequent steps shared storage is required and so in this step we look at one way of using software to provide iSCSI targets without any iSCSI/SAN hardware (just using the server’s internal disk). This is a reasonable option to experiment with but probably not what you’d want to deploy with for a HA application. If you already have shared storage set up then you can skip this step and use that instead.

As part of this process you’ll create at least two virtual disks within the iSCSI target; one for the quorum file and one for the MySQL binaries and data files. The quorum file is used by Windows Failover Clustering to avoid “split-brain” behaviour.

Step 2. Ensure Windows Failover Clustering is enabled

Ensure that WSFC is enabled

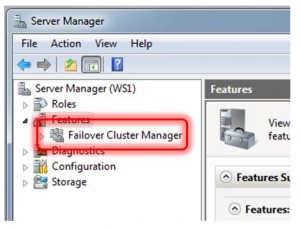
To confirm that Windows Failover Clustering is installed on ws1 and ws3, open the “Features” branch in the Server Manager tool and check if “Failover Cluster Manager” is present.

If Failover Clustering is not installed then it is very simple to add it. Select “Features” within the Service Manager and then click on “Add Features” and then select “Failover Clustering” and then “Next”.


Step 3. Install MySQL as a service on both servers

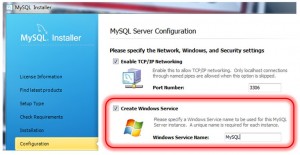
Install MySQL as a Windows Service

If MySQL is already installed as a service on both ws1 and ws3 then this step can be skipped.

The installation is very straight-forward using the MySQL Windows Installer and selecting the default options is fine.

Within the MySQL installation wizard, sticking with the defaults is fine for this exercise. When you reach the configuration step, check “Create Windows Service”.

The installation and configuration must be performed on both ws1 and ws2, if necessary.

Step 4. Migrate MySQL binaries & data to shared storage

If the MySQL Service is running on either ws1 or ws3 then stop it – open the Task Manager using ctrl-shift-escape, select the “Services” tab and then right-click on the MySQL service and choose “Stop Service”.

As the iSCSI disks were enabled on ws1 you can safely access them in order to copy across the MySQL binaries and data files to the shared disk.

Step 5. Create Windows Failover Cluster

Create the Cluster (without MySQL)

From the Server Manager on either ws1 or ws3 navigate to “Features -> Failover Cluster Manager” and then select “Validate a Configuration”. When prompted enter ws1 as one name and then ws3 as the other.

In the “Testing Options” select “Run all tests” and continue. If the tests report any errors then these should be fixed before continuing.

Now that the system has been verified, select “Create a Cluster” and provide the same server names as used in the validation step. In this example, “MySQL” is provided as the “Cluster Name” and then the wizard goes on to create the cluster.

Step 6. Create Cluster of MySQL Servers within Windows Cluster

Cluster the MySQL Service

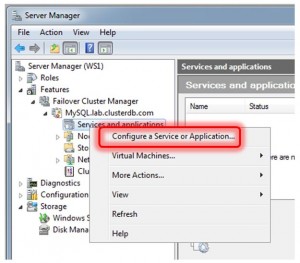
Adding the MySQL service to the new Cluster is very straight-forward. Right-click on “Services and applications” in the Server Manager tree and select “Configure a Service or Application…”. When requested by the subsequent wizard, select “Generic Service” from the list and then “MySQL” from the offered list of services. Our example name was “ClusteredMySQL”. Please choose an appropriate name for your cluster. The wizard will then offer the shared disk that has not already been established as the quorum disk for use with the Clustered service – make sure that it is selected.

Once the wizard finishes, it starts up the MySQL Service. Click on the “ClusteredMySQL” service branch to observe that the service is up and running. You should also make a note of the Virtual IP (VIP) assigned, in this case 192.168.2.18.

Step 7. Test the cluster

As described in Step 6, the VIP should be used to connect to the clustered MySQL service:

C: mysql –u root –h 192.168.2.18 –P3306 –pbob

From there create a database and populate some data.

mysql> CREATE DATABASE clusterdb;
mysql> USE clusterdb;
mysql> CREATE TABLE simples (id int not null primary key) ENGINE=innodb;
mysql> REPLACE INTO simples VALUES (1);
mysql> SELECT * FROM simples;
+----+
| id |
+----+
| 1 |
+----+

Migrate MySQL Service Across Cluster

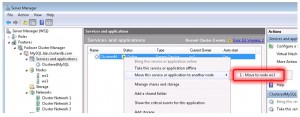
The MySQL service was initially created on ws1 but it can be forced to migrate to ws3 by right-clicking on the service and selecting “Move this service or application to another node”.

As the MySQL data is held in the shared storage (which has also been migrated to ws3), it is still available and can still be accessed through the existing mysql client which is connected to the VIP:

mysql> select * from simples; 
ERROR 2006 (HY000): MySQL server has gone away 
No connection. Trying to reconnect... 
Connection id: 1 
Current database: clusterdb 
+----+ 
| id | 
+----+ 
| 1 | 
+----+

Note the error shown above – the mysql client loses the connection to the MySQL service as part of the migration and so it automatically reconnects and complete the query. Any application using MySQL with Windows Failover Cluster should also expect to have to cope with these “glitches” in the connection.

Conclusion

More users develop and deploy and MySQL on Windows than any other single platform. Enhancements in MySQL 5.5 increased performance by over 5x compared to previous MySQL releases. With certification for Windows Server Failover Clustering, MySQL can now be deployed to support business critical workloads demanding high availability, enabling organizations to better meet demanding service levels while also reducing TCO and eliminating single vendor lock-in.
Please let me know how you get on by leaving comments on this post.