Following on from the earlier article on running MySQL Cluster on a single Windows host, this one looks at installing and running over multiple Windows machines.
Target Deployment
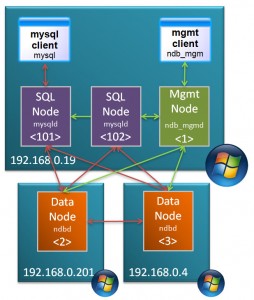
In this post, the MySQL Cluster database will be split over 3 Windows machines:
- 2 hosts with each running 1 data node
- 3rd host running management node and 2 MySQL Servers
MySQL Cluster Downloads
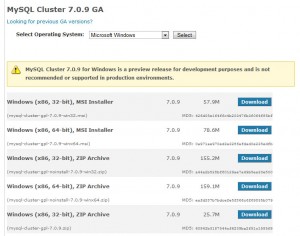
The first step is to download and install the software on each of the Windows hosts. There are 2 main ways that you can install MySQL Cluster on Windows – the first is an MSI installer and the second is extracting the files from a Zip archive – this article focuses on using the Zip file as the single host article used the MSI installer. You can get the Zip archive from the Cluster downloads page on mysql.com
Make sure that you choose the correct file MSI vs. Zip, 32 bit vs. 64 bit. Also make sure that you don’t download the source code rather than the binaries (you can tell the source archive as it’s a much smaller file).
Repeat this on each of the hosts that will run a Cluster node (or download it once and then copy it to each of the hosts).
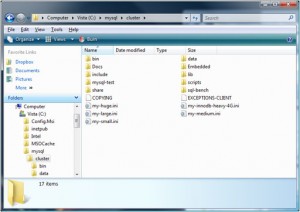
Extract Zip archive
Extract the contents of the Zip archive to “c:mysqlcluster”.
I prefer to keep the configuration and data files separate from the software and so I create a new folder “MySQL_ClusterMy_Cluster” in my home directory and in there create “conf” and “data” folders. Within the “data” folder on 192.168.0.19, create a sub-folder for each of the 2 MySQL Server (mysqld) processes and then copy “c:mysqlclusterdatamysql” to each – this creates the mysql database for each of the MySQL nodes containing data such as privileges and password.
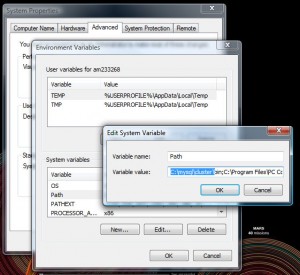
Add MySQL executables to PATH
To get access to the executables from the command line, add “c:mysqlclusterbin” to the PATH environment variable.
Create a “config.ini” file within the “conf” folder that was created on the host to run the management node (ndb_mgmd) – which in this example is 192.168.0.19:
[ndbd default]
noofreplicas=2
datadir=E:am233268DocumentsMySQL_ClusterMy_Clusterdata

[ndbd]
hostname=192.168.0.201
id=2

[ndbd]
hostname=192.168.0.4
id=3

[ndb_mgmd]
id=1
hostname=192.168.0.19

mysqld]
id=101
hostname=192.168.0.19

[mysqld]
id=102
hostname=192.168.0.19
As both of the MySQL Server nodes will also run on 192.168.0.19, we create a cnf file for each of them in that same “conf” folder:
my.101.cnf
[mysqld]
ndb-nodeid=101
ndbcluster
datadir=E:am233268DocumentsMySQL_ClusterMy_Clusterdatamysqld_1
port=3306
ndb-connectstring=192.168.0.19:1186
my.102.cnf
[mysqld]
ndb-nodeid=102
ndbcluster
datadir=E:am233268DocumentsMySQL_ClusterMy_Clusterdatamysqld_2
port=3307
ndb-connectstring=192.168.0.19:1186
Note that the “ndb-connectstring” is not strictly needed as the MySQL Servers happen to be on the same host as the management node but they’ve been included to make it clearer what to change if you moved those nodes to another machine.
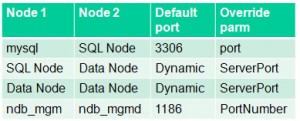
Ports to open for MySQL Cluster nodes
The information from this table can help you set up the firewall rules to allow the nodes to communitcate with each other but if possible, turn off the firewall for connections between these 3 nodes.
The next step is to start the nodes (processes) but before then, a hint.
If you run each command from a different command prompt then your screen will quickly fill with Windows. Instead, rather than just typing “c: <command>” use “c: start /B <command>” (for example “c: start /B ndbd –initial”) so that multiple processes can be run from the same Window. To keep things simple, the “start /B” has been skipped for the rest of this article.
The first process to start is the management node; run the following from the “<home>DocumentsMySQL_ClusterMy_Cluster” folder on 192.168.0.19:
192.168.0.19: ndb_mgmd --initial -f conf/config.ini --configdir=./conf
Next, start the data nodes on 192.168.0.201 and 192.168.0.4:
192.168.0.201: ndbd -c 192.168.0.19:1186 --initial

192.168.0.4: ndbd -c 192.168.0.19:1186 --initial
and then finally start the MySQL Server nodes on 192.168.0.19:
192.168.0.19: mysqld --defaults-file=confmy.101.cnf
192.168.0.19: mysqld --defaults-file=confmy.102.cnf
Finally, check that all of the nodes are up and running:
192.168.0.19: ndb_mgm
-- NDB Cluster -- Management Client --
ndb_mgm> show
Connected to Management Server at: localhost:1186
Cluster Configuration
---------------------
[ndbd(NDB)]     2 node(s)
id=2    @192.168.0.201  (mysql-5.1.39 ndb-7.0.9, Nodegroup: 0, Master)
id=3    @192.168.0.4  (mysql-5.1.39 ndb-7.0.9, Nodegroup: 0)

[ndb_mgmd(MGM)] 1 node(s)
id=1    @192.168.0.19  (mysql-5.1.39 ndb-7.0.9)

[mysqld(API)]   2 node(s)
id=101  @192.168.0.19  (mysql-5.1.39 ndb-7.0.9)
id=102  @192.168.0.19  (mysql-5.1.39 ndb-7.0.9)
Known limitation of running MySQL Cluster on Windows:
- No angel process for data nodes -> processes will not be automatically restarted even if you set StopOnError to FALSE
- Running nodes as Windows services is not really practical (as well as software limitations, would still need to activate processes through ndb_mgm)
- Safe to run management node or MySQL Servers (or NDB API Apps) on Windows in production: will soon be supported
- See open MySQL Cluster bugs reported for Windows:
- You tell us! Help us get to GA quality on Windows:


