Archive for andrew

MongoDB Atlas as The Data Store for Apostrophe

Apostrophe is a Content Management Systems that’s designed to build content-driven web sites. Because of their ease of use, Apostrophe is built upon MongoDB and Node.js.

This post explains why MongoDB Atlas is an ideal choice for Apostrophe and then goes on to show how to configure Apostrophe to use it.

Why MongoDB Atlas is the Ideal Database for Apostrophe

MongoDB delivers flexible schemas, rich queries, an idiomatic Node.js driver, and simple to use high availability and scaling. This makes it the go-to database for anyone looking to build applications on Node.js.

MongoDB Atlas provides all of the features of MongoDB, without the operational heavy lifting required for any new application. MongoDB Atlas is available on demand through a pay-as-you-go model and billed on an hourly basis, letting you focus on what you do best.

It’s easy to get started – use a simple GUI to select the instance size, region, and features you need. MongoDB Atlas provides:

  • Security features to protect access to your data
  • Built in replication for always-on availability, tolerating complete data center failure
  • Backups and point in time recovery to protect against data corruption
  • Fine-grained monitoring to let you know when to scale. Additional instances can be provisioned with the push of a button
  • Automated patching and one-click upgrades for new major versions of the database, enabling you to take advantage of the latest and greatest MongoDB features
  • A choice of cloud providers, regions, and billing options

Like Apostrophe, MongoDB Atlas is a natural fit for users looking to simplify their development and operations work, letting them focus on what makes their application unique rather than commodity (albeit essential) plumbing.

Installing Apostrophe and Setting it up to Use MongoDB Atlas

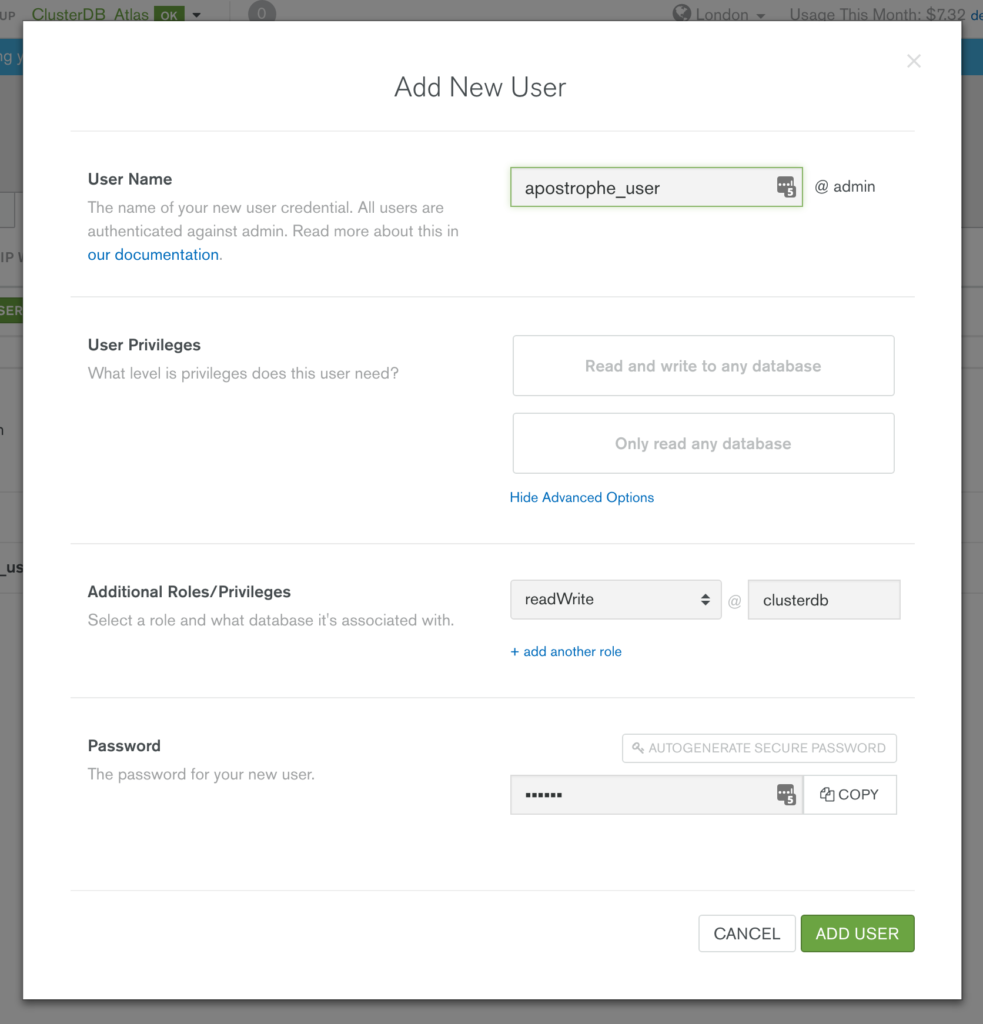
Before starting with Apostrophe, you should launch your MongoDB cluster using MongoDB Atlas and then (optionally) create a user with read and write privileges for just the database that will be used for this project, as shown in Figure 1. You must also add the IP address of your application server to the IP Whitelist in the MongoDB Atlas security tab.

Creating an Apostrophe user in MongoDB Atlas

Figure 1:Creating an Apostrophe user in MongoDB Atlas

If it isn’t already installed on your system, download and install Node.js:

You should then add the bin sub-folder to your .bash_profile file and then install ImageMagick (used by Apostrophe to handle image files); clone the Apostrophe Sandbox project; and then install its dependencies:

Before starting Apostrophe you need to configure it with details on how to connect to your specific MongoDB Atlas cluster. This is done by cloning the configuration file to data/local.js:

You should then edit the data/local.js file and set the uri parameter using the specific connection information provided for your MongoDB Atlas group:

The URI contains these components:

  • apostrophe_user is the name of the user you created in the MongoDB Atlas UI
  • my_password is the password you chose when creating the user in MongoDB Atlas
  • cluster0-shard-00-00-qfovx.mongodb.net, cluster0-shard-00-01-qfovx.mongodb.net, & cluster0-shard-00-02-qfovx.mongodb.net are the hostnames of the instances in your MongoDB Atlas replica set (click on the “CONNECT” button in the MongoDB Atlas UI if you don’t have these)
  • 27017 is the standard MongoDB port number
  • clusterdb is the name of the database (schema) that Apostrophe will use (note that this must match the project name used when installing Apostrophe as well as the database you granted the user access to
  • To enforce security, MongoDB Atlas mandates that the ssl option is used
  • admin is the database that’s being used to store the credentials for apostrophe_user

Clients connect to Apostrophe through port 3000 and so you must open that port in your firewall.

You can then create the database and start Apostrophe:

Testing the Application

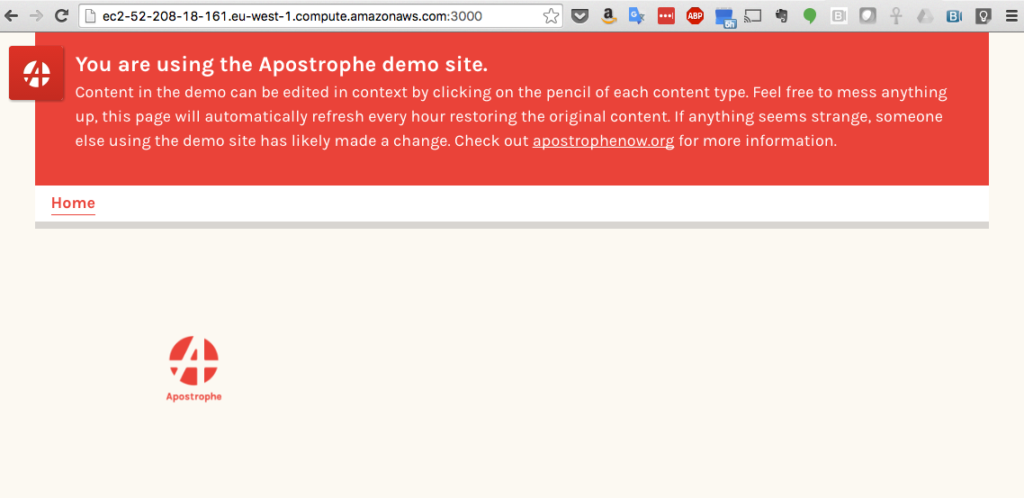
Browse to the application at http://address-of-app-server:3000 as shown in Figure 2 and then login using the username admin and the password demo.

Apostrophe Running on MongoDB Atlas

Figure 2: Apostrophe Running on MongoDB Atlas

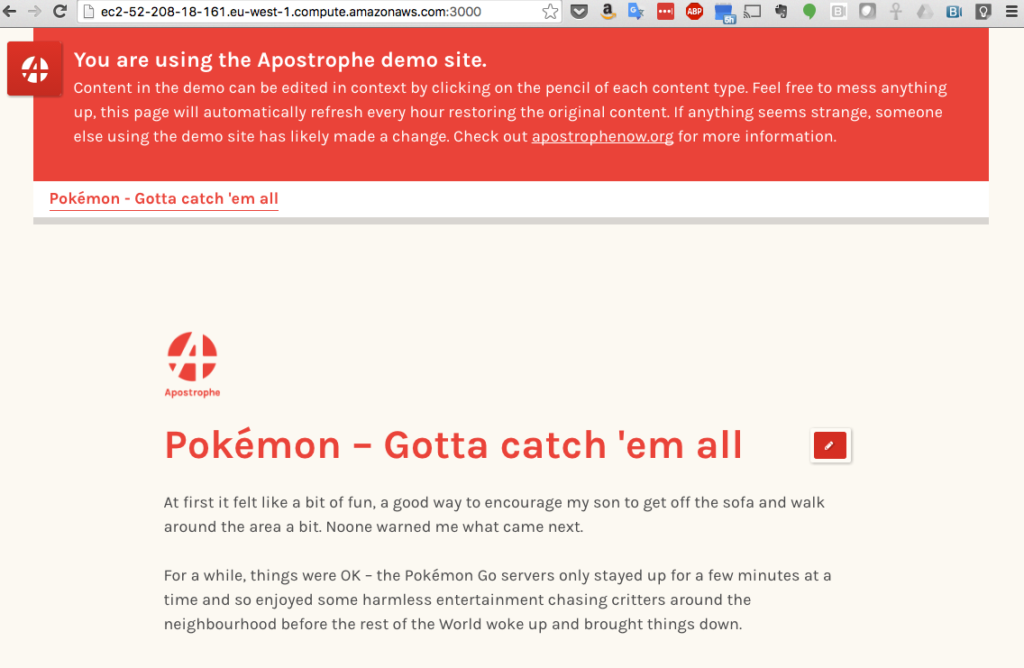
Now, go ahead and add some content (Figure 3).

Edit Apostrophe Home Page with Data Stored in MongoDB Atlas

Figure 3: Edit Apostrophe Home Page with Data Stored in MongoDB Atlas

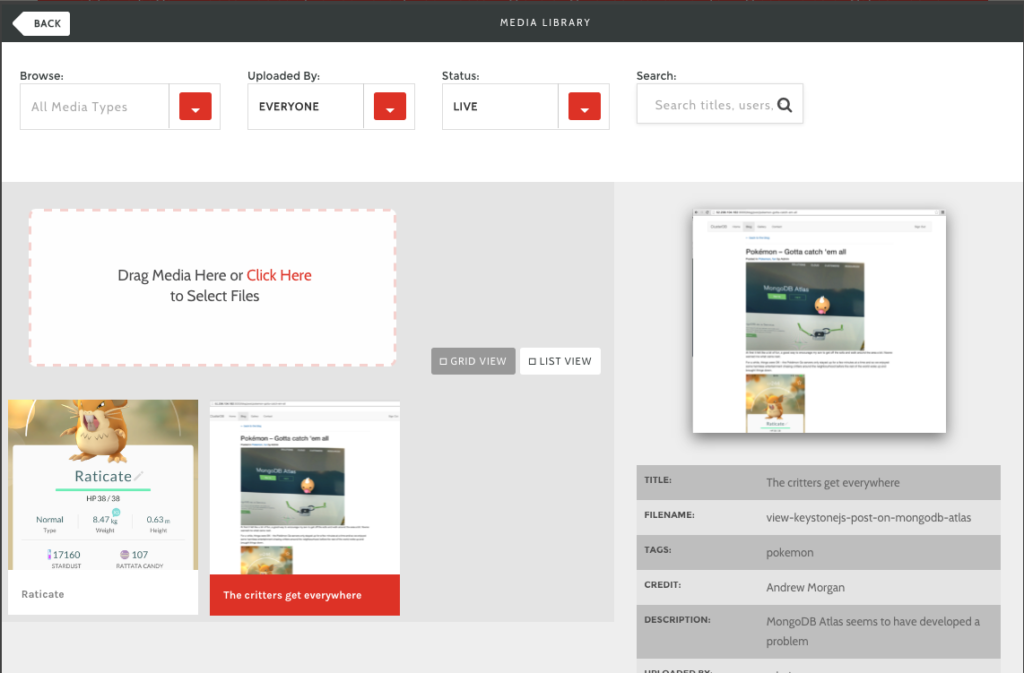
Upload some images as shown in Figure 4.

Upload Images to Apostrophe on MongoDB Atlas

Figure 4: Upload Images to Apostrophe on MongoDB Atlas

Optionally, to confirm that, MongoDB Atlas really is being used by Apostrophe, you can connect using the MongoDB shell:

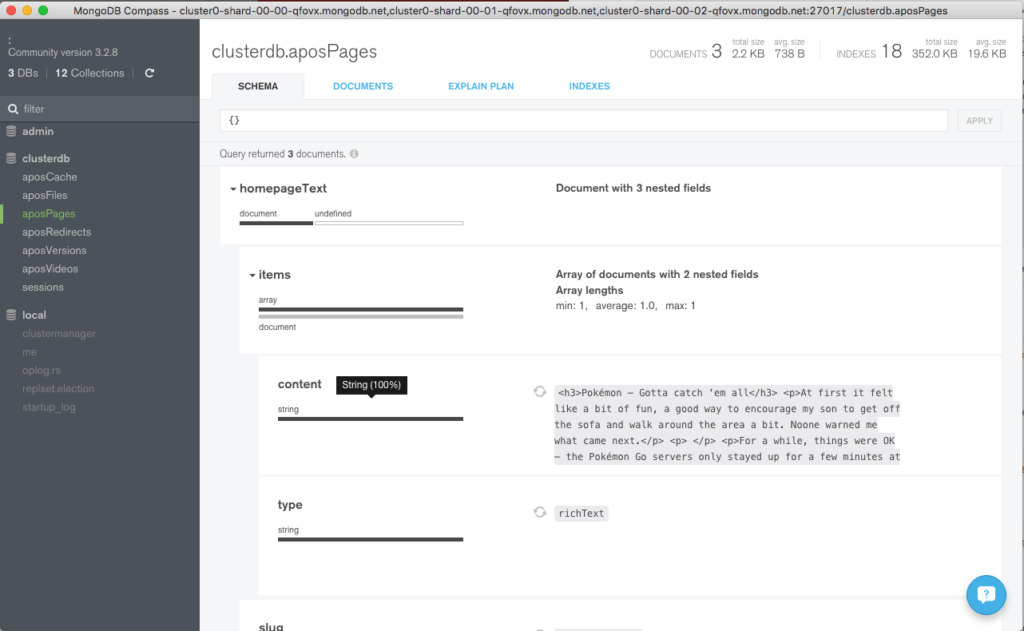
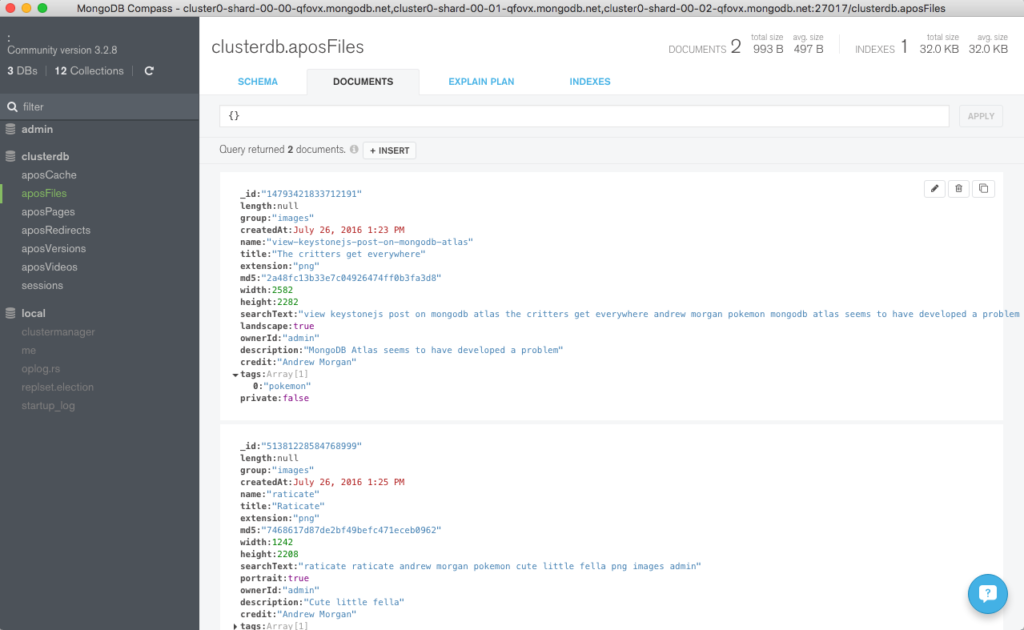
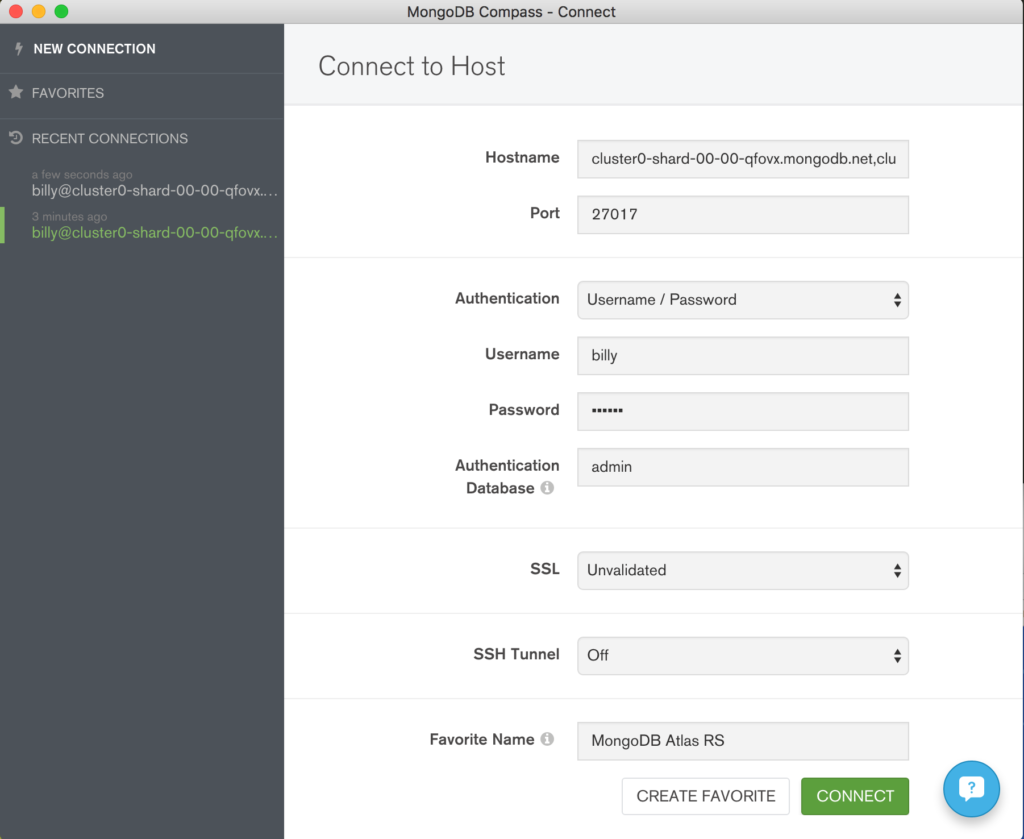
To visually navigate through the schema and data created by Apostrophe, download and install MongoDB Compass. Use your MongoDB Atlas credentials to connect Compass to your MongoDB database – Figure 5.

Connect MongoDB Compass to MongoDB Atlas

Figure 5: Connect MongoDB Compass to MongoDB Atlas

Navigate through the structure of the data in the clusterdb database (Figure 6) and view the JSON documents (Figure 7).

Explore Apostrophe Schema Using MongoDB Compass

Figure 6: Explore Apostrophe Schema Using MongoDB Compass

View Apostrophe Documents in MongoDB Compass

Figure 7: View Apostrophe Documents in MongoDB Compass

What Next?

While MongoDB Atlas radically simplifies the operation of MongoDB there are still some decisions to take to ensure the best performance and reliability for your application. The MongoDB Atlas Best Practices white paper provides guidance on best practices for deploying, managing, and optimizing the performance of your database with MongoDB Atlas.

The guide outlines considerations for achieving performance at scale with MongoDB Atlas across a number of key dimensions, including instance size selection, application patterns, schema design and indexing, and disk I/O. While this guide is broad in scope, it is not exhaustive. Following the recommendations in the guide will provide a solid foundation for ensuring optimal application performance.


Running MongoDB as a Microservice with Docker and Kubernetes

Introduction

Want to try out MongoDB on your laptop? Execute a single command and you have a lightweight, self-contained sandbox; another command removes all traces when you’re done.

Need an identical copy of your application stack in multiple environments? Build your own container image and let your development, test, operations, and support teams launch an identical clone of your environment.

Containers are revolutionizing the entire software lifecycle: from the earliest technical experiments and proofs of concept through development, test, deployment, and support.

Orchestration tools manage how multiple containers are created, upgraded and made highly available. Orchestration also controls how containers are connected to build sophisticated applications from multiple, microservice containers.

The rich functionality, simple tools, and powerful APIs make container and orchestration functionality a favorite for DevOps teams who integrate them into Continuous Integration (CI) and Continuous Delivery (CD) workflows.

This post delves into the extra challenges you face when attempting to run and orchestrate MongoDB in containers and illustrates how these challenges can be overcome.

Considerations for MongoDB

Running MongoDB with containers and orchestration introduces some additional considerations:

  • MongoDB database nodes are stateful. In the event that a container fails, and is rescheduled, it’s undesirable for the data to be lost (it could be recovered from other nodes in the replica set, but that takes time). To solve this, features such as the Volume abstraction in Kubernetes can be used to map what would otherwise be an ephemeral MongoDB data directory in the container to a persistent location where the data survives container failure and rescheduling.
  • MongoDB database nodes within a replica set must communicate with each other – including after rescheduling. All of the nodes within a replica set must know the addresses of all of their peers, but when a container is rescheduled, it is likely to be restarted with a different IP Address. For example, all containers within a Kubernetes Pod share a single IP address, which changes when the pod is rescheduled. With Kubernetes, this can be handled by associating a Kubernetes Service with each MongoDB node, which uses the Kubernetes DNS service to provide a hostname for the service that remains constant through rescheduling.
  • Once each of the individual MongoDB nodes is running (each within its own container), the replica set must be initialized and each node added. This is likely to require some additional logic beyond that offered by off the shelf orchestration tools. Specifically, one MongoDB node within the intended replica set must be used to execute the rs.initiate and rs.add commands.
  • If the orchestration framework provides automated rescheduling of containers (as Kubernetes does) then this can increase MongoDB’s resiliency since a failed replica set member can be automatically recreated, thus restoring full redundancy levels without human intervention.
  • It should be noted that while the orchestration framework might monitor the state of the containers, it is unlikely to monitor the applications running within the containers, or backup their data. That means it’s important to use a strong monitoring and backup solution such as MongoDB Cloud Manager, included with MongoDB Enterprise Advanced and MongoDB Professional. Consider creating your own image that contains both your preferred version of MongoDB and the MongoDB Automation Agent.

Implementing a MongoDB Replica Set using Docker and Kubernetes

As described in the previous section, distributed databases such as MongoDB require a little extra attention when being deployed with orchestration frameworks such as Kubernetes. This section goes to the next level of detail, showing how this can actually be implemented.

This section starts by creating the entire MongoDB replica set in a single Kubernetes cluster (which would normally be within a single data center – that clearly doesn’t provide geographic redundancy. In reality, little has to be changed to run across multiple clusters and those steps are described later.

Each member of the replica set will be run as its own pod with a service exposing an external IP address and port. This ‘fixed’ IP address is important as both external applications and other replica set members can rely on it remaining constant in the event that a pod is rescheduled.

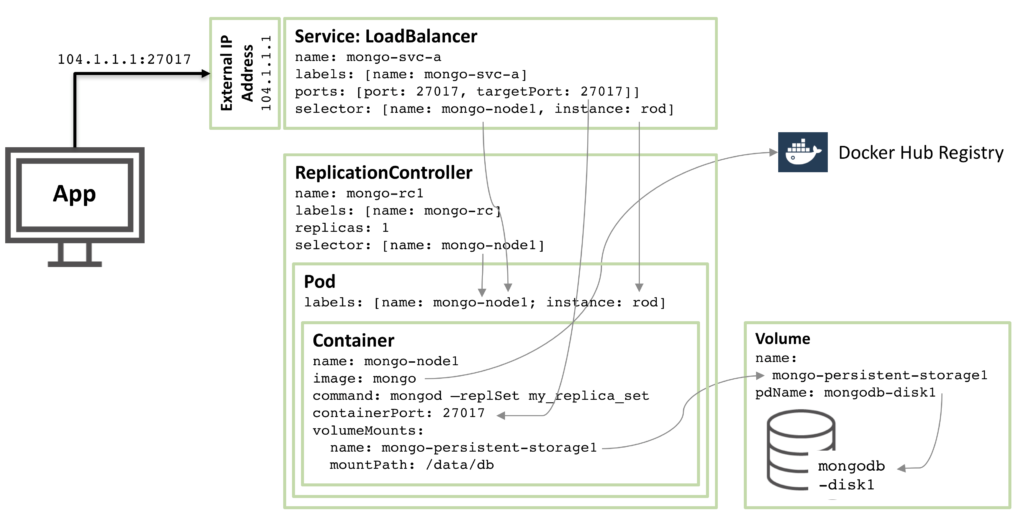
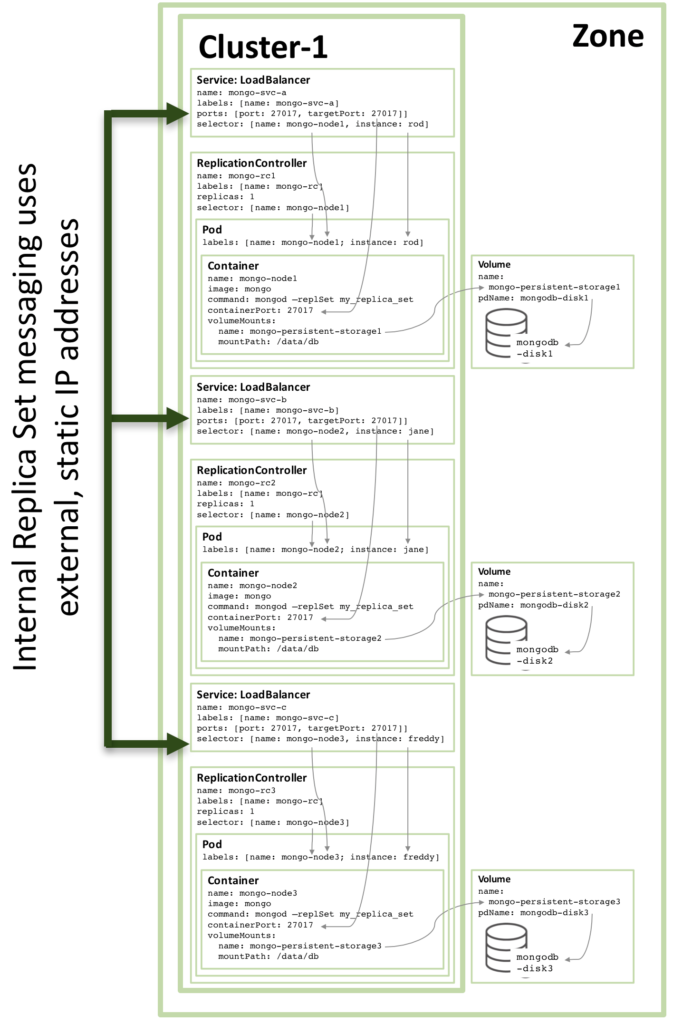
The following diagram illustrates one of these pods and the associated Replication Controller and service.

MongoDB Replica Set member configured as a Kubernetes Pod and exposed as a service

Figure 1: MongoDB Replica Set member as a Kubernetes Pod

Stepping through the resources described in that configuration we have:

  • Starting at the core there is a single container named mongo-node1. mongo-node1 includes an image called mongo which is a publicly available MongoDB container image hosted on Docker Hub. The container exposes port 27107 within the cluster.
  • The Kubernetes volumes feature is used to map the /data/db directory within the connector to the persistent storage element named mongo-persistent-storage1; which in turn is mapped to a disk named mongodb-disk1 created in the Google Cloud. This is where MongoDB would store its data so that it is persisted over container rescheduling.
  • The container is held within a pod which has the labels to name the pod mongo-node and provide an (arbitrary) instance name of rod.
  • A Replication Controller named mongo-rc1 is configured to ensure that a single instance of the mongo-node1 pod is always running.
  • The LoadBalancer service named mongo-svc-a exposes an IP Address to the outside world together with the port of 27017 which is mapped to the same port number in the container. The service identifies the correct pod using a selector that matches the pod’s labels. That external IP Address and port will be used by both an application and for communication between the replica set members. There are also local IP addresses for each container, but those change when containers are moved or restarted, and so aren’t of use for the replica set.

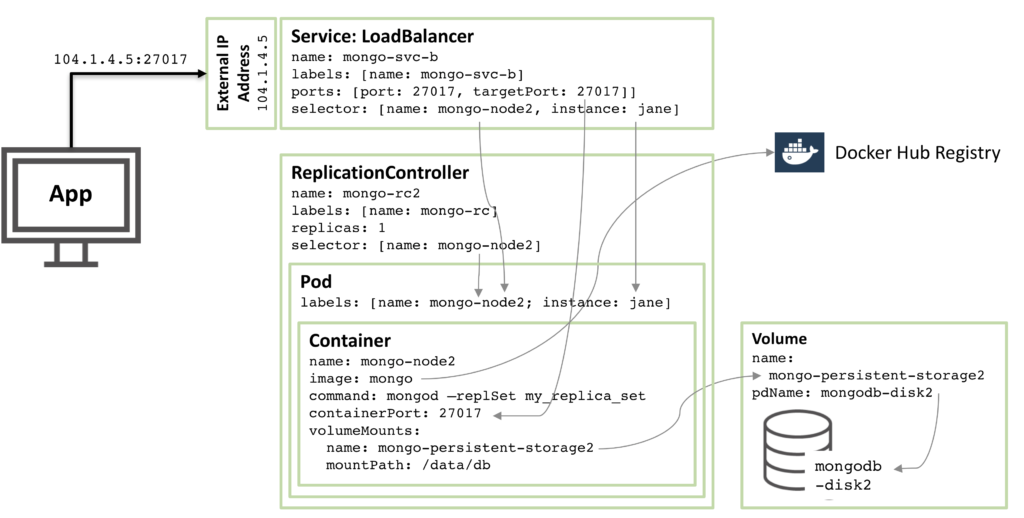
The next diagram shows the configuration for a second member of the replica set.

Second MongoDB Replica Set member configured as a Kubernetes Pod

Figure 2: Second MongoDB Replica Set member configured as a Kubernetes Pod

90% of the configuration is the same, with just these changes:

  • The disk and volume names must be unique and so mongodb-disk2 and mongo-persistent-storage2 are used
  • The Pod is assigned a label of instance: jane and name: mongo-node2 so that the new service can distinguish it (using a selector) from the rod Pod used in Figure 1.
  • The Replication Controller is named mongo-rc2
  • The Service is named mongo-svc-b and gets a unique, external IP Address (in this instance, Kubernetes has assigned 104.1.4.5)

The configuration of the third replica set member follows the same pattern and the following figure shows the complete replica set:

Full Replica Set member configured as a Kubernetes Service

Figure3: Full Replica Set member configured as a Kubernetes Service

Note that even if running the configuration shown in Figure 3 on a Kubernetes cluster of three or more nodes, Kubernetes may (and often will) schedule two or more MongoDB replica set members on the same host. This is because Kubernetes views the three pods as belonging to three independent services.

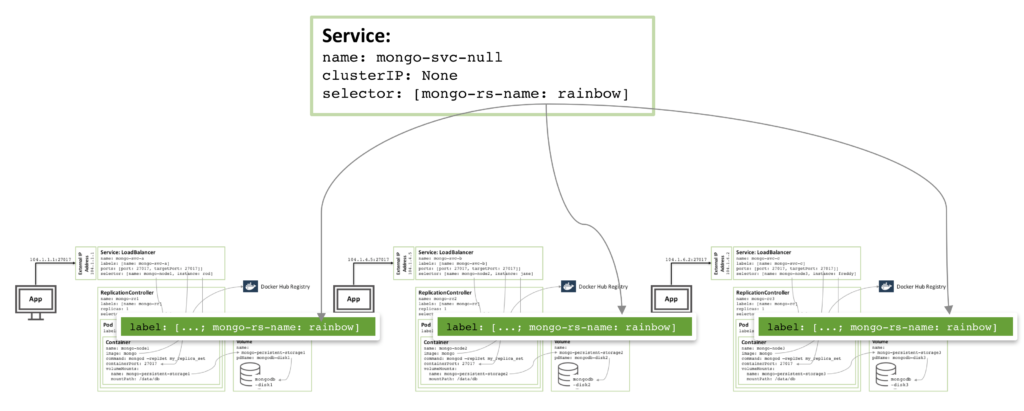
To increase redundancy (within the zone), an additional headless service can be created. The new service provides no capabilities to the outside world (and will not even have an IP address) but it serves to inform Kubernetes that the three MongoDB pods form a service and so Kubernetes will attempt to schedule them on different nodes.

Figure 4: Headless service to avoid co-locating of MongoDB replica set members

Figure 4: Headless service to avoid co-locating of MongoDB replica set members

The actual configuration files and the commands needed to orchestrate and start the MongoDB replica set can be found in the Enabling Microservices: Containers & Orchestration Explained white paper. In particular, there are some special steps required to combine the three MongoDB instances into a functioning, robust replica set which are described in the paper.

Multiple Availability Zone MongoDB Replica Set

There is risk associated with the replica set created above in that everything is running in the same GCE cluster, and hence in the same availability zone. If there were a major incident that took the availability zone offline, then the MongoDB replica set would be unavailable. If geographic redundancy is required, then the three pods should be run in three different availability zones or regions.

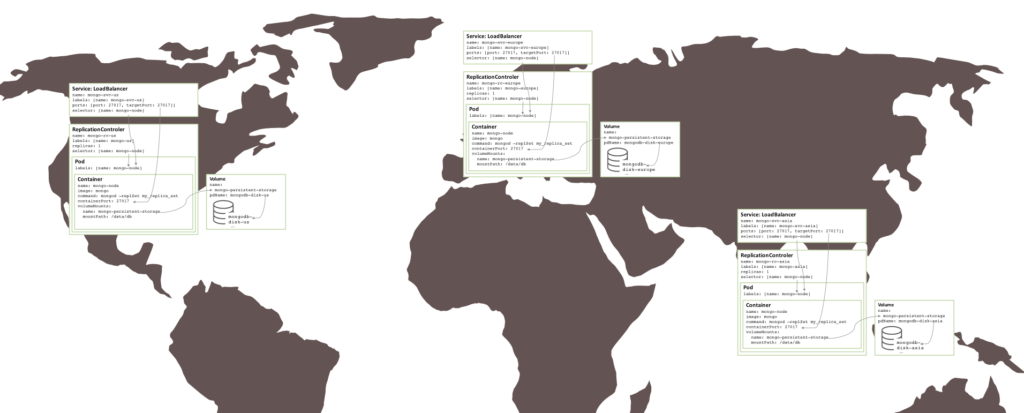
Surprisingly little needs to change in order to create a similar replica set that is split between three zones – which requires three clusters. Each cluster requires its own Kubernetes YAML file that defines just the pod, Replication Controller and service for one member of the replica set. It is then a simple matter to create a cluster, persistent storage, and MongoDB node for each zone.

Replica set running over multiple availability zones/regions

Figure 5: Replica set running over multiple availability zones/regions

Next Steps

To learn more about containers and orchestration – both the technologies involved and the business benefits they deliver – read the Enabling Microservices: Containers & Orchestration Explained white paper. The same paper provides the complete instructions to get the replica set described in this post up and running on Docker and Kubernetes in the Google Container Engine.

Watch this webinar recording to learn more on this topic and see a live demo putting it all together.


Analyzing Data in Microsoft Excel with the MongoDB Connector for BI

There are many great BI tools out there that enable powerful analytics and data visualization but sometimes the right tool for the job is the one you already have sitting on your laptop.

MongoDB 3.2 introduced the MongoDB Connector for BI which presents an SQL API to allow BI tools to read data from your database in real-time. Typically, this functionality will be showcased with specialized tools such as Tableau but it’s equally applicable to Microsoft’s ubiquitous Excel.

This video demonstrates how to connect Excel running on Microsoft Windows to the BI connector and then fetch data from MongoDB.


The instructions in the demo assume that you already have a MongoDB database running together with a configured instance of the MongoDB Connector for BI – the documentation explains how to set that up.

Note that Excel is not able to handle the “.” character or capital letters in table of column names. To overcome this, it was necessary to edit the DRDL file produced by the mongodrdl tool to map names to lowercase equivalents and to replace each “.” (used to flatten embedded documents) with a “_”; this requires v1.1 or later of the BI connector.

The MongoDB Connector for BI is part of MongoDB Enterprise Advanced; it can be freely downloaded for evaluation – why not try it out for yourself.

More information on the BI connector as well as other MongoDB 3.2 features can be found in MongoDB 3.2: What’s New.


Analytics with MongoDB: Haymarket Media + Joins Coming in MongoDB 3.2 – London MUG

At the November London MongoDB Meetup Group we had 2 sessions.

The first was by Pete Dignan, explaining how PistonHeads (part of Haymarket Media) use MongoDB to perform analytics to make sure that their dealers get the best possible value. This was a really interesting presentation and Pete has kindly agreed to share his charts here…

You can also find out more about PistonHead’s use of MongoDB and their migration from MySQL in this article.

I then presented on the new $lookup feature from MongoDB 3.2 (adding the ability to perform left outer joins between MongoDB collections) together with other enhancements to the MongoDB Aggregation Framework pipeline. You can view the charts here:

For more details on $lookup check out the webinar replay or read this post.

The London MongoDB Meetup Group meets every 6-8 weeks and it’s a great opportunity learn what’s happening with MongoDB as well as how people use it – if you live or work near London then it would be great to see you there.


Joins and Other Aggregation Enhancements in MongoDB 3.2

This post looks at the aggregation enhancements being introduced in MongoDB 3.2 – most notably $lookup which implements left-outer equi-joins in the MongoDB Aggregation Framework. The material was originally published in a MongoDB blog series.

It starts with an introduction to analyzing data with MongoDB. We then explain why joins are sometimes useful for MongoDB – in spite of the strengths of the document model – and how developers have been working without them. It then works through examples of building aggregation pipelines – including using the operators added in MongoDB 3.2. After that, we look at how geolocation data can be included as well as what to do when you reach the limit of what can be done using a single pipeline – including adding wrapper code. Finally, there’s a summary of some of the limitations of the Aggregation Framework and reasons why you might supplement it with a full visualization solution such as Tableau together with MongoDB’s Connector for BI (Business Intelligence) – also new in MongoDB 3.2.

Disclaimer

MongoDB’s product plans are for informational purposes only. MongoDB’s plans may change and you should not rely on them for delivery of a specific feature at a specific time.

Real-Time Analytics and Search

With the emergence of new data sources such as social media, mobile applications and sensor-equipped “Internet of Things” networks, organizations can extend analytics to deliver real-time insight and discovery into such areas as operational performance, customer satisfaction, and competitor behavior.

Time to value is everything. For example, having access to real-time customer sentiment or fleet tracking is of little benefit unless the data can be analyzed and reported in real-time.

MongoDB 3.2 aims to extend the options for performing analytics on the live, operational database – ensuring that answers are delivered quickly, and reflect current data. Work that would previously have needed to be done on the client side can now be performed by the database – freeing the developer to focus on new features.

The Case for Joins

MongoDB’s document data model is flexible and provides developers many options in terms of modeling their data. Most of the time all the data for a record tends to be located in a single document. For the operational application, accessing data is simple, high performance, and easy to scale with this approach.

When it comes to analytics and reporting, however, it is possible that the data you need to access spans multiple collections. This is illustrated in Figure 1, where the _id field of multiple documents from the products collection is included in a document from the orders collection. For a query to analyze orders and details about their associated products, it must fetch the order document from the orders collection and then use the embedded references to read multiple documents from the products collection. Prior to MongoDB 3.2, this work is implemented in application code. However, this adds complexity to the application and requires multiple round trips to the database, which can impact performance.

Application-Layer simulation of joins between documents
Figure 1: Application-Layer simulation of joins between documents

MongoDB 3.2 introduces the $lookup operator that can now be included as a stage in an aggregation pipeline. With this approach, the work of combining data from the orders and products collections is implemented within the database, and as part of a broader aggregation pipeline that performs other processing in a single query. As a result, there is less work to code in the application, and fewer round trips to the database. You can think about $lookup as equivalent to a left outer equi-join.

Aside – What is a Left Outer Equi-Join?

A left outer equi-join produces a result set that contains data for all documents from the left table (collection) together with data from the right table (collection) for documents where there is a match with documents from the left table (collection). This is illustrated in Figure 2.

Left-Outer join between tables/collections
Figure 2: Left-Outer join between collections

MongoDB’s Aggregation Framework

The Aggregation Framework is a pipeline for data aggregation modeled on the concept of data processing pipelines. Documents enter a multi-stage pipeline that transforms the documents into aggregated results. The pipeline consists of stages; each stage transforms the documents as they pass through.

In general, each successive stage reduces the volume of data; removing information that isn’t needed and combining other data to produce summarized results.

Figure 3 shows a conceptual model for the Aggregation Framework pipeline. This is what’s happening at each stage:

  • On the left-hand side/start of the pipeline is the original collection contents – each record (document) containing a number of shapes (keys), each with a particular color (value)
  • The $match stage filters out any documents that don’t contain a red diamond
  • The $project stage adds a new “square” attribute with a value computed from the value (color) of the snowflake and triangle attributes
  • The $lookup stage (new in 3.2 – more details later) performs a left-outer join with another collection, with the star being the comparison key. This creates new documents which contain everything from the previous stage but augmented with data from any document from the second collection containing a matching colored star (i.e., the blue and yellow stars had matching “lookup” values, whereas the red star had none).
  • Finally, the $group stage groups the data by the color of the square and produces statistics (sum, average and standard deviation) for each group.

MongoDB Aggregation Framework Pipeline
Figure 3: MongoDB Aggregation Framework pipeline

This is the full set of aggregation stages:

  • $match – Filter documents
  • $geoNear – Sort documents based on geographic proximity
  • $project – Reshape documents (remove or rename keys or add new data based on calculations on the existing data)
  • $lookupComing in 3.2 – Left-outer joins
  • $unwind – Expand documents (for example create multiple documents where each contains one element from an array from the original document)
  • $group – Summarize documents
  • $sample – Randomly selects a subset of documents
  • $sort – Order documents
  • $skip – Jump over a number of documents
  • $limit – Limit number of documents
  • $redact – Restrict sensitive content from documents
  • $outComing in 3.2* – store the results in a new collection

The details can be found in the documentation.

New Aggregation Operators in MongoDB 3.2

There are operators used within each stage and this set is being extended in MongoDB 3.2 to include:

  • Array operations
    • $slice, $arrayElemAt, $concatArrays, $isArray, $filter, $min, $max, $avg and $sum (some of these were previously available in a $group stage but not in $project
  • Standard Deviations
    • $stdDevSamp (based on a sample) and $stdDevPop (based on the complete population)
  • Square Root
    • $sqrt
  • Absolute (make +ve) value
    • $abs
  • Rounding numbers
    • $trunc, $ceil, $floor
  • Logarithms
    • $log, $log10, $ln
  • Raise to power
    • $pow
  • Natural Exponent
    • $exp

Further details on these new operators can be found in the MongoDB 3.2 Release Notes.

$lookup – Left Outer Equi-Joins

Figure 4 illustrates the syntax for performing the join:

  • leftCollection is the collection that the aggregation is being performed on and is the left collection in the join
  • from identifies the collection that it will be joined with – the right collection (rightCollection in this case)
  • localField specifies the key from the original/left collection – leftVal
  • foreignField specifies the key from the right collection – rightVal
  • as indicates that the data from the right collection should be embedded within the resulting documents as an array called embeddedData

$lookup – Left-Outer Joins for MongoDB
Figure 4: $lookup – Left-Outer Joins for MongoDB

In the follow-on blogs in this series, you’ll see how the data from a home sales collection (containing details of each home sale, including the property’s postal code) is joined with data from a postal code collection (containing postal codes and their geographical location). This produces documents that contain the original home sale information augmented with the coordinates of the property. In this case, the “homesales” collection is the left-collection and “postcodes” the right-collection; the “postcode” field from each collection is the localField which is matched with the foreignField.

Worked Examples

The Data Set

The examples use two data sets, the first being a comprehensive set of home sale data for a town and the second being a mapping from postal codes to geospatial locations for that same town.

For those interested, the imported data sets needed some cleaning up to make this walkthrough more useful – the steps are described here.

The two data sets can be checked using the mongo shell:

db.homeSales.findOne()
{
  "_id": ObjectId("56005dd980c3678b19792b7f"),
  "amount": 9000,
  "date": ISODate("1996-09-19T00:00:00Z"),
  "address": {
    "nameOrNumber": 25,
    "street": "NORFOLK PARK COTTAGES",
    "town": "MAIDENHEAD",
    "county": "WINDSOR AND MAIDENHEAD",
    "postcode": "SL6 7DR"
  }
}

db.postcodes.findOne()
{
  "_id": ObjectId("5600521e50fa77da54dfc0d2"),
  "postcode": "SL6 0AA",
  "location": {
    "type": "Point",
    "coordinates": [
      51.525605,
      -0.700974
    ]
  }
}

An even better option to understand the contents of these collections is to use MongoDB Compass (to be released with MongoDB 3.2). Figure 1 shows an overview of the homeSales collection and Figure 2 delves into its address sub-document.

These datasets (the homeSales and postcodes collections) can be downloaded here.

MongoDB Compass View of homeSales Collection
Figure 1: MongoDB Compass View of the homeSales Collection

Viewing Sub-Documents With MongoDB Compass
Figure 2: Viewing Sub-Documents With MongoDB Compass

Building the First Pipeline

As the error messages from complex pipelines aren’t always very specific, it makes sense to start with a simple pipeline and then check the results before moving onto the next.

As a collection’s indexes are only used for the beginning stages in the pipeline (before any transformations are performed), it is often sensible to reduce the result set as much as possible with a $match stage to filter out any unnecessary documents. Ideally, the match would be against the sharding key so that fewer shards need to be included. For the first pipeline stage the cheaper property sales are going to excluded and so it would help to have a secondary index on the amount key:

db.homeSales.createIndex({amount: 1})

The first stage in the pipeline then filters out any sales of less than £3,000,000:

db.homeSales.aggregate([
  {$match: {
    amount: {$gte:3000000}}
  }
  ])

The results can then be inspected to understand what will flow into the next stage in the pipeline:

{
    {
      "_id": ObjectId("56005dda80c3678b19799e52"),
      "amount": 3000000,
      "date": ISODate("2012-04-19T00:00:00Z"),
      "address": {
        "nameOrNumber": "TEMPLE FERRY PLACE",
        "street": "MILL LANE",
        "town": "MAIDENHEAD",
        "county": "WINDSOR AND MAIDENHEAD",
        "postcode": "SL6 5ND"
      }
    },

...

    {
      "_id": ObjectId("56005dda80c3678b19799e5c"),
      "amount": 5425000,
      "date": ISODate("1999-03-15T00:00:00Z"),
      "address": {
        "nameOrNumber": "2 - 3",
        "street": "THE SWITCHBACK",
        "town": "MAIDENHEAD",
        "county": "WINDSOR AND MAIDENHEAD",
        "postcode": "SL6 7RJ"
      }
    }

In the next stage, a left-outer join is performed – using $lookup – to find documents from the postcodes collection with a matching postcode so that the geographic location can be determined:

db.homeSales.aggregate([
  {$match: {
    amount: {$gte:3000000}}
  }, 
  {$lookup: {
    from: "postcodes", 
    localField: "address.postcode",
    foreignField: "postcode",
    as: "postcode_docs"}
  }
])

Which yields these results:

{
    {
      "_id": ObjectId("56005dda80c3678b19799e52"),
      "amount": 3000000,
      "date": ISODate("2012-04-19T00:00:00Z"),
      "address": {
        "nameOrNumber": "TEMPLE FERRY PLACE",
        "street": "MILL LANE",
        "town": "MAIDENHEAD",
        "county": "WINDSOR AND MAIDENHEAD",
        "postcode": "SL6 5ND"
      },
      "postcode_docs": [
        {
          "_id": ObjectId("560053e280c3678b1978b293"),
          "postcode": "SL6 5ND",
          "location": {
            "type": "Point",
            "coordinates": [
              51.549516,
              -0.80702
            ]
          }
        }
      ]
    },

...

      "postcode_docs": [
        {
          "_id": ObjectId("560053e280c3678b1978b524"),
          "postcode": "SL6 7RJ",
          "location": {
            "type": "Point",
            "coordinates": [
              51.536848,
              -0.735835
            ]
          }
        }
      ]
    }

The pipeline can then be extended with a $project stage to refactor the documents, removing any information that isn’t needed. The documents are then sorted in reverse-price order:

db.homeSales.aggregate([
  {$match: {
    amount: {$gte:3000000}}
  }, 
  {$lookup: {
    from: "postcodes", 
    localField: "address.postcode",
    foreignField: "postcode",
    as: "postcode_docs"}
  },
  {$project: {
    _id: 0,
    saleDate: "$date",
    price: "$amount",
    address: 1,
    location: "$postcode_docs.location"}},
  {$sort:
    {
      price: -1
    }}
])

The address and physical location of every home sale, starting with the most expensive is then shown:

    {
      "address": {
        "nameOrNumber": "2 - 3",
        "street": "THE SWITCHBACK",
        "town": "MAIDENHEAD",
        "county": "WINDSOR AND MAIDENHEAD",
        "postcode": "SL6 7RJ"
      },
      "saleDate": ISODate("1999-03-15T00:00:00Z"),
      "price": 5425000,
      "location": [
        {
          "type": "Point",
          "coordinates": [
            51.536848,
            -0.735835
          ]
        }
      ]
    },

...

    {
      "address": {
        "nameOrNumber": "TEMPLE FERRY PLACE",
        "street": "MILL LANE",
        "town": "MAIDENHEAD",
        "county": "WINDSOR AND MAIDENHEAD",
        "postcode": "SL6 5ND"
      },
      "saleDate": ISODate("2012-04-19T00:00:00Z"),
      "price": 3000000,
      "location": [
        {
          "type": "Point",
          "coordinates": [
            51.549516,
            -0.80702
          ]
        }
      ]
    }

Building Further Pipelines

If all of the sales need to be analyzed (rather than just the most expensive few) then there would be too many results from the previous pipeline to be easily understood. For this reason, the pipeline is modified so that extra analysis and aggregation is performed within the database. This can be done using a $group stage – in this case to produce sales statistics by year:

db.homeSales.aggregate([
  {
    $group: 
    {
      _id: {$year: "$date"},
      higestPrice: {$max: "$amount"},
      lowestPrice: {$min: "$amount"},
      averagePrice: {$avg: "$amount"},
      priceStdDev: {$stdDevPop: "$amount"}
    }
  },
  {
    $sort: {_id: 1}
  }
])
    {
      "_id": 1995,
      "higestPrice": 1000000,
      "lowestPrice": 12000,
      "averagePrice": 114059.35206869633,
      "priceStdDev": 81540.50490801703
    },

...

    {
      "_id": 2015,
      "higestPrice": 1688000,
      "lowestPrice": 125000,
      "averagePrice": 451413.23917137476,
      "priceStdDev": 228293.6005201898
    }

Note that this is using the $stdDevPop (standard deviation) aggregation operator being introduced in MongoDB 3.2.

There’s more precision than needed for some of the keys and so a common pattern can be employed – use a final $project stage to tidy up the data:

db.homeSales.aggregate([
  {
    $group: 
    {
      _id: {$year: "$date"},
      higestPrice: {$max: "$amount"},
      lowestPrice: {$min: "$amount"},
      averagePrice: {$avg: "$amount"},
      priceStdDev: {$stdDevPop: "$amount"}
    }
  },
  {
    $sort: {_id: 1}
  },
  {
    $project:
    {
      _id: 1,
      higestPrice: 1,
      lowestPrice: 1,
      averagePrice: {$trunc: "$averagePrice"},
      priceStdDev: {$trunc: "$priceStdDev"}
    }
  }
])
    {
      "_id": 1995,
      "higestPrice": 1000000,
      "lowestPrice": 12000,
      "averagePrice": 114059,
      "priceStdDev": 81540
    },

...

    {
      "_id": 2015,
      "higestPrice": 1688000,
      "lowestPrice": 125000,
      "averagePrice": 451413,
      "priceStdDev": 228293
    }

It often makes sense to store the results in a new collection – either because the results will be reused many times or that subsequent aggregation pipelines will reference them. This is simple to achieve using a $out stage; note that:

  • If the target collection already exists then its contents will be overwritten
  • If used then the $out must be the final stage in the pipeline

The following example writes the results to a collection called annualHomePrices:

db.homeSales.aggregate([
  {
    $group: 
    {
      _id: {$year: "$date"},
      highestPrice: {$max: "$amount"},
      lowestPrice: {$min: "$amount"},
      averagePrice: {$avg: "$amount"},
      priceStdDev: {$stdDevPop: "$amount"}
    }
  },
  {
    $sort: {_id: 1}
  },
  {
    $project:
    {
      _id: 0,
      year: "$_id",
      highestPrice: 1,
      lowestPrice: 1,
      averagePrice: {$trunc: "$averagePrice"},
      priceStdDev: {$trunc: "$priceStdDev"}
    }
  },
  {
    $out: "annualHomePrices"
  }
])
> db.annualHomePrices.findOne()
{
  "_id": ObjectId("560957ac29a5574d557d426d"),
  "highestPrice": 1000000,
  "lowestPrice": 12000,
  "averagePrice": 114059,
  "priceStdDev": 81540,
  "year": 1995
}

These “interim” results could then be used to build further result sets – without the need to run all of that processing again. As an example, using a simple $project stage, the gap between the highest and lowest house sale can be calculated for each year:

db.annualHomePrices.aggregate([
  {$project: 
    {
      Year: "$year",
      hightToLowPriceGap: {
        $subtract: ["$highestPrice", "$lowestPrice"]
      },
      _id: 0
    }
  }
])
{
   "Year": 2012,
   "hightToLowPriceGap": 2923000
},
{
   "Year": 2013,
   "hightToLowPriceGap": 5092250
},
{
   "Year": 2014,
   "hightToLowPriceGap": 3883050
},
{
  "Year": 2015,
  "hightToLowPriceGap": 1563000
}

As a final stage in this post, a pipeline is built to find the postal code and geographic location of the most expensive house sale for each of the recorded years:
Perform a $sort on the full homeSales data set so that the documents are ordered from most expensive sale first
$group the results based on the year of the home sale, deriving the priciestPostCode from the $first document in that group (year). Because the documents were sorted on price before entering the group stage, the first document is also the one with the highest price
$lookup the postal code in the postcodes collection to get the geolocation data
$sort the results by year
$project just the data that is of interest

db.homeSales.aggregate([
    {
      $sort: {amount: -1}
    },
    {
      $group:
      {
        _id: {$year: "$date"},
        priciestPostCode: {$first: "$address.postcode"}
      }
    },
    {
      $lookup:
      {
        from: "postcodes",
        localField: "priciestPostCode",
        foreignField: "postcode",
        as: "locationData"
      }
    },
    {
      $sort: {_id: -1}
    },
    {
      $project:
      {
        _id: 0,
        Year: "$_id",
        PostCode: "$priciestPostCode",
        Location: "$locationData.location"
      }
    }
  ])
{
  "Year": 2015,
  "PostCode": "SL6 9UD",
  "Location": [
    {
      "type": "Point",
      "coordinates": [
        51.558455,
        -0.756023
      ]
    }
  ]
},
{
  "Year": 2014,
  "PostCode": "SL6 1UP",
  "Location": [
    {
      "type": "Point",
      "coordinates": [
        51.51407,
        -0.704414
      ]
    }
  ]
},
...

Adding Some Coding Glue and Geolocation

Obviously, there are limits as to how much can be achieved with a single aggregation pipeline but with the addition of just a little code outside of the database (in this example, JavaScript in the mongo shell), additional results can be produced.

We start by repeating an aggregation from the previous section but store the data in a collection so that we can build upon those results:

db.homeSales.aggregate([
    {
      $sort: {amount: -1}
    },
    {
      $group:
      {
        _id: {$year: "$date"},
        priciestPostCode: {$first: "$address.postcode"}
      }
    },
    {
      $lookup:
      {
        from: "postcodes",
        localField: "priciestPostCode",
        foreignField: "postcode",
        as: "locationData"
      }
    },
    {
      $sort: {_id: -1}
    },
    {
      $project:
      {
        _id: 0,
        Year: "$_id",
        PostCode: "$priciestPostCode",
        Location: "$locationData.location"
      }
    },
    {
      $out: "hottestLocations"
    }
  ])
db.hottestLocations.findOne()
{
  "_id": ObjectId("5629108c96be45aba9cb0c98"),
  "Year": 2015,
  "PostCode": "SL6 9UD",
  "Location": [
    {
      "type": "Point",
      "coordinates": [
        51.558455,
        -0.756023
      ]
    }
  ]
}

In this example, geospatial operations are performed on the location from the postcodes collection and so a geospatial index should be added:

db.postcodes.createIndex({location: "2dsphere"})

A function is created that, given a location, will find the five nearest postcodes – taking advantage of a $geoNear stage – note that this must be the first stage in the pipeline:

var findNeighbours = function (spot, yearTag) {
  var result = db.postcodes.aggregate([
      {
        $geoNear:
        {
          near: spot,
          distanceField: "distance",
          num: 5,
          spherical: true
        }
      },
      {
        $group: {
          _id: yearTag,
          "neighbours": {
            $addToSet: "$postcode"
          }
        }
      }
    ]);
  return result.result;
}

Then, for each of the hottestLocations collection, that function is called to display and the contents of the returned cursor are displayed:

db.hottestLocations.find().forEach(function(myDoc) {
  var myCursor = findNeighbours(myDoc.Location[0], myDoc.Year);
  myCursor.forEach(printjson);
})

The result is a list of the 5 closest postcodes to the top selling home each year:

{
  "_id": 1995,
  "neighbours": [
    "SL6 2NL",
    "SL6 2JL",
    "SL6 2NB",
    "SL6 2JN",
    "SL6 2NA"
  ]
}

...

{
  "_id": 2015,
  "neighbours": [
    "SL6 9XB",
    "SL6 9XL",
    "SL6 9UE",
    "SL6 9UB",
    "SL6 9UD"
  ]
}

Bonus Query – For Those Choosing a School

There’s often a correlation between the house prices near a school and that school’s performance. So, if you were considering a specific school then it might make sense to check house prices in the area surrounding that school.

The following pipeline will find house price statistics, by year, for all postcodes within a 3 km radius of the school – which is located at coordinates (51.5156725, -0.727387):

db.postcodes.aggregate([
      {
        $geoNear:
        {
          near: 
          {
            "type": "Point",
            "coordinates": [
              51.5156725,
              -0.727387
            ]},
          distanceField: "distance",
          num: 10000,
          maxDistance: 3000,
          spherical: true
        }
      },
      {
        $lookup: {
          from: "homeSales",
          localField: "postcode",
          foreignField: "address.postcode",
          as: "priceData"
        }
      },
      {
        $unwind: "$priceData"
      },

      {
        $group: 
        {
          _id: {$year: "$priceData.date"},
          highestPrice: {$max: "$priceData.amount"},
          lowestPrice: {$min: "$priceData.amount"},
          averagePrice: {$avg: "$priceData.amount"},
          priceStdDev: {$stdDevPop: "$priceData.amount"}
        }
      },
      {
        $project:
        {
          _id: 0,
          Year: "_id",
          highestPrice: 1,
          lowestPrice: 1,
          averagePrice: {$trunc: "$averagePrice"},
          priceStdDev: {$trunc: "$priceStdDev"}
        }
      },
      {
        $sort: 
        {
          "Year": -1
        }
      }
    ]);
{
  "highestPrice": 1350000,
  "lowestPrice": 125000,
  "averagePrice": 410593,
  "priceStdDev": 182358,
  "Year": 2015
},
...
{
  "highestPrice": 930000,
  "lowestPrice": 12000,
  "averagePrice": 103455,
  "priceStdDev": 68615,
  "Year": 1995
}

Limitations

As seen, it’s possible to build up sophisticated analytical queries using the enhanced aggregation features – especially when pipelines are combined with a little application or scripting glue.

Some limitations that you may meet include:

  • $geoNear can only be used as the first stage in the pipeline
  • $lookup only supports equality for the match and the equality has to be between a single key from each collection
  • The right-collection for $lookup cannot be sharded
  • The pipeline is linear; there are no forks and once data has been aggregated, the lost details can’t be reused later in the pipeline (this is why writing results to a new collection using $out can be helpful)
  • One can remove information at each stage but it’s impossible to add new raw data (other than through $lookup)
  • Indexes are only used for the beginning stages of the pipeline (and right tables in any subsequent $lookup)
  • $out can only be used in the final stage of the pipeline

When to Use Full Data Visualization Solutions

A lot can be achieved directly in the database – especially when augmented with a small amount of code. So when would it make sense to use a BI visualization tool such as Tableau. The capabilities will vary from product to product but some general considerations are given here:

  • Visualization – displaying information in graphs and on maps (rather than in JSON result sets) makes it much simpler for the human mind to see patterns and draw conclusions from the data (see Figure 1 which is based on the same data set used earlier and graphically shows the highest home sale price by location and year)
  • Multiple Data Sources – combining data from multiple sources (data blending); for example from a MongoDB database and an Excel spreadsheet can greatly broaden the context of reports
  • Interactivity – visualization tools make it simple to create interactive queries/dashboards where business user can graphically tweak parameters to get precise results and test theories
  • Skills – performing all of the analytics directly in MongoDB requires knowledge of the MongoDB Query Language and possibly some basic coding skills. Using the visualization tools is analogous to using intermediate features in Microsoft Excel such as pivot tables and graphs and so it opens up the ability to analyze the data to a broader set of users in the organization
  • Extra functions – for example, the ability to add trend lines to a chart

MongoDB Data Visualized in a Tableau Map
Figure 1: MongoDB Data Visualized in a Tableau Map

MongoDB 3.2 introduces the MongoDB Connector for BI which allows Business Intelligence tools such as Tableau to access data from MongoDB using SQL – opening up a range of new options for performing analytics on live data.

Next Steps

To learn more about what’s coming up in MongoDB 3.2, register for the What’s new in MongoDB 3.2 webinar and review the MongoDB 3.2 release notes.

There’s a webinar recording explaining more about $lookup and the other aggregation features.

To get the best understanding of the new features then you should experiment with the software which is available in the MongoDB 3.2 (not for production) download – to use the new $lookup aggregation theMongoDB Enterprise Advanced download should be used.

The reason MongoDB releases development releases is to give the community a chance to try out the new software – and we hope that you’ll give us feedback, whether it be by joining the MongoDB 3.2 bug hunt or commenting on this post.

Document Validation – Adding Just the Right Amount of Control Over Your MongoDB Documents

This post looks at Document Validation, a new feature in MongoDB 3.2. It introduces the feature together with its benefits and then goes on to step through a tutorial on how to introduce validation to an existing, live MongoDB deployment. This material was orginally published on the MongoDB blog.

Disclaimer

MongoDB’s future product plans are for informational purposes only. MongoDB’s plans may change and you should not rely on them for delivery of a specific feature at a specific time.

Introduction

One of MongoDB’s primary attractions for developers is that it gives them the ability to start application development without first needing to define a formal schema. Operations teams appreciate the fact that they don’t need to perform a time-consuming schema upgrade operation every time the developers need to store a different attribute (as an example, The Weather Channel is now able to launch new features in hours whereas it used to take weeks. For business leaders, the application gets launched much faster, and new features can be rolled out more frequently. MongoDB powers agility.

Many projects reach a point where it’s necessary to enforce rules on what’s being stored in the database – for example, that for any document in a particular collection, you can be assured that certain attributes are present. Reasons for this include:

  • Different development teams working with the same data; each one needing to know what they can expect to find in a particular collection
  • Development teams working on different applications, spread over multiple sites means that a clear understanding of shared data is important
  • Development teams from different companies where misunderstandings about what data should be present can lead to issues

As an example, an e-commerce website may centralize a product catalog feed from each of its vendors into a single collection. If one of the vendors alters the format of its product catalog, the global catalog search could fail.

This has resulted in developers building their own validation logic – either with the application code (possibly multiple times for different applications) or by adding middleware such as Mongoose.

If the database doesn’t enforce rules about the data, development teams need to implement this logic in their applications. However, use of multiple development languages makes it hard to add a validation layer across multiple applications.

To address the challenges discussed above, while at the same time maintaining the benefits of a dynamic schema, MongoDB 3.2 introduces document validation.

Validating Documents in MongoDB 3.2

Note that at the time of writing, MongoDB 3.2 is not yet released but this functionality can be tried out in MongoDB 3.2 which is available for testing only, not production.

Document Validation provides significant flexibility to customize which parts of the documents are and are not validated for any collection. For any key it might be appropriate to check:

  • That a key exists
  • If a key does exist, is it of the correct type
  • That the value is in a particular format (e.g., regular expressions can be used to check if the contents of the string matches a particular pattern)
  • That the value falls within a given range

Further, it may be necessary to combine these checks – for example that the document contains the user’s name and either their email address or phone number, and if the email address does exist, then it must be correctly formed.

Adding the validation checks to a collection is very intuitive to any developer or DBA familiar with MongoDB as it uses the same expression syntax as a find query to search the database. As an example, the following snippet adds validations to the contacts collection that validates:

  • The year of birth is no later than 1994
  • The document contains a phone number and/or an email address
  • When present, the phone number and email addresses are strings
db.runCommand({
   collMod: "contacts",
   validator: { 
      $and: [
        {year_of_birth: {$lte: 1994}},
        {$or: [ 
                  {phone: { $type: "string"}}, 
                  {email: { $type: "string"}}
              ]}]
    }})

When and How to Add Document Validation

Proponents of the waterfall development processes would assert that all of the validations should be added right at the start of the project – certainly before going into production. This is possible, but in more agile approaches, the first version may deploy with no validations and future releases will add new data and checks. Fortunately, MongoDB 3.2 provides a great deal of flexibility in this area.

For existing data, we want to allow the application to continue to operate as we introduce validation into our collections. Therefore, we want to allow updates and simply log failed validations so we can take corrective measures separately if necessary, or take no action.

For new data, we want to ensure the data is valid and therefore return an error if the validation fails.

For any collection, developers or the DBA can choose to specify validation rules for each collection as well as indicating whether failed validations result in a hard error or just a warning – Table 1 shows the available permutations.

Configuration options for controlling how document validations are applied to a collection

Table 1: Configuration Options for Document Validation

Figure 1 illustrates one possible timeline for how the application is developed.

Lifecycle for introducing document validation

Figure 1: Aligning document validation with application lifecycle

Of course, as applications evolve they require additional pieces of data and it will often make sense to add to the documentat validation rules to check that this data is always included. Figure 2 illustrates an example timeline of how this could be managed.

Introducing New Data Together with Validations

Figure 2: Introducing New Data Together with Validations

Coping with Multiple Schema Versions

A tricky problem to solve with RDBMSs is the versioning of data models; with MongoDB it’s very straight-forward to set up validations that can cope with different versions of documents, with each version having a different set of checks applied. In the example validation checks below, the following logic is applied:

  • If the document is unversioned (possibly dating to the time before validations were added), then no checks are applied
  • For version 1, the document is checked to make sure that the name key exists
  • For version 2 documents, the type of the name key is also validated to ensure that it is a string
db.runCommand({
   collMod: "contacts",
   validator:
     {$or: [{version: {"$exists": false}},
            {version: 1,
             $and: [{Name: {"$exists": true}}]
            },
            {version: 2,
             $and: [{Name: {"$exists": true, "$type": 2}}]
            }
          ]
      } 
})

In this way, multiple versions of documents can exist within the same collection, and the application can lazily up-version them over time. Note that the version attribute is user-defined.

Document Validation Limitations in MongoDB 3.2

This is the first release of Document Validation and so it’s inevitable that there are still some things that would be great to add:

  • The current error message is very generic and doesn’t pick out which part of your document failed validation (note that the validation rule for a collection may check several things across many attributes). Jira ticket
  • The validation checks cannot compare one key’s value against another (whether in the same or different documents). For example {salary: {$gte: startingSalary}} is not possible. Jira ticket
  • It is the application or DBA’s responsibility to bring legacy data into compliance with new rules (there are no audits or tools) – the tutorial in this post attempts to show how this can be done.

Where MongoDB Document Validation Excels (vs. RDBMSs)

In MongoDB, Document Validation is simple to set up. There is no need for stored procedures – which for many types of validation would be required in an RDBMS – and because the familiar MongoDB query language is used, there is no new syntax to learn.

The functionality is very flexible and it can enforce constraints on as little or as much of the schema as required. You get the best of both worlds – a dynamic schema for rapidly changing, polymorphic data, with the option to enforce strict validation checks against specific attributes from the onset of your project, or much later on. If you initially have no validations defined, they can still be added later – even once in production, across thousand of servers.

It is always a concern whether adding extra checks will impact the performance of the system; in our tests, document validation adds a negligible overhead.

So, is all Data Validation Now Done in the Database?

The answer is ‘probably not’ – either because there’s a limit to what can be done in the database or because there will always be a more appropriate place for some checks. Here are some areas to consider:

  • For a good user-experience, checks should be made as high up the stack as is sensible. For example, the format of an entered email address should be first checked in the browser rather than waiting for the request to be processed and an attempt made to write it to the database.
  • Any validations which need to compare values between keys, other documents, or external information cannot currently be implemented within the database.
  • Many checks are best made within the application’s business logic – for example “is this user allowed to use these services in their home country”; the checks in the database are primarily there to protect against coding errors.
  • If you need information on why the document failed validation then the application will need to check against each of the sub-rules within collection’s validation rule as the error message will not currently give this level of detail.

Tutorial

The intent of this section is to step you through exactly how document validation can be introduced into an existing production deployment in such a way that there is no impact to your users. It covers:

  • Setting up some test data (not needed for a real deployment)
  • Using MongoDB Compass and the mongo shell to reverse engineer the de facto data model and identify anomalies in the existing documents
  • Defining the appropriate document validation rules
  • Preventing new documents being added which don’t follow the new rules
  • Bring existing documents “up to spec” against the new rules

This section looks at taking an existing, deployed database which currently has no document validations defined. It steps through understanding what the current document structure looks like; deciding on what rules to add and then rolling out those new rules.

As a pre-step add some data to the database (obviously, this isn’t needed if working with your real deployment).

use clusterdb;
db.dropDatabase();
use clusterdb();
db.inventory.insert({ "_id" : 1, "sku" : "abc", 
    "description" : "product 1", "instock" : 120 });
db.inventory.insert({ "_id" : 2, "sku" : "def", 
    "description" : "product 2", "instock" : 80 });
db.inventory.insert({ "_id" : 3, "sku" : "ijk", 
    "description" : "product 3", "instock" : 60 });
db.inventory.insert({ "_id" : 4, "sku" : "jkl", 
    "description" : "product 4", "instock" : 70 });
db.inventory.insert({ "_id" : 5, "sku" : null, 
    "description" : "Incomplete" });
db.inventory.insert({ "_id" : 6 });

for (i=1000; i<2000; i++) {
  db.orders.insert({
    _id: i,
    item: "abc", 
    price: i % 50,
    quantity: i % 5
  });
};

for (i=2000; i<3000; i++) {
  db.orders.insert({
    _id: i,
    item: "jkl", 
    price: i % 30,
    quantity: Math.floor(10 * Math.random()) + 1
  });
};

for (i=3000; i<3200; i++) {
  db.orders.insert({
    _id: i,
    price: i % 30,
    quantity: Math.floor(10 * Math.random()) + 1
  });
};

for (i=3200; i<3500; i++) {
  db.orders.insert({
    _id: i,
    item: null,
    price: i % 30,
    quantity: Math.floor(10 * Math.random()) + 1
  });
};

for (i=3500; i<4000; i++) {
  db.orders.insert({
    _id: i,
    item: "abc",
    price: "free",
    quantity: Math.floor(10 * Math.random()) + 1
  });
};

for (i=4000; i<4250; i++) {
  db.orders.insert({
    _id: i,
    item: "abc",
    price: "if you have to ask....",
    quantity: Math.floor(10 * Math.random()) + 1
  });
};

The easiest way to start understanding the de facto schema for your database is to use MongoDB Compass. Simply connect Compass to your mongod (or mongos if you’re using sharding) and select the database/collection you’d like to look into. To see MongoDB Compass in action – view this demo video.

As shown in Figure 3, there are typically four keys in each document from the clusterdb.orders table:

  • _id is always present and is a number
  • item is normally present and is a string (either “abc” or “jkl”) but is occasionally null or missing altogether (undefined)
  • price is always present and is in most cases a number (the histogram shows how the values are distributed between 0 and 49) but in some cases it’s a string
  • quantity is always present and is a number

Viewing the Document Schema using MongoDB Compass

Figure 3: Viewing the Document Schema using MongoDB Compass

For this tutorial, we’ll focus on the price. By clicking on the string label, Compass will show us more information about the string content for price – this is shown in Figure 4.

Drilling Down into string Values

Figure 4: Drilling Down into string Values

Compass shows us that:

  • For those instances of price which are strings, the common values are “free” and “if you have to ask….”.
  • If you click on one of those values, a query expression is formed and clicking “Apply” runs that query and now Compass will show you information only for that subset of documents. For example, where price == "if you have to ask...." (see Figure 5).
  • By selecting multiple attributes, you can build up fairly complex queries.
  • The query you build visually is printed at the top so you can easily copy/paste into other contexts like the shell.

Formulating Search Expressions with MongoDB Compass

Figure 5: Formulating Search Expressions with MongoDB Compass

If applications are to work with the price from these documents then it would be simpler it it was always set to a numerical value, and so this is something that should be fixed.

Before cleaning up the existing documents, the application should be updated to ensure numerical values are stored in the price field. We can do this by adding a new validation rule to the collection. We want this rule to:

  • Allow changes to existing invalid documents
  • Prevent inserts of new documents which violate validation rules
  • Set up a very simple document validation rule that checks that price exists and contains a double – see the enumeration of MongoDB BSON types

These steps should be run from the mongo shell:

db.orders.runCommand("collMod", 
                   {validationLevel: "moderate", 
                    validationAction: "error"});

db.runCommand({collMod: "orders", 
               validator: {
                  price: {$exists: true},
                  price: {$type: 1}
                }
              });

The validation rules for this collection can now be checked:

db.getCollectionInfos({name:"orders"})
[
  {
    "name": "orders",
    "options": {
      "validator": {
        "price": {
          "$type": 1
        }
      },
      "validationLevel": "moderate",
      "validationAction": "error"
    }
  }
]

Now that this has been set up, it’s possible to check that we can’t add a new document that breaks the rule:

db.orders.insert({
    "_id": 6666, 
    "item": "jkl", 
    "price": "rogue",
    "quantity": 1 });

Document failed validation
WriteResult({
  "nInserted": 0,
  "writeError": {
    "code": 121,
    "errmsg": "Document failed validation"
  }
})

But it’s OK to modify an existing document that does break the rule:

db.orders.findOne({price: {$type: 2}});

{
  "_id": 3500,
  "item": "abc",
  "price": "free",
  "quantity": 5
}

> db.orders.update(
    {_id: 3500},
    {$set: {quantity: 12}});

Updated 1 existing record(s) in 5ms
WriteResult({
  "nMatched": 1,
  "nUpserted": 0,
  "nModified": 1
})

Now that the application is no longer able to store new documents that break the new rule, it’s time to clean up the “legacy” documents. At this point, it’s important to point out that Compass works on a random sample of the documents in a collection (this is what allows it to be so quick). To make sure that we’re fixing all of the documents, we check from the mongo shell. As the following commands could consume significant resources, it may make sense to run them on a secondary):

secondary> db.orders.aggregate([
    {$match: {
      price: {$type: 2}}},
    {$group: {
      _id: "$price", 
      count: {$sum:1}}}
  ])

{ "_id" : "if you have to ask....", "count" : 250 }
{ "_id" : "free", "count" : 500 }

The number of exceptions isn’t too high and so it is safe to go ahead and fix up the data without consuming too many resources:

db.orders.update(
    {price:"free"},
    {$set: {price: 0}},
    {multi: true});

db.orders.update(
    {price:"if you have to ask...."},
    {$set: {price: 1000000}},
    {multi: true});

At this point it’s now safe to enter the strict mode where any inserts or updates will cause an error if the document being stored doesn’t follow the rules:

db.orders.runCommand("collMod", 
                   {validationLevel: "strict", 
                    validationAction: "error"});

Next Steps

Hopefully this has given you a sense for what the Document Validation functionality offers and started you thinking about how it could be applied to your application and database. I’d encourage you to read up more on the topic and these are some great resources:


Free Webinar: Document Validation in MongoDB 3.2

Defining MongoDB Document Validation RulesI’ll be presenting a free webinar on Thursday29th Octover – the new Document Validation feature coming in MongoDB 3.2.

Thursday, October 29, 2015
9am PDT | 12pm EDT | 4pm GMT

One of MongoDB’s primary attractions for developers is that it gives them the ability to start application development without needing to define a formal, up-front schema. Operations teams appreciate the fact that they don’t need to perform a time-consuming schema upgrade operation every time the developers need to store a different attribute.

Some projects reach a point where it’s necessary to define rules on what’s being stored in the database. This webinar explains how MongoDB 3.2 allows that document validation work to be performed by the database rather than in the application code.

This webinar focuses on the benefits of using document validation: how to set up the rules using the familiar MongoDB Query Language and how to safely roll it out into an existing, mature production environment.

During the webinar, you will get chance to submit your questions and get them answered by the experts.

The webinar is free but you need to register in advance here.


MongoDB Document Validation – London MUG charts

Defining MongoDB Document Validation Rules

Last night I preented on the MongoDB 3.2 Documentation Validation feature at the London MongoDB User Group meetup; the charts are shared here. Unfortunately, I didn’t record the demo and so you’ll have to grab me at a future MUG if you’d like to see that!

Abstract

One of MongoDB’s primary appeals to developers is that it gives them the ability to start application development without needing to define a formal, up-front schema. Operations teams appreciate the fact that they don’t need to perform a time-consuming schema upgrade operation every time the developers need to store a different attribute (as an example, The Weather Channel is now able to launch new features in hours whereas it used to take weeks). For business leaders, the application gets launched much faster, and new features can be rolled out more frequently. MongoDB powers agility.

Some projects reach a point where it’s necessary to define rules on what’s being stored in the database – for example, that for any document in a particular collection, you can be assured that certain attributes are present.

To address the challenges discussed above, while at the same time maintaining the benefits of a dynamic schema, MongoDB 3.2 introduces document validation.

There is significant flexibility to customize which parts of the documents are and are not validated for any collection.

Please feel free to ask any questions through comments on this post.


Migrating Databases

mysql> DELETE FROM MySQL.employees WHERE name="Andrew";
Query OK, 1 row affected (0.06 sec)

> db.employees.insert({
  name: {first: "Andrew", 
         last: "Morgan"}, 
  startDate: new Date('June 25 2015'), 
  role: "Product Marketing"});

WriteResult({ "nInserted" : 1 })

Today was my last day working for MySQL/Oracle. I’ve really enjoyed my time here and it’s difficult to leave behind such great people and technology. Having said that, after 6.5 years it feels like the right time to move onto new challenges.

Tomorrow I start working for MongoDB in their product marketing team.

In terms of this blog, I plan to keep all of the existing content live but if you’ve questions on MySQL then you’ll likely get a faster/better response if you do directly to the MySQL forums. It’s unlikely that I’ll be posting new MySQL articles here but if you’re curious about MongoDB then it might be worth hanging around.

Best Regards, Andrew.


MySQL Cluster 7.4 New Features Webinar Replay

MySQL Cluster 7.4 GAI recently hosted a webinar introducing MySQL Cluster and then looking into what’s new in the latest version (MySQL Cluster 7.4) in some more detail. The replay of the MySQL Cluster 7.4 webinar is now available here. Alternatively if just want to skim through the charts then scroll down.

Abstract

MySQL Cluster powers the subscriber databases of major communication services providers as well as next generation web, cloud, social and mobile applications. It is designed to deliver:

  • Real-time, in-memory performance for both OLTP and analytics workloads
  • Linear scale-out for both reads and writes
  • 99.999% High Availability
  • Transparent, cross-shard transactions and joins
  • Update-Anywhere Geographic replication
  • SQL or native NoSQL APIs
  • All that while still providing full ACID transactions.

Understand some of the highlights of MySQL Cluster 7.4:

  • 200 Million queries per minute
  • Active-Active geographic replication with conflict detection and resolution
  • 5x faster on-line maintenance activities
  • Enhanced reporting for memory and database operations

Charts

Questions and Answers

  • Can all data be stored on disk rather than in memory? Any column that isn’t part of an index can be stored on disk if you want it to be. There is then an in-memory cache for the disk-based data.
  • Is in-memory data safe from the whole system shutting down (e.g. power loss for the whole data center)? The in-memory data is (asynchronously) checkpointed to disk (so that there is persistence but latency isn’t impacted).
  • I need to store more than 14K non BLOB/TEXT data in a single row – has this been addressed? As you say the options are to use TEXT/BLOB columns (or of course to split the data over multiple rows).
  • Can you comment on improvements of virtualized deploymets regarding the 7.4 version? Only to say that more and more people are deploying on VMs and we’re not seeing issues caused – if we do then they’ll be fixed
  • Can I upgrage from the previous version (7.3) to MySQL Cluster 7.4 or do I have to reinstall the product of the new version (7.4)? You can perform a rolling upgarade from MySQL Cluster 7.3 to MySQL Cluster 7.4 – the database stays uo throughout the process and you don’t lose any data or have to stop writing changes.