Archive for MySQL Cluster

Direct access to MySQL Cluster through Memcached API – free webinar

Memcached access to MySQL Cluster

As described in an earlier post Memcached is an extremely popular caching layer used in most big web properties and we’re adding the ability to access MySQL Cluster directly using the familiar Memcached key-value/NoSQL API without needing to go through the MySQL Server. There is a huge amount of flexibility built into this solution – including:

  • Decide what data should be held only in the Memcached server; what should be written straight through to MySQL Cluster and then discarded  and what data should be cached in Memcached but persisted in MySQL Cluster
  • Where data is held both in Cluster and the Memcached server, they can automatically be kept in sync
  • By default it’s completely schema-less, all key-value pairs will be transparently stored in a single table within MySQL Cluster behind the scenes
  • Can map key-prefixes to columns in MySQL Cluster tables – allowing simultaneous access to the same data using SQL.
Mat Keep along with JD Duncan (lead developer for this functionality) will be hosting a free webinar on this topic (and I’ll be helping with the Q&A) on Wednesday (20th July 2011) at 9:00 am Pacific (17:00 UK, 18:00 CET). As always, please register for the event even if you can’t make this time as you’ll be sent a link to the recording.


MySQL Cluster Manager 1.1.1 (GA) Available

The latest (GA) version of MySQL Cluster Manager is available through Oracle’s E-Delivery site. You can download the software and try it out for yourselves (just select “MySQL Database” as the product pack, select your platform, click “Go” and then scroll down to get the software).

So what’s new in this version

If you’ve looked at MCM in the past then the first thing that you’ll notice is that it’s now much simpler to get it up and running – in particular the configuration and running of the agent has now been reduced to just running a single executable (called "mcmd").

The second change is that you can now stop the MCM agents from within the MCM CLI – for example "stop agents mysite" will safely stop all of the agents running on the hosts defined by "mysite".

Those 2 changes make it much simpler for the novice user to get up and running quickly; for the more expert user, the most signifficant change is that MCM can now manage multiple clusters.

Obviously, there are a bunch of more minor changes as well as bug fixes.

Refresher – So What is MySQL Cluster Manager?

MySQL Cluster Manager provides the ability to control the entire cluster as a single entity, while also supporting very granular control down to individual processes within the cluster itself.  Administrators are able to create and delete entire clusters, and to start, stop and restart the cluster with a single command.  As a result, administrators no longer need to manually restart each data node in turn, in the correct sequence, or to create custom scripts to automate the process.

MySQL Cluster Manager automates on-line management operations, including the upgrade, downgrade and reconfiguration of running clusters as well as adding nodes on-line for dynamic, on-demand scalability, without interrupting applications or clients accessing the database.  Administrators no longer need to manually edit configuration files and distribute them to other cluster nodes, or to determine if rolling restarts are required. MySQL Cluster Manager handles all of these tasks, thereby enforcing best practices and making on-line operations significantly simpler, faster and less error-prone.

MySQL Cluster Manager is able to monitor cluster health at both an Operating System and per-process level by automatically polling each node in the cluster.  It can detect if a process or server host is alive, dead or has hung, allowing for faster problem detection, resolution and recovery.

To deliver 99.999% availability, MySQL Cluster has the capability to self-heal from failures by automatically restarting failed Data Nodes, without manual intervention.  MySQL Cluster Manager extends this functionality by also monitoring and automatically recovering SQL and Management Nodes.

How is it Implemented?

MySQL Cluster Manager Architecture

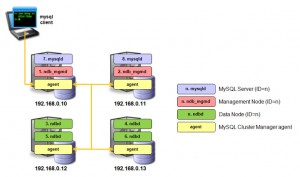
MySQL Cluster Manager is implemented as a series of agent processes that co-operate with each other to manage the MySQL Cluster deployment; one agent running on each host machine that will be running a MySQL Cluster node (process). The administrator uses the regular mysql command to connect to any one of the agents using the port number of the agent (defaults to 1862 compared to the MySQL Server default of 3306).

How is it Used?

When using MySQL Cluster Manager to manage your MySQL Cluster deployment, the administrator no longer edits the configuration files (for example config.ini and my.cnf); instead, these files are created and maintained by the agents. In fact, if those files are manually edited, the changes will be overwritten by the configuration information which is held within the agents. Each agent stores all of the cluster configuration data, but it only creates the configuration files that are required for the nodes that are configured to run on that host.

Similarly when using MySQL Cluster Manager, management actions must not be performed by the administrator using the ndb_mgm command (which directly connects to the management node meaning that the agents themselves would not have visibility of any operations performed with it).

When using MySQL Cluster Manager, the ‘angel’ processes are no longer needed (or created) for the data nodes, as it becomes the responsibility of the agents to detect the failure of the data nodes and recreate them as required. Additionally, the agents extend this functionality to include the management nodes and MySQL Server nodes.

Installing, Configuring & Running MySQL Cluster Manager

On each host that will run Cluster nodes, install the MCM agent. To do this, just download the zip file from Oracle E-Delivery and then extract the contents into a convenient location:

$ unzip V27167-01.zip
$ tar xf mysql-cluster-manager-1.1.1-linux-rhel5-x86-32bit.tar.gz
$ mv mysql-cluster-manager-1.1.1-linux-rhel5-x86-32bit ~/mcm

Starting the agent is then trivial (remember to reapeat on each host though):

$ cd ~/mcm
$ bin/mcmd&

Next, some examples of how to use MCM.

Example 1: Create a Cluster from Scratch

The first step is to connect to one of the agents and then define the set of hosts that will be used for the Cluster:

$ mysql -h 192.168.0.10 -P 1862 -u admin -psuper --prompt='mcm> ' 
mcm> create site --hosts=192.168.0.10,192.168.0.11,192.168.0.12,192.168.0.13 mysite;

Next step is to tell the agents where they can find the Cluster binaries that are going to be used, define what the Cluster will look like (which nodes/processes will run on which hosts) and then start the Cluster:

mcm> add package --basedir=/usr/local/mysql_6_3_27a 6.3.27a; 
mcm> create cluster --package=6.3.26 --processhosts=ndb_mgmd@192.168.0.10,ndb_mgmd@192.168.0.11, 
  ndbd@192.168.0.12,ndbd@192.168.0.13,ndbd@192.168.0.12, ndbd@192.168.0.13,mysqld@192.168.0.10,
  mysqld@192.168.0.11 mycluster; 
mcm> start cluster mycluster; 

Example 2: On-Line upgrade of a Cluster

A great example of how MySQL Cluster Manager can simplify management operations is upgrading the Cluster software. If performing the upgrade by hand then there are dozens of steps to run through which is time consuming, tedious and subject to human error (for example, restarting nodes in the wrong order could result in an outage). With MySQL Cluster Manager, it is reduced to two commands – define where to find the new version of the software and then perform the rolling, in-service upgrade:

mcm> add package --basedir=/usr/local/mysql_7_1_8 7.1.8; 
mcm> upgrade cluster --package=7.1.8 mycluster;

Behind the scenes, each node will be halted and then restarted with the new version – ensuring that there is no loss of service.

Example 3: Automated On-Line Add-Node

Automated On-Line Add-Node

Since MySQL Cluster 7.0 it has been possible to add new nodes to a Cluster while it is still in service; there are a number of steps involved and as with on-line upgrades if the administrator makes a mistake then it could lead to an outage.


We’ll now look at how this is automated when using MySQL Cluster Manager; the first step is to add any new hosts (servers) to the site and indicate where those hosts can find the Cluster software:

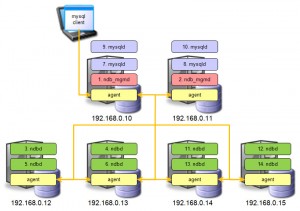
mcm> add hosts --hosts=192.168.0.14,192.168.0.15 mysite; 
mcm> add package --basedir=/usr/local/mysql_7_1_8 
  --hosts=192.168.0.14,192.168.0.15 7_1_8;

The new nodes can then be added to the Cluster and then started up:

mcm> add process --processhosts=mysqld@192.168.0.10,mysqld@192.168.0.11,ndbd@192.168.0.14,
  ndbd@192.168.0.15,ndbd@192.168.0.14,ndbd@192.168.0.15 mycluster; 
mcm> start process --added mycluster; 

The Cluster has now been extended but you need to perform a final step from any of the MySQL Servers to repartition the existing Cluster tables to use the new data nodes:

mysql> ALTER ONLINE TABLE <table-name> REORGANIZE PARTITION; 
mysql> OPTIMIZE TABLE <table-name>;

Where can I found out more?

There is a lot of extra information to help you understand what can be achieved with MySQL Cluster Manager and how to use it:


Webinar: Delivering Scalable and Highly Available Session Management with MySQL Cluster

Update – the webinar replay is now available from http://www.mysql.com/news-and-events/on-demand-webinars/display-od-630.html?clusterdb

There is a free webinar today (31st May) covering the use of MySQL Cluster in session management – register for free here. The session starts at 9:00 am Pacific, 17:00 UK, 18:00 Central European Time.

As organizations seek to enhance their users’ web experience through personalization based on historic browsing and buying behaviors, session data is becoming more critical. Larger volumes of session data need to be managed and persisted in real-time, and so session management has become increasingly performance-intensive, while also demanding very high levels of availability to ensure a seamless customer experience. In these scenarios, it makes sense to evaluate the MySQL Cluster database.

This is a practical session, demonstrating how to manage PHP session data with MySQL Cluster, and includes:

  • Demands of session management
  • Brief review of MySQL Cluster architecture
  • Why MySQL Cluster is well placed to meet the demands from session management
  • Getting a session management solution up and running with PHP and MySQL Cluster
  • Performance optimization, including the latest enhancements to JOIN performance
  • Case studies


Webinar: MySQL Cluster, Scaling Web Databases with Auto-Partitioning and SQL/NoSQL Access

Scale-out with MySQL Cluster

Update: webinar replay is now available from http://event.on24.com/r.htm?e=311660&s=1&k=3DCFE1CB3E1CF3F0FD0969DC66D93989

On Thursday 26th May Mat Keep and I will be presenting a webinar on how MySQL Cluster can deliver linear scalability – together with some tips on how to achieve it. As always the webinar is free but you need to register here.


The session starts on Thu, May 26 at 17:00 UK time, 18:00 Central European Time, 09:00 Pacific.

This webinar will discuss best practices in scaling services on-demand for high volumes of reads and writes, and provide insight on the range of NoSQL and SQL access methods available to developers, specifically covering:

  • Automatic partitioning (sharding) for high scalability
  • On-line scaling of the cluster across commodity hardware
  • SQL and NoSQL interfaces, and what should be used when
  • On-line updating of schema design to accommodate rapidly evolving applications
  • Resources to get started


MySQL Cluster 7.1.13 Released


The binary version for MySQL Cluster 7.1.13 has now been made available at http://www.mysql.com/downloads/cluster/

A description of all of the changes (fixes) that have gone into MySQL Cluster 7.1.13 (compared to 7.1.10) can be found in the official MySQL Cluster documentation for Cluster 7.1.13, 7.1.12 & 7.1.11.


Sharing user credentials between MySQL Servers with Cluster

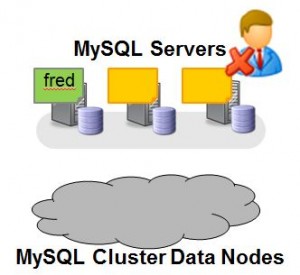
Fig. 1 User privileges stored in MyISAM

The Developer Release for MySQL Cluster 7.2 includes a new feature that allows the system data required for checking user access to be shared amongst all of your MySQL Servers. By default all of the tables holding these credentials are stored in MyISAM and so are local to that MySQL Server.

This can become painful to manage – every time you want to create a new user or change their permissions you need to repeat it on every server, miss one out and the user won’t be able to access that server (or will still be able to access it after you withdraw their privileges).

This is illustrated in Fig.1 – The user “fred” is created on one MySQL Server but when Fred attempts to connect to one of the MySQL Servers they’re blocked. This maybe what you wanted to happen but probably not.

In this post, we’ll see how to change this behaviour but first we’ll confirm the default behaviour.

Obviously, it makes sense to try this out for yourself and you can download the source or binaries from http://dev.mysql.com/downloads/cluster/ (select the sub-tab for the Development Milestone Release).

The first step is to run Cluster with multiple MySQL Servers – if you’re not comfortable with how to do this then refer to this post on how to distribute MySQL Cluster over multiple hosts.

Four mysql client connections will be used – one for root to connect to server 1; one for Fred to connect to server 1; one for root to connect to server 2 and one for Fred to try connecting to server 2.

So, let’s create Fred on server 1 and a table for him to access:

$ mysql -h 192.168.1.7 -P3306 -u root --prompt 'server1-root> '
server1-root> GRANT ALL ON *.* TO 'fred'@'192.168.1.7';
server1-root> CREATE DATABASE clusterdb; USE clusterdb;
server1-root> CREATE TABLE towns (id INT NOT NULL PRIMARY KEY,
  town VARCHAR(20)) ENGINE=NDBCLUSTER;
server1-root> REPLACE INTO towns VALUES (1,'Maidenhead'),(2, 'Reading');

Next we confirm that Fred can access this data when connecting through server 1:

$ mysql -h 192.168.1.7 -P3306 -u fred --prompt 'server1-fred> '
server1-fred> SELECT * FROM clusterdb.towns;
+----+------------+
| id | town       |
+----+------------+
|  1 | Maidenhead |
|  2 | Reading    |
+----+------------+

Now try the same thing from server 2:

$ mysql -h 192.168.1.7 -P3307 -u fred --prompt 'server2> '
server2-fred> SELECT * FROM clusterdb.towns;
ERROR 1142 (42000): SELECT command denied to user ''@'ws2.localdomain'
 for table 'towns'

What we need to do next is to run a script (as MySQL root) and then a stored procedure to convert 5 tables from the mysql database (“user”, “db”, “tables_priv”, “columns_priv” & “procs_priv”) from the MyISAM to the ndbcluster storage engine:

server1-root> SOURCE /usr/local/mysql/share/mysql/ndb_dist_priv.sql;
server1-root> CALL mysql.mysql_cluster_move_privileges();

We can confirm that the storage engine has changed, for example:

server1-root> SHOW CREATE TABLE mysql.userG
*************************** 1. row ***************************
      Table: userCreate Table: CREATE TABLE `user` (
  `Host` char(60) COLLATE utf8_bin NOT NULL DEFAULT '',
....
....
 ) ENGINE=ndbcluster DEFAULT CHARSET=utf8 COLLATE=utf8_bin COMMENT='Users
 and global privileges'

Note that “ENGINE=ndbcluster”.

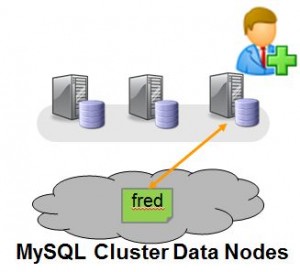
Fig. 2 User Privilege Tables Stored in MySQL Cluster

Now that these tables are stored in MySQL Cluster, they should be visible from all of the MySQL Servers. So now, whichever MySQL Server Fred attempts to connect through, that MySQL Server will fetch the privilege data from the shared data nodes rather than using local information and so Fred will get the same access rights. As our clusterdb.towns table was created using the ndbcluster storage engine as well, it is accessible from all servers and so Fred should now be able to see the contents of the table from server 2 as the access rights on server 2 now allow it. Note that the data already stored in those 5 mysql tables survived the migration from MyISAM to MySQL Cluster.

So the final test is to confirm that Fred really is allowed to get to this data from server 2:

$ mysql -h 192.168.1.7 -P3307 -u fred --prompt 'server2-fred>
server2-fred> SELECT * FROM clusterdb.towns;
+----+------------+
| id | town       |
+----+------------+
|  1 | Maidenhead |
|  2 | Reading    |
+----+------------+

Note that if “fred” were already connected to server2 then he would need to disconnect and reconnect.

Once server1 has been set up in this way, changes to the user privileges data can be made from any one of the mysql servers in the Cluster (not just server1) and they will be enforced by all of the MySQL Servers.

You can find the official documentation for this feature here.


Dramatically Increased MySQL Cluster JOIN performance with Adaptive Query Localization

Regular readers of this Blog or attendees at the 2010 O’Reilly MySQL Conference may recall a feature that the MySQL Cluster team were working to speed up JOINs (see Jonas’s slides from that conference here). The good news is that work has continued since then and it is now part of the new MySQL Cluster 7.2 Milestone Development Release. This post will step through where to get hold of the binaries and see the benefits for yourself. The examples I try here result in a 25x speedup just by turning the feature on – I’ve also seen a 50x speedup on other queries!

We’re anxious to get feedback on what benefits you see with your application’s JOINs, please respond to this post.

What’s in a name?

If some of this seems familiar but you don’t remember hearing the term “Adaptive Query Localization” before then you’re not going crazy – previous internal names were SPJ (Select Project Join) and Pushed-Down Joins. We just figured that Adaptive Query Localization was more descriptive.
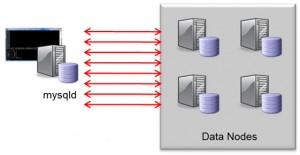
Classic Nested-Loop-Join

What does it do?

Traditionally, joins have been implemented in the MySQL Server where the query was executed. This is implemented as a nested-loop join; for every row from the first part of the join, a request has to be sent to the data nodes in order to fetch the data for the next level of the join and for every row in that level…. This method can result in a lot of network messages which slows down the query (as well as wasting resources).

When turned on, Adaptive Query Localization results in the hard work being pushed down to the data nodes where the data is locally accessible. As a bonus, the work is divided amongst the pool of data nodes and so you get parallel execution.
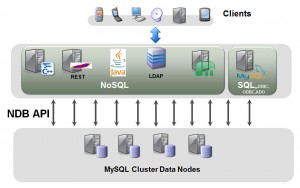
NDB API

How is it implemented?

I’ll leave the real deep and dirty details to others but cover the basic concepts here. All API nodes access the data nodes using the native C++ NDB API, the MySQL Server is one example of an API node (the new Memcached Cluster API is another). This API has been expanded to allowed parameterised or linked queries where the input from one query is dependent on the previous one.

To borrow an example from an excellent post by Frazer Clement on the topic, the classic way to implement a join would be…

SQL > select t1.b, t2.c from t1,t2 where t1.pk=22 and t1.b=t2.pk;
  ndbapi > read column b from t1 where pk = 22;
              [round trip]
           (b = 15)
  ndbapi > read column c from t2 where pk = 15;
              [round trip]
           (c = 30)
           [ return b = 15, c = 30 ]

Using the new functionality this can be performed with a single network round trip where the second read operation is dependent on the results of the first…

  ndbapi > read column @b:=b from t1 where pk = 22;
           read column c from t2 where pk=@b;
              [round trip]
           (b = 15, c = 30)
           [ return b = 15, c = 30 ]
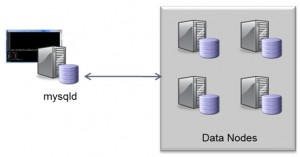
Effects of Adaptive Query Localization

Note that if your application is using the NDB API directly then you can use this same linked query functionality to speed up your queries.

Where do I get it?

Download the source or binaries from http://dev.mysql.com/downloads/cluster/ (select the sub-tab for the Development Milestone Release).

How do I use it?

The first step is to get you Cluster up and running. As the focus of this feature is to reduce the amount of network messaging, it makes sense to perform your tests on multiple machines; if you need pointers on setting Cluster up then check this post on running Cluster over multiple machines (or the Windows version).
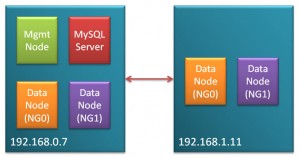
System Configuration

For my test, I used 2 PCs, each running Fedora 14 with Quad-Core CPU, 8 GBytes of RAM and Gigabit Ethernet connectivity. Each PC was running 2 data nodes (ndbd rather than ndbmtd) and one of the PCs was also running the management node and the MySQL Server running the queries (note that this configuration is not suitable for a HA deployment – for that run the management node on a third machine and run a MySQL Server on 192.168.1.11).

I’d hoped to go a step further and have the MySQL Server run on a third machine but hardware problems put paid to that – the reason that this would have been interesting is that it would have meant more of the messaging would be over the network and so would give a more realistic performance comparison (the speedup factor should have been higher). Another couple of steps that could further improve the speedup:

  1. Use multi-threaded data nodes (as more of the work is being done in the data nodes, this should help)
  2. Use machines with more cores
  3. Tune the configuration parameters (I’m keeping it as simple as possible here)

For reference, here is the configuration file used (config.ini):

 [ndb_mgmd]
 hostname=192.168.1.7
 datadir=/home/billy/mysql/spj/my_cluster/ndb_data
 NodeId=1

 [ndbd default]
 noofreplicas=2
 DiskPageBufferMemory=4M

 [ndbd]
 hostname=192.168.1.7
 datadir=/home/billy/mysql/spj/my_cluster/ndb_data
 NodeId=3

 [ndbd]
 hostname=192.168.1.11
 datadir=/home/billy/mysql/spj/my_cluster/ndb_data
 NodeId=4

 [ndbd]
 hostname=192.168.1.7
 datadir=/home/billy/mysql/spj/my_cluster/ndb_data2
 NodeId=5

 [ndbd]
 hostname=192.168.1.11
 datadir=/home/billy/mysql/spj/my_cluster/ndb_data2
 NodeId=6

 [mysqld]
 NodeId=50

And for the MySQL Server (my.cnf):

[mysqld]
ndbcluster
datadir=/home/billy/mysql/spj/my_cluster/mysqld_data

As a reminder – here is how you start up such a Cluster:

[billy@ws2 my_cluster]$ ndb_mgmd -f conf/config.ini --initial 
  --configdir=/home/billy/mysql/spj/my_cluster/conf/
[billy@ws2 my_cluster]$ ndbd -c 192.168.1.7:1186
[billy@ws1 my_cluster]$ ndbd -c 192.168.1.7:1186
[billy@ws2 my_cluster]$ ndbd -c 192.168.1.7:1186
[billy@ws1 my_cluster]$ ndbd -c 192.168.1.7:1186
[billy@ws2 my_cluster]$ ndb_mgm -e show # Wait until data nodes are running [billy@ws2 my_cluster]$ mysqld --defaults-file=conf/my.cnf& [billy@ws2 my_cluster]$ mysql -h 127.0.0.1 -P 3306 -u root

Three tables that are to be used for the queries and these are created as follows:

mysql> CREATE DATABASE clusterdb; USE clusterdb;
mysql> CREATE TABLE residents (id INT NOT NULL PRIMARY KEY, name VARCHAR(20),
  postcode VARCHAR(20)) ENGINE=ndb;
mysql> CREATE TABLE postcodes (postcode VARCHAR(20) NOT NULL PRIMARY KEY, 
  town VARCHAR(20)) ENGINE=ndb;
mysql> CREATE TABLE towns (town VARCHAR(20) NOT NULL PRIMARY KEY,
  county VARCHAR(20)) ENGINE=ndb;

I then added 100K rows to each of these tables; if you want to recreate this then you can download the data files here.

mysql> LOAD DATA LOCAL INFILE  "/home/billy/Dropbox/LINUX/projects/SPJ/residents.csv"
   REPLACE INTO TABLE residents FIELDS TERMINATED BY ',' ENCLOSED BY '"';
mysql> LOAD DATA LOCAL INFILE  "/home/billy/Dropbox/LINUX/projects/SPJ/postcodes.csv"
  REPLACE INTO TABLE postcodes FIELDS TERMINATED BY ',' ENCLOSED BY '"';
mysql> LOAD DATA LOCAL INFILE  "/home/billy/Dropbox/LINUX/projects/SPJ/towns.csv"
  REPLACE INTO TABLE towns FIELDS TERMINATED BY ',' ENCLOSED BY '"'; 

Now everything is set up to actually perform our tests! First of all two queries are run with the adaptive query localization turned off i.e. this is the “before” picture:

mysql> set ndb_join_pushdown=off;
mysql> SELECT COUNT(*)  FROM residents,postcodes WHERE
  residents.postcode=postcodes.postcode AND postcodes.town="MAIDENHEAD";
 +----------+
 | COUNT(*) |
 +----------+
 |    20000 |
 +----------+
 1 row in set (27.65 sec)
mysql> SELECT COUNT(*)  FROM residents,postcodes,towns WHERE
  residents.postcode=postcodes.postcode AND
  postcodes.town=towns.town AND towns.county="Berkshire";
 +----------+
 | COUNT(*) |
 +----------+
 |    40001 |
 +----------+
 1 row in set (48.68 sec)

and then the test is repeated with adaptive query localization turned on:

mysql> set ndb_join_pushdown=on;
mysql> SELECT COUNT(*)  FROM residents,postcodes WHERE
  residents.postcode=postcodes.postcode AND postcodes.town="MAIDENHEAD";
 +----------+
 | COUNT(*) |
 +----------+
 |    20000 |
 +----------+
 1 row in set (1.07 sec)
mysql> SELECT COUNT(*)  FROM residents,postcodes,towns WHERE
  residents.postcode=postcodes.postcode AND postcodes.town=towns.town
  AND towns.county="Berkshire";
 +----------+
 | COUNT(*) |
 +----------+
 |    40001 |
 +----------+
 1 row in set (2.02 sec)

For those 2 queries it represents a 25.8x and 24.1x speedup.

It’s important to note that not every join can currently be pushed down to the data nodes; here are the current rules (we hope to relax them overtime) for a query to be suitable:

  • JOINed columns must have the same data type
  • Queries should not reference BLOBs
  • Explicit locking is not supported
  • Only supports fully or partially qualified primary keys or plain indexes as access method for child tables (first part of JOIN can be a full table scan)

You can check whether your query is fitting these rules using EXPLAIN, for example:

mysql> set ndb_join_pushdown=on;
mysql> EXPLAIN SELECT COUNT(*)  FROM residents,postcodes WHERE residents.postcode=postcodes.postcode AND postcodes.town="MAIDENHEAD";
+----+-------------+-----------+--------+---------------+---------+---------+------------------------------+--------+--------------------------------------------------------------------------+
| id | select_type | table     | type   | possible_keys | key     | key_len | ref                          | rows   | Extra                                                                    |
+----+-------------+-----------+--------+---------------+---------+---------+------------------------------+--------+--------------------------------------------------------------------------+
|  1 | SIMPLE      | residents | ALL    | NULL          | NULL    | NULL    | NULL                         | 100000 | Parent of 2 pushed join@1                                                |
|  1 | SIMPLE      | postcodes | eq_ref | PRIMARY       | PRIMARY | 22      | clusterdb.residents.postcode |      1 | Child of 'residents' in pushed join@1; Using where with pushed condition |
+----+-------------+-----------+--------+---------------+---------+---------+------------------------------+--------+--------------------------------------------------------------------------+
mysql> EXPLAIN EXTENDED SELECT COUNT(*)  FROM residents,postcodes,towns WHERE residents.postcode=postcodes.postcode AND postcodes.town=towns.town AND towns.county="Berkshire";
+----+-------------+-----------+--------+---------------+---------+---------+------------------------------+--------+----------+------------------------------------------------------------------------------------------------------------------------+
| id | select_type | table     | type   | possible_keys | key     | key_len | ref                          | rows   | filtered | Extra                                                                                                                  |
+----+-------------+-----------+--------+---------------+---------+---------+------------------------------+--------+----------+------------------------------------------------------------------------------------------------------------------------+
|  1 | SIMPLE      | residents | ALL    | NULL          | NULL    | NULL    | NULL                         | 100000 |   100.00 | Parent of 3 pushed join@1                                                                                              |
|  1 | SIMPLE      | postcodes | eq_ref | PRIMARY       | PRIMARY | 22      | clusterdb.residents.postcode |      1 |   100.00 | Child of 'residents' in pushed join@1                                                                                  |
|  1 | SIMPLE      | towns     | eq_ref | PRIMARY       | PRIMARY | 22      | clusterdb.postcodes.town     |      1 |   100.00 | Child of 'postcodes' in pushed join@1; Using where with pushed condition: (`clusterdb`.`towns`.`county` = 'Berkshire') |
+----+-------------+-----------+--------+---------------+---------+---------+------------------------------+--------+----------+------------------------------------------------------------------------------------------------------------------------+

Note that if you want to check for more details why your join isn’t currently being pushed down to the data node then you can use “EXPLAIN EXTENDED” and then “SHOW WARNINGS” to get more hints. Hopefully that will allow you to tweak your queries to get the best improvements.

PLEASE let us know your experiences and give us examples of queries that worked well and (just as importantly) those that didn’t so that we can improve the feature – just leave a comment on this Blog with your table schemas, your query and your before/after timings.

Almost here – MySQL Cluster at Collaborate 11


A quick reminder that MySQL is well represented at the Oracle Collaborate conference which starts in Orlando on Sunday.

For those not familiar with Collaborate, it’s the big community conference for Oracle users – this year it’s in Orlando from April 10th through 14th (I’ve just re-checked the weather forecast, 31 Celsius vs. -18 at the last conference I presented at – OOW Beijing in December – what a difference 4 months and 8,000 miles make!).

I’ll be presenting on MySQL Cluster in a session called “Building Highly Available Scalable Real-Time Services with MySQL Cluster” where I’ll focus on:

  • Basics of MySQL Cluster – what it does, who uses it and why
  • Accessing your data – SQL and NoSQL access methods
  • Latest features
  • What’s coming in the future.

My session starts at 8:00 am on Tuesday 12th April (sorry for the early start) and is in room 306A.

For people interested in MySQL Cluster, another session you should try to attend is “MySQL Cluster for the Enterprise” presented by Craig Russell at 2:15 pm on Wednesday 13th April.

Other MySQL HA topics from the Oracle team:

To get an overall picture of what is happening to MySQL in Oracle, you should attend Tomas Ulin’s (VP of MySQL Engineering) “The State of MySQL” session at 9:15 am on Monday 11th April.

You can see a full list of sessions in the MySQL track here.

And last but not least, come and visit us at the MySQL booths in the Oracle Demo Grounds (Booth #657) to chat with us and/or get a demo. Here are the opening times:

  • Monday 6:00pm – 8:00pm (Welcome Reception)
  • Tuesday 10:15am – 4:00pm & 5:30pm-7:00pm (Reception)
  • Wednesday 10:15am – 4:00pm

I’ll be at the demo booth as much as possible but definitely for the 6:00pm – 8:00pm slot on Monday and from 10:15am – 1pm on Wednesday – hope to see some of you there.

Register for the event at http://collaborate11.ioug.org/Home/Registration/tabid/82/Default.aspx


High Availability Solutions – part for the MySQL On Windows Forum

STOP PRESS: the recording of this forum is now available for replay.

On March 16th, we’re holding an on-line forum to discuss MySQL on Windows – I’ll be handling the High Availability session (includes MySQL replication and MySQL Cluster). The event runs from 9 am Pacific Time until 12:00 pm; the HA session is schedules for 11:00 Pacific and runs for half an hour. I’ll also be answering questions on-line during the forum. As always the even is free but you need to register here.

Here is the official description…

Join our Online Forum and discover how you can win with MySQL on Windows. Oracle’s MySQL Vice President of Engineering Tomas Ulin will kick off a comprehensive agenda of presentations enabling you to better understand:

  • Why the world’s most popular open source database is extremely popular on Windows, both for enterprise users and ISVs
  • How MySQL fits into the Windows environment, and what are the upcoming milestones to make MySQL even better on the Microsoft platform
  • What are the visual tools at your disposal to effectively develop, deploy and manage MySQL applications on Windows
  • How you can deliver highly available business critical Windows based MySQL applications
  • Why Security Solutions Provider SonicWall selected MySQL over Microsoft SQL Server, and how they successfully deliver MySQL based solutions

Additionally, Oracle experts will be on live chat throughout the event to answer your toughest questions.

MySQL on Windows: It Just Keeps Getting Better!

Oracle’s MySQL Vice President of Engineering Tomas Ulin will kick off the Online Forum and review why MySQL has become highly popular on Windows for both enterprise users and ISVs, as well as Oracle’s MySQL on Windows Strategy. Senior Product Manager Rob Young will then help you understand how MySQL fits into your familiar Windows environment, covering MySQL Connectors, integration with Visual Studio, security aspects…and more. They will also review the improvements Oracle recently delivered as well as the upcoming milestones to make MySQL even better on Windows.

From Modeling to Performance Tuning: MySQL Visual Tools for Developers & DBAs

Are you wondering what visual tools are at your disposal to effectively develop, deploy and manage MySQL applications on Windows? Mike Zinner and Rob Young will show you how you can benefit from the following tools:

  • MySQL Workbench, which provides visual data modeling, SQL development, and comprehensive administration tools for MySQL server configuration, user administration, and much more.
  • The MySQL Enterprise Monitor, a “Virtual DBA assistant” that helps MySQL DBAs manage more MySQL databases as well as find and fix problems before they become serious problems or costly outages.
  • The MySQL Query Analyzer, which helps improve your C# and .Net application performance by monitoring query performance and accurately pinpointing SQL code that is causing a slow down.
  • MySQL Enterprise Backup, to perform online hot MySQL backups.

Implementing MySQL High Availability Solutions on Windows

Databases play a key role in ensuring application availability, and MySQL offers a range of HA solutions on Windows. Senior Product Manager Andrew Morgan will in this session explore two of them:

  • MySQL Replication, which has been widely deployed by some of the leading web properties and in the enterprise to deliver highly available database services, providing a means of mirroring data across multiple hosts to withstand failures of individual systems.
  • MySQL Cluster combining 99.999% availability with the low TCO of an open source solution. With a distributed shared-nothing architecture and no single point of failure, MySQL Cluster can scale linearly to meet the unprecedented demands of the next generation web services & telecom applications.

Customer Story: SonicWall

SonicWALL provides network security and data protection solutions enabling to secure, control and scale global networks. Director of Product Management Jan Sijp will share with you how they have successfully delivered MySQL based solutions on both Windows & Linux, providing information about the challenges they were facing, why they selected MySQL over Microsoft SQL Server, and the implementation process.


MySQL London Meetup on Tuesday

There’s a Meetup on Tuesday evening for MySQL users in the London area. It’s hosted at the Canonical offices (27th floor of Millbank Tower) at 18:30. Likely to last for a couple of hours before we head to a local pub for more serious discussions.

These are pretty informal events – if you want to find out the latest news in the MySQL world or have something to say then please come along. I’m hoping to discuss the latest MySQL Cluster developments.

Find the details and register at the Facebook page: http://www.facebook.com/event.php?eid=134352579966946&ref=mf