 MySQL Cluster Manager 1.2.2 is now available to download from E-delivery and from My Oracle Support .
Details on the changes can be found in the MySQL Cluster Manager documentation . Please give it a try and let me know what you think.


 MySQL Cluster Manager 1.2.2 is now available to download from E-delivery and from My Oracle Support .
Details on the changes can be found in the MySQL Cluster Manager documentation . Please give it a try and let me know what you think.

 The binary version for MySQL Cluster 7.2.10 has now been made available at http://www.mysql.com/downloads/cluster/ (GPL version) or https://support.oracle.com/ (commercial version).
A description of all of the changes (fixes) that have gone into MySQL Cluster 7.2.10 (compared to 7.2.9) is available from the 7.2.10 Change log.
 Oracle have just announced that MySQL Cluster Manager 1.2 is Generally Available. For anyone not familiar with MySQL Cluster Manager – it’s a command-line management tool that makes it simpler and safer to manage your MySQL Cluster deployment – use it to create, configure, start, stop, upgrade…. your cluster.
So what has changed since MCM 1.1 was released?
The first thing is that a lot of work has happened under the covers and it’s now faster, more robust and can manage larger clusters. Feature-wise you get the following (note that a couple of these were released early as part of post-GA versions of MCM 1.1):
A new version of the MySQL Cluster Manager white paper has been released that explains everything that you can do with it and also includes a tutorial for the key features; you can download it here.
Watch this video for a tutorial on using MySQL Cluster Manager, including the new features:
A single-host cluster can very easily be created and run – an easy way to start experimenting with MySQL Cluster:
billy@black:~$ mcm/bin/mcmd –bootstrap

MySQL Cluster Manager 1.2.1 started
Connect to MySQL Cluster Manager by running "/home/billy/mcm-1.2.1-cluster-7.2.9_32-linux-rhel5-x86/bin/mcm" -a black.localdomain:1862
Configuring default cluster 'mycluster'...
Starting default cluster 'mycluster'...
Cluster 'mycluster' started successfully
        ndb_mgmd        black.localdomain:1186
        ndbd            black.localdomain
        ndbd            black.localdomain
        mysqld          black.localdomain:3306
        mysqld          black.localdomain:3307
        ndbapi          *
Connect to the database by running "/home/billy/mcm-1.2.1-cluster-7.2.9_32-linux-rhel5-x86/cluster/bin/mysql" -h black.localdomain -P 3306 -u root
You can then connect to MCM:
billy@black:~$ mcm/bin/mcm
Or access the database itself simply by running the regular mysql client.
When querying the status of the processes in a Cluster, you’re now also shown the package being used for each node:
mcm> show status --process mycluster;
+--------+----------+------ +---------+-----------+---------+
| NodeId | Process  | Host  | Status  | Nodegroup | Package |
+--------+----------+-------+---------+-----------+---------+
| 49     | ndb_mgmd | black | running |           | 7.2.9   |
| 50     | ndb_mgmd | blue  | running |           | 7.2.9   |
| 1      | ndbd     | green | running | 0         | 7.2.9   |
| 2      | ndbd     | brown | running | 0         | 7.2.9   |
| 3      | ndbd     | green | running | 1         | 7.2.9   |
| 4      | ndbd     | brown | running | 1         | 7.2.9   |
| 51     | mysqld   | black | running |           | 7.2.9   |
| 52     | mysqld   | blue  | running |           | 7.2.9   |
+--------+----------+-------+---------+-----------+---------+
MySQL Cluster supports on-line backups (and the subsequent restore of that data); MySQL Cluster Manager 1.2 simplifies the process.
The database can be backed up with a single command (which in turn makes every data node in the cluster backup their data):
mcm> backup cluster mycluster;
The list command can be used to identify what backups are available in the cluster:
mcm> list backups mycluster;

+----------+--------+--------+----------------------+
| BackupId | NodeId | Host   | Timestamp            |
+----------+--------+--------+----------------------+
| 1        | 1      | green  | 2012-11-31T06:41:36Z |
| 1        | 2      | brown  | 2012-11-31T06:41:36Z |
| 1        | 3      | green  | 2012-11-31T06:41:36Z |
| 1        | 4      | brown  | 2012-11-31T06:41:36Z |
| 1        | 5      | purple | 2012-11-31T06:41:36Z |
| 1        | 6      | red    | 2012-11-31T06:41:36Z |
| 1        | 7      | purple | 2012-11-31T06:41:36Z |
| 1        | 8      | red    | 2012-11-31T06:41:36Z |
+----------+--------+--------+----------------------+
You may then select which of these backups you want to restore by specifying the associated BackupId when invoking the restore command:
mcm> restore cluster -I 1 mycluster;
Note that if you need to empty the database of its existing contents before performing the restore then MCM 1.2 introduces the initial option to the start cluster command which will delete all data from all MySQL Cluster tables.
A single command will now stop all of the agents for your site:
mcm> stop agents mysite;
You can fetch the MCM binaries from edelivery.oracle.com and then see how to use it in the MySQL Cluster Manager white paper.
Please try it out and let us know how you get on!
 The binary version for MySQL Cluster 7.2.9 has now been made available at http://www.mysql.com/downloads/cluster/ (GPL version) or https://support.oracle.com/ (commercial version).
A description of all of the changes (fixes) that have gone into MySQL Cluster 7.2.9 (compared to 7.2.8) is available from the 7.2.9 Change log.
Oracle has announced that it now provides support for DRBD with MySQL – this means a single point of support for the entire MySQL/DRBD/Pacemaker/Corosync/Linux stack! As part of this, we’ve released a new white paper which steps you through everything you need to do to configure this High Availability stack. The white paper provides a step-by-step guide to installing, configuring, provisioning and testing the complete MySQL and DRBD stack, including:
DRBD is an extremely popular way of adding a layer of High Availability to a MySQL deployment – especially when the 99.999% availability levels delivered by MySQL Cluster isn’t needed. It can be implemented without the shared storage required for typical clustering solutions (not required by MySQL Cluster either) and so it can be a very cost effective solution for Linux environments.
At the lowest level, 2 hosts are required in order to provide physical redundancy; if using a virtual environment, those 2 hosts should be on different physical machines. It is an important feature that no shared storage is required. At any point in time, the services will be active on one host and in standby mode on the other.
Pacemaker and Corosync combine to provide the clustering layer that sits between the services and the underlying hosts and operating systems. Pacemaker is responsible for starting and stopping services – ensuring that they’re running on exactly one host, delivering high availability and avoiding data corruption. Corosync provides the underlying messaging infrastructure between the nodes that enables Pacemaker to do its job; it also handles the nodes membership within the cluster and informs Pacemaker of any changes.
The core Pacemaker process does not have built in knowledge of the specific services to be managed; instead agents are used which provide a wrapper for the service-specific actions. For example, in this solution we use agents for Virtual IP Addresses, MySQL and DRBD – these are all existing agents and come packaged with Pacemaker. This white paper will demonstrate how to configure Pacemaker to use these agents to provide a High Availability stack for MySQL.
The essential services managed by Pacemaker in this configuration are DRBD, MySQL and the Virtual IP Address that applications use to connect to the active MySQL service.
DRBD synchronizes data at the block device (typically a spinning or solid state disk) – transparent to the application, database and even the file system. DRBD requires the use of a journaling file system such as ext3 or ext4. For this solution it acts in an active-standby mode – this means that at any point in time the directories being managed by DRBD are accessible for reads and writes on exactly one of the two hosts and inaccessible (even for reads) on the other. Any changes made on the active host are synchronously replicated to the standby host by DRBD.
A single Virtual IP (VIP) is shown in the figure (192.168.5.102) and this is the address that the application will connect to when accessing the MySQL database. Pacemaker will be responsible for migrating this between the 2 physical IP addresses.
One of the final steps in configuring Pacemaker is to add network connectivity monitoring in order to attempt to have an isolated host stop its MySQL service to avoid a “split-brain” scenario. This is achieved by having each host ping an external (not one part of the cluster) IP addresses – in this case the network router (192.168.5.1).
Deploying a well configured cluster has just got a lot easier! Oracle have released a new auto-installer/configurator for MySQL Cluster that makes the processes extremely simple while making sure that the cluster is well configured for your application. The installer is part of MySQL Cluster 7.3 and so is not yet GA but it can also be used on MySQL Cluster 7.2. A single command launches the web-based wizard which then steps you through configuring the cluster; to keep things even simpler, it will automatically detect the resources on your target machines and use these results together with the type of workload you specify in order to determine values for the key configuration parameters.
Before going through the detailed steps, here’s a demonstration of the auto-installer in action…
The software can be downloaded from MySQL Labs; just select the MySQL-Cluster-Auto-Installer build, unzip the file and then run. To run on Windows, just double click setup.bat – note that if you installed from the MSI and didn’t change the install directory then this will be located somewhere like C:Program Files (x86)MySQLMySQL Cluster 7.2. On Linux, just run ndb_setup.
From the landing page, just click on the “Create new MySQL Cluster” icon to get started.
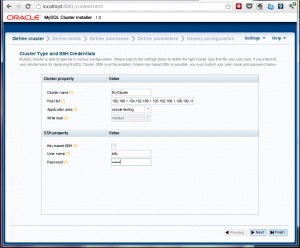
 On the next page you need to specify the list of servers that will form part of the cluster. The machine where the installer is being run from needs to have ssh access to all of the cluster hosts (further, access to those machines must already have been approved from this one – if you’re uncertain, just manually connect to each one using an ssh client.
By default, the wizard assumes that ssh keys have been set up (so that a password isn’t needed) – if that isn’t the case, just un-check the checkbox and provide your username and password.
On this page, you also get to specify what “type” of cluster you want; if you’re experimenting for the first time then it’s probably safest to stick with “Simple testing” but for a production system you’d want to specify the kind of application and whether it will a write-intensive application.
On the next page, you will see the wizard attempt to auto-detect the resources on your target machines. If this fails then you can enter the data manually.You can also overwrite the resource-values (for example, if you don’t want the cluster to use up a big share of the memory on the target systems then just overwrite the amount of memory.
It’s also on this page that you can specify where the MySQL Cluster software is stored on each of the hosts (if the defaults aren’t correct) – this should be the path to where you unzipped the MySQL Cluster tar-ball/zip file – as well as where the data (and configuration files) should be stored. You can just overwrite the values or select multiple rows and hit the “edit” button.
The following page presents you with a default set of nodes (processes) and how they’ll be distributed across all of the target hosts – if you’re happy with the proposal then just advance to the next page. So what can you change:
The diagram to the right shows an example of adding an extra MySQL Server.
On the next screen you’re presented with some of the key configuration parameters that have been set (behind the scenes, the wizard sets many more) that you might want to override; if you’re happy then just progress to the next screen. If you do want to make any changes then make them here before continuing. If you’d previously selected anything other than “simple” for the kind of cluster to create then you can check the “Show advanced configuration options” box in order to view/modify more parameters.
On the final screen you can review the details of the final recommended configuration and then just hit “Deploy and start cluster” and it will do just that. Depending on the complexity of the cluster, it can take a while to deploy and start everything but you’re shown a progress bar together with an explanation of what stage the process is at.
If for some reason you prefer or need to start the processes manually, this page also shows you the commands that you’d need to run (as well as the configuration files if you need to create them manually).
Once the wizard declares the process complete, you can check for yourself before going ahead and start your testing:
billy@black:~ $ ndb_mgm -e show
Connected to Management Server at: localhost:1186
Cluster Configuration
---------------------
[ndbd(NDB)]     2 node(s)
id=1    @192.168.1.106  (mysql-5.5.25 ndb-7.2.8, Nodegroup: 0, Master)
id=2    @192.168.1.107  (mysql-5.5.25 ndb-7.2.8, Nodegroup: 0)

[ndb_mgmd(MGM)] 2 node(s)
id=49   @192.168.1.104  (mysql-5.5.25 ndb-7.2.8)
id=52   @192.168.1.105  (mysql-5.5.25 ndb-7.2.8)

[mysqld(API)]   9 node(s)
id=50 (not connected, accepting connect from 192.168.1.104)
id=51 (not connected, accepting connect from 192.168.1.104)
id=53 (not connected, accepting connect from 192.168.1.105)
id=54 (not connected, accepting connect from 192.168.1.105)
id=55   @192.168.1.104  (mysql-5.5.25 ndb-7.2.8)
id=56   @192.168.1.104  (mysql-5.5.25 ndb-7.2.8)
id=57   @192.168.1.105  (mysql-5.5.25 ndb-7.2.8)
id=58   @192.168.1.105  (mysql-5.5.25 ndb-7.2.8)
id=59   @192.168.1.106  (mysql-5.5.25 ndb-7.2.8)
As always it would be great to hear some feedback especially if you’ve ideas on improving it or if you hit any problems.
 The binary version for MySQL Cluster 7.2.8 has now been made available at http://www.mysql.com/downloads/cluster/ (GPL version) or https://support.oracle.com/ (commercial version).
A description of all of the changes (fixes) that have gone into MySQL Cluster 7.2.8 (compared to 7.2.7) is available from the 7.2.8 Change log.
 The binary & source versions for MySQL Cluster 7.1.23 have now been made available at https://www.mysql.com/downloads/cluster/7.1.html#downloads (GPL version) or https://support.oracle.com/ (commercial version).
A description of all of the changes (fixes) that have gone into MySQL Cluster 7.1.23 (compared to 7.1.22) are available from the 7.1.23 Change log.
 The binary version for MySQL Cluster 7.2.7 has now been made available at http://www.mysql.com/downloads/cluster/ (GPL version) or https://support.oracle.com/ (commercial version).
A description of all of the changes (fixes) that have gone into MySQL Cluster 7.2.7 (compared to 7.2.6) are available from the 7.2.7 Change log.
This paper steps you through:
As well as the kind of regular updates that are needed from time to time, this version includes the extra opportunities for optimizations that are available with MySQL Cluster 7.2 such as faster joins and engineering the threads within a multi-threaded data node.
As a reminder, I’ll be covering much of this material in an upcoming webinar.