Archive for MySQL

MySQL Utilities Webinar

MySQL Utilities logoOn Thursday, Dr Charles Bell and I will be presenting a webinar on MySQL Utilities; there will be a heavy focus on what you can acheive with them and how you should use them. As well as listening to the presentation, this is a great chance to get your questions answered by the experts (Israel Gomez from the engineering team will also be on-line to help with the questions). As always, the webinar is free but you should register in advance here. If the time isn’t convenient, register anyway and you’ll be sent a link to the replay when it’s available.

Abstract:

MySQL Utilities provide a collection of command-line utilities that are used for maintaining and administering MySQL databases, including:

  • Admin Utilities (Clone, Copy, Compare, Diff, Export, Import)
  • Replication Utilities (Setup, Configuration, Automated Slave Promotion)
  • General Utilities (Disk Usage, Redundant Indexes, Search Meta Data)

Andrew Morgan and Chuck Bell will guide you through these utilities, and many more, explaining what you can gain from these tools and how to use them (for example how a single command repeatedly checks your master server and in the event it fails, automatically promotes one of the slaves to be the new master). This is your opportunity to listen to the development lead describe what he and his team have created, and to get your questions answered by the experts.

WHO:
Andrew Morgan, Principal Product Manager
Chuck Bell, Software Development Manager

WHEN:
Thu, Jul 18: 09:00 Pacific time (America)
Thu, Jul 18: 10:00 Mountain time (America)
Thu, Jul 18: 11:00 Central time (America)
Thu, Jul 18: 12:00 Eastern time (America)
Thu, Jul 18: 16:00 UTC
Thu, Jul 18: 17:00 Western European time
Thu, Jul 18: 18:00 Central European time
Thu, Jul 18: 19:00 Eastern European time
Thu, Jul 18: 21:30 India, Sri Lanka
Fri, Jul 19: 00:00 Singapore/Malaysia/Philippines time
Fri, Jul 19: 00:00 China time
Fri, Jul 19: 01:00 日本
Fri, Jul 19: 02:00 NSW, ACT, Victoria, Tasmania (Australia)

The presentation will be approximately 60 minutes long followed by Q&A.


Using JavaScript and Node.js with MySQL Cluster – First steps

MySQL Cluster driver for JavaScript/Node.js

We’re very pleased to announce that MySQL Cluster 7.3 has gone GA; for a full run-down of the new features and enhancements, take a look at the "MySQL Cluster 7.3 New Features for Internet-Scale Performance with Carrier-Grade Availability" white paper but this post will focus on just one of the features – the MySQL Cluster JavaScript Driver for Node.js. The post will step you through setting everything up so that you can get your first Node.js code reading and writing from MySQL Cluster.

Background

MySQL Cluster is a distributed, shared nothing database that provides linear scalability, 99.999% availability and high read/write throughput with low latency. SQL is just one way of accessing data stored in MySQL Cluster – there are also a number of native NoSQL APIs that go straight to the data without any interim conversion to SQL. These APIs include C++, Memcached, Java, JPA and REST – in MySQL Cluster 7.3 JavaScript/Node.js is added to the list.

Node.js (typically referred to simply as "Node") is a platform for running fast, scalable applications using JavaScript. For maximum performance, Node.js is built around a non-blocking, event-driven architecture – just like MySQL Cluster and so they fit together very well.

The MySQL Cluster JavaScript Driver for Node.js is just what it sounds like it is – it’s a connector that can be called directly from your JavaScript code to read and write your data. As it accesses the data nodes directly, there is no extra latency from passing through a MySQL Server and need to convert from JavaScript code//objects into SQL operations. If for some reason, you’d prefer it to pass through a MySQL Server (for example if you’re storing tables in InnoDB) then that can be configured.

As with all of the other APIs that we offer, you’re able to mix & match access methods; while you access the database using JavaScript objects, these will be mapped to rows in database tables and this same data can simultaneously be accessed by other NoSQL API or through SQL.
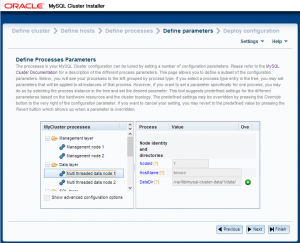
MySQL Cluster Auto-Installer

MySQL Cluster Auto-Installer

Installing MySQL Cluster

Obviously, to try out our JavaScript code we’ll need a database to access. The simplest way to do this is to use the new auto-installer that’s part of MySQL Cluster 7.3; this provides a browser-based GUI that configures and runs a MySQL Cluster database that’s been configured for your application and environment. Using this installer is described in the "MySQL Cluster Auto-Installer" post.


Setting up the Database

Foreign Key constraints between tables

Tables with Foreign Key constraint

A simple database schema is being used – a single table would really be enough but we’ll actually create two in order to demonstrate that Foreign Key constraints (Foreign Keys are another new feature in MySQL Cluster 7,3) are still enforced when using the NoSQL APIs.

These two tables are set up as follows:

[billy@bob]$ mysql --protocol=tcp -u root
Welcome to the MySQL monitor.  Commands end with ; or g.
Your MySQL connection id is 2
Server version: 5.6.10-ndb-7.3.1-cluster-gpl MySQL Cluster Community Server (GPL)

Copyright (c) 2000, 2013, Oracle and/or its affiliates. All rights reserved.

Oracle is a registered trademark of Oracle Corporation and/or its
affiliates. Other names may be trademarks of their respective
owners.

Type 'help;' or 'h' for help. Type 'c' to clear the current input statement.

mysql> CREATE TABLE test.counties (county VARCHAR(30) NOT NULL PRIMARY KEY,
country VARCHAR(30)) ENGINE=ndb;
Query OK, 0 rows affected (1.17 sec)

mysql> CREATE TABLE test.towns (town VARCHAR(30) NOT NULL PRIMARY KEY, county VARCHAR(30),
INDEX county_county_index (county), CONSTRAINT county_town FOREIGN KEY (county) REFERENCES counties(county) 
ON DELETE RESTRICT ON UPDATE RESTRICT) ENGINE=ndb;
Query OK, 0 rows affected (1.00 sec)

Installing Node.js

Node.js can be downloaded from Node.js.org.

If you’re using Windows then the MSI will guide you through the process – though when you’ve finished you’ll need to manually run the following from the cmd prompt:

npm install -g node-gyp

On Linux, you’ll need to manually build and install Node.js after you’ve downloaded it:

[root@bob node-v0.10.7]# ./configure
[root@bob node-v0.10.7]# make
[root@bob node-v0.10.7]# make install

Building mysql-js (the JavaScript driver for MySQL Cluster)

Regardless of what operating system is being used, the driver must be built before it can be used. Furthermore, to build the driver you need to have a local MySQL Cluster package (so that it can access the NDB API client library).

Depending on the exact Linux distro and version being used, some dependencies may need to be installed first:

[root@bob]$ yum install gcc
[root@bob]$ yum install gcc-c++
[root@bob]$ npm install mysql
[root@bob]$ npm install -g node-gyp

Once that has been done, the driver can be built – the following should be run from within the share/nodejs directory within the MySQL Cluster package:

[billy@bob nodejs]$ node configure.js 
[billy@bob nodejs]$ node-gyp configure build -d

Example Code

To begin with, the complete code is provided and then each component is explained.

var nosql = require('..'); 

var Town = function(name, county) {
    if (name) this.town = name;
    if (county) this.county = county;
};

// create basic object<->table mapping
var annotations = new nosql.TableMapping('towns').applyToClass(Town);

//check results of find
var onFind = function(err, result) {
    console.log('onFind.');
    if (err) {
        console.log(err);
    } else {
        console.log('Found: ' + JSON.stringify(result));
    }
    process.exit(0);
};

//check results of insert
var onInsert = function(err, object, session) {
    console.log('onInsert.');
    if (err) {
        console.log(err);
    } else {
        console.log('Inserted: ' + JSON.stringify(object));

        // Now read the data back out from the database
        session.find(Town, 'Maidenhead', onFind);
    }
};

// insert an object
var onSession = function(err, session) {
    console.log('onSession.');
    if (err) {
    console.log('Error onSession.');
        console.log(err);
        process.exit(0);
    } else {
        var data = new Town('Maidenhead', 'Berkshire');
        session.persist(data, onInsert, data, session);
    }
};

var dbProperties = nosql.ConnectionProperties('ndb');

console.log('Openning session');

// connect to the database
nosql.openSession(dbProperties, Town, onSession);

console.log('Openned session');

Step 1 Import API software

The first step is for your JavaScript application to specify that it will use the new API (mysql-js); this will work if this file is stored in a directory under cluster-install/share/nodejs:

var nosql = require('mysql-js');

Step 2 Define JavaScript class

A class should be defined that will be used by the application and will also be mapped to the towns table that has already been created. The class is defined through the specification of its constructor:

var Town = function(name, county) {
    if (name) this.town = name;
    if (county) this.county = county;
};

Step 3 Define schema mappings

MySQL Cluster is a relational database while JavaScript works with objects. To get the best of both worlds, mappings can be set up between MySQL tables (or individual columns) and JavaScript objects – in this case it’s kept very simple and the Town class is mapped to the towns table:

var annotations = new nosql.TableMapping('towns').applyToClass(Town);

Note that you can also define mappings at a finer level – only mapping to specific columns within a table and allowing the class members to have different names to the table columns.

Step 4 Connect to the database

In this step, the application connects to the database to indicate that it wants to access the data nodes directly rather than via the MySQL Server (and hidden conversion to SQL), the ConnectionProperties is set to ndb (rather than mysql). Additionally, a callback function (onSession) is passed as an argument. Recall that this is an event-driven, non-blocking, asynchronous API and so after calling openSession, control will be immediately returned to the application – without waiting for the session to actually be established – the application can then go away and perform other useful work. Once the session has been created, the callback function (onSession) will be invoked, allowing the application to take the next steps.

var dbProperties = nosql.ConnectionProperties('ndb');
nosql.openSession(dbProperties, annotations, onSession);

Step 5 Store some data

Note that the code in this step is the implementation of the call back function (onSession) that we passed in as a parameter to openSession in the previous step. This function simply instantiates a Town JavaScript object and then writes it to MySQL Cluster through the persist method. Once more, a callback function is passed in (onInsert) which will be invoked once the data has been stored in the database. Note that any objects specified after the callback function in the parameter list (in this case, the Town object data) will be provided as parameters to the callback function when it’s executed – note that the session parameter is also included and the framework will pass that as a parameter to the onInsert callback function.

var onSession = function(err, session) {
    if (err) {...} else {
        var data = new Town('Maidenhead', 'Berkshire');
        session.persist(data, onInsert, data, session);
    }
};

Step 6 Verify insert succeeded & initiate reading of data from the database

Next, our callback function (onInsert) is called and the object parameter contains the Town that had been passed into the persist method in the previous step, together with the session variable. This function simply checks that there wasn’t an error and then displays the Town that has been stored in the database. Again, a callback function is provided – onFind – that will be called once the data has been found.

var onInsert = function(err, object, session) {
    if (err) { ... } else {
        console.log('Inserted: ' + JSON.stringify(object));
        session.find(Town, 'Maidenhead', onFind);
    }
};

Step 7 Process the data read back from the database

Finally, onFind is called-back and it handles the processing of the results (whether it is an error or the Town object in the form of the result parameter).

var onFind = function(err, result) {
    console.log('onFind.');
    if (err) { ... } else {
        console.log('Found: ' + JSON.stringify(result));
    }
    process.exit(0);
};

The on-line documentation for mysql-js describes the API in full and includes some further examples.

Running the application

Before running the application, the location of the NDB API client library must be provided (this is with the MySQL Cluster package):

[billy@bob my_samples]$ export LD_LIBRARY_PATH=/home/billy/cluster_7_3/lib

The example code should be stored in a file called my-test.js in a directory under cluster-install/share/nodejs/my_samples. To run the application, just run the following (spoiler – there will be a database error!):

[billy@bob my_samples]$ node my-test.js 
Openning session
Openned session
Connected to cluster as node id: 50
onSession.
onInsert.
{ message: 'Error',
  sqlstate: '23000',
  ndb_error: null,
  cause: 
   { message: 'Foreign key constraint violated: No parent row found [255]',
     sqlstate: '23000',
     ndb_error: 
      { message: 'Foreign key constraint violated: No parent row found',
        handler_error_code: 151,
        code: 255,
        classification: 'ConstraintViolation',
        status: 'PermanentError' },
     cause: null } }

This error is seen because the code is attempting to add an object/row to the towns table where the county doesn’t already have an entry in the counties table – this breaks the Foreign Key constraint that was included when the tables were created.

To get around this, the required row should be added to the counties table:

[billy@bob my_samples]$ mysql --protocol=tcp -u root
Welcome to the MySQL monitor.  Commands end with ; or g.
Your MySQL connection id is 3
Server version: 5.6.10-ndb-7.3.1-cluster-gpl MySQL Cluster Community Server (GPL)

Copyright (c) 2000, 2013, Oracle and/or its affiliates. All rights reserved.

Oracle is a registered trademark of Oracle Corporation and/or its
affiliates. Other names may be trademarks of their respective
owners.

Type 'help;' or 'h' for help. Type 'c' to clear the current input statement.

mysql> REPLACE INTO test.counties VALUES ('Berkshire', 'England');
Query OK, 1 row affected (0.25 sec)

The code can then be executed again – this time successfully:

[billy@drbd1 my_samples]$ node my-test.js 
Openning session
Openned session
Connected to cluster as node id: 50
onSession.
onInsert.
Inserted: {"town":"Maidenhead","county":"Berkshire"}
onFind.
Found: {"county":"Berkshire","town":"Maidenhead"}

What next?

Please give this a try – especially with your own code – and let us know how you get on. We’re especially interested in what features you’d like to see added – embedded objects, lists, joins….


Replication and auto-failover made easy with MySQL Utilities

MySQL utilities in Workbench

Utilities in MySQL Workbench

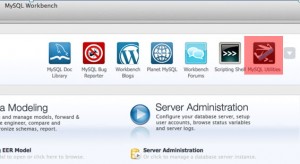
If you’re a user of MySQL Workbench then you may have noticed a pocket knife icon appear in the top right hand corner – click on that and a terminal opens which gives you access to the MySQL utilities. In this post I’m focussing on the replication utilities but you can also refer to the full MySQL Utilities documentation.

What I’ll step through is how to uses these utilities to:

  • Set up replication from a single master to multiple slaves
  • Automatically detect the failure of the master and promote one of the slaves to be the new master
  • Introduce the old master back into the topology as a new slave and then promote it to be the master again

Tutorial Video

Before going through the steps in detail here’s a demonstration of the replication utilities in action…

To get full use of these utilities you should use the InnoDB storage engine together with the Global Transaction ID functionality from the latest MySQL 5.6 DMR.

Do you really need/want auto-failover?

For many people, the instinctive reaction is to deploy a fully automated system that detects when the master database fails and then fails over (promotes a slave to be the new master) without human intervention. For many applications this may be the correct approach.

There are inherent risks to this though – What if the failover implementation has a flaw and fails (after all, we probably don’t test this out in the production system very often)? What if the slave isn’t able to cope with the workload and makes things worse? Is it just a transitory glitch and would the best approach have been just to wait it out?

Following a recent, high profile outage there has been a great deal of debate on the topic between those that recommend auto-failover and those that believe it should only ever be entrusted to a knowledgeable (of the application and the database architecture) and well informed (of the state of the database nodes, application load etc.) human. Of course, if the triggering of the failover is to be left to a human then you want that person to have access to the information they need and an extremely simple procedure (ideally a single command) to execute the failover. Probably the truth is that it all depends on your specific circumstances.

The MySQL replication utilities aim to support you whichever camp you belong to:

  • In the fully automated mode, the utilities will continually monitor the state of the master and in the event of its failure identify the best slave to promote – by default it will select the one that is most up-to-date and then apply any changes that are available on other slaves but not on this one before promoting it to be the new master. The user can override this behaviour (for example by limiting which of the slaves are eligible for promotion). The user is also able to bind in their own programs to be run before and after the failover (for example, to inform the application).
  • In the monitoring mode, the utility still continually checks the availability of the master, and informs the user if it should fail. The user then executes a single command to fail over to their preferred slave.

Step 1. Make sure MySQL Servers are configured correctly

For some of the utilities, it’s important that you’re using Global Transaction IDs; binary logging needs to be enabled; may as well use the new crash-safe slave functionality… It’s beyond the scope of this post to go through all of those and so instead I’ll just give example configuration files for the 5 MySQL Servers that will be used:

my1.cnf

[mysqld]
binlog-format=ROW
log-slave-updates=true
gtid-mode=on
disable-gtid-unsafe-statements=true # Use enforce-gtid-consistency from 5.6.9+
master-info-repository=TABLE
relay-log-info-repository=TABLE
sync-master-info=1
datadir=/home/billy/mysql/data1
server-id=1
log-bin=util11-bin.log
report-host=utils1
report-port=3306
socket=/home/billy/mysql/sock1
port=3306

my2.cnf

[mysqld]
binlog-format=ROW
log-slave-updates=true
gtid-mode=on
disable-gtid-unsafe-statements=true # Use enforce-gtid-consistency from 5.6.9+
master-info-repository=TABLE
relay-log-info-repository=TABLE
sync-master-info=1
datadir=/home/billy/mysql/data2
server-id=2
log-bin=util12-bin.log
report-host=utils1
report-port=3307
socket=/home/billy/mysql/sock2
port=3307

my3.cnf

[mysqld]
binlog-format=ROW
log-slave-updates=true
gtid-mode=on
disable-gtid-unsafe-statements=true # Use enforce-gtid-consistency from 5.6.9+
master-info-repository=TABLE
relay-log-info-repository=TABLE
sync-master-info=1
datadir=/home/billy/mysql/data3
server-id=3
log-bin=util2-bin.log
report-host=utils2
report-port=3306
socket=/home/billy/mysql/sock3
port=3306

my4.cnf

[mysqld]
binlog-format=ROW
log-slave-updates=true
gtid-mode=on
disable-gtid-unsafe-statements=true # Use enforce-gtid-consistency from 5.6.9+
master-info-repository=TABLE
relay-log-info-repository=TABLE
master-info-file=/home/billy/mysql/master4.info
datadir=/home/billy/mysql/data4
server-id=4
log-bin=util4-bin.log
report-host=utils2
report-port=3307
socket=/home/billy/mysql/sock4
port=3307

my5.cnf

[mysqld]
binlog-format=ROW
log-slave-updates=true
gtid-mode=on
disable-gtid-unsafe-statements=true # Use enforce-gtid-consistency from 5.6.9+
datadir=/home/billy/mysql/data5
master-info-repository=TABLE
relay-log-info-repository=TABLE
sync-master-info=1
#master-info-file=/home/billy/mysql/master5.info
server-id=5
log-bin=util5-bin.log
report-host=utils2
report-port=3308
socket=/home/billy/mysql/sock5
port=3308

The utilities are actually going to be run from a remote host and so it will be necessary for that host to access each of the MySQL Servers and so a user has to be granted remote access (note that the utilities will automatically create the replication user):

[billy@utils1 ~]$ mysql -h 127.0.0.1 -P3306 -u root -e "grant all on *.* to root@'%' with grant option;"
[billy@utils1 ~]$ mysql -h 127.0.0.1 -P3307 -u root -e "grant all on *.* to root@'%' with grant option;"
[billy@utils2 ~]$ mysql -h 127.0.0.1 -P3306 -u root -e "grant all on *.* to root@'%' with grant option;"
[billy@utils2 ~]$ mysql -h 127.0.0.1 -P3307 -u root -e "grant all on *.* to root@'%' with grant option;"
[billy@utils2 ~]$ mysql -h 127.0.0.1 -P3308 -u root -e "grant all on *.* to root@'%' with grant option;"

OK – that’s the most painful part of the whole process out of the way!

Set up replication

While there are extra options (such as specifying what username/password to use for the replication user or providing a password for the root user) I’m going to keep things simple and use the defaults as much as possible. The following commands are run from the MySQL Utilities terminal – just click on the pocket-knife icon in MySQL Workbench.

mysqlreplicate --master=root@utils1:3306 --slave=root@utils1:3307
# master on utils1: ... connected.
# slave on utils1: ... connected.
# Checking for binary logging on master...
# Setting up replication...
# ...done.

mysqlreplicate --master=root@utils1:3306 --slave=root@utils2:3306
# master on utils1: ... connected.
# slave on utils2: ... connected.
# Checking for binary logging on master...
# Setting up replication...
# ...done.

mysqlreplicate --master=root@utils1:3306 --slave=root@utils2:3307
# master on utils1: ... connected.
# slave on utils2: ... connected.
# Checking for binary logging on master...
# Setting up replication...
# ...done.

mysqlreplicate --master=root@utils1:3306 --slave=root@utils2:3308
# master on utils1: ... connected.
# slave on utils2: ... connected.
# Checking for binary logging on master...
# Setting up replication...
# ...done.

That’s it, replication has now been set up from one master to four slaves.

You can now check that the replication topology matches what you intended:

mysqlrplshow --master=root@utils1 --discover-slaves-login=root;
# master on utils1: ... connected.
# Finding slaves for master: utils1:3306

# Replication Topology Graph
utils1:3306 (MASTER)
   |
   +--- utils1:3307 - (SLAVE)
   |
   +--- utils2:3306 - (SLAVE)
   |
   +--- utils2:3307 - (SLAVE)
   |
   +--- utils2:3308 - (SLAVE)

Additionally, you can also check that any of the replication relationships is correctly configure:

mysqlrplcheck --master=root@utils1 --slave=root@utils2
# master on utils1: ... connected.
# slave on utils2: ... connected.
Test Description                                                     Status
---------------------------------------------------------------------------
Checking for binary logging on master                                [pass]
Are there binlog exceptions?                                         [pass]
Replication user exists?                                             [pass]
Checking server_id values                                            [pass]
Is slave connected to master?                                        [pass]
Check master information file                                        [pass]
Checking InnoDB compatibility                                        [pass]
Checking storage engines compatibility                               [pass]
Checking lower_case_table_names settings                             [pass]
Checking slave delay (seconds behind master)                         [pass]
# ...done.

Including the -s option would have included the output that you’d expect to see from SHOW SLAVE STATUSG on the slave.

Automated monitoring and failover

The previous section showed how you can save some serious time (and opportunity for user-error) when setting up MySQL replication. We now look at using the utilities to automatically monitor the state of the master and then automatically promote a new master from the pool of slaves. For simplicity I’ll stick with default values wherever possible but note that there are a number of extra options available to you such as:

  • Constraining which slaves are eligible for promotion to master; the default is to take the most up-to-date slave
  • Binding in your own scripts to be run before or after the failover (e.g. inform your application to switch master?)
  • Have the utility monitor the state of the servers but don’t automatically initiate failover

Here is how to set it up:

mysqlfailover --master=root@utils1:3306 --discover-slaves-login=root --rediscover

MySQL Replication Failover Utility
Failover Mode = auto     Next Interval = Wed Aug 15 13:19:30 2012

Master Information
------------------
Binary Log File    Position  Binlog_Do_DB  Binlog_Ignore_DB
util11-bin.000001  2586

Replication Health Status
+---------+-------+---------+--------+------------+---------+
| host    | port  | role    | state  | gtid_mode  | health  |
+---------+-------+---------+--------+------------+---------+
| utils1  | 3306  | MASTER  | UP     | ON         | OK      |
| utils1  | 3307  | SLAVE   | UP     | ON         | OK      |
| utils2  | 3306  | SLAVE   | UP     | ON         | OK      |
| utils2  | 3307  | SLAVE   | UP     | ON         | OK      |
| utils2  | 3308  | SLAVE   | UP     | ON         | OK      |
+---------+-------+---------+--------+------------+---------+

Q-quit R-refresh H-health G-GTID Lists U-UUIDs

mysqlfailover will then continue to run, refreshing the state – just waiting for something to go wrong.

Rather than waiting, I kill the master MySQL Server:

mysqladmin -h utils1 -P3306 -u root shutdown

Checking with the still-running mysqlfailover we can see that it has promoted utils1:3307.

MySQL Replication Failover Utility
Failover Mode = auto     Next Interval = Wed Aug 15 13:21:13 2012

Master Information
------------------
Binary Log File    Position  Binlog_Do_DB  Binlog_Ignore_DB
util12-bin.000001  7131

Replication Health Status
+---------+-------+---------+--------+------------+---------+
| host    | port  | role    | state  | gtid_mode  | health  |
+---------+-------+---------+--------+------------+---------+
| utils1  | 3307  | MASTER  | UP     | ON         | OK      |
| utils2  | 3306  | SLAVE   | UP     | ON         | OK      |
| utils2  | 3307  | SLAVE   | UP     | ON         | OK      |
| utils2  | 3308  | SLAVE   | UP     | ON         | OK      |
+---------+-------+---------+--------+------------+---------+

Q-quit R-refresh H-health G-GTID Lists U-UUIDs

Add the recovered MySQL Server back into the topology

After restarting the failed MySQL Server, it can be added back into the mix as a slave to the new master:

mysqlreplicate --master=root@utils1:3307 --slave=root@utils1:3306
# master on utils1: ... connected.
# slave on utils1: ... connected.
# Checking for binary logging on master...
# Setting up replication...
# ...done.

The output from mysqlfailover (still running) confirms the addition:

MySQL Replication Failover Utility
Failover Mode = auto     Next Interval = Wed Aug 15 13:24:38 2012

Master Information
------------------
Binary Log File    Position  Binlog_Do_DB  Binlog_Ignore_DB
util12-bin.000001  7131

Replication Health Status
+---------+-------+---------+--------+------------+---------+
| host    | port  | role    | state  | gtid_mode  | health  |
+---------+-------+---------+--------+------------+---------+
| utils1  | 3307  | MASTER  | UP     | ON         | OK      |
| utils1  | 3306  | SLAVE   | UP     | ON         | OK      |
| utils2  | 3306  | SLAVE   | UP     | ON         | OK      |
| utils2  | 3307  | SLAVE   | UP     | ON         | OK      |
| utils2  | 3308  | SLAVE   | UP     | ON         | OK      |
+---------+-------+---------+--------+------------+---------+

Q-quit R-refresh H-health G-GTID Lists U-UUIDs

If it were important that the recovered MySQL Server be restored as the master then it is simple to manually trigger the promotion (after quitting out of mysqlfailover):

mysqlrpladmin --master=root@utils1:3307 --new-master=root@utils1:3306 --demote-master 
  --discover-slaves-login=root switchover

# Discovering slaves for master at utils1:3307
# Checking privileges.
# Performing switchover from master at utils1:3307 to slave at utils1:3306.
# Checking candidate slave prerequisites.
# Waiting for slaves to catch up to old master.
# Stopping slaves.
# Performing STOP on all slaves.
# Demoting old master to be a slave to the new master.
# Switching slaves to new master.
# Starting all slaves.
# Performing START on all slaves.
# Checking slaves for errors.
# Switchover complete.
#
# Replication Topology Health:
+---------+-------+---------+--------+------------+---------+
| host    | port  | role    | state  | gtid_mode  | health  |
+---------+-------+---------+--------+------------+---------+
| utils1  | 3306  | MASTER  | UP     | ON         | OK      |
| utils1  | 3307  | SLAVE   | UP     | ON         | OK      |
| utils2  | 3306  | SLAVE   | UP     | ON         | OK      |
| utils2  | 3307  | SLAVE   | UP     | ON         | OK      |
| utils2  | 3308  | SLAVE   | UP     | ON         | OK      |
+---------+-------+---------+--------+------------+---------+
# ...done.

As always, we’d really appreciate people trying this out and giving us feedback!


What’s new in MySQL 5.6 Replication – free webinar

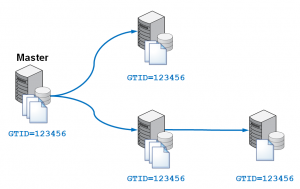
Global Transaction IDs - simplifying replication management

There will be a webinar this Wednesday where you can get the latest information on all of the great new content that has been included in the MySQL 5.6 Development Releases as well as some features that are still being developed. As always, the webinar is free but you need to register here in advance. Even if you can’t attend the live event it’s worth registering so that you get sent the replay.

Some of the topics we’ll be discussing are:

  • Enhanced data integrity: Global Transactions Identifiers, Crash-Safe Slaves and Replication Event Checksums;
  • High performance: Multi-Threaded Slaves, Binlog Group Commit and Optimized Row-Based Replication;
  • Improved flexibility: Time Delayed Replication, Multi-Source Replication, Binlog API and Informational Log Events
The event starts on Wednesday, December 14, 2011: 09:00 Pacific time; 17:00 UK; 18:00 CET.


MySQL HA Solutions – webinar replay

If you were unable to attend the live webinar (or you want to go back and listen to it again) then it’s now available to view on-line here.

Databases are the center of today’s web and enterprise applications, storing and protecting an organization’s most valuable assets and supporting business-critical applications. Just minutes of downtime can result in significant lost revenue and dissatisfied customers. Ensuring database highly availability is therefore a top priority for any organization. Tune into this webcast to learn more.

The session discusses:

  1. Causes, effect and impact of downtime
  2. Methodologies to map applications to HA solution
  3. Overview of MySQL HA solutions
  4. Operational best practices to ensure business continuity


Setting per-server threshold in MySQL Enterprise Monitor

I was speaking with a MySQL customer last week and he had a feature request for MEM. He wants different servers to have different threshold values for certain MEM advisor rules and suggests that users be allowed to override the thresholds when scheduling the rule against a server – just as you can with the refresh interval. At the moment they work around this by creating multiple duplicates of the same rule and then set different thresholds in each. This is a good feature request but in the mean-time this post explains an alternate workaround – having the rules act on thresholds that are defined within the databases of the individual serves.

Step 1. Create a new threshold table in each MySQL Server

The table should be created and then a row added for each rule that needs a per-server threshold:

mysql> create database clusterdb;use clusterdb;
mysql> CREATE TABLE thresholds (name VARCHAR(50) NOT NULL PRIMARY KEY, 
       scale_percentage INT);
mysql> REPLACE INTO thresholds VALUES ('connect_usage_excessive',50);

The scale_percentage value will be used in the new MEM rule as a scaling factor for the info, warning and critical threshold levels.
Note that if using MySQL Cluster then you have the option as to whether each MySQL Server in the Cluster has its own set of thresholds (create the table with the InnoDB storage engine) or if they share the same thresholds (create the table with the ndbcluster storage engine).

Step 2. Add custom data collector(s)

First of all, check that you have permissions to edit the custom.xml file – on Windows this will be stored in a location such as C:Program FilesMySQLEnterpriseAgentsharemysql-monitor-agentitems

Change permissions for custom.xml if needed


For each rule that needs a variable threshold, add a new class:

<class>
     <namespace>mysql</namespace>
     <classname>connection_usage_excessive</classname>
     <query><![CDATA[SELECT scale_percentage AS 
         connection_usage_excessive_scale_percentage
         FROM clusterdb.thresholds 
         WHERE name='connect_usage_excessive']]></query>
     <attributes>
          <default counter="false" type="INTEGER"/>
     <attribute name="connection_usage_excessive_scale_percentage"/>
     </attributes>
</class>

This custom.xml files should be copied to every server. For this data collector to be picked up by MEM, simply restart the agent(s).

Step 3. Copy and extend the rule

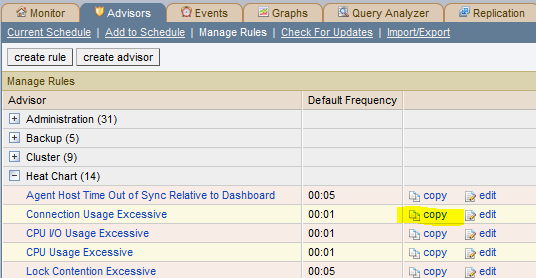
From the “Advisors/Manage Rules” tab of the MEM browser click on the copy icon next to the rule you want to apply per-server thresholds to and then edit that rule.

Create a copy of the advisor rule


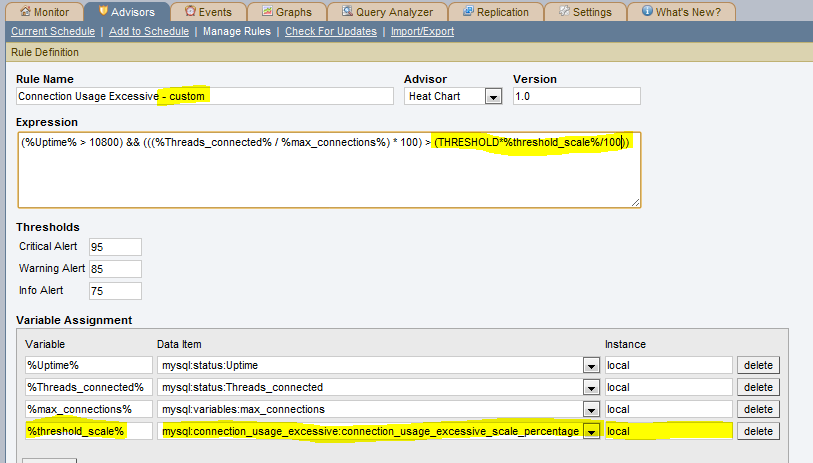
When editing the rule, add a new variable “%threshold_scale%” which uses the new data collector you’ve just created and then in the expression apply that as a percentage to factor the threshold.

Apply the threshold scaler within the rule

Step 4. Schedule the rule

You can now go ahead and schedule this rule against each of the servers – and the threshold will automatically be scaled appropriately for each server.

Schedule new rule against each server


MySQL with Windows Server 2008 R2 Failover Clustering

Windows Server 2008 R2 Failover Clustering

Oracle has announced support for running MySQL on Windows Server Failover Clustering (WSFC); with so many people developing and deploying MySQL on Windows, this offers a great option to add High Availability to MySQL deployments if you don’t want to go as far as deploying MySQL Cluster.

This post will give a brief overview of how to set things up but for all of the gory details a new white paper MySQL with Windows Server 2008 R2 Failover Clustering is available – please give me any feedback. I will also be presenting on this at a free webinar on Thursday 15th September (please register in advance) as well at an Oracle OpenWorld session in San Francisco on Tuesday 4th October (Tuesday, 01:15 PM, Marriott Marquis – Golden Gate C2) – a good opportunity to get more details and get your questions answered.

It sometimes surprises people just how much MySQL is used on Windows, here are a few of the reasons:

  • Lower TCO
    • 90% savings over Microsoft SQL Server
    • If your a little skeptical about this then try it out for yourself with the MySQL TCO Savings Calculator
  • Broad platform support
    • No lock-in
    • Windows, Linux, MacOS, Solaris
  • Ease of use and administration
    • < 5 mins to download, install & configure
    • MySQL Enterprise Monitor & MySQL WorkBench
  • Reliability
    • 24×7 Uptime
    • Field Proven
  • Performance and scalability
    • MySQL 5.5 delivered over 500% performance boost on Windows.
  • Integration into Windows environment
    • ADO.NET, ODBC & Microsoft Access Integration
    • And now, support for Windows Server Failover Clustering!
Probably the most common form of High Availability for MySQL is MySQL (asynchronous or semi-synchronous replication) and the option for the highest levels of availability is MySQL Cluster. We are in the process of rolling out a number of solutions that provide levels of availability somewhere in between MySQL Replication and MySQL Cluster; Oracle VM Template for MySQL Enterprise Edition was the first (overview, webinar replay, white paper) and WSFC is the second.


Solution Overview

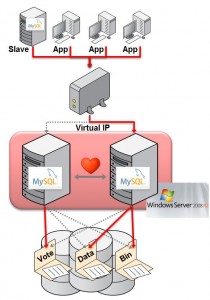
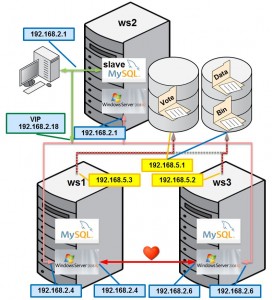
MySQL with Windows Failover Clustering requires at least 2 servers within the cluster together with some shared storage (for example FCAL SAN or iSCSI disks). For redundancy, 2 LANs should be used for the cluster to avoid a single point of failure and typically one would be reserved for the heartbeats between the cluster nodes.

The MySQL binaries and data files are stored in the shared storage and Windows Failover Clustering ensures that at most one of the cluster nodes will access those files at any point in time (hence avoiding file corruptions).

Clients connect to the MySQL service through a Virtual IP Address (VIP) and so in the event of failover they experience a brief loss of connection but otherwise do not need to be aware that the failover has happened other than to handle the failure of any in-flight transactions.

Target Configuration

This post will briefly step through how to set up and use a cluster and this diagrams shows how this is mapped onto physical hardware and network addresses for the lab used later in this post. In this case, iSCSI is used for the shared storage. Note that ideally there would be an extra subnet for the heartbeat connection between ws1 and ws3.

This is only intended to be an overview and the steps have been simplified refer to the white paper for more details on the steps.

Prerequisites

  • MySQL 5.5 & InnoDB must be used for the database (note that MyISAM is not crash-safe and so failover may result in a corrupt database)
  • Windows Server 2008 R2
  • Redundant network connections between nodes and storage
  • WSFC cluster validation must pass
  • iSCSI or FCAL SAN should be used for the shared storage

Step 1 Configure iSCSI in software (optional)

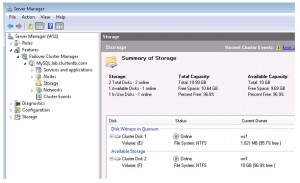
Create 2 clustered disks

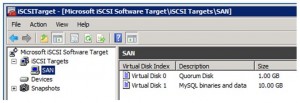
This post does not attempt to describe how to configure a highly available, secure and performant SAN but in order to implement the subsequent steps shared storage is required and so in this step we look at one way of using software to provide iSCSI targets without any iSCSI/SAN hardware (just using the server’s internal disk). This is a reasonable option to experiment with but probably not what you’d want to deploy with for a HA application. If you already have shared storage set up then you can skip this step and use that instead.

As part of this process you’ll create at least two virtual disks within the iSCSI target; one for the quorum file and one for the MySQL binaries and data files. The quorum file is used by Windows Failover Clustering to avoid “split-brain” behaviour.

Step 2. Ensure Windows Failover Clustering is enabled

Ensure that WSFC is enabled

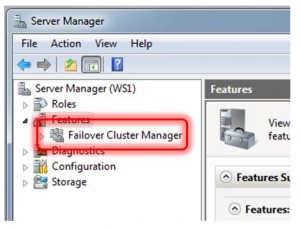
To confirm that Windows Failover Clustering is installed on ws1 and ws3, open the “Features” branch in the Server Manager tool and check if “Failover Cluster Manager” is present.

If Failover Clustering is not installed then it is very simple to add it. Select “Features” within the Service Manager and then click on “Add Features” and then select “Failover Clustering” and then “Next”.


Step 3. Install MySQL as a service on both servers

Install MySQL as a Windows Service

If MySQL is already installed as a service on both ws1 and ws3 then this step can be skipped.

The installation is very straight-forward using the MySQL Windows Installer and selecting the default options is fine.

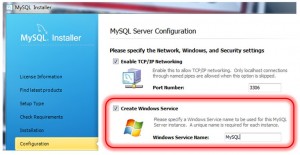
Within the MySQL installation wizard, sticking with the defaults is fine for this exercise. When you reach the configuration step, check “Create Windows Service”.

The installation and configuration must be performed on both ws1 and ws2, if necessary.

Step 4. Migrate MySQL binaries & data to shared storage

If the MySQL Service is running on either ws1 or ws3 then stop it – open the Task Manager using ctrl-shift-escape, select the “Services” tab and then right-click on the MySQL service and choose “Stop Service”.

As the iSCSI disks were enabled on ws1 you can safely access them in order to copy across the MySQL binaries and data files to the shared disk.

Step 5. Create Windows Failover Cluster

Create the Cluster (without MySQL)

From the Server Manager on either ws1 or ws3 navigate to “Features -> Failover Cluster Manager” and then select “Validate a Configuration”. When prompted enter ws1 as one name and then ws3 as the other.

In the “Testing Options” select “Run all tests” and continue. If the tests report any errors then these should be fixed before continuing.

Now that the system has been verified, select “Create a Cluster” and provide the same server names as used in the validation step. In this example, “MySQL” is provided as the “Cluster Name” and then the wizard goes on to create the cluster.

Step 6. Create Cluster of MySQL Servers within Windows Cluster

Cluster the MySQL Service

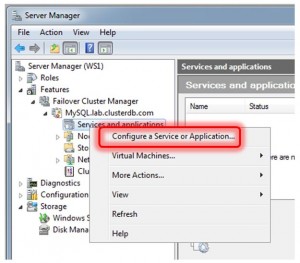
Adding the MySQL service to the new Cluster is very straight-forward. Right-click on “Services and applications” in the Server Manager tree and select “Configure a Service or Application…”. When requested by the subsequent wizard, select “Generic Service” from the list and then “MySQL” from the offered list of services. Our example name was “ClusteredMySQL”. Please choose an appropriate name for your cluster. The wizard will then offer the shared disk that has not already been established as the quorum disk for use with the Clustered service – make sure that it is selected.

Once the wizard finishes, it starts up the MySQL Service. Click on the “ClusteredMySQL” service branch to observe that the service is up and running. You should also make a note of the Virtual IP (VIP) assigned, in this case 192.168.2.18.

Step 7. Test the cluster

As described in Step 6, the VIP should be used to connect to the clustered MySQL service:

C: mysql –u root –h 192.168.2.18 –P3306 –pbob

From there create a database and populate some data.

mysql> CREATE DATABASE clusterdb;
mysql> USE clusterdb;
mysql> CREATE TABLE simples (id int not null primary key) ENGINE=innodb;
mysql> REPLACE INTO simples VALUES (1);
mysql> SELECT * FROM simples;
+----+
| id |
+----+
| 1 |
+----+

Migrate MySQL Service Across Cluster

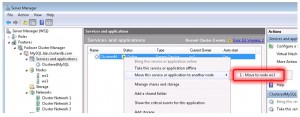
The MySQL service was initially created on ws1 but it can be forced to migrate to ws3 by right-clicking on the service and selecting “Move this service or application to another node”.

As the MySQL data is held in the shared storage (which has also been migrated to ws3), it is still available and can still be accessed through the existing mysql client which is connected to the VIP:

mysql> select * from simples; 
ERROR 2006 (HY000): MySQL server has gone away 
No connection. Trying to reconnect... 
Connection id: 1 
Current database: clusterdb 
+----+ 
| id | 
+----+ 
| 1 | 
+----+

Note the error shown above – the mysql client loses the connection to the MySQL service as part of the migration and so it automatically reconnects and complete the query. Any application using MySQL with Windows Failover Cluster should also expect to have to cope with these “glitches” in the connection.

Conclusion

More users develop and deploy and MySQL on Windows than any other single platform. Enhancements in MySQL 5.5 increased performance by over 5x compared to previous MySQL releases. With certification for Windows Server Failover Clustering, MySQL can now be deployed to support business critical workloads demanding high availability, enabling organizations to better meet demanding service levels while also reducing TCO and eliminating single vendor lock-in.
Please let me know how you get on by leaving comments on this post.


Webinar: “Oracle VM Template for MySQL Enterprise Edition” on Wednesday

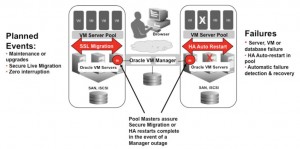
HA Provided by OVM

Join us for a webinar this Wednesday (13th July) to understand more about the benefits of using the new Oracle VM Template for MySQL Enterprise Edition as well as how to get started with it. As always the webinar is free but please register here. The webinar starts at 9:00 am Pacific (5:00 pm UK, 6:00 pm CET) and even if you can’t make that time register anyway and you’ll be sent a link to the charts and replay.

As a reminder, a new white paper is available that goes through some of the details – if you have time then take a look at this paper before the webinar and then get any of your questions answered. Get the white paper here.

The official description…

Virtualization is a key technology to enable data center efficiency and provides the foundation for cloud computing. Integrating MySQL Enterprise Edition with Oracle Linux, the Oracle VM Template is the fastest, easiest and most reliable way to provision virtualized MySQL instances, enabling users to meet the explosive demand for web-based services. This webinar will demonstrate how the Oracle VM Template for MySQL Enterprise Edition ensures rapid deployment and helps eliminate configuration efforts and risks by providing a pre-installed and pre-configured virtualized software image, also taking advantage of Oracle VM’s mechanisms to deliver high availability. The webinar will cover: – An overview of the technologies packaged into the template – How to configure and deploy the template – How to use, modify and save an adapted template that supports specific application requirements By attending the webinar, you will learn how the Oracle VM Template for MySQL Enterprise Edition provides the foundation for a more agile and highly available MySQL environment. This session will be approximately 1 hour in length and will include interactive Q&A throughout. Please join us for this informative webinar!


White Paper – Oracle VM Template for MySQL Enterprise Edition

HA Provided by OVM

A new white paper is available that steps you though the benefits and the use of the Oracle VM Template for MySQL Enterprise Edition (also see yesterday’s press announcement). Get the white paper here.

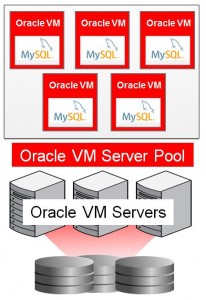
As a reminder Oracle Virtual Manager provides a way to add High Availability to your MySQL deployment (this is separate from MySQL Replication and MySQL Cluster). The new OVM template provides a very convenient way to create one or more Virtual Machines that come pre-provisioned with OVM, Oracle Linux and MySQL Enterprise Edition as well as the scripts required to integrate MySQL into OVM’s HA features.


New – Oracle VM Template for MySQL Enterprise Edition

Oracle VM Template for MySQL Enterprise Edition

Oracle today announced the release of the “Oracle VM Template for MySQL Enterprise Edition” – you can read the press-release here.

There are a couple of ways to look at the benefits:

  • Provides a simple alternate High Availability solution for MySQL (i.e. rather than MySQL Replication or MySQL Cluster – although you can still set up replication to/from a MySQL Server installed this way)
  • A new, very simple way to get up and running with MySQL Enterprise – running on a complete stack that Oracle can provide support for

As the focus of this blog is normally MySQL Cluster and Replication, the HA attributes of this solution are probably those of most interest. When you download the template and then load it into Oracle Virtual Machine (OVM) Manager and fire it up you get the chance to flag that you want it to be run in a HA mode. What this means is that:

  • If the hardware, virtual machine, operating system or MySQL Server fail then the OVM Manager will recreate the VM on another physical server from the OVM Server Pool
  • For routine hardware maintenance you can tell OVM Manager to migrate a running VM to another physical server

Note that the data files are actually stored on shared storage under Oracle Cluster File System 2 (OCFS2) which is how a newly instantiated replacement VM can get up and running quickly. As the original hardware (or the MySQL Server instance, OS or VM) could still fail without warning the MySQL Storage Engine must be crash-safe and so this should be used with InnoDB rather than MyISAM.

The complete software line-up looks like this:

  • Oracle Linux 5 Update 6 with the Unbreakable Enterprise Kernel
  • Oracle VM 2.2.1
  • Oracle VM Manager 2.1.5
  • Oracle Cluster File System 2 (OCFS2)
  • MySQL Database 5.5.10 (Enterprise Edition) – InnoDB