Introduction
Want to try out MongoDB on your laptop? Execute a single command and you have a lightweight, self-contained sandbox; another command removes all traces when you’re done.
Need an identical copy of your application stack in multiple environments? Build your own container image and let your development, test, operations, and support teams launch an identical clone of your environment.
Containers are revolutionizing the entire software lifecycle: from the earliest technical experiments and proofs of concept through development, test, deployment, and support.
Orchestration tools manage how multiple containers are created, upgraded and made highly available. Orchestration also controls how containers are connected to build sophisticated applications from multiple, microservice containers.
The rich functionality, simple tools, and powerful APIs make container and orchestration functionality a favorite for DevOps teams who integrate them into Continuous Integration (CI) and Continuous Delivery (CD) workflows.
This post delves into the extra challenges you face when attempting to run and orchestrate MongoDB in containers and illustrates how these challenges can be overcome.
Considerations for MongoDB
Running MongoDB with containers and orchestration introduces some additional considerations:
- MongoDB database nodes are stateful. In the event that a container fails, and is rescheduled, it’s undesirable for the data to be lost (it could be recovered from other nodes in the replica set, but that takes time). To solve this, features such as the Volume abstraction in Kubernetes can be used to map what would otherwise be an ephemeral MongoDB data directory in the container to a persistent location where the data survives container failure and rescheduling.
- MongoDB database nodes within a replica set must communicate with each other – including after rescheduling. All of the nodes within a replica set must know the addresses of all of their peers, but when a container is rescheduled, it is likely to be restarted with a different IP Address. For example, all containers within a Kubernetes Pod share a single IP address, which changes when the pod is rescheduled. With Kubernetes, this can be handled by associating a Kubernetes Service with each MongoDB node, which uses the Kubernetes DNS service to provide a
hostname for the service that remains constant through rescheduling.
- Once each of the individual MongoDB nodes is running (each within its own container), the replica set must be initialized and each node added. This is likely to require some additional logic beyond that offered by off the shelf orchestration tools. Specifically, one MongoDB node within the intended replica set must be used to execute the
rs.initiate and rs.add commands.
- If the orchestration framework provides automated rescheduling of containers (as Kubernetes does) then this can increase MongoDB’s resiliency since a failed replica set member can be automatically recreated, thus restoring full redundancy levels without human intervention.
- It should be noted that while the orchestration framework might monitor the state of the containers, it is unlikely to monitor the applications running within the containers, or backup their data. That means it’s important to use a strong monitoring and backup solution such as MongoDB Cloud Manager, included with MongoDB Enterprise Advanced and MongoDB Professional. Consider creating your own image that contains both your preferred version of MongoDB and the MongoDB Automation Agent.
Implementing a MongoDB Replica Set using Docker and Kubernetes
As described in the previous section, distributed databases such as MongoDB require a little extra attention when being deployed with orchestration frameworks such as Kubernetes. This section goes to the next level of detail, showing how this can actually be implemented.
This section starts by creating the entire MongoDB replica set in a single Kubernetes cluster (which would normally be within a single data center – that clearly doesn’t provide geographic redundancy. In reality, little has to be changed to run across multiple clusters and those steps are described later.
Each member of the replica set will be run as its own pod with a service exposing an external IP address and port. This ‘fixed’ IP address is important as both external applications and other replica set members can rely on it remaining constant in the event that a pod is rescheduled.
The following diagram illustrates one of these pods and the associated Replication Controller and service.
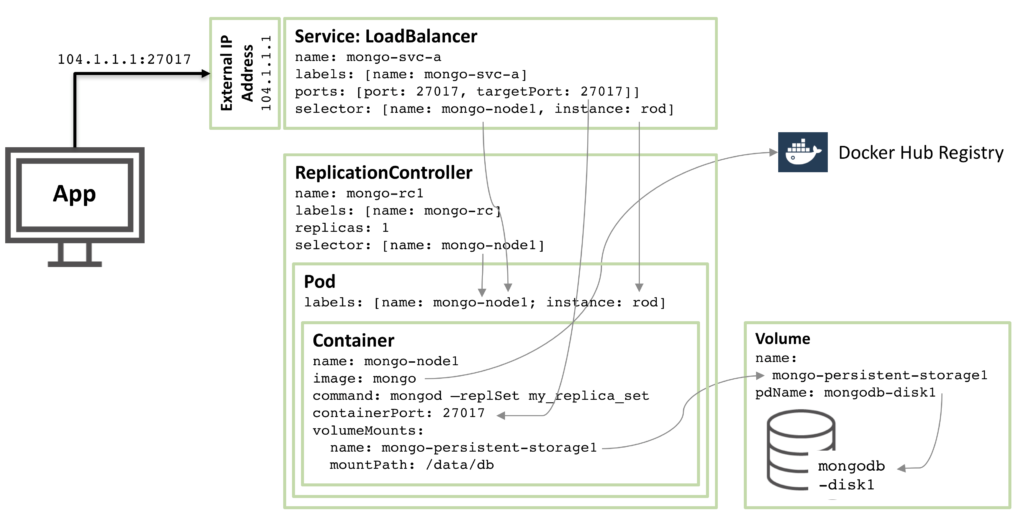
Figure 1: MongoDB Replica Set member as a Kubernetes Pod
Stepping through the resources described in that configuration we have:
- Starting at the core there is a single container named
mongo-node1. mongo-node1 includes an image called mongo which is a publicly available MongoDB container image hosted on Docker Hub. The container exposes port 27107 within the cluster.
- The Kubernetes volumes feature is used to map the
/data/db directory within the connector to the persistent storage element named mongo-persistent-storage1; which in turn is mapped to a disk named mongodb-disk1 created in the Google Cloud. This is where MongoDB would store its data so that it is persisted over container rescheduling.
- The container is held within a pod which has the labels to name the pod
mongo-node and provide an (arbitrary) instance name of rod.
- A Replication Controller named
mongo-rc1 is configured to ensure that a single instance of the mongo-node1 pod is always running.
- The
LoadBalancer service named mongo-svc-a exposes an IP Address to the outside world together with the port of 27017 which is mapped to the same port number in the container. The service identifies the correct pod using a selector that matches the pod’s labels. That external IP Address and port will be used by both an application and for communication between the replica set members. There are also local IP addresses for each container, but those change when containers are moved or restarted, and so aren’t of use for the replica set.
The next diagram shows the configuration for a second member of the replica set.
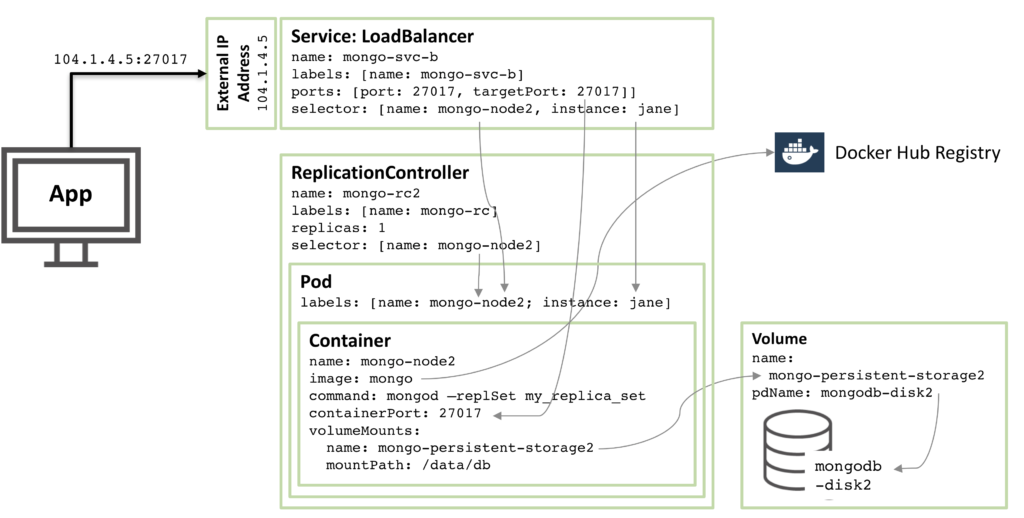
Figure 2: Second MongoDB Replica Set member configured as a Kubernetes Pod
90% of the configuration is the same, with just these changes:
- The disk and volume names must be unique and so
mongodb-disk2 and mongo-persistent-storage2 are used
- The Pod is assigned a label of
instance: jane and name: mongo-node2 so that the new service can distinguish it (using a selector) from the rod Pod used in Figure 1.
- The Replication Controller is named
mongo-rc2
- The Service is named
mongo-svc-b and gets a unique, external IP Address (in this instance, Kubernetes has assigned 104.1.4.5)
The configuration of the third replica set member follows the same pattern and the following figure shows the complete replica set:
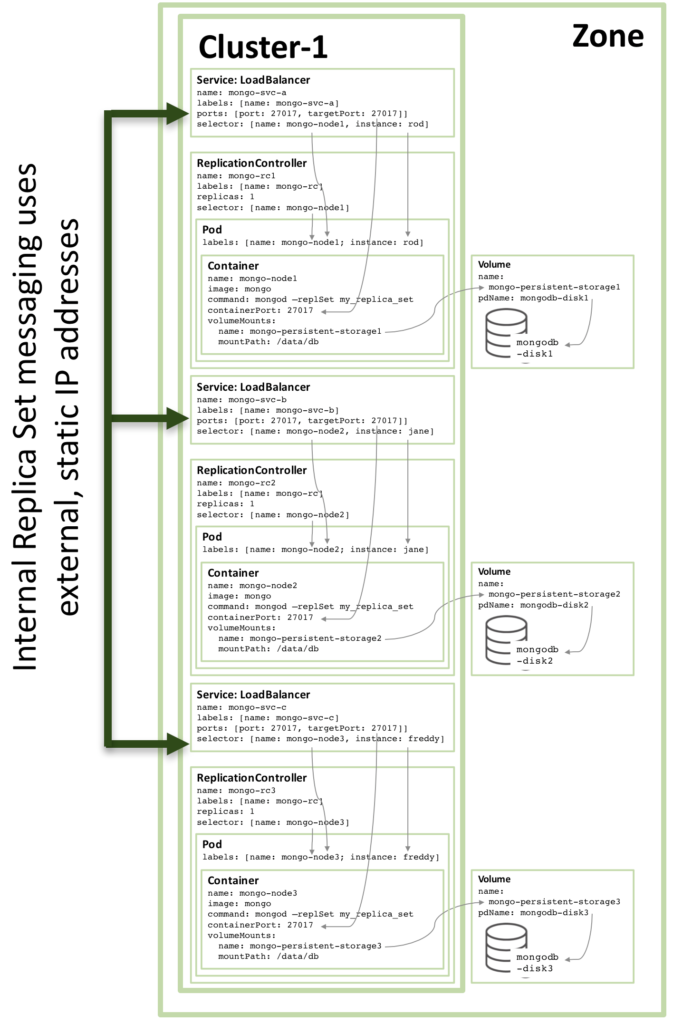
Figure3: Full Replica Set member configured as a Kubernetes Service
Note that even if running the configuration shown in Figure 3 on a Kubernetes cluster of three or more nodes, Kubernetes may (and often will) schedule two or more MongoDB replica set members on the same host. This is because Kubernetes views the three pods as belonging to three independent services.
To increase redundancy (within the zone), an additional headless service can be created. The new service provides no capabilities to the outside world (and will not even have an IP address) but it serves to inform Kubernetes that the three MongoDB pods form a service and so Kubernetes will attempt to schedule them on different nodes.
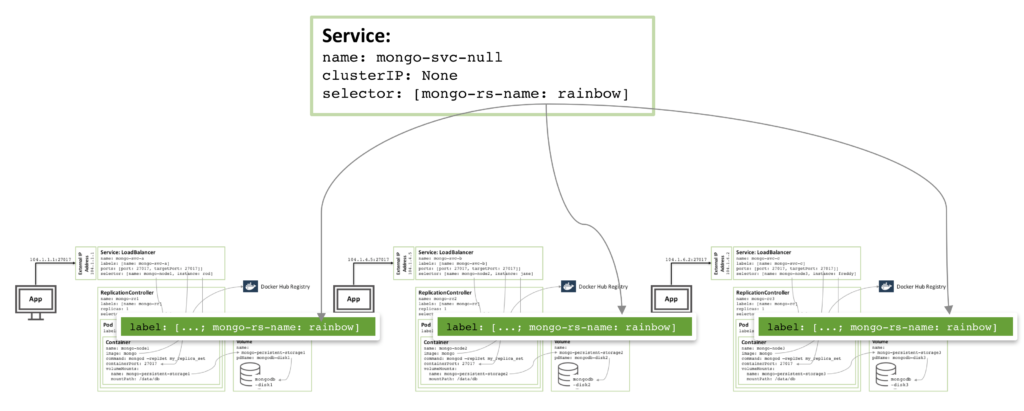
Figure 4: Headless service to avoid co-locating of MongoDB replica set members
The actual configuration files and the commands needed to orchestrate and start the MongoDB replica set can be found in the Enabling Microservices: Containers & Orchestration Explained white paper. In particular, there are some special steps required to combine the three MongoDB instances into a functioning, robust replica set which are described in the paper.
Multiple Availability Zone MongoDB Replica Set
There is risk associated with the replica set created above in that everything is running in the same GCE cluster, and hence in the same availability zone. If there were a major incident that took the availability zone offline, then the MongoDB replica set would be unavailable. If geographic redundancy is required, then the three pods should be run in three different availability zones or regions.
Surprisingly little needs to change in order to create a similar replica set that is split between three zones – which requires three clusters. Each cluster requires its own Kubernetes YAML file that defines just the pod, Replication Controller and service for one member of the replica set. It is then a simple matter to create a cluster, persistent storage, and MongoDB node for each zone.
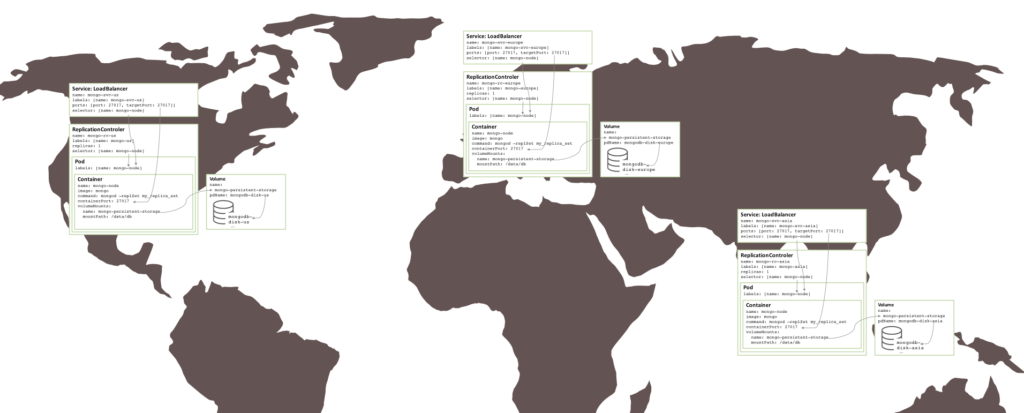
Figure 5: Replica set running over multiple availability zones/regions
Next Steps
To learn more about containers and orchestration – both the technologies involved and the business benefits they deliver – read the Enabling Microservices: Containers & Orchestration Explained white paper. The same paper provides the complete instructions to get the replica set described in this post up and running on Docker and Kubernetes in the Google Container Engine.
Watch this webinar recording to learn more on this topic and see a live demo putting it all together.
 The slides and recording from my session at MongoDB Europe 2016, are now available. The presentation covers Microservices and some of the key technologies that enable them.


