Tag Archive for MySQL Cluster 7.1

Upcoming webinar: MySQL Cluster deployment best practices

On Wednesday 25 August, Johan Anderson and Mat keep will be presenting a free webinar on the best practices for deploying MySQL Cluster. If you’d like to attend then just register here.

Johan has years of MySQL Cluster professional services experience – and so if you’re interested in deploying a product ready MySQL Cluster database then this is a must-view session. Even if you can’t make it live, register anyway and you’ll be sent a link to the recording and charts afterwards.

Content

An invaluable session for those who are about to, or who already have, deployed MySQL Cluster. Delivered by the lead MySQL Cluster professional services consultant in Oracle, this session will present best practices on deploying MySQL Cluster in order to accelerate time to service with the highest levels of availability and performance to support your most critical web and telecoms applications.

The session will cover:

  • identifying suitable applications for MySQL Cluster
  • comparing differences in functionality and configuration with InnoDB
  • using triggers and stored procedures to implement foreign key functionality
  • hardware, networking and file system selection
  • dimensioning and capacity planning
  • configuration best practices
  • disk data deployment
  • administration and monitoring
  • services available to get started

WHEN

Wednesday, August 25, 2010: 09:00 Pacific time (America)
Wed, Aug 25: 06:00 Hawaii time
Wed, Aug 25: 10:00 Mountain time (America)
Wed, Aug 25: 11:00 Central time (America)
Wed, Aug 25: 12:00 Eastern time (America)
Wed, Aug 25: 16:00 UTC
Wed, Aug 25: 17:00 Western European time
Wed, Aug 25: 18:00 Central European time
Wed, Aug 25: 19:00 Eastern European time


Install, configure and run MySQL Cluster – demo video

There is a new video available: Demonstration of installing, configuring and running MySQL Cluster (LINUX) to accompany the MySQL Cluster Quick Start guides. The Flash video video lasts for about 7 minutes.

If you aren’t able to view Flash on your device then a (poorer quality) version is included here – watch the Flash version if you’re able to!


MySQL Cluster presentation at Oracle Open World 2010

As part of “MySQL Sunday” at this year’s Oracle Open World, Mat Keep and I will be presenting on the latest MySQL Cluster features. We’ll be presenting at 15:30 (Pacific Time) on 19th September (the event starts with a key note at 12:30).

If you’re attending Oracle Open World then please indicate that you’d like to attend the MySQL Sunday when you register. If you aren’t planning to go to Oracle Open World but will be in the San Francisco area then buying a Discover pass (only $50 if you register by 16 July) will get you into the MySQL Sunday sessions. Register here.

For details on the presentations and speakers, check here.


Breakfast seminar on what’s new with MySQL – London

If you’re in London on Thursday 24th June then there’s a great chance to find out what’s new in MySQL.

Join us for an Oracle MySQL Breakfast Seminar to better understand Oracle’s MySQL strategy and what’s new with MySQL!
Agenda:
09:00 a.m.    Welcome Coffee/Tea
09:30 a.m.    Oracle’s MySQL Strategy
10:00 a.m.    What’s New – The MySQL Server & MySQL Cluster
10.45 a.m.    Coffee/Tea Break
11:00 a.m.    What’s New – MySQL Enterprise & MySQL Workbench
11:45 a.m.    Q&A
12:00 noon    End of the Breakfast Seminar

Cost?
None, it’s a free event! But places are limited and the seminar is held on a first come first served basis, so register quickly!

Location:

Sun Microsystem’s Customer Briefing Center
Regis House
45 King William Street
London EC4R 9AN
Tel: (020) 7628 3000

Image courtesy of Anirudh Koul.

Join us for an Oracle MySQL Breakfast Seminar in London, Thursday June 24th 2010, to better understand Oracle’s MySQL strategy and what’s new with MySQL!

Agenda:
09:00 a.m. Welcome Coffee/Tea
09:30 a.m. Oracle’s MySQL Strategy
10:00 a.m. What’s New – The MySQL Server & MySQL Cluster
10.45 a.m. Coffee/Tea Break
11:00 a.m. What’s New – MySQL Enterprise & MyQL Workbench
11:45 a.m. Q&A
12:00 noon End of the Breakfast Seminar

* Agenda subject to change

Cost?
None, it’s a free event! But places are limited and the seminar is held on a first come first served basis, so register quickly!


MySQL Cluster Scores with Pyro and Cell C at the FIFA World Cup – new case study

The Pyro Group has selected the MySQL Cluster database to power their InRoam SDP (Service Delivery Platform). InRoam enables Cell C and their network partners to provide low cost, border-less mobile communications services to hundreds of thousands of football fans from around the world as they descend on South Africa for the 2010 FIFA World Cup tournament.

This new case study can be downloaded from http://www.mysql.com/why-mysql/case-studies/mysql_cs-pyro_telecoms.php

Solution Overview

  • Pyro InRoam SDP is an intelligent application enabling subscribers to communicate with ease across borders
  • Migrated from a Microsoft platform with SQL Server to offer greater choice and less restrictive licensing
  • MySQL Cluster selected to power the SDP as a result of high transactional throughput, low latency, carrier-grade availability and low cost
  • MySQL Cluster database supports 7 million roaming subscribers per day, performing 1,000 reads or 500 writes per second on up to 1TB of data accessed over SQL and the native NDB C++ API
MySQL Cluster Scores with Pyro and Cell C at the FIFA World Cup


Configure MySQL Enterprise Monitor to monitor MySQL Cluster

MySQL Cluster 7.1 introduced the ndbinfo database which contains views giving real-time access to a whole host of information that helps you monitor and tune your MySQL Cluster deployment. Because this data can be accessed through regular SQL, various systems can be configured to monitor the Cluster. This post gives one example, extending MySQL Enterprise Monitor to keep an eye on the amount of free memory on the data nodes (through a graph) and then raise an alarm when it starts to run low – even generating SNMP traps if that’s what you need.

One of the features of MySQL Enterprise Monitor is that you can define custom data collectors and that those data collectors can run SQL queries to get the data. The information retrieved by those custom data collectors can then be used with rules that the user defines through the MySQL Enterprise Monitor GUI to create warning/alarms.

In this example, I create two new data collectors in the file”<MySQL Enterprise Monitor installation directory>/agent/share/mysql-proxy/items/cluster.xml” before starting up the MySQL Enterprise Monitor agent (note that these should be created for the agent of each MySQL Server in the Cluster that you would like to use to present the information from the data nodes):

cluster.xml:

<?xml version="1.0" encoding="utf-8"?>
<classes>
  <class>
    <namespace>mysql</namespace>
    <classname>cluster_max_used</classname>
    <query><![CDATA[SELECT MAX(used) AS Used FROM ndbinfo.memoryusage WHERE memory_type = 'Data Memory';]]></query>
  </class>
  <class>
    <namespace>mysql</namespace>
    <classname>cluster_min_avail</classname>
    <query><![CDATA[SELECT MIN(total) AS Total FROM ndbinfo.memoryusage WHERE memory_type = 'Data Memory';]]></query>
  </class>
</classes>

So that the agent picks up this file, it should be referenced within <MySQL Enterprise Monitor installation directory>/agent/mysql-monitor-agent.ini:

agent-item-files = share/mysql-monitor-agent/items/quan.lua,share/mysql-monitor-agent/items/items-mysql-monitor.xml,
share/mysql-monitor-agent/items/custom.xml,share/mysql-monitor-agent/items/cluster.xml

In MySQL Enterprise Monitor, events are raised by rules. Rules are grouped together into Advisors and so I create a new Advisor called “MySQL Cluster” and then create just one new rule within that Advisor group.

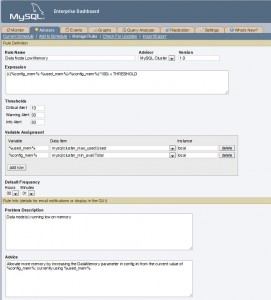
As shown in Fig. 1 the rule is called “Data Node Low Memory”. The “Variable Assignment” section is used to define 2 variables %used_mem% and %config_mem% which are populated from the Used and Total results from the 2 new data collectors. The “Expression” section is used to test “((Total Used)/Total)x100< THRESHOLD” and then the values to be substituted for THRESHOLD are defined in the “Thresholds” section – indicating at what points the Info, Warning and Critical Alters should be raised.

There are then a number of optional sections that you can use to add useful information to the person investigating the alert.

Once the rule has been created, the next step is to schedule and (if desired) tag that the alerts should also result in SNMP traps being raised. This is standard MySQL Enterprise Monitor practice and so it isn’t explained here except to point out that this rule is monitoring information from the data nodes but the rule has to be applied to a MySQL Server in the Cluster (MySQL Enterprise Monitor has no idea what a data node is) and so you need to schedule the rule against one or more arbitrary MySQL Server instances in the Cluster).

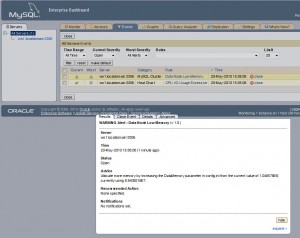
Fig. 2 Warning alert

To test the functionality, start adding more data to your MySQL Cluster until the Warning alert is triggered as shown in Fig. 2. As you can see, the optional information we included is shown – including values from Used and Total.


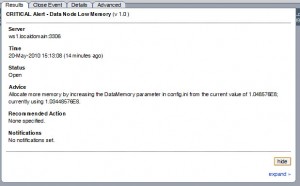
Fig. 3 Major alert

I then add more data to the database until the critical alert is raised and confirm that it’s displayed on the main monitoring panel of the MySQL Enterprise Monitor dashboard. Note that if you requested these alerts be included with the SNMP feed then SNMP traps will also be raised.

Please note that this example is intended to illustrate the mechanics of setting up monitoring on an arbitrary piece of data from ndbinfo and obviously in the real world you would want to monitor more than just the memory and even for the memory, you might want to use a more sophisticated rule.

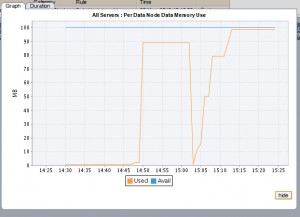
Fig. 4 Custom graph for memory usage


It is sometimes more useful to see how a value changes over time. For this, MySQL Enterprise Monitor provides graphs. The data collectors created for the rule can also be used to add a new graph to Enterprise monitor. The graph is defined by creating the following file:

<com_mysql_merlin_server_graph_Design>
  <version>1.0</version>
  <uuid>b0bc2bba-ea9b-102b-b396-94aca32b0b28</uuid>
  <tag></tag>
  <name>Per Data Node Data Memory Use</name>
  <rangeLabel>MB</rangeLabel> <frequency>00:01:00</frequency>
  <series>
    <label>Used</label>
    <expression>cluster_data_node_used_data_memory/1024/1024</expression>
  </series>
  <series>
    <label>Avail</label>
    <expression>cluster_data_node_config_data_memory/1024/1024</expression>
  </series>
  <variables>
    <name>cluster_data_node_used_data_memory</name>
    <dcItem>
      <nameSpace>mysql</nameSpace>
      <className>cluster_max_used</className>
      <attribName>Used</attribName>
    </dcItem>
    <instance>local</instance>
  </variables>
  <variables>
    <name>cluster_data_node_config_data_memory</name>
    <dcItem>
      <nameSpace>mysql</nameSpace>
      <className>cluster_min_avail</className>
      <attribName>Total</attribName>
    </dcItem>
    <instance>local</instance>
  </variables>
</com_mysql_merlin_server_graph_Design>
 

Fig. 5 MySQL Enterprise Monitor dashboard

Click on Import/Export in the Graphs tab in Enterprise Monitor (2.2) and then import the file defining the graph.

The graph will then appear on the graphs tab and can also be configured to appear on the main dashboard as shown in Fig. 5


Free webinar – learn about MySQL Cluster 7.1

MySQL Cluster 7.1 was declared GA earlier this month and today (29 April) you have the chance to learn all about it by registering for this free webinar.

In blazing speed we will cover the most important features of MySQL Cluster 7.1: NDB$INFO; MySQL Cluster Connector/Java and other features that push the limits of MySQL Cluster into new workloads and communities.

NDB$INFO presents real-time usage statistics from the MySQL Cluster data nodes as a series of SQL tables, enabling developers and administrators to monitor database performance and optimize their applications.

Designed for Java developers, the MySQL Cluster Connector for Java implements an easy-to-use and high performance native Java interface and OpenJPA plug-in that maps Java classes to tables stored in the MySQL Cluster database.

It’s worth registering even if you can’t attend as  you should then receive a link to the replay and the charts.

It starts at 9:00 Pacific / 5 pm UK / 6pm CET.


MySQL Cluster 7.1 is GA

MySQL Cluster 7.1 has been declared GA – including MySQL Cluster Connector for Java and MySQL Cluster Manager – see http://www.mysql.com/products/database/cluster/ for details.


Using ClusterJPA (part of MySQL Cluster Connector for Java) – a tutorial

Fig. 1 Java access to MySQL Cluster

This is a follow up to the earlier post Using ClusterJ (part of MySQL Cluster Connector for Java) – a tutorial but covers the ClusterJPA interface rather than ClusterJ.

JPA is the Java standard for persistence and different vendors can implement their own implementation of this API and they can (and do) add proprietary extensions. Three of the most common implementations are OpenJPA, Hibernate and Toplink. JPA can be used within server containers or outside of them (i.e. with either J2EE or J2SE).

Typically a JPA implementation would access the database (for example, MySQL Cluster) using JDBC. JDBC gives a great deal of flexibility to the JPA implementer but it cannot give the best performance when using MySQL Cluster as there is an internal conversion to SQL by Connector/J and a subsequent translation from SQL to the C++ NDB API by the MySQL Server. As of MySQL Cluster 7.1, OpenJPA can be configured to use the high performance NDB API (via ClusterJ) for most operations but fall back on JDBC for more complex queries.

The first implementation of ClusterJPA is as an OpenJPA BrokerFactory but in the future, it may be extended to work with other JPA implementations.

ClusterJPA overcomes ClusterJ limitations, notably:

  • Persistent classes
  • Relationships
  • Joins in queries
  • Lazy loading
  • Table and index creation from object model

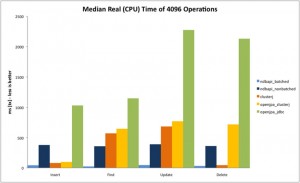
Fig.2 ClusterJPA Performance

Typically users base their selection of a JPA solution on factors such as proprietary extensions, what existing applications already use and (increasingly with ClusterJPA) performance.

The performance of ClusterJPA (OpenJPA using ClusterJ) has been compared with OpenJPA using JDBC in Figure 2. It should be noted that the performance is significantly better when using ClusterJPA (the yellow bar). It is hoped that in the future the performance can be improved even further for finds, updates and deletes.

Adapting an OpenJPA based application to use ClusterJPA with MySQL Cluster should be fairly straight-forward with the main change being in the definition of the persistence unit in persistence.xml:

<persistence xmlns=http://java.sun.com/xml/ns/persistence xmlns:xsi="http://www.w3.org/2001/XMLSchema-instance" version="1.0">
 <persistence-unit name="clusterdb" transaction-type="RESOURCE_LOCAL“>
  <provider> org.apache.openjpa.persistence.PersistenceProviderImpl </provider>
  <class>Employee</class>
  <class>Department</class>
  <properties>
   <property name="openjpa.jdbc.SynchronizeMappings" value="buildSchema" />
   <property name="openjpa.ConnectionDriverName"
    value="com.mysql.jdbc.Driver" />
   <property name="openjpa.ConnectionURL" value="jdbc:mysql://localhost:3306/clusterdb" />
   <property name="openjpa.ConnectionUserName" value="root" />
   <property name="openjpa.ConnectionPassword" value="" />
   <property name="openjpa.BrokerFactory" value="ndb" />
   <property name="openjpa.jdbc.DBDictionary" value="TableType=ndbcluster" />
   <property name="openjpa.ndb.connectString" value="localhost:1186" />
   <property name="openjpa.ndb.database" value="clusterdb" /
  </properties>
 </persistence-unit>
</persistence>

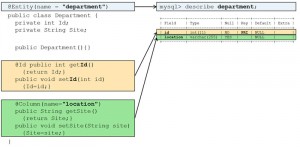
Fig. 3 ClusterJPA Annotations

Defining the object-to-table mappings is performed by annotating the persistent class for the domain object. If not already in existence, OpenJPA will create the table. The property  openjpa.jdbc.DBDictionary tells OpenJPA to create the tables using ndb as the storage engine.

This paper does not go into the use of JPA in great depth – focusing instead on the specifics of using OpenJPA with MySQL Cluster/ClusterJPA. For more information on the use of JPA and OpenJPA, refer to http://openjpa.apache.org/ and in particular, http://openjpa.apache.org/builds/latest/docs/manual/manual.html

The tutorials are using MySQL Cluster 7.1.2a on Fedora 12. If using earlier or more recent versions of MySQL Cluster then you may need to change the class-paths as explained in http://dev.mysql.com/doc/ndbapi/en/mccj-using-jpa.html

For this tutorial, it is necessary to have MySQL Cluster up and running. For simplicity all of the nodes (processes) making up the Cluster will be run on the same physical host, along with the application.

Although most of the database access is performed through the NDB API, the Cluster includes a MySQL Server process for OpenJPA to use for complex queries and to allow the user to check the contents of the database manually.

These are the MySQL Cluster configuration files being used :

config.ini:

[ndbd default]
noofreplicas=2
datadir=/home/billy/mysql/my_cluster/data

[ndbd]
hostname=localhost
id=3

[ndbd]
hostname=localhost
id=4

[ndb_mgmd]
id = 1
hostname=localhost
datadir=/home/billy/mysql/my_cluster/data

[mysqld]
hostname=localhost
id=101

[api]
hostname=localhost

my.cnf:

[mysqld]
ndbcluster
datadir=/home/billy/mysql/my_cluster/data
basedir=/usr/local/mysql

This tutorial focuses on ClusterJPA rather than on running MySQL Cluster; if you are new to MySQL Cluster then refer to Running a simple Cluster before trying these tutorials.

JPA/OpenJPA/ClusterJPA can be used within or outside a container (i.e. it can be used with J2EE or J2SE) – for simplicity, this tutorial does not use a container (i.e. it is written using J2SE).

Before being able to run any ClusterJPA code, you first need to download and install OpenJPA from http://openjpa.apache.org/ – this tutorial uses OpenJPA 1.2.1. Simply extract the contents of the binary tar ball to the host you want to run your application on; for this tutorial, I use /usr/local/openjpa.

Additionally, ClusterJPA must sometimes use JDBC to satisfy certain queries and so “JDBC Driver for MySQL (Connector/J)” should also be installed – this can be downloaded from http://dev.mysql.com/downloads/connector/j/ Again, simply extract the contents of the tar ball, for this tutorial the files are stored in /usr/local/connectorj and version 5.1.12 is used.

If the ClusterJ tutorial has already been run on this MySQL Cluster database then drop the tables from the cluster so that you can observe them being created automatically – though in a real application, you may prefer to create them manually.

A configuration file is required to indicate how persistence is to be handled for the application. Create a new directory called META-INF in the application source directory and within there create a file called persistence.xml:

<persistence xmlns="http://java.sun.com/xml/ns/persistence"
 xmlns:xsi="http://www.w3.org/2001/XMLSchema-instance" version="1.0">
 <persistence-unit name="clusterdb" transaction-type="RESOURCE_LOCAL">
 <provider>
 org.apache.openjpa.persistence.PersistenceProviderImpl
 </provider>
 <class>Employee</class>
 <class>Department</class>
 <properties>
 <property name="openjpa.jdbc.SynchronizeMappings" value="buildSchema" />
 <property name="openjpa.ConnectionDriverName"
 value="com.mysql.jdbc.Driver" />
 <property name="openjpa.ConnectionURL"
 value="jdbc:mysql://localhost:3306/clusterdb" />
 <property name="openjpa.ConnectionUserName" value="root" />
 <property name="openjpa.ConnectionPassword" value="" />
 <property name="openjpa.BrokerFactory" value="ndb" />
 <property name="openjpa.jdbc.DBDictionary" value="TableType=ndb"/>
 <property name="openjpa.ndb.connectString" value="localhost:1186" />
 <property name="openjpa.ndb.database" value="clusterdb" />
 </properties>
 </persistence-unit>
</persistence>

A persistence unit called ‘clusterdb’ is created; the provider (implementation for the persistence) is set to openjpa (as opposed for example to hibernate). Two classes are specified – ‘Employee’ and ‘Department’ which relate to the persistent classes that the application will define. Connector/J is defined as the JDBC connection (together with the host and the port of the MySQL Server to be used). The key to having OpenJPA use ClusterJPA is to set the BrokerFactory to ndb and specify the connect string (host:port) for the MySQL Cluster management node. The database is defined to be ‘clusterdb’ for both the JDBC and ClusterJ connections. The engine type when creating tables is set to ndb.

If not already done so, create the ‘clusterdb’ database (if it already contains tables from the ClusterJ tutorial then drop them):

mysql> create database clusterdb;

The next step is to create the persistent class definitions for the Department and Employee Entities:

Department.java:

import javax.persistence.*;

@Entity(name = "department")
public class Department {
  private int Id;
  private String Site;

  public Department(){}

  @Id public int getId() {return Id;}
  public void setId(int id) {Id=id;}

  @Column(name="location")    
  public String getSite() {return Site;}
  public void setSite(String site) {Site=site;}

  public String toString() {
  return "Department: " + getId() + " based in " + getSite();
 }
}

Using the @Entity tag, the table name is specified to be ‘department’. Note that unlike ClusterJ, ClusterJPA uses persistent classes (rather than interfaces) and so it is necessary to define the properties as well as the getter/setter methods. The primary key is defined using the @Id tag and we specify that the column associated with the Site property should be called ‘location’ using the @Column tag.

As this is a class, it is possible to add other useful methods – in this case toString().

Employee.java:

import javax.persistence.*;
@Entity(name = "employee") //Name of the table
public class Employee {
 private int Id;
 private String First;
 private String Last;
 private String City;
 private String Started;  
 private String Ended;  
 private int Department;

 public Employee(){}

 @Id public int getId() {return Id;}
 public void setId(int id) {Id=id;}

 public String getFirst() {return First;}
 public void setFirst(String first) {First=first;}

 public String getLast() {return Last;}
 public void setLast(String last) {Last=last;}

 @Column(name="municipality")  
 public String getCity() {return City;}
 public void setCity(String city) {City=city;}

 public String getStarted() {return Started;}
 public void setStarted(String date) {Started=date;}

 public String getEnded() {return Ended;}
 public void setEnded(String date) {Ended=date;}

 public int getDepartment() {return Department;}
 public void setDepartment(int department) {Department=department;}

 public String toString() {
  return getFirst() + " " + getLast() + " (Dept " +
  getDepartment()+ ") from " + getCity() +
  " started on " + getStarted() + " & left on " + getEnded();
 }
}

The next step is to write the application code which we step through here block by block; the first of which simply contains the import statements and then:

Main.java (part 1):

import java.util.List;
import javax.persistence.EntityManager;
import javax.persistence.EntityManagerFactory;
import javax.persistence.EntityTransaction;
import javax.persistence.Persistence;
import javax.persistence.Query;
import java.io.*;
public class Main {
public static void main (String[] args) throws java.io.IOException {
 EntityManagerFactory entityManagerFactory = Persistence.createEntityManagerFactory("clusterdb");
 EntityManager em = entityManagerFactory.createEntityManager();
 EntityTransaction userTransaction = em.getTransaction();
 BufferedReader br = new BufferedReader(new InputStreamReader(System.in));
 System.out.println("The tables will now have been created - check through SQL.");
 System.out.println("mysql> use clusterdb;");
 System.out.println("mysql> show tables;");
 System.out.println("Hit return when you are done");
 String ignore = br.readLine();

As part of creating the EntityManagerFactory and EntityManager, OpenJPA creates the tables for the two classes specified for the ‘clusterdb’ persistence unit. While the application waits for the user to press return, this can be checked:

mysql> use clusterdb
 mysql> show tables;
 +---------------------+
 | Tables_in_clusterdb |
 +---------------------+
 | department          |
 | employee            |
 +---------------------+

After hitting return, the application can create an Employee object and then persist it – at which point it will be stored in the ‘employee’ table. A second Employee object is then created and populated with the data read back from the database (using a primary key look up on the Id property with a value of 1):

Main.java (part 2):

 userTransaction.begin();
 Employee emp = new Employee();
 emp.setId(1);
 emp.setDepartment(666);
 emp.setFirst("Billy");
 emp.setLast("Fish");
 emp.setStarted("1st February 2009");
 em.persist(emp);
 userTransaction.commit();
 userTransaction.begin();
 Employee theEmployee = em.find(Employee.class, 1);
 userTransaction.commit();
 System.out.println(theEmployee.toString());
 System.out.println("Chance to check the database before City is set");
 System.out.println("Hit return when you are done");
 ignore = br.readLine();

The Employee object read back from the database is displayed:

Billy Fish (Dept 666) from null started on 1st February 2009 & left on null
Chance to check the database before City is set
Hit return when you are done

At this point, the application waits to give the user a chance to confirm that the Employee really has been written to the database:

mysql> select * from employee;
+----+--------------+------------+-------+-------+------+-------------------+
| id | municipality | department | ended | first | last | started           |
+----+--------------+------------+-------+-------+------+-------------------+
|  1 | NULL         |        666 | NULL  | Billy | Fish | 1st February 2009 |
+----+--------------+------------+-------+-------+------+-------------------+

After hitting return, the application continues and an update is made to the persisted Employee object – note that there is no need to explicitly ask for the changes to be persisted, this happens automatically when the transaction is committed:

Main.java (part 3):

 userTransaction.begin();
 theEmployee.setCity("London");
 theEmployee.setDepartment(777);
 userTransaction.commit();
 System.out.println("Chance to check the City is set in the database");
 System.out.println("Hit return when you are done");
 ignore = br.readLine();

At this point, the application again waits while the user has a chance to confirm that the changes did indeed get written through to the database:

mysql> select * from employee;
+----+--------------+------------+-------+-------+------+-------------------+
| id | municipality | department | ended | first | last | started           |
+----+--------------+------------+-------+-------+------+-------------------+
|  1 | London       |        777 | NULL  | Billy | Fish | 1st February 2009 |
+----+--------------+------------+-------+-------+------+-------------------+

When allowed to continue, the application creates and persists an additional 100 Employee & Department entities. It then goes on to create and execute a query to find all employees with a department number of 777 and then looks up the location of the site for that department.

Main.java (part 4):

 Department dept;
 userTransaction.begin();
 for (int i=700;i<800;i++) {
  emp = new Employee();
  dept = new Department();
  emp.setId(i+1000);
  emp.setDepartment(i);
  emp.setFirst("Billy");
  emp.setLast("No-Mates-"+i);
  emp.setStarted("1st February 2009");
  em.persist(emp);
  dept.setId(i);
  dept.setSite("Building-"+i);
  em.persist(dept);
 }
 userTransaction.commit();
 userTransaction.begin();
 Query q = em.createQuery("select x from Employee x where x.department=777");
 Query qd;
 for (Employee m : (List<Employee>) q.getResultList()) {
  System.out.println(m.toString());
  qd = em.createQuery("select x from Department x where x.id=777");
  for (Department d : (List<Department>) qd.getResultList()) {
   System.out.println(d.toString());
  }
 }
 userTransaction.commit();

These are the results displayed:

Billy No-Mates-777 (Dept 777) from null started on 1st February 2009 & left on null
Department: 777 based in Building-777
Billy Fish (Dept 777) from London started on 1st February 2009 & left on null
Department: 777 based in Building-777

Note that joins between tables are possible with JPA but that is beyond the scope of this tutorial.

Finaly, the EntityManager and EntityManagerFactory are closed:

Main.java (part 5):

  em.close();
  entityManagerFactory.close();
 }
}

Compiling and running the ClusterJPA tutorial code

javac -classpath /usr/local/mysql/share/mysql/java/clusterjpa.jar:/usr/local/openjpa/openjpa-1.2.1.jar:/usr/local/openjpa/lib/geronimo-jpa_3.0_spec-1.0.jar:. Main.java Employee.java Department.java
java -Djava.library.path=/usr/local/mysql/lib/ -classpath /usr/local/mysql/share/mysql/java/clusterjpa.jar:/usr/local/openjpa/openjpa-1.2.1.jar:/usr/local/openjpa/lib/*:/usr/local/connectorj/mysql-connector-java-5.1.12-bin.jar:. Main 

Download the source code for this tutorial from here (together with the code for the previous ClusterJ tutorial).


Using ClusterJ (part of MySQL Cluster Connector for Java) – a tutorial

Fig. 1 Java access to MySQL Cluster

ClusterJ is part of the MySQL Cluster Connector for Java which is currently in beta as part of MySQL Cluster 7.1. It is designed to provide a high performance method for Java applications to store and access data in a MySQL Cluster database. It is also designed to be easy for Java developers to use and is “in the style of” Hibernate/Java Data Objects (JDO) and JPA. It uses the Domain Object Model DataMapper pattern:

  • Data is represented as domain objects
  • Domain objects are separate from business logic
  • Domain objects are mapped to database tables

The purpose of ClusterJ is to provide a mapping from the table-oriented view of the data stored in MySQL Cluster to the Java objects used by the application. This is achieved by annotating interfaces representing the Java objects; where each persistent interface is mapped to a table and each property in that interface to a column. By default, the table name will match the interface name and the column names match the property names but this can be overridden using annotations.
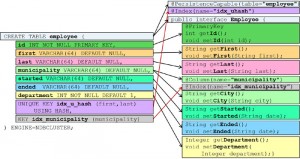
Fig. 2 ClusterJ Interface Annotations

If the table does not already exist (for example, this is a brand new application with new data) then the table must be created manually – unlike OpenJPA, ClusterJ will not create the table automatically.

Figure 2 shows an example of an interface that has been created in order to represent the data held in the ‘employee’ table.

ClusterJ uses the following concepts:

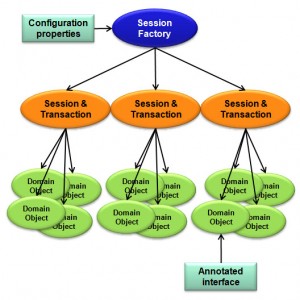
  • Fig. 3 ClusterJ Terminology

    SessionFactory: There is one instance per MySQL Cluster instance for each Java Virtual Machine (JVM). The SessionFactory object is used by the application to get hold of sessions. The configuration details for the ClusterJ instance are defined in the Configuration properties which is an artifact associated with the SessionFactory.

  • Session: There is one instance per user (per Cluster, per JVM) and represents a Cluster connection
  • Domain Object: Objects representing the data from a table. The domain objects (and their relationships to the Cluster tables) are defined by annotated interfaces (as shown in the right-hand side of Figure 2.
  • Transaction: There is one transaction per session at any point in time. By default, each operation (query, insert, update, or delete) is run under a new transaction. . The Transaction interface allows developers to aggregate multiple operations into a single, atomic unit of work.

ClusterJ will be suitable for many Java developers but it has some restrictions which may make OpenJPA with the ClusterJPA plug-in more appropriate. These ClusterJ restrictions are:

  • Persistent Interfaces rather than persistent classes. The developer provides the signatures for the getter/setter methods rather than the properties and no extra methods can be added.
  • No Relationships between properties or between objects can be defined in the domain objects. Properties are primitive types.
  • No Multi-table inheritance; there is a single table per persistent interface
  • No joins in queries (all data being queried must be in the same table/interface)
  • No Table creation – user needs to create tables and indexes
  • No Lazy Loading – entire record is loaded at one time, including large object (LOBs).

Tutorial

This tutorial uses MySQL Cluster 7.1.2a on Fedora 12. If using earlier or more recent versions of MySQL Cluster then you may need to change the class-paths as explained in http://dev.mysql.com/doc/ndbapi/en/mccj-using-clusterj.html

It is necessary to have MySQL Cluster up and running. For simplicity all of the nodes (processes) making up the Cluster will be run on the same physical host, along with the application.

These are the MySQL Cluster configuration files being used :

config.ini:

[ndbd default]noofreplicas=2
datadir=/home/billy/mysql/my_cluster/data

[ndbd]
hostname=localhost
id=3

[ndbd]
hostname=localhost
id=4

[ndb_mgmd]
id = 1
hostname=localhost
datadir=/home/billy/mysql/my_cluster/data

[mysqld]
hostname=localhost
id=101

[api]
hostname=localhost

my.cnf:

[mysqld]
ndbcluster
datadir=/home/billy/mysql/my_cluster/data
basedir=/usr/local/mysql

This tutorial focuses on ClusterJ rather than on running MySQL Cluster; if you are new to MySQL Cluster then refer to running a simple Cluster before trying this tutorial.

ClusterJ needs to be told how to connect to our MySQL Cluster database; including the connect string (the address/port for the management node), the database to use, the user to login as and attributes for the connection such as the timeout values. If these parameters aren’t defined then ClusterJ will fail with run-time exceptions. This information represents the “configuration properties” shown in Figure 3.  These parameters can be hard coded in the application code but it is more maintainable to create a clusterj.properties file that will be imported by the application. This file should be stored in the same directory as your application source code.

clusterj.properties:

com.mysql.clusterj.connectstring=localhost:1186
 com.mysql.clusterj.database=clusterdb
 com.mysql.clusterj.connect.retries=4
 com.mysql.clusterj.connect.delay=5
 com.mysql.clusterj.connect.verbose=1
 com.mysql.clusterj.connect.timeout.before=30
 com.mysql.clusterj.connect.timeout.after=20
 com.mysql.clusterj.max.transactions=1024

As ClusterJ will not create tables automatically, the next step is to create ‘clusterdb’ database (referred to in clusterj.properties) and the ‘employee’ table:

[billy@ws1 ~]$ mysql -u root -h 127.0.0.1 -P 3306 -u root
 mysql>  create database clusterdb;use clusterdb;
 mysql> CREATE TABLE employee (
 ->     id INT NOT NULL PRIMARY KEY,
 ->     first VARCHAR(64) DEFAULT NULL,
 ->     last VARCHAR(64) DEFAULT NULL,
 ->     municipality VARCHAR(64) DEFAULT NULL,
 ->     started VARCHAR(64) DEFAULT NULL,
 ->     ended  VARCHAR(64) DEFAULT NULL,
 ->     department INT NOT NULL DEFAULT 1,
 ->     UNIQUE KEY idx_u_hash (first,last) USING HASH,
 ->     KEY idx_municipality (municipality)
 -> ) ENGINE=NDBCLUSTER;

The next step is to create the annotated interface:

Employee.java:

import com.mysql.clusterj.annotation.Column;
import com.mysql.clusterj.annotation.Index;
import com.mysql.clusterj.annotation.PersistenceCapable;
import com.mysql.clusterj.annotation.PrimaryKey;
@PersistenceCapable(table="employee")
@Index(name="idx_uhash")
public interface Employee {
@PrimaryKey
int getId();
void setId(int id);
String getFirst();
void setFirst(String first);

String getLast();
void setLast(String last);
@Column(name="municipality")
@Index(name="idx_municipality")
String getCity();
void setCity(String city);
String getStarted();
void setStarted(String date);
String getEnded();
void setEnded(String date);
Integer getDepartment();
void setDepartment(Integer department);
}

The name of the table is specified in the annotation @PersistenceCapable(table=”employee”) and then each column from the employee table has an associated getter and setter method defined in the interface. By default, the property name in the interface is the same as the column name in the table – the column name has been overridden for the City property by explicitly including the @Column(name=”municipality”) annotation just before the associated getter method. The @PrimaryKey annotation is used to identify the property whose associated column is the Primary Key in the table. ClusterJ is made aware of the existence of indexes in the database using the @Index annotation.

The next step is to write the application code which we step through here block by block; the first of which simply contains the import statements and then loads the contents of the clusterj.properties defined above:

Main.java (part 1):

import com.mysql.clusterj.ClusterJHelper;
import com.mysql.clusterj.SessionFactory;
import com.mysql.clusterj.Session;
import com.mysql.clusterj.Query;
import com.mysql.clusterj.query.QueryBuilder;
import com.mysql.clusterj.query.QueryDomainType;
import java.io.File;
import java.io.InputStream;
import java.io.FileInputStream;
import java.io.*;
import java.util.Properties;
import java.util.List;
public class Main {
public static void main (String[] args) throws java.io.FileNotFoundException,java.io.IOException {
// Load the properties from the clusterj.properties file
File propsFile = new File("clusterj.properties");
InputStream inStream = new FileInputStream(propsFile);
Properties props = new Properties();
props.load(inStream);
//Used later to get userinput
BufferedReader br = new BufferedReader(new
InputStreamReader(System.in));

The next step is to get a handle for a SessionFactory from the ClusterJHelper class and then use that factory to create a session (based on the properties imported from clusterj.properties file.

Main.java (part 2):

// Create a session (connection to the database)
SessionFactory factory = ClusterJHelper.getSessionFactory(props);
Session session = factory.getSession();

Now that we have a session, it is possible to instantiate new Employee objects and then persist them to the database. Where there are no transaction begin() or commit() statements, each operation involving the database is treated as a separate transaction.

Main.java (part 3):

// Create and initialise an Employee
Employee newEmployee = session.newInstance(Employee.class);
newEmployee.setId(988);
newEmployee.setFirst("John");
newEmployee.setLast("Jones");
newEmployee.setStarted("1 February 2009");
newEmployee.setDepartment(666);
// Write the Employee to the database
session.persist(newEmployee);

At this point, a row will have been added to the ‘employee’ table. To verify this, a new Employee object is created and used to read the data back from the ‘employee’ table using the primary key (Id) value of 998:

Main.java (part 4):

// Fetch the Employee from the database
 Employee theEmployee = session.find(Employee.class, 988);
if (theEmployee == null)
 {System.out.println("Could not find employee");}
else
 {System.out.println ("ID: " + theEmployee.getId() + "; Name: " +
 theEmployee.getFirst() + " " + theEmployee.getLast());
 System.out.println ("Location: " + theEmployee.getCity());
 System.out.println ("Department: " + theEmployee.getDepartment());
 System.out.println ("Started: " + theEmployee.getStarted());
 System.out.println ("Left: " + theEmployee.getEnded());
}

This is the output seen at this point:

ID: 988; Name: John Jones
Location: null
Department: 666
Started: 1 February 2009
Left: null
Check the database before I change the Employee - hit return when you are done

The next step is to modify this data but it does not write it back to the database yet:

Main.java (part 5):

// Make some changes to the Employee & write back to the database
theEmployee.setDepartment(777);
theEmployee.setCity("London");
System.out.println("Check the database before I change the Employee -
hit return when you are done");
String ignore = br.readLine();

The application will pause at this point and give you chance to check the database to confirm that the original data has been added as a new row but the changes have not been written back yet:

mysql> select * from clusterdb.employee;
+-----+-------+-------+--------------+-----------------+-------+------------+
| id  | first | last  | municipality | started         | ended | department |
+-----+-------+-------+--------------+-----------------+-------+------------+
| 988 | John  | Jones | NULL         | 1 February 2009 | NULL  |        666 |
+-----+-------+-------+--------------+-----------------+-------+------------+

After hitting return, the application will continue and write the changes to the table, using an automatic transaction to perform the update.

Main.java (part 6):

session.updatePersistent(theEmployee);
System.out.println("Check the change in the table before I bulk add
Employees - hit return when you are done");
ignore = br.readLine();

The application will again pause so that we can now check that the change has been written back (persisted) to the database:

mysql> select * from clusterdb.employee;
+-----+-------+-------+--------------+-----------------+-------+------------+
| id  | first | last  | municipality | started         | ended | department |
+-----+-------+-------+--------------+-----------------+-------+------------+
| 988 | John  | Jones | London       | 1 February 2009 | NULL  |        777 |
+-----+-------+-------+--------------+-----------------+-------+------------+

The application then goes onto create and persist 100 new employees. To improve performance, a single transaction is used to that all of the changes can be written to the database at once when the commit() statement is run:

Main.java (part 7):

// Add 100 new Employees - all as part of a single transaction
 newEmployee.setFirst("Billy");
 newEmployee.setStarted("28 February 2009");
session.currentTransaction().begin();
for (int i=700;i<800;i++) {
 newEmployee.setLast("No-Mates"+i);
 newEmployee.setId(i+1000);
 newEmployee.setDepartment(i);
 session.persist(newEmployee);
 }
session.currentTransaction().commit();

The 100 new employees will now have been persisted to the database. The next step is to create and execute a query that will search the database for all employees in department 777 by using a QueryBuilder and using that to build a QueryDomain that compares the ‘department’ column with a parameter. After creating the, the department parameter is set to 777 (the query could subsequently be reused with different department numbers). The application then runs the query and iterates through and displays each of employees in the result set:

Main.java (part 8):

// Retrieve the set all of Employees in department 777
QueryBuilder builder = session.getQueryBuilder();
QueryDomainType<Employee> domain =
builder.createQueryDefinition(Employee.class);
domain.where(domain.get("department").equal(domain.param(
"department")));
Query<Employee> query = session.createQuery(domain);
query.setParameter("department",777);
List<Employee> results = query.getResultList();
for (Employee deptEmployee: results) {
System.out.println ("ID: " + deptEmployee.getId() + "; Name: " +
deptEmployee.getFirst() + " " + deptEmployee.getLast());
System.out.println ("Location: " + deptEmployee.getCity());
System.out.println ("Department: " + deptEmployee.getDepartment());
System.out.println ("Started: " + deptEmployee.getStarted());
System.out.println ("Left: " + deptEmployee.getEnded());
}
System.out.println("Last chance to check database before emptying table
- hit return when you are done");
ignore = br.readLine();

At this point, the application will display the following and prompt the user to allow it to continue:

ID: 988; Name: John Jones
Location: London
Department: 777
Started: 1 February 2009
Left: null
ID: 1777; Name: Billy No-Mates777
Location: null
Department: 777
Started: 28 February 2009
Left: null

We can compare that output with an SQL query performed on the database:

mysql> select * from employee where department=777;
 +------+-------+-------------+--------------+------------------+-------+------------+
 | id   | first | last        | municipality | started          | ended | department |
 +------+-------+-------------+--------------+------------------+-------+------------+
 |  988 | John  | Jones       | London       | 1 February 2009  | NULL  |        777 |
 | 1777 | Billy | No-Mates777 | NULL         | 28 February 2009 | NULL  |        777 |
 +------+-------+-------------+--------------+------------------+-------+------------+

Finally, after pressing return again, the application will remove all employees:

Main.java (part 9):

session.deletePersistentAll(Employee.class);
 }
}

As a final check, an SQL query confirms that all of the rows have been deleted from the ‘employee’ table.

mysql> select * from employee;
Empty set (0.00 sec)

Compiling and running the ClusterJ tutorial code

javac -classpath /usr/local/mysql/share/mysql/java/clusterj-api.jar:. Main.java Employee.java
java -classpath /usr/local/mysql/share/mysql/java/clusterj.jar:. -Djava.library.path=/usr/local/mysql/lib Main
 

Download the source code for this tutorial from here (together with the code for the up-coming ClusterJPA tutorial).