Tag Archive for MySQL Cluster 7.2

MySQL Cluster 7.2.6 is available for download

The binary version for MySQL Cluster 7.2.6 has now been made available at http://www.mysql.com/downloads/cluster/ (GPL version) or https://support.oracle.com/ (commercial version).

A description of all of the changes (fixes) that have gone into MySQL Cluster 7.2.6 (compared to 7.2.5) are available from the 7.2.6 Change log.


On-line add-node with MCM; a more complex example

I’ve previously provided an example of using MySQL Cluster Manager to add nodes to a running MySQL Cluster deployment but I’ve since received a number of questions around how to do this in more complex circumstances (for example when ending up with more than 1 MySQL Server on a single host where each mysqld process should use a different port). The purpose of this post is to work through one of these more complex scenarios.

The starting point is an existing cluster made up of 3 hosts with the nodes (processes) as described in this MCM report:

mcm> SHOW STATUS -r mycluster;
+--------+----------+-------------------------------+---------+-----------+---------+
| NodeId | Process  | Host                          | Status  | Nodegroup | Package |
+--------+----------+-------------------------------+---------+-----------+---------+
| 1      | ndbmtd   | paas-23-54.osc.uk.oracle.com  | running | 0         | 7_2_5   |
| 2      | ndbmtd   | paas-23-55.osc.uk.oracle.com  | running | 0         | 7_2_5   |
| 49     | ndb_mgmd | paas-23-56.osc.uk.oracle.com  | running |           | 7_2_5   |
| 50     | mysqld   | paas-23-54.osc.uk.oracle.com  | running |           | 7_2_5   |
| 51     | mysqld   | paas-23-55.osc.uk.oracle.com  | running |           | 7_2_5   |
| 52     | mysqld   | paas-23-56.osc.uk.oracle.com  | running |           | 7_2_5   |
| 53     | ndbapi   | *paas-23-56.osc.uk.oracle.com | added   |           |         |
+--------+----------+-------------------------------+---------+-----------+---------+
7 rows in set (0.01 sec)

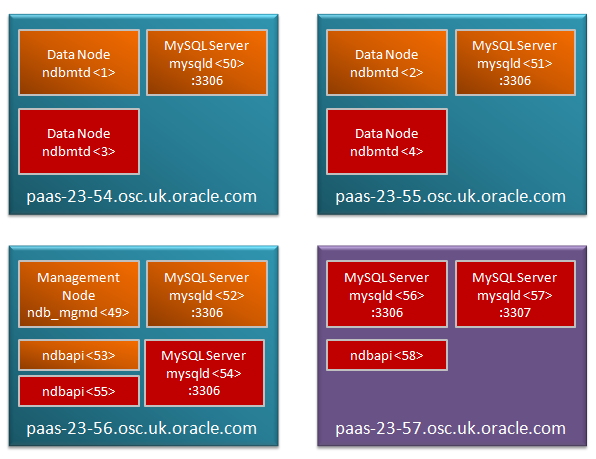
This same configuration is shown graphically in this diagram:

On-Line scalability with MySQL Cluster - starting point

Original MySQL Cluster deployment


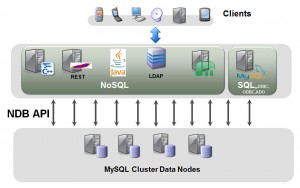
Note that the ‘ndbapi’ node isn’t actually a process but is instead a ‘slot’ that can be used by any NDB API client to access the data in the data nodes directly – this could be any of:

  • A MySQL Server
  • An application using the C++ NDB API directly
  • A Memcached server using the direct NDB driver
  • An application using the ClusterJ, JPA or modndb REST API
  • The MySQL database restore command

This Cluster is now going to be extended by adding an extra host as well as extra nodes (both processes and ndbapi slots).

The following diagram illustrates what the final Cluster will look like:

MySQL Cluster after on-line scaling

MySQL Cluster after on-line scaling

The first step is to add the new host to the configuration and make it aware of the MySQL Cluster package being used (in this example, 7.2.5). Note that you should already have started the mcmd process on this new host (if not then do that now):

mcm> ADD HOSTS --hosts=paas-23-57.osc.uk.oracle.com mysite;
+--------------------------+
| Command result           |
+--------------------------+
| Hosts added successfully |
+--------------------------+
1 row in set (8.04 sec)

mcm> ADD PACKAGE -h paas-23-57.osc.uk.oracle.com --basedir=/home/oracle/cluster_7_2_5 7_2_5;
+----------------------------+
| Command result             |
+----------------------------+
| Package added successfully |
+----------------------------+
1 row in set (0.68 sec)

At this point the MCM agent on the new host is connected with the existing 3 but it has not become part of the Cluster – this is done by declaring which nodes should be on that host; at the same time I add some extra nodes to the existing hosts. As there will be more than one MySQL server (mysqld) running on some of the hosts, I’ll explicitly tell MCM what port number to use for some of the mysqlds (rather than just using the default of 3306).

mcm> ADD PROCESS -R ndbmtd@paas-23-54.osc.uk.oracle.com,
ndbmtd@paas-23-55.osc.uk.oracle.com,mysqld@paas-23-56.osc.uk.oracle.com,
ndbapi@paas-23-56.osc.uk.oracle.com,mysqld@paas-23-57.osc.uk.oracle.com,
mysqld@paas-23-57.osc.uk.oracle.com,ndbapi@paas-23-57.osc.uk.oracle.com 
-s port:mysqld:54=3307,port:mysqld:57=3307 mycluster;
+----------------------------+
| Command result             |
+----------------------------+
| Process added successfully |
+----------------------------+
1 row in set (2 min 34.22 sec)

In case you’re wondering how I was able to predict the node-ids that would be allocated to the new nodes, the scheme is very simple:

  • Node-ids 1-48 are reserved for data nodes
  • Node-ids 49-256 are used for all other node types
  • Within those ranges, node-ids are allocated sequentially

If you look carefully at the results you’ll notice that the ADD PROCESS command took a while to run (2.5 minutes) – the reason for this is that behind the scenes, MCM performed a rolling restart – ensuring that all of the existing nodes pick up the new configuration without losing database service. Before starting the new processes, it makes sense to double check that the correct ports are allocated to each of the mysqlds:

mcm> GET -d port:mysqld mycluster;
+------+-------+----------+---------+----------+---------+---------+---------+
| Name | Value | Process1 | NodeId1 | Process2 | NodeId2 | Level   | Comment |
+------+-------+----------+---------+----------+---------+---------+---------+
| port | 3306  | mysqld   | 50      |          |         | Default |         |
| port | 3306  | mysqld   | 51      |          |         | Default |         |
| port | 3306  | mysqld   | 52      |          |         | Default |         |
| port | 3307  | mysqld   | 54      |          |         |         |         |
| port | 3306  | mysqld   | 56      |          |         | Default |         |
| port | 3307  | mysqld   | 57      |          |         |         |         |
+------+-------+----------+---------+----------+---------+---------+---------+
6 rows in set (0.07 sec)

At this point the new processes can be started and then the status of all of the processes confirmed:

mcm> START PROCESS --added mycluster;
+------------------------------+
| Command result               |
+------------------------------+
| Process started successfully |
+------------------------------+
1 row in set (26.30 sec)

mcm> SHOW STATUS -r mycluster;
+--------+----------+-------------------------------+---------+-----------+---------+
| NodeId | Process  | Host                          | Status  | Nodegroup | Package |
+--------+----------+-------------------------------+---------+-----------+---------+
| 1      | ndbmtd   | paas-23-54.osc.uk.oracle.com  | running | 0         | 7_2_5   |
| 2      | ndbmtd   | paas-23-55.osc.uk.oracle.com  | running | 0         | 7_2_5   |
| 49     | ndb_mgmd | paas-23-56.osc.uk.oracle.com  | running |           | 7_2_5   |
| 50     | mysqld   | paas-23-54.osc.uk.oracle.com  | running |           | 7_2_5   |
| 51     | mysqld   | paas-23-55.osc.uk.oracle.com  | running |           | 7_2_5   |
| 52     | mysqld   | paas-23-56.osc.uk.oracle.com  | running |           | 7_2_5   |
| 53     | ndbapi   | *paas-23-56.osc.uk.oracle.com | added   |           |         |
| 3      | ndbmtd   | paas-23-54.osc.uk.oracle.com  | running | 1         | 7_2_5   |
| 4      | ndbmtd   | paas-23-55.osc.uk.oracle.com  | running | 1         | 7_2_5   |
| 54     | mysqld   | paas-23-56.osc.uk.oracle.com  | running |           | 7_2_5   |
| 55     | ndbapi   | *paas-23-56.osc.uk.oracle.com | added   |           |         |
| 56     | mysqld   | paas-23-57.osc.uk.oracle.com  | running |           | 7_2_5   |
| 57     | mysqld   | paas-23-57.osc.uk.oracle.com  | running |           | 7_2_5   |
| 58     | ndbapi   | *paas-23-57.osc.uk.oracle.com | added   |           |         |
+--------+----------+-------------------------------+---------+-----------+---------+
14 rows in set (0.08 sec)

The enlarged Cluster is now up and running but any existing MySQL Cluster tables will only be stored across the original data nodes. To remedy that, each of those existing tables should be repartitioned:

mysql> ALTER ONLINE TABLE simples REORGANIZE PARTITION;
Query OK, 0 rows affected (0.22 sec)
Records: 0  Duplicates: 0  Warnings: 0

mysql> OPTIMIZE TABLE simples;
+-------------------+----------+----------+----------+
| Table             | Op       | Msg_type | Msg_text |
+-------------------+----------+----------+----------+
| clusterdb.simples | optimize | status   | OK       |
+-------------------+----------+----------+----------+
1 row in set (0.00 sec)

You can safely perform the repartitioning while the Cluster is up and running (with your application sending in reads and writes) but there is a performance impact (has been measured at 50%) and so you probably want to do this at a reasonably quiet time of day.

As always, please post feedback and questions in the comments section of this post.


NoSQL and MySQL – free webinar, replay now available

Schema-free NoSQL Data

Update – the webinar replay is now available from here.

On Thursday, I’ll be presenting a webinar on NoSQL (of course with a MySQL twist!) – as always it’s free to attend but you need to register here in advance. Even if you can’t attend, it’s worth registering as you’ll be sent a link to the replay and the charts. The session will introduce the concepts and motivations behind the NoSQL movement and then go on to explain how you can get most of the same benefits with MySQL (including MySQL Cluster) while still getting the RDBMS benefits such as ACID transactions.

The official description:

The ever increasing performance demands of web-based services has generated significant interest in providing NoSQL access methods to MySQL – enabling users to maintain all of the advantages of their existing relational database infrastructure, while providing blazing fast performance for simple queries, using an API to complement regular SQL access to their data. This session looks at the existing NoSQL access methods for MySQL as well as the latest developments for both the InnoDB and MySQL Cluster storage engines. See how you can get the best of both worlds – persistence, consistency, rich queries, high availability, scalability and simple, flexible APIs and schemas for agile development.

When:

  • Thursday, March 29, 2012: 09:00 Pacific time (America)
  • Thu, Mar 29: 06:00 Hawaii time
  • Thu, Mar 29: 10:00 Mountain time (America)
  • Thu, Mar 29: 11:00 Central time (America)
  • Thu, Mar 29: 12:00 Eastern time (America)
  • Thu, Mar 29: 16:00 UTC
  • Thu, Mar 29: 17:00 Western European time
  • Thu, Mar 29: 18:00 Central European time
  • Thu, Mar 29: 19:00 Eastern European time


MySQL Cluster 7.2.5 available for download

The binary version for MySQL Cluster 7.2.5 has now been made available at http://www.mysql.com/downloads/cluster/ (GPL version) or https://support.oracle.com/ (commercial version).

A description of all of the changes (fixes) that have gone into MySQL Cluster 7.2.5 (compared to 7.2.4) will appear in the 7.2.5 Change log.


MySQL Scaling breakfast seminar – London, April 25th

I’ll be presenting on/demoing MySQL Cluster 7.2 at this free breakfast seminar in Oracle’s London office on 25th April – starting with coffee at 9:00 and ending with lunch at 13:00 (quite a generous take on “breakfast”!). Space is limited and so if you would like to attend then register early here.

As well as MySQL Cluster there will be sessions on optimising MySQL Server for performance and scaling and Oracle’s roadmap for cloud deployment.

Full agenda:

09:00 Registration and Welcome Coffee
09:30 Introduction
Simon Deighton, MySQL Sales Manager
09:45 MySQL Database: Performance & Scalability Optimizations
Tony Holmes, Principal PreSales Consultant
10:45 Coffee/Tea Break
11:00 Performance & Scalability with MySQL Cluster 7.2
Mat Keep, Senior Product Marketing Manager & Andrew Morgan, Senior Product Manager
12:00 The MySQL Roadmap: Discover What’s Next For On-Premise & Cloud-Based Deployments
Tony Holmes, Principal PreSales Consultant
12:45 Q&A
13:00 Light lunch buffet and end of seminar


1 Billion queries per minute and much more – free webinar on MySQL Cluster 7.2 GA

1 Billion queries per minute with MySQL Cluster

1 Billion queries per minute with MySQL Cluster

Oracle announced the General Availability of MySQL Cluster 7.2 today. Join this live webinar to learn about what’s new in the production-ready, GA release of MySQL Cluster 7.2, enabling the latest generation of web and telecoms applications to take advantage of high write scalability, SQL and NoSQL interfaces and 99.999% availability, including:

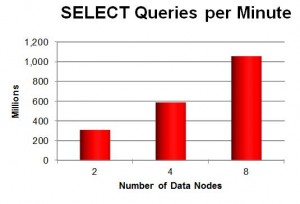
  • Performance enhancements delivering 1 billion queries per minute, using just 8 data nodes
  • 70x higher JOIN performance with Adaptive Query Localization, enabling real-time analytics across live data sets
  • New NoSQL API via Memcached, creating a persistent, key-value datastore for schema and schemaless data
  • Auto-sharding across data centers with synchronous replication for scaling of highly available, global services
  • Simplified ease-of-use with new options for on-premise and cloud deployments
  • Integration with the latest MySQL 5.5 GA release

The webinar takes place on Thursday 23rd February at 09:00 PST, 17:00 GMT, 18:00 CET. Mat Keep and I will be presenting.

As always, the webinar is free but you’ll need to register here in advance – even if you can’t make the live event, this will make sure that you get emailed a link to the recording.


1 Billion Queries Per Minute – MySQL Cluster 7.2 is GA!

1 Billion queries per minute with MySQL Cluster

1 Billion queries per minute with MySQL Cluster

Oracle have just announced that MySQL Cluster 7.2 is now GA and available for production deployments.

Amongst the highlights for the release are:

  • Performance enhancements delivering 1 billion queries per minute, using just 8 data nodes
  • 70x higher JOIN performance with Adaptive Query Localization, enabling real-time analytics across live data sets
  • New NoSQL API via Memcached, creating a persistent, key-value datastore for schema and schemaless data
  • Auto-sharding across data centers with synchronous replication for scaling of highly available, global services
  • Simplified ease-of-use with new options for on-premise and cloud deployments
  • Integration with the latest MySQL 5.5 GA release

You can find more of the details on this release together with links to lots of resources from this MySQL Dev-Zone article – “MySQL Cluster 7.2 GA Released, Delivers 1 BILLION Queries per Minute”


MySQL Cluster Manager 1.1.4 Released – includes support for MySQL Cluster 7.2

MySQL Cluster Manager 1.1. is now available to download and try from Oracle E-Delivery (select “MySQL Database” as the product pack).

There’s lots of good stuff gone in under the covers as part of this release, with some of the highlights being:

  • Support for MySQL Cluster 7.2
  • Configuration of MySQL Server parameters
  • Verbose option added to commands for extra info on what’s going on
  • Faster Cluster rolling restarts – data nodes from different node groups will be restarted in parallel (still avoids an outage but cuts the end-to-end restart time)
  • Robustness enhancements to the configurator – especially important when managing large Clusters
  • Bug fixes (well we always need to include that one)

More details on the changes can be found in the MySQL Cluster Manager documentation.

Please give it a try and let me know what you think.


Scalable, persistent, HA NoSQL Memcache storage using MySQL Cluster

Memcached API with Cluster Data Nodes

The native Memcached API for MySQL Cluster is now GA as part of MySQL Cluster 7.2

This post was first published in April 2011 when the first trial version of the Memcached API for MySQL Cluster was released; it was then up-versioned for the second MySQL Cluster 7.2 Development Milestone Release in October 2011. I’ve now refreshed the post based on the GA of MySQL Cluster 7.2 which includes the completed Memcache API.

There are a number of attributes of MySQL Cluster that make it ideal for lots of applications that are considering NoSQL data stores. Scaling out capacity and performance on commodity hardware, in-memory real-time performance (especially for simple access patterns), flexible schemas… sound familiar? In addition, MySQL Cluster adds transactional consistency and durability. In case that’s not enough, you can also simultaneously combine various NoSQL APIs with full-featured SQL – all working on the same data set. This post focuses on a new Memcached API that is now available to download, try out and deploy. This post steps through setting up Cluster with the Memcached API and then demonstrates how to read and write the same data through both Memcached and SQL (including for existing MySQL Cluster tables).

Download the community version from mysql.com or the commercial version from Oracle’s Software Delivery Cloud (note that there is not currently a Windows version).
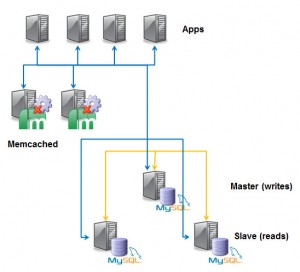
Traditional use of Memcached

First of all a bit of background about Memcached. It has typically been used as a cache when the performance of the database of record (the persistent database) cannot keep up with application demand. When changing data, the application will push the change to the database, when reading data, the application first checks the Memached cache, if it is not there then the data is read from the database and copied into Memcached. If a Memcached instance fails or is restarted for maintenance reasons, the contents are lost and the application will need to start reading from the database again. Of course the database layer probably needs to be scaled as well so you send writes to the master and reads to the replication slaves.

This has become a classic architecture for web and other applications and the simple Memcached attribute-value API has become extremely popular amongst developers.

As an illustration of the simplicity of this API, the following example stores and then retrieves the string “Maidenhead” against the key “Test”:

telnet localhost 11211
set Test 0 0 10
Maidenhead!
END
get Test
VALUE Test 0 10
Maidenhead!
END

Note that if we kill and restart the memcached server, the data is lost (as it was only held in RAM):

get Test
END

New options for using Memcached API with MySQL Cluster
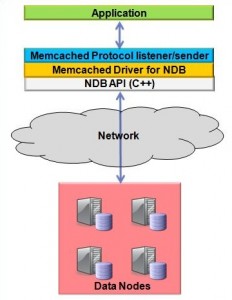
Architecture for Memcached NDB API

What we’re doing with MySQL Cluster is to offer a bunch of new ways of using this API but with the benefits of MySQL Cluster. The solution has been designed to be very flexible, allowing the application architect to find a configuration that best fits their needs.

A quick diversion on how this is implemented. The application sends reads and writes to the memcached process (using the standard Memcached API). This in turn invokes the Memcached Driver for NDB (which is part of the same process) which in turn calls the NDB API for very quick access to the data held in MySQL Cluster’s data nodes (it’s the fastest way of accessing MySQL Cluster).

Because the data is now stored in MySQL Cluster, it is persistent and you can transparently scale out by adding more data nodes (this is an on-line operation).

Another important point is that the NDB API is already a commonly used, fully functional access method that the Memcached API can exploit. For example, if you make a change to a piece of data then the change will automatically be written to any MySQL Server that has its binary logging enabled which in turn means that the change can be replicated to a second site.

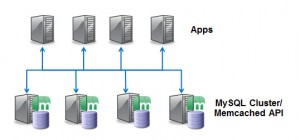
Memcached API with Cluster Data Nodes

So the first (and probably simplest) architecture is to co-locate the Memcached API with the data nodes.

The applications can connect to any of the memcached API nodes – if one should fail just switch to another as it can access the exact same data instantly. As you add more data nodes you also add more memcached servers and so the data access/storage layer can scale out (until you hit the 48 data node limit).
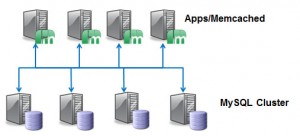
Memcached server with the Application

Another simple option is to co-locate the Memcached API with the application. In this way, as you add more application nodes you also get more Memcached throughput. If you need more data storage capacity you can independently scale MySQL Cluster by adding more data nodes. One nice feature of this approach is that failures are handled very simply – if one App/Memcached machine should fail, all of the other applications just continue accessing their local Memcached API.
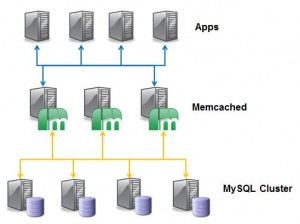
Separate Memcached layer

For maximum flexibility, you can have a separate Memcached layer so that the application, the Memcached API & MySQL Cluster can all be scaled independently.

In all of the examples so far, there has been a single source for the data (it’s all held in MySQL Cluster).
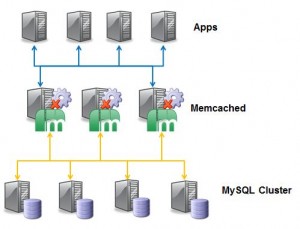


Local Cache in Memcached

If you choose, you can still have all or some of the data cached within the memcached server (and specify whether that data should also be persisted in MySQL Cluster) – you choose how to treat different pieces of your data. If for example, you had some data that is written to and read from frequently then store it just in MySQL Cluster, if you have data that is written to rarely but read very often then you might choose to cache it in Memcached as well and if you have data that has a short lifetime and wouldn’t benefit from being stored in MySQL Cluster then only hold it in Memcached. The beauty is that you get to configure this on a per-key-prefix basis (through tables in MySQL Cluster) and that the application doesn’t have to care – it just uses the Memcached API and relies on the software to store data in the right place(s) and to keep everything in sync.

Of course if you want to access the same data through SQL then you’d make sure that it was configured to be stored in MySQL Cluster.

Enough of the theory, how to try it out…

Installing & configuarying the software

As this post is focused on API access to the data rather than testing High Availability, performance or scalability the Cluster can be kept extremely simple with all of the processes (nodes) running on a single server. The only thing to be careful of when you create your Cluster is to make sure that you define at least 5 API sections (e.g. [mysqld]) in your configuration file so you can access using SQL and 2 Memcached servers (each uses 2 connections) at the same time.

For further information on how to set up a single-host Cluster, refer to this post or just follow the next few steps.

Create a config.ini file for the Cluster configuration:

[ndb_mgmd]
hostname=localhost
datadir=/home/billy/my_cluster/ndb_data
NodeId=1

[ndbd default]
noofreplicas=2
datadir=/home/billy/my_cluster/ndb_data

[ndbd]
hostname=localhost
NodeId=3

[ndbd]
hostname=localhost
NodeId=4

[mysqld]
NodeId=50

[mysqld]
NodeId=51

[mysqld]
NodeId=52

[mysqld]
NodeId=53

[mysqld]
NodeId=54

and a my.cnf file for the MySQL server:

[mysqld]
ndbcluster
datadir=/home/billy/my_cluster/mysqld_data

Before starting the Cluster, install the standard databases for the MySQL Server (from wherever you have MySQL Cluster installed – typically /usr/local/mysql):

[billy@ws2 mysql]$ ./scripts/mysql_install_db
  --basedir=/usr/local/mysql
  --datadir=/home/billy/my_cluster/mysqld_data
  --user=billy
Start up the system

We are now ready to start up the Cluster processes:

[billy@ws2 my_cluster]$ ndb_mgmd -f conf/config.ini
  --initial --configdir=/home/billy/my_cluster/conf/
[billy@ws2 my_cluster]$ ndbd
[billy@ws2 my_cluster]$ ndbd
[billy@ws2 my_cluster]$ ndb_mgm -e show # Wait for data nodes to start
[billy@ws2 my_cluster]$ mysqld --defaults-file=conf/my.cnf &

If your version doesn’t already have the ndbmemcache database installed then that should be your next step:

[billy@ws2 ~]$ mysql -h 127.0.0.1 -P3306 -u root < /usr/local/mysql/share/memcache-api/ndb_memcache_metadata.sql

After that, start the Memcached server (with the NDB driver activated):

[billy@ws2 ~]$  memcached -E /usr/local/mysql/lib/ndb_engine.so -e "connectstring=localhost:1186;role=db-only" -vv -c 20

Notice the “connectstring” – this allows the primary Cluster to be on a different machine to the Memcached API. Note that you can actually use the same Memcached server to access multiple Clusters – you configure this within the ndbmemcached database in the primary Cluster. In a production system you may want to include reconf=false amogst the -e parameters in order to stop configuration changes being applied to running Memcached servers (you’d need to restart those servers instead).

Try it out!

Next the fun bit – we can start testing it out:

[billy@ws2 ~]$ telnet localhost 11211

set maidenhead 0 0 3 
SL6 
STORED 
get maidenhead 
VALUE maidenhead 0 3 
SL6 
END

We can now check that the data really is stored in the database:

mysql> SELECT * FROM ndbmemcache.demo_table;
   +------------------+------------+-----------------+--------------+
   | mkey             | math_value | cas_value       | string_value |
   +------------------+------------+-----------------+--------------+
   | maidenhead       |       NULL | 263827761397761 | SL6          |
   +------------------+------------+-----------------+--------------+

Of course, you can also modify this data through SQL and immediately see the change through the Memcached API:

mysql> UPDATE ndbmemcache.demo_table SET string_value='sl6 4' WHERE mkey='maidenhead';

[billy@ws2 ~]$ telnet localhost 11211

get maidenhead
VALUE maidenhead 0 5 
SL6 4 
END

By default, the normal limit of 14K per row still applies when using the Memcached API; however, the standard configuration treats any key-value pair with a key-pefix of “b:” differently and will allow the value to be up to 3 Mb (note the default limit imposed by the Memcached server is 1 Mb and so you’d also need to raise that). Internally the contents of this value will be split between 1 row in ndbmemcache.demo_table_large and one or more rows in ndbmemcache.external_values.

Note that this is completely schema-less, the application can keep on adding new key/value pairs and they will all get added to the default table. This may well be fine for prototyping or modest sized databases. As you can see this data can be accessed through SQL but there’s a good chance that you’ll want a richer schema on the SQL side or you’ll need to have the data in multiple tables for other reasons (for example you want to replicate just some of the data to a second Cluster for geographic redundancy or to InnoDB for report generation).

The next step is to create your own databases and tables (assuming that you don’t already have them) and then create the definitions for how the app can get at the data through the Memcached API. First let’s create a table that has a couple of columns that we’ll also want to make accessible through the Memcached API:

mysql> CREATE DATABASE clusterdb; USE clusterdb;
mysql> CREATE TABLE towns_tab (town VARCHAR(30) NOT NULL PRIMARY KEY,
  zip VARCHAR(10), population INT, county VARCHAR(10)) ENGINE=NDB;
mysql> REPLACE INTO towns_tab VALUES ('Marlow', 'SL7', 14004, 'Berkshire');

Next we need to tell the NDB driver how to access this data through the Memcached API. Two ‘containers’ are created that identify the columns within our new table that will be exposed. We then define the key-prefixes that users of the Memcached API will use to indicate which piece of data (i.e. database/table/column) they are accessing:

mysql> USE ndbmemcache;
mysql> REPLACE INTO containers VALUES ('towns_cnt', 'clusterdb',
'towns_tab', 'town', 'zip', 0, NULL, NULL, NULL, NULL);
mysql> REPLACE INTO containers VALUES ('pop_cnt', 'clusterdb',
  'towns_tab', 'town', 'population', 0, NULL, NULL, NULL, NULL);
mysql> SELECT * FROM containers;
   +------------+-------------+------------------+-------------+----------------+-------+------------------+------------+--------------------+-----------------------------+
   | name       | db_schema   | db_table         | key_columns | value_columns  | flags | increment_column | cas_column | expire_time_column | large_values_table          |
   +------------+-------------+------------------+-------------+----------------+-------+------------------+------------+--------------------+-----------------------------+
   | demo_ext   | ndbmemcache | demo_table_large | mkey        | string_value   | 0     | NULL             | cas_value  | NULL               | ndbmemcache.external_values |
   | towns_cnt  | clusterdb   | towns_tab        | town        | zip            | 0     | NULL             | NULL       | NULL               | NULL                        |
   | demo_table | ndbmemcache | demo_table       | mkey        | string_value   | 0     | math_value       | cas_value  | NULL               | NULL                        |
   | pop_cnt    | clusterdb   | towns_tab        | town        | population     | 0     | NULL             | NULL       | NULL               | NULL                        |
   | demo_tabs  | ndbmemcache | demo_table_tabs  | mkey        | val1,val2,val3 | flags | NULL             | NULL       | expire_time        | NULL                        |
   +------------+-------------+------------------+-------------+----------------+-------+------------------+------------+--------------------+-----------------------------+
mysql> REPLACE INTO key_prefixes VALUES (1, 'twn_pr:', 0,
  'ndb-only', 'towns_cnt');
mysql> REPLACE INTO key_prefixes VALUES (1, 'pop_pr:', 0,
  'ndb-only', 'pop_cnt');
mysql> SELECT * FROM key_prefixes;
   +----------------+------------+------------+---------------+------------+
   | server_role_id | key_prefix | cluster_id | policy        | container  |
   +----------------+------------+------------+---------------+------------+
   |              1 | pop_pr:    |          0 | ndb-only      | pop_cnt    |
   |              0 | t:         |          0 | ndb-test      | demo_tabs  |
   |              3 |            |          0 | caching       | demo_table |
   |              0 |            |          0 | ndb-test      | demo_table |
   |              0 | mc:        |          0 | memcache-only | NULL       |
   |              1 | b:         |          0 | ndb-only      | demo_ext   |
   |              2 |            |          0 | memcache-only | NULL       |
   |              1 |            |          0 | ndb-only      | demo_table |
   |              0 | b:         |          0 | ndb-test      | demo_ext   |
   |              3 | t:         |          0 | caching       | demo_tabs  |
   |              1 | t:         |          0 | ndb-only      | demo_tabs  |
   |              4 |            |          0 | ndb-test      | demo_ext   |
   |              1 | twn_pr:    |          0 | ndb-only      | towns_cnt  |
   |              3 | b:         |          0 | caching       | demo_ext   |
   +----------------+------------+------------+---------------+------------+

At present it is necessary to restart the Memcached server in order to pick up the new key_prefix (and so you’d want to run multiple instances in order to maintain service):


[billy@ws2:~]$ memcached -E /usr/local/mysql/lib/ndb_engine.so -e "connectstring=localhost:1186;role=db-only" -vv -c 20
   07-Feb-2012 11:22:29 GMT NDB Memcache 5.5.19-ndb-7.2.4 started [NDB 7.2.4; MySQL 5.5.19]
   Contacting primary management server (localhost:1186) ...
   Connected to "localhost:1186" as node id 51.
   Retrieved 5 key prefixes for server role "db-only".
   The default behavior is that:
       GET uses NDB only
       SET uses NDB only
       DELETE uses NDB only.
   The 4 explicitly defined key prefixes are "b:" (demo_table_large), "pop_pr:" (towns_tab), 
      "t:" (demo_table_tabs) and "twn_pr:" (towns_tab)

Now these columns (and the data already added through SQL) are accessible through the Memcached API:

[billy@ws2 ~]$ telnet localhost 11211

get twn_pr:Marlow
VALUE twn_pr:Marlow 0 3 
SL7 
END 
set twn_pr:Maidenhead 0 0 3 
SL6 
STORED 
set pop_pr:Maidenhead 0 0 5 
42827 
STORED

and then we can check these changes through SQL:

mysql> SELECT * FROM clusterdb.towns_tab;
   +------------+------+------------+-----------+
   | town       | zip  | population | county    |
   +------------+------+------------+-----------+
   | Maidenhead | SL6  |      42827 | NULL      |
   | Marlow     | SL7  |      14004 | Berkshire |
   +------------+------+------------+-----------+

One final test is to start a second memcached server that will access the same data. As everything is running on the same host, we need to have the second server listen on a different port:

[billy@ws2 ~]$ memcached -E /usr/local/mysql/lib/ndb_engine.so 
   -e "connectstring=localhost:1186;role=db-only" -vv -c 20 
   -p 11212 -U 11212 
[billy@ws2 ~]$ telnet localhost 11212

get twn_pr:Marlow 
VALUE twn_pr:Marlow 0 3
SL7 
END
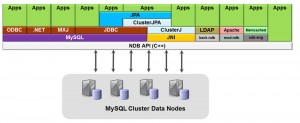
Memcached alongside NoSQL & SQL APIs

As mentioned before, there’s a wide range of ways of accessing the data in MySQL Cluster – both SQL and NoSQL. You’re free to mix and match these technologies – for example, a mission critical business application using SQL, a high-running web app using the Memcached API and a real-time application using the NDB API. And the best part is that they can all share the exact same data and they all provide the same HA infrastructure (for example synchronous replication and automatic failover within the Cluster and geographic replication to other clusters).

Finally, a reminder – please try this out and let us know what you think (or if you don’t have time to try it then let us now what you think anyway) by adding a comment to this post.


70x Faster Joins with AQL now GA with MySQL Cluster 7.2

70x faster joins with AQL

The new GA MySQL Cluster 7.2 Release (7.2.4) just announced by Oracle includes 2 new features which when combined can improve the performance of joins by a factor of 70x (or even higher). The first enhancement is that MySQL Cluster now provides the MySQL Server with better information on the available indexes which allows the MySQL optimizer to automatically produce better query execution plans. Previously it was up to the user to manually provide hints to the optimizer. The second new feature is Adaptive Query Localization which allows the work of the join to be distributed across the data nodes (local to the data it’s working with) rather than up in the MySQL Server; this allows more computing power to be applied to calculating the join as well as dramatically reducing the number of messages being passed around the system. The combined result is that your joins can now run MUCH faster and this post describes a test that results in a 70x speed-up for a real-world query.

The Query

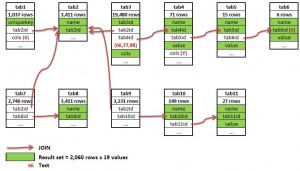
11-Way Join used in Test

The join used in this test is based on a real-world example used for an on-line store/Content Management System. The original query identified all of the media in the system which was appropriate to a particular device and for which a user is entitled to access. As this query is part of a customer’s application I’ve replaced all of the table and column names.

The join runs across 11 tables (which contain 33.5K rows in total) and produces a result set of 2,060 rows, each with 19 columns. The figure to the right illustrates the join and the full join is included below.

SELECT
        tab1.uniquekey,
        tab8.name,
        tab8.tab8id,
        tab11.name,
        tab11.tab11id,
        tab11.value,
        tab10.tab10id,
        tab10.name,
        tab2.name,
        tab2.tab2id,
        tab4.value + tab5.value + tab6.value,
        tab3.colx,
        tab3.tab3id,
        tab4.tab4id,
        tab4.name,
        tab5.tab5id,
        tab5.name,
        tab6.tab6id,
        tab6.name
FROM
        tab1,tab2,tab3,tab4,tab5,tab6,tab7,tab8,tab9,tab10,tab11
WHERE
        tab7.tab2id = tab2.tab2id	AND
        tab7.tab8id = tab8.tab8id	AND
        tab9.tab2id = tab2.tab2id	AND
	tab9.tab10id = tab10.tab10id	AND
	tab10.tab11id = tab11.tab11id	AND
        tab3.tab2id = tab2.tab2id	AND
	tab3.tab4id = tab4.tab4id	AND
	tab4.tab5id = tab5.tab5id	AND
	tab4.colz =  'Y'		AND
	tab5.tab6id = tab6.tab6id	AND
	tab6.tab6id IN (6)		AND
	(tab3.tab4id IN (66, 77, 88))	AND
	tab1.tab2id = tab2.tab2id	AND
	tab1.colx = 6;

Enabling AQL

First of all, make sure that you’re using the GA version of MySQL Cluster (7.2.4 or later); the Open Source version is available from http://dev.mysql.com/downloads/cluster/#downloads

and the commercial version from the Oracle Software Delivery Cloud. You can double check that AQL is enabled:

mysql> show variables like 'ndb_join_pushdown';

| ndb_join_pushdown                   | ON |

Running the Query & Results

Test configuration

To get the full benefit from AQL, you should run “ANALYZE TABLE;” once for each of the tables (no need to repeat for every query and it only needs running on one MySQL Server in the Cluster). This is very important and you should start doing this as a matter of course when you create or modify a table.

For this test, 3 machines were used:

  1. Intel Core 2 Quad Core @2.83 GHz; 8 Gbytes RAM; single, multi-threaded data node (ndbmtd)
  2. Intel Core 2 Quad Core @2.83 GHz; 8 Gbytes RAM; single, multi-threaded data node (ndbmtd)
  3. 4 Core Fedora VM running on VirtualBox on Windows 7, single MySQL Server

The query was then run and compared to MySQL CLuster 7.1.15a:

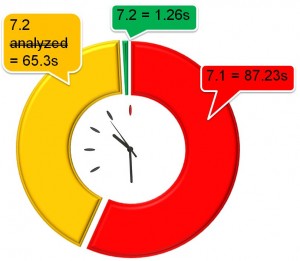
MySQL Cluster 7.1.15a 1 minute 27.23 secs
MySQL Cluster 7.2.1 (without having run ANALYZE TABLE) 1 minute 5.3 secs 1.33x Cluster 7.1
MySQL Cluster 7.2.1 (having run ANALYZE TABLE) 1.26 secs 69.23x Cluster 7.1

How it Works

Classic Nested-Loop-Join

Traditionally, joins have been implemented in the MySQL Server where the query was executed. This is implemented as a nested-loop join; for every row from the first part of the join, a request has to be sent to the data nodes in order to fetch the data for the next level of the join and for every row in that level…. This method can result in a lot of network messages which slows down the query (as well as wasting resources). When turned on, Adaptive Query Localization results in the hard work being pushed down to the data nodes where the data is locally accessible. As a bonus, the work is divided amongst the pool of data nodes and so you get parallel execution.

NDB API

I’ll leave the real deep and dirty details to others but cover the basic concepts here. All API nodes access the data nodes using the native C++ NDB API, the MySQL Server is one example of an API node (the new Memcached Cluster API is another). This API has been expanded to allow parameterised or linked queries where the input from one query is dependent on the previous one. To borrow an example from an excellent post by Frazer Clement on the topic, the classic way to implement a join would be…

SQL > select t1.b, t2.c from t1,t2 where t1.pk=22 and t1.b=t2.pk;
  ndbapi > read column b from t1 where pk = 22;
              [round trip]
           (b = 15)
  ndbapi > read column c from t2 where pk = 15;
              [round trip]
           (c = 30)
           [ return b = 15, c = 30 ]

Using the new functionality this can be performed with a single network round trip where the second read operation is dependent on the results of the first…

  ndbapi > read column @b:=b from t1 where pk = 22;
           read column c from t2 where pk=@b;
              [round trip]
           (b = 15, c = 30)
           [ return b = 15, c = 30 ]

You can check whether your query is fitting these rules using EXPLAIN, for example:

mysql> set ndb_join_pushdown=on;
mysql> EXPLAIN SELECT COUNT(*) FROM residents,postcodes WHERE residents.postcode=postcodes.postcode AND postcodes.town="MAIDENHEAD";
+----+-------------+-----------+--------+---------------+---------+---------+------------------------------+--------+--------------------------------------------------------------------------+
| id | select_type | table     | type   | possible_keys | key     | key_len | ref                          | rows   | Extra                                                                    |
+----+-------------+-----------+--------+---------------+---------+---------+------------------------------+--------+--------------------------------------------------------------------------+ 
| 1  | SIMPLE      | residents | ALL    | NULL          | NULL    | NULL    | NULL                         | 100000 | Parent of 2 pushed join@1                                                |
| 1  | SIMPLE      | postcodes | eq_ref | PRIMARY       | PRIMARY | 22      | clusterdb.residents.postcode | 1      | Child of 'residents' in pushed join@1; Using where with pushed condition | 
+----+-------------+-----------+--------+---------------+---------+---------+------------------------------+--------+--------------------------------------------------------------------------+
mysql> EXPLAIN EXTENDED SELECT COUNT(*) FROM residents,postcodes,towns 
  WHERE residents.postcode=postcodes.postcode AND 
  postcodes.town=towns.town AND towns.county="Berkshire"; 
+----+-------------+-----------+--------+---------------+---------+---------+------------------------------+--------+----------+------------------------------------------------------------------------------------------------------------------------+ 
| id | select_type | table     | type   | possible_keys | key     | key_len | ref                          | rows   | filtered | Extra                                                                                                                  | 
+----+-------------+-----------+--------+---------------+---------+---------+------------------------------+--------+----------+------------------------------------------------------------------------------------------------------------------------+ 
| 1  | SIMPLE      | residents | ALL    | NULL          | NULL    | NULL    | NULL                         | 100000 | 100.00   | Parent of 3 pushed join@1                                                                                              | 
| 1  | SIMPLE      | postcodes | eq_ref | PRIMARY       | PRIMARY | 22      | clusterdb.residents.postcode | 1      | 100.00   | Child of 'residents' in pushed join@1                                                                                  |
| 1  | SIMPLE      | towns     | eq_ref | PRIMARY       | PRIMARY | 22      | clusterdb.postcodes.town     | 1      | 100.00   | Child of 'postcodes' in pushed join@1; Using where with pushed condition: (`clusterdb`.`towns`.`county` = 'Berkshire') | 
+----+-------------+-----------+--------+---------------+---------+---------+------------------------------+--------+----------+------------------------------------------------------------------------------------------------------------------------+

Note that if you want to check for more details why your join isn’t currently being pushed down to the data node then you can use “EXPLAIN EXTENDED” and then “SHOW WARNINGS” to get more hints. Hopefully that will allow you to tweak your queries to get the best improvements.

PLEASE let us know your experiences and give us examples of queries that worked well and (just as importantly) those that didn’t so that we can improve the feature – just leave a comment on this Blog with your table schemas, your query and your before/after timings.