Tag Archive for MySQL Cluster CGE

Webinar: MySQL Cluster 7.0: What’s New? (AS/ANZ/IN)

Mat Keep and I will be presenting a Webinar on Wednesday, August 12, 2009 describing the new capabilities of MySQL Cluster 7.0. The time is designed to be Asia/Australasia-friendly but of course it’s open to everyone.

Register for the MySQL Cluster 7 Webinar here.

By attending this webinar, you will learn more about the next generation of MySQL Cluster, and how it enables you to deliver 99.999% database availability, with real time performance and linear scalability, while slashing TCO.

Boasting a range of breakthrough capabilities, MySQL Cluster 7.0 will enable you to stay ahead of your most demanding, mission-critical application requirements. Enhanced scalability delivers higher database performance with fewer nodes to simplify deployment and administration. Expanded platform support and interoperability delivers more choice in both the development and deployment of MySQL Cluster. Simplified cluster monitoring tools reduce DBA administration overhead and operational costs.

Wednesday, August 12, 2009: 14:00 Singapore/Malaysia/Philippines time

Wed, Aug 12: 11:30 India, Sri Lanka
Wed, Aug 12: 13:00 Thailand/Vietnam/Western Indonesia time
Wed, Aug 12: 14:00 Western Australia
Wed, Aug 12: 15:30 Northern Territory (Australia)
Wed, Aug 12: 15:30 South Australia
Wed, Aug 12: 16:00 Queensland (Australia)
Wed, Aug 12: 16:00 NSW, ACT, Victoria, Tasmania (Australia)
Wed, Aug 12: 18:00 New Zealand time


MySQL Cluster Data Node restart times

Restart times have been reduced in MySQL Cluster 6.3.28a & 7.0.9a – refer to that article for the new timings: http://www.clusterdb.com/mysql-cluster/mysql-cluster-restarts-get-faster/

Restarts are required for certain, infrequent maintenance activities. Note that there is no loss of service while a single node restarts.

When a data node restarts, it first attempts to load the data into memory from the local log files and then it will catch up with any subsequent changes by retrieveing them from the surviving node(s) in its node group.

 Based on this, you would expect the time taken to restart a data node to be influenced by:

  1. The amount of data that was stored on the data node before the restart
  2. Rate of updates being made to the data during the restart
  3. Network performance (assuming the data is being updated during recovery)

The times will also be influenced bycertain configuration parameters, performance of the host machine and whether the multi-threaded data node (ndbmtd) is being used.

To provide some insight into how these factors impact restart times, tests have been performed where the following factors are varied:

  • Database size (Each Gbyte is made up of 1,000,000 tuples in each of 5 tables)
  • Whether traffic is running or not (a single thread using the NDB API to send in up to 2K tps (10K updates/second))
  • Whether the 2 data nodes in the node group are on the same host or separated by a Gbit Ethernet network

The following factors are kept constant:

  • Physical hosts: Intel Core 2 Quad Q8200@2.33 GHz; 7.7 GBytes RAM
  • NoOfFragmentLogFiles: 300
  • MaxNoOfExecutionThreads=4

Here are the observed results:

Data Node restart times

Data Node restart times

There are a couple of things to note from these results:

  • Using the multi-threaded data node (ndbmtd) greatly improves the restart time (in this case, 4 threads were available, improvements could be even greater on an 8 core/thread system)
  • Results become less predictable when heavy update traffic is being processed (in this case, up to 10,000 updated rows/second on a single node group). In the tests, no attempt was made to regulate this traffic and the test application was run on the same host as the one of the data nodes. Changes to the rate of updates will vary how long it takes for the restarting node to catch-up as it’s a moving target.

There is another recovery/restart scenario. The measurements shown above assumed that the file system on the data node’s host was intact and could be used to recover the in-memory copy – if that were not the case (or the data nodes were restarted with the “initial” option) then all of the data would have to be recovered from the surviving data node(s) in the same node group. As a comparison restarting a 6 Gbyte data node with the “initial” option took 20 minutes compared to 8 minutes without it (ndbmtd, over Gbit n/w).


Intelligent user-controlled partitioning and writing distribution-aware NDB API Applications

Default partitioning
By default, Cluster will partition based on primary key

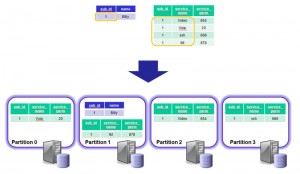
By default, Cluster will partition based on primary key

When adding rows to a table that’s using MySQL Cluster as the storage engine, each row is assigned to a partition where that partition is mastered by a particular data node in the Cluster. The best performance comes when all of the data required to satisfy a transaction is held within a single partition so that it can be satisfied within  a single data node rather than being bounced back and forth between multiple nodes where  extra latency will be introduced.

By default, Cluster partions the data by hashing the primary key. This is not always optimal.

For example, if we have 2 tables, the first using a single-column primary key (sub_id) and the second using a composite key (sub_id, service_name)…

mysql> describe names;
+--------+-------------+------+-----+---------+-------+
| Field  | Type        | Null | Key | Default | Extra |
+--------+-------------+------+-----+---------+-------+
| sub_id | int(11)     | NO   | PRI | NULL    |       |
| name   | varchar(30) | YES  |     | NULL    |       |
+--------+-------------+------+-----+---------+-------+

mysql> describe services;
+--------------+-------------+------+-----+---------+-------+
| Field        | Type        | Null | Key | Default | Extra |
+--------------+-------------+------+-----+---------+-------+
| sub_id       | int(11)     | NO   | PRI | 0       |       |
| service_name | varchar(30) | NO   | PRI |         |       |
| service_parm | int(11)     | YES  |     | NULL    |       |
+--------------+-------------+------+-----+---------+-------+

If we then add data to these (initially empty) tables, we can then use the ‘explain’ command to see which partitions (and hence phyical hosts) are used to store the data for this single subscriber…

mysql> insert into names values (1,'Billy');

mysql> insert into services values (1,'VoIP',20),(1,'Video',654),(1,'IM',878),(1,'ssh',666);

mysql> explain partitions select * from names where sub_id=1;
+----+-------------+-------+------------+-------+---------------+---------+---------+-------+------+-------+
| id | select_type | table | partitions | type  | possible_keys | key     | key_len | ref   | rows | Extra |
+----+-------------+-------+------------+-------+---------------+---------+---------+-------+------+-------+
|  1 | SIMPLE      | names | p3         | const | PRIMARY       | PRIMARY | 4       | const |    1 |       |
+----+-------------+-------+------------+-------+---------------+---------+---------+-------+------+-------+

mysql> explain partitions select * from services where sub_id=1;
+----+-------------+----------+-------------+------+---------------+---------+---------+-------+------+-------+
| id | select_type | table    | partitions  | type | possible_keys | key     | key_len | ref   | rows | Extra |
+----+-------------+----------+-------------+------+---------------+---------+---------+-------+------+-------+
|  1 | SIMPLE      | services | p0,p1,p2,p3 | ref  | PRIMARY       | PRIMARY | 4       | const |   10 |       |
+----+-------------+----------+-------------+------+---------------+---------+---------+-------+------+-------+

The service records for the same subscriber (sub_id = 1) are split accross 4 diffent partitions (p0, p1, p2 & p3). This means that the query results in messages being passed backwards and forwards between the 4 different data nodes which cnsumes extra CPU time and incurs extra latency.

User-defined partitioning to the rescue

We can override the default behaviour by telling Cluster which fields should be fed into the hash algorithm. For our example, it’s reasonable to expect a transaction to access multiple records for the same subscriber (identified by their sub_id) and so the application will perform best if all of the rows for that sub_id are held in the same partition…

mysql> drop table services;

mysql> create table services (sub_id int, service_name varchar (30), service_parm int, primary key (sub_id, service_name)) engine = ndb
-> partition by key (sub_id);

mysql> insert into services values (1,'VoIP',20),(1,'Video',654),(1,'IM',878),(1,'ssh',666);

mysql> explain partitions select * from services where sub_id=1;
+----+-------------+----------+------------+------+---------------+---------+---------+-------+------+-------+
| id | select_type | table    | partitions | type | possible_keys | key     | key_len | ref   | rows | Extra |
+----+-------------+----------+------------+------+---------------+---------+---------+-------+------+-------+
|  1 | SIMPLE      | services | p3         | ref  | PRIMARY       | PRIMARY | 4       | const |   10 |       |
+----+-------------+----------+------------+------+---------------+---------+---------+-------+------+-------+

Now all of the rows for sub_id=1 from the services table are now held within a single partition (p3) which is the same as that holding the row for the same sub_id in the names table. Note that it wasn’t necessary to drop, recreate and re-provision the services table, the following command would have had the same effect:

mysql> alter table services partition by key (sub_id);

Writing a distribution-aware application using the NDB API
Distribution unaware NDB API application

Distribution unaware NDB API application

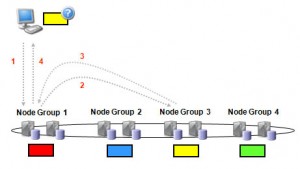
In our example, the data is nicely partitioned for optimum performance when accessing all of the subscriber’s data – a single data node holding all of their data. However, there is another step to take to get the best out of your NDB-API based application. By default, the NDB API will use the Transaction Coordinator (TC) on a ‘random’ data node to handle the transaction – we could get lucky and the guess is correct but it’s more likely that it will be sent to the wrong data node which with then have to proxy it to the correct data node. The probability of getting it right first time reduces as the number of node groups increases and so can prevent linear scaling.

It’s very simple to modify this behaviour so that the best data node/TC is hit first time, every time. When creating the transaction, the application can include parameters telling the NDB API one of the tables to be accessed and for what key(s). The NDB API will then use that information to identify the best TC to use…

const NdbDictionary::Dictionary* myDict= myNdb.getDictionary();
const NdbDictionary::Table *namesTable= myDict->getTable("names");
const NdbDictionary::Table *servicesTable= myDict->getTable("services");

NdbRecAttr *myRecAttr;

Ndb::Key_part_ptr dist_key[2];
dist_key[0].ptr = (const void*) &sub_id;
dist_key[0].len = sizeof(sub_id);
dist_key[1].ptr = NULL;
dist_key[1].len = NULL;

if (namesTable == NULL)
APIERROR(myDict->getNdbError());

if (servicesTable == NULL)
APIERROR(myDict->getNdbError());

NdbTransaction *myTransaction= myNdb.startTransaction(namesTable,
dist_key);
if (myTransaction == NULL) APIERROR(myNdb.getNdbError());

NdbOperation *myOperation= myTransaction->getNdbOperation(namesTable);
if (myOperation == NULL) APIERROR(myTransaction->getNdbError());

myOperation->readTuple(NdbOperation::LM_Read);
myOperation->equal("sub_id",sub_id);

myRecAttr= myOperation->getValue("name", NULL);
if (myRecAttr == NULL) APIERROR(myTransaction->getNdbError());

// Perform operations on "services" table as well as part of another operation
// if required; the subscriber's data will be in the same data node

if (myTransaction->execute( NdbTransaction::Commit ) == -1)
APIERROR(myTransaction->getNdbError());

printf(" %2d    %sn",
sub_id, myRecAttr->aRef());

myNdb.closeTransaction(myTransaction);

Note that as the services table has been configured to use the same field (sub_id) for partitioning as the names table, the startTransaction method only needs to know about the namesTable as the TC that the NDB API selects will serve just as well for this subscriber’s data from the services table. The rest of the code can be found in distaware.


MySQL Cluster Multi-Range Read using NDB API

As described in “Batching – improving MySQL Cluster performance when using the NDB API“, reducing the number of times the application node has to access the data nodes can greatly improve performance and reduce latency. That article focussed on setting up multiple operatations (as part of a single transaction) and then executing them as a single batch sent by the NDB API library to the data nodes.

The purpose of this entry is to show how a single NDB API operation can access multiple rows from a table with a single index lookup. It goes on to explain the signifficance of this both now and in the future (much faster joins using SQL for MySQL Cluster tables).

There are several operation types to cover table scans and index lookups (refer to the “MySQL Cluster API Developer Guide” for detals). For this example, I use an NdbIndexScanOperation.

The code sample assumes that the following table structure and data has been set up for table “COUNTRY” in database “TEST_DB_1” using the NDB storage engine (Note that the full example application sets this up automatically):

+--------------+------------------+------+-----+---------+-------+
| Field        | Type             | Null | Key | Default | Extra |
+--------------+------------------+------+-----+---------+-------+
| SUB_ID       | int(10) unsigned | NO   | PRI | NULL    |       |
| COUNTRY_CODE | int(10) unsigned | NO   |     | NULL    |       |
+--------------+------------------+------+-----+---------+-------+

+--------+--------------+
| SUB_ID | COUNTRY_CODE |
+--------+--------------+
|     13 |            1 |
|      2 |            1 |
|      4 |           61 |
|      7 |           46 |
|      9 |           44 |
|     10 |           33 |
|     12 |           44 |
|      5 |           33 |
|     14 |           61 |
|      1 |           44 |
|      8 |            1 |
+--------+--------------+

The following code causes the NDB API library to send a single request from the application to the data nodes to read the rows where the primary key “SUB_ID” falls into the ranges (2<= SUB_ID <4); (5 < SUB_ID <=9) or (SUB_ID == 13). Note that this is just a fragment of the code and the error checking has been removed for clarity (refer to full example application to see the rest of the code, including the error handling).

NdbIndexScanOperation *psop;

/* RecAttrs for NdbRecAttr Api */
NdbRecAttr *recAttrAttr1;
NdbRecAttr *recAttrAttr2;

psop=myTransaction->getNdbIndexScanOperation(myPIndex);

Uint32 scanFlags=
  NdbScanOperation::SF_OrderBy |
  NdbScanOperation::SF_MultiRange |
  NdbScanOperation::SF_ReadRangeNo;

psop->readTuples(NdbOperation::LM_Read,
                 scanFlags,
                 (Uint32) 0,          // batch
                 (Uint32) 0)          // parallel

/* Add a bound
* Tuples where SUB_ID >=2 and < 4
*/
Uint32 low=2;
Uint32 high=4;
Uint32 match=13;

psop->setBound("SUB_ID", NdbIndexScanOperation::BoundLE, (char*)&low);
psop->setBound("SUB_ID", NdbIndexScanOperation::BoundGT, (char*)&high);
psop->end_of_bound(0);

/* Second bound
* Tuples where SUB_ID > 5 and <=9
*/
low=5;
high=9;
psop->setBound("SUB_ID", NdbIndexScanOperation::BoundLT, (char*)&low);
psop->setBound("SUB_ID", NdbIndexScanOperation::BoundGE, (char*)&high);
psop->end_of_bound(1);

/* Third bound
* Tuples where SUB_ID == 13
*/
psop->setBound("SUB_ID", NdbIndexScanOperation::BoundEQ, (char*)&match);
psop->end_of_bound(2);

/* Read all columns */
recAttrAttr1=psop->getValue("SUB_ID");
recAttrAttr2=psop->getValue("COUNTRY_CODE");

myTransaction->execute( NdbTransaction::Commit);

while (psop->nextResult(true) == 0)
{
  printf(" %8d    %8d   Range no : %2dn",
  recAttrAttr1->u_32_value(),
  recAttrAttr2->u_32_value(),
  psop->get_range_no());
}
psop->close();

When run, this code produces the following output:

SUB_ID    COUNTRY_CODE
2           1   Range no :  0
7          46   Range no :  1
8           1   Range no :  1
9          44   Range no :  1
13          1   Range no :  2

Why is this signifficant?

This can be very useful for applications using the NDB API; imagine an application that wanted to find the birthdays for all of my friends. Assume that I have 2 tables of interest:

mysql> describe friends; describe birthday;
+--------+-------------+------+-----+---------+-------+
| Field  | Type        | Null | Key | Default | Extra |
+--------+-------------+------+-----+---------+-------+
| name   | varchar(30) | NO   | PRI | NULL    |       |
| friend | varchar(30) | NO   | PRI |         |       |
+--------+-------------+------+-----+---------+-------+
2 rows in set (0.00 sec)
+-------+-------------+------+-----+---------+-------+
| Field | Type        | Null | Key | Default | Extra |
+-------+-------------+------+-----+---------+-------+
| name  | varchar(30) | NO   | PRI | NULL    |       |
| day   | int(11)     | YES  |     | NULL    |       |
| month | int(11)     | YES  |     | NULL    |       |
| year  | int(11)     | YES  |     | NULL    |       |
+-------+-------------+------+-----+---------+-------+
4 rows in set (0.00 sec)

Using the NDB API, I can create 1 NdbIndexScanOperation operation to read all tuples from “friends” where the “name” field matches “Andrew” and then use the results to perform a second NdbIndexScanOperation to read the rows that match each of my friends’ names in the “birthday” table. In other words, performing a join using only 2 trips from the application to the data nodes.

Of course, it’s simple to get the same results using SQL…SELECT birthday.name, birthday.day, birthday.month FROM friends, birthday WHERE friend.name='Andrew' AND friends.friend=birthday.name;However, if the tables are very large and I have a lot of friends then performing this join using SQL can be expensive as it requires a separate trip to the data nodes to fetch each birthday. In the future, Batched Key Access (BKA) will optimise these joins by performing one of these NDB API Multi-Range Reads (MRR) to fetch all of the birthdays in one go!  Until then, using the NDB API directly can deliver signifficantly faster results.


Batching – improving MySQL Cluster performance when using the NDB API

As many people are aware, the best performance can be achieved from MySQL Cluster by using the native (C++) NDB API (rather than using SQL via a MySQL Server). What’s less well known is that you can improve the performance of your NDB-API enabled application even further by ‘batching’. This article attempts to explain why batching helps and how to do it.

What is batching and why does it help?

NDB API accessing data from the Cluster without batching

NDB API accessing data from the Cluster without batching

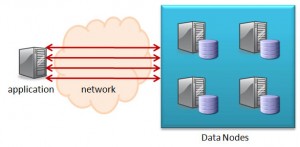
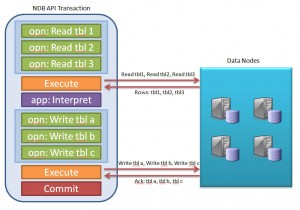
Batching involves sending multiple operations from the application to the Cluster in one group rather than individually; the Cluster then processes these operations and sends back the results. Without batching, each of these operations incurs the latency of crossing the network as well as consuming CPU time on both the application and data node hosts.

By batching together multiple operations, all of the requests can be sent in one message and all of the replies received in another – thus reducing the number of messages and hence the latency and CPU time consumed.

How to use batching with the MySQL Cluster NDB API

Batched NDB API Operations

Batched NDB API Operations

The principle is that you batch together as many operations as you can, execute them together and then interpret the results. After interpretting the results, the application may then decide to send in another batch of operations.

An NDB API transaction consists of one or more operations where each operation (currently) acts on a single table and could be a simple primary key read or write or a complex table scan.

The operation is not sent to the Cluster at the point that it’s defined. Instead, the application must explicitly request that all operations defined within the transaction up to that point be executed – at which point, the NDB API can send the batch of operations to the data nodes to be processed. The application may request that the transaction be committed at that point or it may ask for the transaction to be held open so that it can analyse the results from the first set of operations and then use that information within a subsequent series of operations and then commit the transaction after executing that second batch of operations.

The following code sample shows how this can be implemented in practice (note that the application logic and all error handling has been ommited).

const NdbDictionary::Dictionary* myDict= myNdb.getDictionary();

const NdbDictionary::Table *myTable= myDict->getTable("tbl1");
const NdbDictionary::Table *myTable2= myDict->getTable("tbl2");

NdbTransaction *myTransaction= myNdb.startTransaction();

// Read all of the required data as part of a single batch

NdbOperation *myOperation= myTransaction->getNdbOperation(myTable1);
myOperation->readTuple(NdbOperation::LM_Read);
myOperation->equal("ref", asset_num);
myRecAttr= myOperation->getValue("cost", NULL);

NdbOperation *myOperation2= myTransaction->getNdbOperation(myTable2);
myOperation2->readTuple(NdbOperation::LM_Read);
myOperation2->equal("ref", asset_num);
myRecAttr= myOperation->getValue("volume", NULL);

myTransaction->execute(NdbTransaction::NoCommit);

// NOT SHOWN: Application logic interprets results from first set of operations

// Based on the data read during the initial batch, make the necessary changes

myOperation *myOperation3= myTransaction->getNdbOperation(myTable1);
myOperation3->updateTuple();
myOperation3->equal("ref", asset_num);
myOperation2->setValue("cost", new_cost);

myOperation *myOperation4= myTransaction->getNdbOperation(myTable2);
myOperation4->updateTuple();
myOperation4->equal("ref", asset_num);
myOperation4->setValue("volume", new_volume);

myTransaction->execute( NdbTransaction::Commit);
myNdb.closeTransaction(myTransaction);


Creating a simple Cluster on a single LINUX host

It isn’t necessarily immediately obvious how to set up a Cluster on LINUX; this post attempts to show how to get a simple Cluster up and running. For simplicity, all of the nodes will run on a single host – a subsequent post will take the subsequent steps of moving some of them to a second host. As with my Windows post the Cluster will contain the following nodes:

  • 1 Management node (ndb_mgmd)
  • 2 Data nodes (ndbd)
  • 3 MySQL Server (API) nodes (mysqld)

Downloading and installing

Browse to the MySQL Cluster LINUX download page at mysql.com and download the correct version (32 or 64 bit) and store it in the desired directory (in my case, /home/billy/mysql) and then extract and rename the new folder to something easier to work with…

[billy@ws1 mysql]$ tar xvf mysql-cluster-gpl-7.0.6-linux-x86_64-glibc23.tar.gz
[billy@ws1 mysql]$ mv mysql-cluster-gpl-7.0.6-linux-x86_64-glibc23 7_0_6

Create 3 data folders (one for each of the MySQL API – mysqld – processes) and setup the files that will be needed for them to run correctly…

[billy@ws1 mysql]$ cd 7_0_6/data
[billy@ws1 data]$ mkdir data1 data2 data3
[billy@ws1 data]$ mkdir data1/mysql data1/test data2/mysql data2/test data3/mysql data3/test
[billy@ws1 7_0_6]$ cd ..
[billy@ws1 7_0_6]$ scripts/mysql_install_db --basedir=/home/billy/mysql/7_0_6 --datadir=/home/billy/mysql/7_0_6/data/data1
[billy@ws1 7_0_6]$ scripts/mysql_install_db --basedir=/home/billy/mysql/7_0_6 --datadir=/home/billy/mysql/7_0_6/data/data2
[billy@ws1 7_0_6]$ scripts/mysql_install_db --basedir=/home/billy/mysql/7_0_6 --datadir=/home/billy/mysql/7_0_6/data/data3

Configure and run the Cluster

Create a sub-directory called “conf” and create the following 4 files there:

config.ini

[ndbd default]
noofreplicas=2

[ndbd]
hostname=localhost
id=2

[ndbd]
hostname=localhost
id=3

[ndb_mgmd]
id = 1
hostname=localhost

[mysqld]
id=4
hostname=localhost

[mysqld]
id=5
hostname=localhost

[mysqld]
id=6
hostname=localhost

my.1.conf

[mysqld]
ndb-nodeid=4
ndbcluster
datadir=/home/billy/mysql/7_0_6/data/data1
basedir=/home/billy/mysql/7_0_6
port=3306
server-id=1
log-bin

my.2.conf

[mysqld]
ndb-nodeid=5
ndbcluster
datadir=/home/billy/mysql/7_0_6/data/data2
basedir=/home/billy/mysql/7_0_6
port=3307
server-id=2
log-bin

my.3.conf

[mysqld]
ndb-nodeid=6
ndbcluster
datadir=/home/billy/mysql/7_0_6/data/data3
basedir=/home/billy/mysql/7_0_6
port=3308
server-id=3
log-bin

Those files configure the nodes that make up the Cluster. From a command prompt window, launch the management node:

[billy@ws1 7_0_6]$ bin/ndb_mgmd --initial -f conf/config.ini --configdir=/home/billy/mysql/7_0_6/conf
2009-06-17 13:00:08 [MgmSrvr] INFO     -- NDB Cluster Management Server. mysql-5.1.34 ndb-7.0.6
2009-06-17 13:00:08 [MgmSrvr] INFO     -- Reading cluster configuration from 'conf/config.ini'

Check that the management node is up and running:

[billy@ws1 7_0_6]$ bin/ndb_mgm
ndb_mgm> show
Connected to Management Server at: localhost:1186
Cluster Configuration
---------------------
[ndbd(NDB)]    2 node(s)
id=2 (not connected, accepting connect from localhost)
id=3 (not connected, accepting connect from localhost)

[ndb_mgmd(MGM)]    1 node(s)
id=1    @localhost  (mysql-5.1.34 ndb-7.0.6)

[mysqld(API)]    3 node(s)
id=4 (not connected, accepting connect from localhost)
id=5 (not connected, accepting connect from localhost)
id=6 (not connected, accepting connect from localhost)
ndb_mgm> quit

and then start the 2 data nodes (ndbd) and 3 MySQL API/Server nodes (ndbd) and then check that they’re all up and running:

[billy@ws1 7_0_6]$ bin/ndbd --initial -c localhost:1186
2009-06-17 13:05:47 [ndbd] INFO     -- Configuration fetched from 'localhost:1186', generation: 1
[billy@ws1 7_0_6]$ bin/ndbd --initial -c localhost:1186
2009-06-17 13:05:51 [ndbd] INFO     -- Configuration fetched from 'localhost:1186', generation: 1

[billy@ws1 7_0_6]$ bin/mysqld --defaults-file=conf/my.1.conf&
[billy@ws1 7_0_6]$ bin/mysqld --defaults-file=conf/my.2.conf&
[billy@ws1 7_0_6]$ bin/mysqld --defaults-file=conf/my.3.conf&

[billy@ws1 7_0_6]$ bin/ndb_mgm
-- NDB Cluster -- Management Client --
ndb_mgm> show
Connected to Management Server at: localhost:1186
Cluster Configuration
---------------------
[ndbd(NDB)]    2 node(s)
id=2    @127.0.0.1  (mysql-5.1.34 ndb-7.0.6, Nodegroup: 0, Master)
id=3    @127.0.0.1  (mysql-5.1.34 ndb-7.0.6, Nodegroup: 0)

[ndb_mgmd(MGM)]    1 node(s)
id=1    @127.0.0.1  (mysql-5.1.34 ndb-7.0.6)

[mysqld(API)]    3 node(s)
id=4    @127.0.0.1  (mysql-5.1.34 ndb-7.0.6)
id=5    @127.0.0.1  (mysql-5.1.34 ndb-7.0.6)
id=6    @127.0.0.1  (mysql-5.1.34 ndb-7.0.6)
ndb_mgm> quit

Using the Cluster

There are now 3 API nodes/MySQL Servers/mysqlds running; all accessing the same data. Each of those nodes can be accessed by the mysql client using the ports that were configured in the my.X.cnf files. For example, we can access the first of those nodes (node 4) in the following way (each API node is accessed using the port number in its associate my.X.cnf file:

[billy@ws1 7_0_6]$ bin/mysql -h localhost -P 3306
Welcome to the MySQL monitor.  Commands end with ; or g.
Your MySQL connection id is 4
Server version: 5.1.34-ndb-7.0.6-cluster-gpl-log MySQL Cluster Server (GPL)
Type 'help;' or 'h' for help. Type 'c' to clear the current input statement.
mysql> use test;
Database changed
mysql> create table assets (name varchar(30) not null primary key,
-> value int) engine=ndb;
090617 13:21:36 [Note] NDB Binlog: CREATE TABLE Event: REPL$test/assets
090617 13:21:36 [Note] NDB Binlog: logging ./test/assets (UPDATED,USE_WRITE)
090617 13:21:37 [Note] NDB Binlog: DISCOVER TABLE Event: REPL$test/assets
090617 13:21:37 [Note] NDB Binlog: logging ./test/assets (UPDATED,USE_WRITE)
Query OK, 0 rows affected (0.99 sec)
mysql> insert into assets values ('Car','1900');
Query OK, 1 row affected (0.03 sec)
mysql> select * from assets;
+------+-------+
| name | value |
+------+-------+
| Car  |  1900 |
+------+-------+
1 row in set (0.00 sec)
mysql> quit
Bye

Note that as this table is using the ndb (MySQL Cluster) storage engine, the data is actually held in the data nodes rather than in the SQL node and so we can access the exact same data from either of the other 2 SQL nodes:

[billy@ws1 7_0_6]$ bin/mysql -h localhost -P 3307
Welcome to the MySQL monitor.  Commands end with ; or g.
Your MySQL connection id is 5
Server version: 5.1.34-ndb-7.0.6-cluster-gpl-log MySQL Cluster Server (GPL)
type 'help;' or 'h' for help. Type 'c' to clear the current input statement.
mysql> use test;
Reading table information for completion of table and column names
You can turn off this feature to get a quicker startup with -A
Database changed
mysql> select * from assets;
+------+-------+
| name | value |
+------+-------+
| Car  |  1900 |
+------+-------+
1 row in set (0.00 sec)
mysql> quit
Bye

Your next steps

This is a very simple, contrived set up – in any sensible deployment, the nodes would be spread across multiple physical hosts in the interests of performance and redundancy (take a look at the new article (Deploying MySQL Cluster over multiple host) to see how to do that). You’d also set several more variables in the configuration files in order to size and tune your Cluster.


MySQL Cluster – flexibility of replication

One of the better kept secrets about MySQL Cluster appears to be the flexibility available when setting up replication. Rather than being constrained to implementing a single replication scheme, you can mix and match approaches.

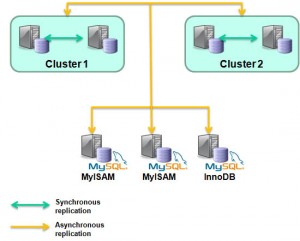
Just about every Cluster deployment will use synchronous replication between the data nodes within a node group to implement High Availability (HA) by making sure that at the point a transaction is committed, the new data is stored in at least 2 physical hosts. Given that MySQL Cluster is usually used to store the data in main memory rather than on disk, this is pretty much mandatory (note that the data changes are still written to disk but that’s done asynchronously to avoid slowing down the database).

MySQL Cluster Replication

MySQL Cluster Replication

MySQL asynchronous replication is often used for MySQL Cluster deployments in order to provide Geographic Redundancy. At the same time as the synchronous replication within a Cluster, the changes can be replicated asynchronously to a second Cluster (or to more than one) at a remote location. Asynchronous rather than synchronous replication is used so that the transaction commit is not delayed while waiting for the remote (could be thousands of miles away, connected by a high latency WAN) Cluster to receive, apply and acknowledge the change. A common misconception is that changes being made through the NDB API will not be replicated to the remote site as this replication is handled by a MySQL Server instance – the reality is that the MySQL Replication implementation will pick up the changes even when they’re written directly to the data nodes through the NDB API.

A third use of replication is to store the Cluster’s data in a seperate database – for example to have a read-only, up-to-date copy of the data stored within the MyISAM storage engine so that complex reports can be generated from it. And the best news is that this can be done at the same time as the local HA and remote Geographic Redundancy replication!

Johan’s Blog provides the technical details around configuring replication in order to provide some extra scaling by setting up non-Cluster slave databases that pick up all changes from the Cluster database.


Webinar replay available: What’s New in the Next Generation of MySQL Cluster?

There is another live webinar on MySQL Cluster 7.0 scheduled for 27th May 09:00 (Western European time) / 08:00 (UK time) / 11:00 (Eastern European time) and you can register here.

Alternatively, if you can’t wait that long then you can watch/listen to the play-back of the original webinar.

Note that you may need to install the WebEx Player (Windows and Mac) – unfortunately, there doesn’t seem to be a simple, supported solution for LINUX users but you can always download the slides (PDF format) from the same link or else wait until 27th May and view it live.

What’s New in the Next Generation of MySQL Cluster?
Thursday, April 30, 2009

Whether you’re racing to introduce a new service, or trying to manage an avalanche of data in real time, your database has to be scalable, fast and highly available to meet ever-changing market conditions and stringent SLAs.

By attending this webinar, you will learn more about MySQL Cluster 7, and how it enables you to deliver 99.999% database availability, with real time performance and linear scalability, while slashing TCO.

Boasting a range of breakthrough capabilities, the MySQL Cluster 7 will enable you to stay ahead of your most demanding, mission-critical application requirements. Enhanced scalability delivers higher database performance with fewer nodes to simplify deployment and administration. Expanded platform support and interoperability delivers more choice in both the development and deployment of MySQL Cluster. Simplified cluster monitoring tools reduce DBA administration overhead and operational costs.

Presented by:

  • Andrew Morgan, MySQL Product Management
  • Matthew Keep, MySQL Product Management


Live Webinar: What’s New in the Next Generation of MySQL Cluster?

Following on from the announcement  at the User Conference last week that MySQL Cluster 7.0 is now generally available, Mat Keep and I will present the first public webcast this Thursday. If you’d like to attend but the time isn’t convenient then you can either watch/listen to the recording after the event or wait for the next one to be announced (will be aimed at different time-zones).

Details…..

What’s New in the Next Generation of MySQL Cluster?
Thursday, April 30, 2009

Whether you’re racing to introduce a new service, or trying to manage an avalanche of data in real time, your database has to be scalable, fast and highly available to meet ever-changing market conditions and stringent SLAs.

By attending this webinar, you will learn more about MySQL Cluster 7, and how it enables you to deliver 99.999% database availability, with real time performance and linear scalability, while slashing TCO.

Boasting a range of breakthrough capabilities, the MySQL Cluster 7 will enable you to stay ahead of your most demanding, mission-critical application requirements. Enhanced scalability delivers higher database performance with fewer nodes to simplify deployment and administration. Expanded platform support and interoperability delivers more choice in both the development and deployment of MySQL Cluster. Simplified cluster monitoring tools reduce DBA administration overhead and operational costs.
WHO:

* Andrew Morgan, MySQL Product Management
* Matthew Keep, MySQL Product Management

WHAT: What’s New in the Next Generation of MySQL Cluster? web presentation.

WHEN:
Thursday, April 30, 2009: 10:00 Pacific time (America)
Thu, Apr 30:      07:00 Hawaii time
Thu, Apr 30:      11:00 Mountain time (America)
Thu, Apr 30:      12:00 Central time (America)
Thu, Apr 30:      13:00 Eastern time (America)
Thu, Apr 30:      17:00 UTC
Thu, Apr 30:      18:00 Western European time
Thu, Apr 30:      19:00 Central European time
Thu, Apr 30:      20:00 Eastern European time

The presentation will be approximately 45 minutes long followed by Q&A.
WHERE: Simply access the web seminar from the comfort of your own office.

Register for the live webinar here:
http://www.mysql.com/news-and-events/web-seminars/display-320.html

Download the MySQL Cluster Architecture and New Features whitepaper:
http://www.mysql.com/why-mysql/white-papers/mysql_wp_cluster7_architecture.php


New MySQL Cluster White Paper – Building a Carrier-Grade Platform for Data Management

A new white paper has been published by MySQL/Sun Microsystems and it can be downloaded from http://www.mysql.com/why-mysql/white-papers/mysql_wp_cluster7_open_cgp.php

Open Source Carrier Grade Platform - using MySQL Cluster CGE

Open Source Carrier Grade Platform - using MySQL Cluster CGE

Abstract:

The convergence of communication networks onto one which is IP (Internet Protocol) based is revolutionizing today’s telecommunications industry. Communications Service Providers (CSPs) are challenged to deliver compelling new personalized services with greater agility and lower costs than ever before. The very survival of Service Providers depends on their ability to generate new revenue streams and increase Average Revenue Per User (ARPU), whilst at the same time delivering significant improvements in operational efficiency and time to market.

Network and IT infrastructure used for service delivery has traditionally been based on proprietary hardware and software, either developed in-house or supplied by proprietary vendors. The challenge this has presented to Network Equipment Providers (NEPs) and Communications Service Providers (CSPs) is that the infrastructure is inflexible and carries a high TCO.

In addition to the challenges above, risk of vendor lock-in and the need for interoperability through open APIs have driven the migration to standards-based hardware and open-source software for new carrier-grade systems used in next generation networks. We call such systems “open source, carrier-grade platforms”.

The drive to adopt open architectures extends into a core enabler of network convergence and service delivery – the database. Whether Service Providers are looking to deploy new Web/Telco 2.0 applications to mobile internet users or consolidating subscriber data within the network to support greater service personalization and targeted advertising, the database plays a key enabling role.

These databases must make information available to new and existing applications in order to maximize interoperability and streamline operations. It is this trend which puts even more demands on the availability, scalability and performance of the database. Real-time, carrier-grade databases with dynamic scalability, flexible data access methods, broad platform support and simplified administration are key to meeting the demands of many of  These new communications services.

With the rapid shift from closed, expensive and proprietary technology, MySQL has grown to become the world’s most popular open source database. In this paper we explore how an open source carrier grade platform is able to cost-effectively meet the communication industry’s high availability, scalability and real-time performance requirements. At the same time we will explore the issues of cost and interoperability with established and emerging technology standards. We also examine the unique architecture and features of MySQL Cluster Carrier Grade Edition, and how they can help both equipment manufacturers and service providers overcome some of the biggest challenges facing their industry today.