Tag Archive for MySQL Cluster Manager

MySQL Cluster Manager 1.2 – using the new features

MySQL Cluster Manager logoOracle have just announced that MySQL Cluster Manager 1.2 is Generally Available. For anyone not familiar with MySQL Cluster Manager – it’s a command-line management tool that makes it simpler and safer to manage your MySQL Cluster deployment – use it to create, configure, start, stop, upgrade…. your cluster.

So what has changed since MCM 1.1 was released?

The first thing is that a lot of work has happened under the covers and it’s now faster, more robust and can manage larger clusters. Feature-wise you get the following (note that a couple of these were released early as part of post-GA versions of MCM 1.1):

  • Automation of on-line backup and restore
  • Single command to start MCM and a single-host Cluster
  • Multiple clusters per site
  • Single command to stop all of the MCM agents in a Cluster
  • Provide more details in “show status” command
  • Ability to restart “initial” the data nodes in order to wipe out the database ahead of a restore

A new version of the MySQL Cluster Manager white paper has been released that explains everything that you can do with it and also includes a tutorial for the key features; you can download it here.

Watch this video for a tutorial on using MySQL Cluster Manager, including the new features:

Using the new features

Single command to run MCM and then create and run a Cluster

A single-host cluster can very easily be created and run – an easy way to start experimenting with MySQL Cluster:

billy@black:~$ mcm/bin/mcmd –bootstrap
		
MySQL Cluster Manager 1.2.1 started
Connect to MySQL Cluster Manager by running "/home/billy/mcm-1.2.1-cluster-7.2.9_32-linux-rhel5-x86/bin/mcm" -a black.localdomain:1862
Configuring default cluster 'mycluster'...
Starting default cluster 'mycluster'...
Cluster 'mycluster' started successfully
        ndb_mgmd        black.localdomain:1186
        ndbd            black.localdomain
        ndbd            black.localdomain
        mysqld          black.localdomain:3306
        mysqld          black.localdomain:3307
        ndbapi          *
Connect to the database by running "/home/billy/mcm-1.2.1-cluster-7.2.9_32-linux-rhel5-x86/cluster/bin/mysql" -h black.localdomain -P 3306 -u root

You can then connect to MCM:

billy@black:~$ mcm/bin/mcm 

Or access the database itself simply by running the regular mysql client.

Extra status information

When querying the status of the processes in a Cluster, you’re now also shown the package being used for each node:

mcm> show status --process mycluster;
+--------+----------+------ +---------+-----------+---------+
| NodeId | Process  | Host  | Status  | Nodegroup | Package |
+--------+----------+-------+---------+-----------+---------+
| 49     | ndb_mgmd | black | running |           | 7.2.9   |
| 50     | ndb_mgmd | blue  | running |           | 7.2.9   |
| 1      | ndbd     | green | running | 0         | 7.2.9   |
| 2      | ndbd     | brown | running | 0         | 7.2.9   |
| 3      | ndbd     | green | running | 1         | 7.2.9   |
| 4      | ndbd     | brown | running | 1         | 7.2.9   |
| 51     | mysqld   | black | running |           | 7.2.9   |
| 52     | mysqld   | blue  | running |           | 7.2.9   |
+--------+----------+-------+---------+-----------+---------+

Simplified on-line backup & restore

MySQL Cluster supports on-line backups (and the subsequent restore of that data); MySQL Cluster Manager 1.2 simplifies the process.

The database can be backed up with a single command (which in turn makes every data node in the cluster backup their data):

mcm> backup cluster mycluster;

The list command can be used to identify what backups are available in the cluster:

mcm> list backups mycluster;

+----------+--------+--------+----------------------+
| BackupId | NodeId | Host   | Timestamp            |
+----------+--------+--------+----------------------+
| 1        | 1      | green  | 2012-11-31T06:41:36Z |
| 1        | 2      | brown  | 2012-11-31T06:41:36Z |
| 1        | 3      | green  | 2012-11-31T06:41:36Z |
| 1        | 4      | brown  | 2012-11-31T06:41:36Z |
| 1        | 5      | purple | 2012-11-31T06:41:36Z |
| 1        | 6      | red    | 2012-11-31T06:41:36Z |
| 1        | 7      | purple | 2012-11-31T06:41:36Z |
| 1        | 8      | red    | 2012-11-31T06:41:36Z |
+----------+--------+--------+----------------------+

You may then select which of these backups you want to restore by specifying the associated BackupId when invoking the restore command:

mcm> restore cluster -I 1 mycluster;

Note that if you need to empty the database of its existing contents before performing the restore then MCM 1.2 introduces the initial option to the start cluster command which will delete all data from all MySQL Cluster tables.

Stopping all MCM agents for a site

A single command will now stop all of the agents for your site:

mcm> stop agents mysite;

Getting started with MySQL Cluster Manager

You can fetch the MCM binaries from edelivery.oracle.com and then see how to use it in the MySQL Cluster Manager white paper.

Please try it out and let us know how you get on!


MySQL Cluster Manager 1.1.6 released

MySQL Cluster Manager 1.1.6 is now available to download from My Oracle Support.

Details on the changes can will be added to the MySQL Cluster Manager documentation . Please give it a try and let me know what you think.

Note that if you’re not a commercial user then you can still download MySQL Cluster Manager 1.1.5 from the Oracle Software Delivery Cloud and try it out for free. Documentation is available here.


On-line add-node with MCM; a more complex example

I’ve previously provided an example of using MySQL Cluster Manager to add nodes to a running MySQL Cluster deployment but I’ve since received a number of questions around how to do this in more complex circumstances (for example when ending up with more than 1 MySQL Server on a single host where each mysqld process should use a different port). The purpose of this post is to work through one of these more complex scenarios.

The starting point is an existing cluster made up of 3 hosts with the nodes (processes) as described in this MCM report:

mcm> SHOW STATUS -r mycluster;
+--------+----------+-------------------------------+---------+-----------+---------+
| NodeId | Process  | Host                          | Status  | Nodegroup | Package |
+--------+----------+-------------------------------+---------+-----------+---------+
| 1      | ndbmtd   | paas-23-54.osc.uk.oracle.com  | running | 0         | 7_2_5   |
| 2      | ndbmtd   | paas-23-55.osc.uk.oracle.com  | running | 0         | 7_2_5   |
| 49     | ndb_mgmd | paas-23-56.osc.uk.oracle.com  | running |           | 7_2_5   |
| 50     | mysqld   | paas-23-54.osc.uk.oracle.com  | running |           | 7_2_5   |
| 51     | mysqld   | paas-23-55.osc.uk.oracle.com  | running |           | 7_2_5   |
| 52     | mysqld   | paas-23-56.osc.uk.oracle.com  | running |           | 7_2_5   |
| 53     | ndbapi   | *paas-23-56.osc.uk.oracle.com | added   |           |         |
+--------+----------+-------------------------------+---------+-----------+---------+
7 rows in set (0.01 sec)

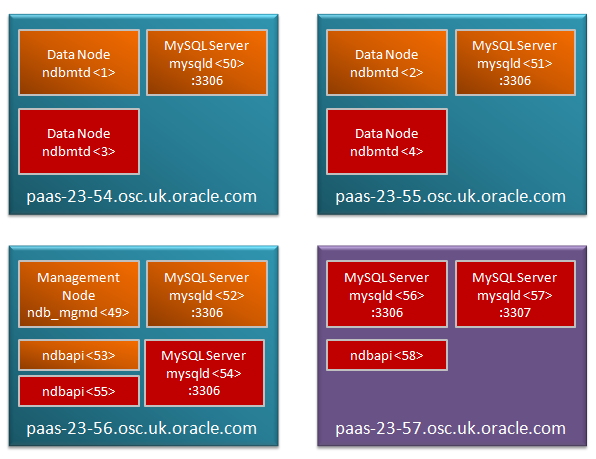
This same configuration is shown graphically in this diagram:

On-Line scalability with MySQL Cluster - starting point

Original MySQL Cluster deployment


Note that the ‘ndbapi’ node isn’t actually a process but is instead a ‘slot’ that can be used by any NDB API client to access the data in the data nodes directly – this could be any of:

  • A MySQL Server
  • An application using the C++ NDB API directly
  • A Memcached server using the direct NDB driver
  • An application using the ClusterJ, JPA or modndb REST API
  • The MySQL database restore command

This Cluster is now going to be extended by adding an extra host as well as extra nodes (both processes and ndbapi slots).

The following diagram illustrates what the final Cluster will look like:

MySQL Cluster after on-line scaling

MySQL Cluster after on-line scaling

The first step is to add the new host to the configuration and make it aware of the MySQL Cluster package being used (in this example, 7.2.5). Note that you should already have started the mcmd process on this new host (if not then do that now):

mcm> ADD HOSTS --hosts=paas-23-57.osc.uk.oracle.com mysite;
+--------------------------+
| Command result           |
+--------------------------+
| Hosts added successfully |
+--------------------------+
1 row in set (8.04 sec)

mcm> ADD PACKAGE -h paas-23-57.osc.uk.oracle.com --basedir=/home/oracle/cluster_7_2_5 7_2_5;
+----------------------------+
| Command result             |
+----------------------------+
| Package added successfully |
+----------------------------+
1 row in set (0.68 sec)

At this point the MCM agent on the new host is connected with the existing 3 but it has not become part of the Cluster – this is done by declaring which nodes should be on that host; at the same time I add some extra nodes to the existing hosts. As there will be more than one MySQL server (mysqld) running on some of the hosts, I’ll explicitly tell MCM what port number to use for some of the mysqlds (rather than just using the default of 3306).

mcm> ADD PROCESS -R ndbmtd@paas-23-54.osc.uk.oracle.com,
ndbmtd@paas-23-55.osc.uk.oracle.com,mysqld@paas-23-56.osc.uk.oracle.com,
ndbapi@paas-23-56.osc.uk.oracle.com,mysqld@paas-23-57.osc.uk.oracle.com,
mysqld@paas-23-57.osc.uk.oracle.com,ndbapi@paas-23-57.osc.uk.oracle.com 
-s port:mysqld:54=3307,port:mysqld:57=3307 mycluster;
+----------------------------+
| Command result             |
+----------------------------+
| Process added successfully |
+----------------------------+
1 row in set (2 min 34.22 sec)

In case you’re wondering how I was able to predict the node-ids that would be allocated to the new nodes, the scheme is very simple:

  • Node-ids 1-48 are reserved for data nodes
  • Node-ids 49-256 are used for all other node types
  • Within those ranges, node-ids are allocated sequentially

If you look carefully at the results you’ll notice that the ADD PROCESS command took a while to run (2.5 minutes) – the reason for this is that behind the scenes, MCM performed a rolling restart – ensuring that all of the existing nodes pick up the new configuration without losing database service. Before starting the new processes, it makes sense to double check that the correct ports are allocated to each of the mysqlds:

mcm> GET -d port:mysqld mycluster;
+------+-------+----------+---------+----------+---------+---------+---------+
| Name | Value | Process1 | NodeId1 | Process2 | NodeId2 | Level   | Comment |
+------+-------+----------+---------+----------+---------+---------+---------+
| port | 3306  | mysqld   | 50      |          |         | Default |         |
| port | 3306  | mysqld   | 51      |          |         | Default |         |
| port | 3306  | mysqld   | 52      |          |         | Default |         |
| port | 3307  | mysqld   | 54      |          |         |         |         |
| port | 3306  | mysqld   | 56      |          |         | Default |         |
| port | 3307  | mysqld   | 57      |          |         |         |         |
+------+-------+----------+---------+----------+---------+---------+---------+
6 rows in set (0.07 sec)

At this point the new processes can be started and then the status of all of the processes confirmed:

mcm> START PROCESS --added mycluster;
+------------------------------+
| Command result               |
+------------------------------+
| Process started successfully |
+------------------------------+
1 row in set (26.30 sec)

mcm> SHOW STATUS -r mycluster;
+--------+----------+-------------------------------+---------+-----------+---------+
| NodeId | Process  | Host                          | Status  | Nodegroup | Package |
+--------+----------+-------------------------------+---------+-----------+---------+
| 1      | ndbmtd   | paas-23-54.osc.uk.oracle.com  | running | 0         | 7_2_5   |
| 2      | ndbmtd   | paas-23-55.osc.uk.oracle.com  | running | 0         | 7_2_5   |
| 49     | ndb_mgmd | paas-23-56.osc.uk.oracle.com  | running |           | 7_2_5   |
| 50     | mysqld   | paas-23-54.osc.uk.oracle.com  | running |           | 7_2_5   |
| 51     | mysqld   | paas-23-55.osc.uk.oracle.com  | running |           | 7_2_5   |
| 52     | mysqld   | paas-23-56.osc.uk.oracle.com  | running |           | 7_2_5   |
| 53     | ndbapi   | *paas-23-56.osc.uk.oracle.com | added   |           |         |
| 3      | ndbmtd   | paas-23-54.osc.uk.oracle.com  | running | 1         | 7_2_5   |
| 4      | ndbmtd   | paas-23-55.osc.uk.oracle.com  | running | 1         | 7_2_5   |
| 54     | mysqld   | paas-23-56.osc.uk.oracle.com  | running |           | 7_2_5   |
| 55     | ndbapi   | *paas-23-56.osc.uk.oracle.com | added   |           |         |
| 56     | mysqld   | paas-23-57.osc.uk.oracle.com  | running |           | 7_2_5   |
| 57     | mysqld   | paas-23-57.osc.uk.oracle.com  | running |           | 7_2_5   |
| 58     | ndbapi   | *paas-23-57.osc.uk.oracle.com | added   |           |         |
+--------+----------+-------------------------------+---------+-----------+---------+
14 rows in set (0.08 sec)

The enlarged Cluster is now up and running but any existing MySQL Cluster tables will only be stored across the original data nodes. To remedy that, each of those existing tables should be repartitioned:

mysql> ALTER ONLINE TABLE simples REORGANIZE PARTITION;
Query OK, 0 rows affected (0.22 sec)
Records: 0  Duplicates: 0  Warnings: 0

mysql> OPTIMIZE TABLE simples;
+-------------------+----------+----------+----------+
| Table             | Op       | Msg_type | Msg_text |
+-------------------+----------+----------+----------+
| clusterdb.simples | optimize | status   | OK       |
+-------------------+----------+----------+----------+
1 row in set (0.00 sec)

You can safely perform the repartitioning while the Cluster is up and running (with your application sending in reads and writes) but there is a performance impact (has been measured at 50%) and so you probably want to do this at a reasonably quiet time of day.

As always, please post feedback and questions in the comments section of this post.


MySQL Scaling breakfast seminar – London, April 25th

I’ll be presenting on/demoing MySQL Cluster 7.2 at this free breakfast seminar in Oracle’s London office on 25th April – starting with coffee at 9:00 and ending with lunch at 13:00 (quite a generous take on “breakfast”!). Space is limited and so if you would like to attend then register early here.

As well as MySQL Cluster there will be sessions on optimising MySQL Server for performance and scaling and Oracle’s roadmap for cloud deployment.

Full agenda:

09:00 Registration and Welcome Coffee
09:30 Introduction
Simon Deighton, MySQL Sales Manager
09:45 MySQL Database: Performance & Scalability Optimizations
Tony Holmes, Principal PreSales Consultant
10:45 Coffee/Tea Break
11:00 Performance & Scalability with MySQL Cluster 7.2
Mat Keep, Senior Product Marketing Manager & Andrew Morgan, Senior Product Manager
12:00 The MySQL Roadmap: Discover What’s Next For On-Premise & Cloud-Based Deployments
Tony Holmes, Principal PreSales Consultant
12:45 Q&A
13:00 Light lunch buffet and end of seminar


MySQL Cluster Manager 1.1.4 Released – includes support for MySQL Cluster 7.2

MySQL Cluster Manager 1.1. is now available to download and try from Oracle E-Delivery (select “MySQL Database” as the product pack).

There’s lots of good stuff gone in under the covers as part of this release, with some of the highlights being:

  • Support for MySQL Cluster 7.2
  • Configuration of MySQL Server parameters
  • Verbose option added to commands for extra info on what’s going on
  • Faster Cluster rolling restarts – data nodes from different node groups will be restarted in parallel (still avoids an outage but cuts the end-to-end restart time)
  • Robustness enhancements to the configurator – especially important when managing large Clusters
  • Bug fixes (well we always need to include that one)

More details on the changes can be found in the MySQL Cluster Manager documentation.

Please give it a try and let me know what you think.


MySQL Cluster Manager 1.1.2 – creating a Cluster is now trivial

MySQL Cluster Manager 1.1.2 is now available to download and try from Oracle E-Delivery (select “MySQL Database” as the product pack). Something that’s new and really cool in the new version is that you can download a version of MCM that actually includes the MySQL Cluster software itself and then you can have MCM automatically define, create and start a single-host cluster deployment for you with just the command “mcmd –bootstrap”. This post aims to show that it’s really as simple as that!

I’ve been playing with Windows recently and so I’ll use that for this example but things would be very similar on other platforms.

Step 1 Download from E-Delivery and extract the zip file

Step2 Start your first cluster!

PS D:AndrewDocumentsMySQLmcm> binmcmd --bootstrap
MySQL Cluster Manager 1.1.2 started
Connect to MySQL Cluster Manager by running "D:AndrewDocumentsMySQLmcmbinmcm" -a NOVA:1862
Configuring default cluster 'mycluster'...
Starting default cluster 'mycluster'...
Cluster 'mycluster' started successfully
 ndb_mgmd NOVA:1186
 ndbd NOVA
 ndbd NOVA
 mysqld NOVA:3306
 mysqld NOVA:3307
 ndbapi *
Connect to the database by running "D:AndrewDocumentsMySQLmcmclusterbinmysql" -h NOVA -P 3306 -u root

That’s it!

Just to prove it you can now go ahead and start using the database (note that I connect with the command suggested by MCM but in this case I had to shift the quotes…

PS C:UsersAndrew> D:"AndrewDocumentsMySQLmcmclusterbinmysql" -h NOVA -P 3306 
mysql> CREATE DATABASE clusterdb;
mysql> USE clusterdb;
mysql> CREATE TABLE towns (name VARCHAR(30) NOT NULL PRIMARY KEY) ENGINE=NDBCLUSTER;
mysql> REPLACE INTO towns VALUES ('Maidenhead'), ('Marlow');
mysql> SELECT * FROM towns;
+------------+
| name       |
+------------+
| Maidenhead |
| Marlow     |
+------------+

So how much simpler is this than doing it by hand? 

With MCM bootstrap:

  • Packages to download & install: 1
  • Config files to create/edit: 0
  • Commands to run: 1
Without MCM:
  • Packages to download & install: 1 if using tar-ball, up to 13 if using RPMs
  • Config files to create/edit: 3
  • Commands to run: 12


MySQL Cluster Manager 1.1.1 (GA) Available

The latest (GA) version of MySQL Cluster Manager is available through Oracle’s E-Delivery site. You can download the software and try it out for yourselves (just select “MySQL Database” as the product pack, select your platform, click “Go” and then scroll down to get the software).

So what’s new in this version

If you’ve looked at MCM in the past then the first thing that you’ll notice is that it’s now much simpler to get it up and running – in particular the configuration and running of the agent has now been reduced to just running a single executable (called "mcmd").

The second change is that you can now stop the MCM agents from within the MCM CLI – for example "stop agents mysite" will safely stop all of the agents running on the hosts defined by "mysite".

Those 2 changes make it much simpler for the novice user to get up and running quickly; for the more expert user, the most signifficant change is that MCM can now manage multiple clusters.

Obviously, there are a bunch of more minor changes as well as bug fixes.

Refresher – So What is MySQL Cluster Manager?

MySQL Cluster Manager provides the ability to control the entire cluster as a single entity, while also supporting very granular control down to individual processes within the cluster itself.  Administrators are able to create and delete entire clusters, and to start, stop and restart the cluster with a single command.  As a result, administrators no longer need to manually restart each data node in turn, in the correct sequence, or to create custom scripts to automate the process.

MySQL Cluster Manager automates on-line management operations, including the upgrade, downgrade and reconfiguration of running clusters as well as adding nodes on-line for dynamic, on-demand scalability, without interrupting applications or clients accessing the database.  Administrators no longer need to manually edit configuration files and distribute them to other cluster nodes, or to determine if rolling restarts are required. MySQL Cluster Manager handles all of these tasks, thereby enforcing best practices and making on-line operations significantly simpler, faster and less error-prone.

MySQL Cluster Manager is able to monitor cluster health at both an Operating System and per-process level by automatically polling each node in the cluster.  It can detect if a process or server host is alive, dead or has hung, allowing for faster problem detection, resolution and recovery.

To deliver 99.999% availability, MySQL Cluster has the capability to self-heal from failures by automatically restarting failed Data Nodes, without manual intervention.  MySQL Cluster Manager extends this functionality by also monitoring and automatically recovering SQL and Management Nodes.

How is it Implemented?

MySQL Cluster Manager Architecture

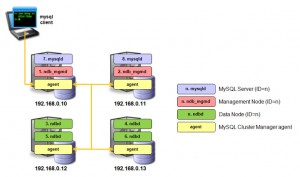
MySQL Cluster Manager is implemented as a series of agent processes that co-operate with each other to manage the MySQL Cluster deployment; one agent running on each host machine that will be running a MySQL Cluster node (process). The administrator uses the regular mysql command to connect to any one of the agents using the port number of the agent (defaults to 1862 compared to the MySQL Server default of 3306).

How is it Used?

When using MySQL Cluster Manager to manage your MySQL Cluster deployment, the administrator no longer edits the configuration files (for example config.ini and my.cnf); instead, these files are created and maintained by the agents. In fact, if those files are manually edited, the changes will be overwritten by the configuration information which is held within the agents. Each agent stores all of the cluster configuration data, but it only creates the configuration files that are required for the nodes that are configured to run on that host.

Similarly when using MySQL Cluster Manager, management actions must not be performed by the administrator using the ndb_mgm command (which directly connects to the management node meaning that the agents themselves would not have visibility of any operations performed with it).

When using MySQL Cluster Manager, the ‘angel’ processes are no longer needed (or created) for the data nodes, as it becomes the responsibility of the agents to detect the failure of the data nodes and recreate them as required. Additionally, the agents extend this functionality to include the management nodes and MySQL Server nodes.

Installing, Configuring & Running MySQL Cluster Manager

On each host that will run Cluster nodes, install the MCM agent. To do this, just download the zip file from Oracle E-Delivery and then extract the contents into a convenient location:

$ unzip V27167-01.zip
$ tar xf mysql-cluster-manager-1.1.1-linux-rhel5-x86-32bit.tar.gz
$ mv mysql-cluster-manager-1.1.1-linux-rhel5-x86-32bit ~/mcm

Starting the agent is then trivial (remember to reapeat on each host though):

$ cd ~/mcm
$ bin/mcmd&

Next, some examples of how to use MCM.

Example 1: Create a Cluster from Scratch

The first step is to connect to one of the agents and then define the set of hosts that will be used for the Cluster:

$ mysql -h 192.168.0.10 -P 1862 -u admin -psuper --prompt='mcm> ' 
mcm> create site --hosts=192.168.0.10,192.168.0.11,192.168.0.12,192.168.0.13 mysite;

Next step is to tell the agents where they can find the Cluster binaries that are going to be used, define what the Cluster will look like (which nodes/processes will run on which hosts) and then start the Cluster:

mcm> add package --basedir=/usr/local/mysql_6_3_27a 6.3.27a; 
mcm> create cluster --package=6.3.26 --processhosts=ndb_mgmd@192.168.0.10,ndb_mgmd@192.168.0.11, 
  ndbd@192.168.0.12,ndbd@192.168.0.13,ndbd@192.168.0.12, ndbd@192.168.0.13,mysqld@192.168.0.10,
  mysqld@192.168.0.11 mycluster; 
mcm> start cluster mycluster; 

Example 2: On-Line upgrade of a Cluster

A great example of how MySQL Cluster Manager can simplify management operations is upgrading the Cluster software. If performing the upgrade by hand then there are dozens of steps to run through which is time consuming, tedious and subject to human error (for example, restarting nodes in the wrong order could result in an outage). With MySQL Cluster Manager, it is reduced to two commands – define where to find the new version of the software and then perform the rolling, in-service upgrade:

mcm> add package --basedir=/usr/local/mysql_7_1_8 7.1.8; 
mcm> upgrade cluster --package=7.1.8 mycluster;

Behind the scenes, each node will be halted and then restarted with the new version – ensuring that there is no loss of service.

Example 3: Automated On-Line Add-Node

Automated On-Line Add-Node

Since MySQL Cluster 7.0 it has been possible to add new nodes to a Cluster while it is still in service; there are a number of steps involved and as with on-line upgrades if the administrator makes a mistake then it could lead to an outage.


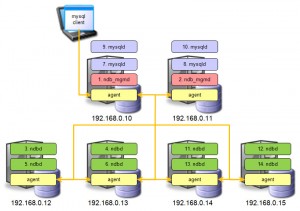
We’ll now look at how this is automated when using MySQL Cluster Manager; the first step is to add any new hosts (servers) to the site and indicate where those hosts can find the Cluster software:

mcm> add hosts --hosts=192.168.0.14,192.168.0.15 mysite; 
mcm> add package --basedir=/usr/local/mysql_7_1_8 
  --hosts=192.168.0.14,192.168.0.15 7_1_8;

The new nodes can then be added to the Cluster and then started up:

mcm> add process --processhosts=mysqld@192.168.0.10,mysqld@192.168.0.11,ndbd@192.168.0.14,
  ndbd@192.168.0.15,ndbd@192.168.0.14,ndbd@192.168.0.15 mycluster; 
mcm> start process --added mycluster; 

The Cluster has now been extended but you need to perform a final step from any of the MySQL Servers to repartition the existing Cluster tables to use the new data nodes:

mysql> ALTER ONLINE TABLE <table-name> REORGANIZE PARTITION; 
mysql> OPTIMIZE TABLE <table-name>;

Where can I found out more?

There is a lot of extra information to help you understand what can be achieved with MySQL Cluster Manager and how to use it:


On-demand-webinar – What’s New in Managing MySQL Cluster

The recording of this webinar is now available to view on-line here.

There will be a live webinar on Wednesday January 12 describing the new ways that you can manage MySQL Cluster (with a bit of monitoring thrown in). As always, the webinar is free but you need to register here. The event is scheduled for 09:00 Pacific / 17:00 UK / 18:00 Central European time but if you can’t make the live webinar it’s still worth registering so that you’re emailed the replay after the event.

By their very nature, clustered environments involve more effort and resource to administer than standalone systems, and the same is true of MySQL Cluster, the database designed for web-scale throughput with carrier-grade availability.

In this webinar, we will present an overview of the three latest enhancements to provisioning, monitoring and managing MySQL Cluster – collectively serving to lower costs, enhance agility and reduce the risk of downtime caused by manual configuration errors.

In this webinar, we will present:

  • NDBINFO: released with MySQL Cluster 7.1, NDBINFO presents real-time status and usage statistics, providing developers and DBAs with a simple means of pro-actively monitoring and optimizing database performance and availability.
  • MySQL Cluster Manager: available as part of the commercial MySQL Cluster Carrier Grade Edition simplifies the creation and management of MySQL Cluster by automating common management tasks, delivering higher administration productivity and enhancing cluster agility. Tasks that used to take 46 commands can be reduced to just one!
  • MySQL Cluster Advisors & Graphs: part of the MySQL Enterprise Monitor and available in the commercial MySQL Cluster Carrier Grade Edition, the Enterprise Advisor includes automated best practice rules that alert on key performance and availability metrics from MySQL Cluster data nodes.

You will also learn how you can get started evaluating and using all of these tools to simplify MySQL Cluster management.

This session will be approximately 1 hour in length and will include interactive Q&A throughout. Please join us for this informative webinar!

WHO:

  • Andrew Morgan, MySQL Cluster Product Management, Oracle
  • Mat Keep, MySQL Cluster Product Management, Oracle


MySQL Cluster Manager 1.1 available!

As the title of this post suggests, MySQL Cluster Manager 1.1 is now available – but this actually has a double meaning:

  1. MySQL Cluster Manager 1.1 is GA (I’ll explain below the major improvements over 1.0)
  2. Everyone is now able to download and try it (without first having to purchase a license)!

This software is only available through commercial licenses (i.e. not GPL like the rest of Cluster) and until recently there was no way for anyone to try it out unless they had already bought MySQL Cluster CGE; this changed on Monday when the MySQL software became available through Oracle’s E-Delivery site. Now you can download the software and try it out for yourselves (just select “MySQL Database” as the product pack, select your platform, click “Go” and then scroll down to get the software).

So What is MySQL Cluster Manager?

MySQL Cluster Manager provides the ability to control the entire cluster as a single entity, while also supporting very granular control down to individual processes within the cluster itself.  Administrators are able to create and delete entire clusters, and to start, stop and restart the cluster with a single command.  As a result, administrators no longer need to manually restart each data node in turn, in the correct sequence, or to create custom scripts to automate the process.

MySQL Cluster Manager automates on-line management operations, including the upgrade, downgrade and reconfiguration of running clusters as well as adding nodes on-line for dynamic, on-demand scalability, without interrupting applications or clients accessing the database.  Administrators no longer need to manually edit configuration files and distribute them to other cluster nodes, or to determine if rolling restarts are required. MySQL Cluster Manager handles all of these tasks, thereby enforcing best practices and making on-line operations significantly simpler, faster and less error-prone.

MySQL Cluster Manager is able to monitor cluster health at both an Operating System and per-process level by automatically polling each node in the cluster.  It can detect if a process or server host is alive, dead or has hung, allowing for faster problem detection, resolution and recovery.

To deliver 99.999% availability, MySQL Cluster has the capability to self-heal from failures by automatically restarting failed Data Nodes, without manual intervention.  MySQL Cluster Manager extends this functionality by also monitoring and automatically recovering SQL and Management Nodes.  

How is it Implemented?

MySQL Cluster Manager Architecture

MySQL Cluster Manager is implemented as a series of agent processes that co-operate with each other to manage the MySQL Cluster deployment; one agent running on each host machine that will be running a MySQL Cluster node (process). The administrator uses the regular mysql command to connect to any one of the agents using the port number of the agent (defaults to 1862 compared to the MySQL Server default of 3306).

How is it Used?

When using MySQL Cluster Manager to manage your MySQL Cluster deployment, the administrator no longer edits the configuration files (for example config.ini and my.cnf); instead, these files are created and maintained by the agents. In fact, if those files are manually edited, the changes will be overwritten by the configuration information which is held within the agents. Each agent stores all of the cluster configuration data, but it only creates the configuration files that are required for the nodes that are configured to run on that host.

Similarly when using MySQL Cluster Manager, management actions must not be performed by the administrator using the ndb_mgm command (which directly connects to the management node meaning that the agents themselves would not have visibility of any operations performed with it).

When using MySQL Cluster Manager, the ‘angel’ processes are no longer needed (or created) for the data nodes, as it becomes the responsibility of the agents to detect the failure of the data nodes and recreate them as required. Additionally, the agents extend this functionality to include the management nodes and MySQL Server nodes.

Example 1: Create a Cluster from Scratch

The first step is to connect to one of the agents and then define the set of hosts that will be used for the Cluster:

$ mysql -h 192.168.0.10 -P 1862 -u admin -psuper --prompt='mcm> '
mcm> create site --hosts=192.168.0.10,192.168.0.11,192.168.0.12,192.168.0.13 mysite;

Next step is to tell the agents where they can find the Cluster binaries that are going to be used, define what the Cluster will look like (which nodes/processes will run on which hosts) and then start the Cluster:

mcm> add package --basedir=/usr/local/mysql_6_3_27a 6.3.27a;
mcm> create cluster --package=6.3.26
--processhosts=ndb_mgmd@192.168.0.10,ndb_mgmd@192.168.0.11,
ndbd@192.168.0.12,ndbd@192.168.0.13,ndbd@192.168.0.12,
ndbd@192.168.0.13,mysqld@192.168.0.10,mysqld@192.168.0.11 mycluster;
mcm> start cluster mycluster; 

Example 2: On-Line upgrade of a Cluster

A great example of how MySQL Cluster Manager can simplify management operations is upgrading the Cluster software. If performing the upgrade by hand then there are dozens of steps to run through which is time consuming, tedious and subject to human error (for example, restarting nodes in the wrong order could result in an outage). With MySQL Cluster Manager, it is reduced to two commands – define where to find the new version of the software and then perform the rolling, in-service upgrade:

mcm> add package --basedir=/usr/local/mysql_7_1_8 7.1.8;
mcm> upgrade cluster --package=7.1.8 mycluster;

Behind the scenes, each node will be halted and then restarted with the new version – ensuring that there is no loss of service.

What’s New in MySQL Cluster Manager 1.1

If you’ve previously tried out version 1.0 then the main improvements you’ll see in 1.1 are:

  • More robust; 1.0 was the first release and a lot of bug fixes have gone in since then
  • Optimized restarts – more selective about which nodes need to be restarted when making a configuration change
  • Automated On-line Add-node

MySQL Cluster Manager 1.1 – Automated On-Line Add-Node

Automated On-Line Add-Node

Since MySQL Cluster 7.0 it has been possible to add new nodes to a Cluster while it is still in service; there are a number of steps involved and as with on-line upgrades if the administrator makes a mistake then it could lead to an outage.

We’ll now look at how this is automated when using MySQL Cluster Manager; the first step is to add any new hosts (servers) to the site and indicate where those hosts can find the Cluster software:

mcm> add hosts --hosts=192.168.0.14,192.168.0.15 mysite;
mcm> add package --basedir=/usr/local/mysql_7_1_8 --hosts=192.168.0.14,192.168.0.15 7_1_8;

The new nodes can then be added to the Cluster and then started up:

mcm> add process --processhosts=mysqld@192.168.0.10,mysqld@192.168.0.11,ndbd@192.168.0.14,
ndbd@192.168.0.15,ndbd@192.168.0.14,ndbd@192.168.0.15 mycluster;
mcm> start process --added mycluster; 

The Cluster has now been extended but you need to perform a final step from any of the MySQL Servers to repartition the existing Cluster tables to use the new data nodes:

mysql> ALTER ONLINE TABLE <table-name> REORGANIZE PARTITION;
mysql> OPTIMIZE TABLE <table-name>;

Where can I found out more?

There is a lot of extra information to help you understand what can be achieved with MySQL Cluster Manager and how to use it: