Tag Archive for MySQL

MySQL Cluster Manager 1.1.1 (GA) Available

The latest (GA) version of MySQL Cluster Manager is available through Oracle’s E-Delivery site. You can download the software and try it out for yourselves (just select “MySQL Database” as the product pack, select your platform, click “Go” and then scroll down to get the software).

So what’s new in this version

If you’ve looked at MCM in the past then the first thing that you’ll notice is that it’s now much simpler to get it up and running – in particular the configuration and running of the agent has now been reduced to just running a single executable (called "mcmd").

The second change is that you can now stop the MCM agents from within the MCM CLI – for example "stop agents mysite" will safely stop all of the agents running on the hosts defined by "mysite".

Those 2 changes make it much simpler for the novice user to get up and running quickly; for the more expert user, the most signifficant change is that MCM can now manage multiple clusters.

Obviously, there are a bunch of more minor changes as well as bug fixes.

Refresher – So What is MySQL Cluster Manager?

MySQL Cluster Manager provides the ability to control the entire cluster as a single entity, while also supporting very granular control down to individual processes within the cluster itself.  Administrators are able to create and delete entire clusters, and to start, stop and restart the cluster with a single command.  As a result, administrators no longer need to manually restart each data node in turn, in the correct sequence, or to create custom scripts to automate the process.

MySQL Cluster Manager automates on-line management operations, including the upgrade, downgrade and reconfiguration of running clusters as well as adding nodes on-line for dynamic, on-demand scalability, without interrupting applications or clients accessing the database.  Administrators no longer need to manually edit configuration files and distribute them to other cluster nodes, or to determine if rolling restarts are required. MySQL Cluster Manager handles all of these tasks, thereby enforcing best practices and making on-line operations significantly simpler, faster and less error-prone.

MySQL Cluster Manager is able to monitor cluster health at both an Operating System and per-process level by automatically polling each node in the cluster.  It can detect if a process or server host is alive, dead or has hung, allowing for faster problem detection, resolution and recovery.

To deliver 99.999% availability, MySQL Cluster has the capability to self-heal from failures by automatically restarting failed Data Nodes, without manual intervention.  MySQL Cluster Manager extends this functionality by also monitoring and automatically recovering SQL and Management Nodes.

How is it Implemented?

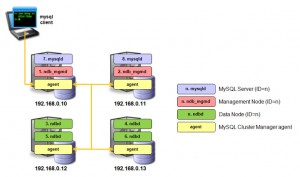
MySQL Cluster Manager Architecture

MySQL Cluster Manager is implemented as a series of agent processes that co-operate with each other to manage the MySQL Cluster deployment; one agent running on each host machine that will be running a MySQL Cluster node (process). The administrator uses the regular mysql command to connect to any one of the agents using the port number of the agent (defaults to 1862 compared to the MySQL Server default of 3306).

How is it Used?

When using MySQL Cluster Manager to manage your MySQL Cluster deployment, the administrator no longer edits the configuration files (for example config.ini and my.cnf); instead, these files are created and maintained by the agents. In fact, if those files are manually edited, the changes will be overwritten by the configuration information which is held within the agents. Each agent stores all of the cluster configuration data, but it only creates the configuration files that are required for the nodes that are configured to run on that host.

Similarly when using MySQL Cluster Manager, management actions must not be performed by the administrator using the ndb_mgm command (which directly connects to the management node meaning that the agents themselves would not have visibility of any operations performed with it).

When using MySQL Cluster Manager, the ‘angel’ processes are no longer needed (or created) for the data nodes, as it becomes the responsibility of the agents to detect the failure of the data nodes and recreate them as required. Additionally, the agents extend this functionality to include the management nodes and MySQL Server nodes.

Installing, Configuring & Running MySQL Cluster Manager

On each host that will run Cluster nodes, install the MCM agent. To do this, just download the zip file from Oracle E-Delivery and then extract the contents into a convenient location:

$ unzip V27167-01.zip
$ tar xf mysql-cluster-manager-1.1.1-linux-rhel5-x86-32bit.tar.gz
$ mv mysql-cluster-manager-1.1.1-linux-rhel5-x86-32bit ~/mcm

Starting the agent is then trivial (remember to reapeat on each host though):

$ cd ~/mcm
$ bin/mcmd&

Next, some examples of how to use MCM.

Example 1: Create a Cluster from Scratch

The first step is to connect to one of the agents and then define the set of hosts that will be used for the Cluster:

$ mysql -h 192.168.0.10 -P 1862 -u admin -psuper --prompt='mcm> ' 
mcm> create site --hosts=192.168.0.10,192.168.0.11,192.168.0.12,192.168.0.13 mysite;

Next step is to tell the agents where they can find the Cluster binaries that are going to be used, define what the Cluster will look like (which nodes/processes will run on which hosts) and then start the Cluster:

mcm> add package --basedir=/usr/local/mysql_6_3_27a 6.3.27a; 
mcm> create cluster --package=6.3.26 --processhosts=ndb_mgmd@192.168.0.10,ndb_mgmd@192.168.0.11, 
  ndbd@192.168.0.12,ndbd@192.168.0.13,ndbd@192.168.0.12, ndbd@192.168.0.13,mysqld@192.168.0.10,
  mysqld@192.168.0.11 mycluster; 
mcm> start cluster mycluster; 

Example 2: On-Line upgrade of a Cluster

A great example of how MySQL Cluster Manager can simplify management operations is upgrading the Cluster software. If performing the upgrade by hand then there are dozens of steps to run through which is time consuming, tedious and subject to human error (for example, restarting nodes in the wrong order could result in an outage). With MySQL Cluster Manager, it is reduced to two commands – define where to find the new version of the software and then perform the rolling, in-service upgrade:

mcm> add package --basedir=/usr/local/mysql_7_1_8 7.1.8; 
mcm> upgrade cluster --package=7.1.8 mycluster;

Behind the scenes, each node will be halted and then restarted with the new version – ensuring that there is no loss of service.

Example 3: Automated On-Line Add-Node

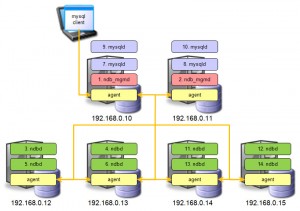
Automated On-Line Add-Node

Since MySQL Cluster 7.0 it has been possible to add new nodes to a Cluster while it is still in service; there are a number of steps involved and as with on-line upgrades if the administrator makes a mistake then it could lead to an outage.


We’ll now look at how this is automated when using MySQL Cluster Manager; the first step is to add any new hosts (servers) to the site and indicate where those hosts can find the Cluster software:

mcm> add hosts --hosts=192.168.0.14,192.168.0.15 mysite; 
mcm> add package --basedir=/usr/local/mysql_7_1_8 
  --hosts=192.168.0.14,192.168.0.15 7_1_8;

The new nodes can then be added to the Cluster and then started up:

mcm> add process --processhosts=mysqld@192.168.0.10,mysqld@192.168.0.11,ndbd@192.168.0.14,
  ndbd@192.168.0.15,ndbd@192.168.0.14,ndbd@192.168.0.15 mycluster; 
mcm> start process --added mycluster; 

The Cluster has now been extended but you need to perform a final step from any of the MySQL Servers to repartition the existing Cluster tables to use the new data nodes:

mysql> ALTER ONLINE TABLE <table-name> REORGANIZE PARTITION; 
mysql> OPTIMIZE TABLE <table-name>;

Where can I found out more?

There is a lot of extra information to help you understand what can be achieved with MySQL Cluster Manager and how to use it:


Webinar: “Oracle VM Template for MySQL Enterprise Edition” on Wednesday

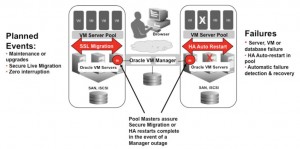
HA Provided by OVM

Join us for a webinar this Wednesday (13th July) to understand more about the benefits of using the new Oracle VM Template for MySQL Enterprise Edition as well as how to get started with it. As always the webinar is free but please register here. The webinar starts at 9:00 am Pacific (5:00 pm UK, 6:00 pm CET) and even if you can’t make that time register anyway and you’ll be sent a link to the charts and replay.

As a reminder, a new white paper is available that goes through some of the details – if you have time then take a look at this paper before the webinar and then get any of your questions answered. Get the white paper here.

The official description…

Virtualization is a key technology to enable data center efficiency and provides the foundation for cloud computing. Integrating MySQL Enterprise Edition with Oracle Linux, the Oracle VM Template is the fastest, easiest and most reliable way to provision virtualized MySQL instances, enabling users to meet the explosive demand for web-based services. This webinar will demonstrate how the Oracle VM Template for MySQL Enterprise Edition ensures rapid deployment and helps eliminate configuration efforts and risks by providing a pre-installed and pre-configured virtualized software image, also taking advantage of Oracle VM’s mechanisms to deliver high availability. The webinar will cover: – An overview of the technologies packaged into the template – How to configure and deploy the template – How to use, modify and save an adapted template that supports specific application requirements By attending the webinar, you will learn how the Oracle VM Template for MySQL Enterprise Edition provides the foundation for a more agile and highly available MySQL environment. This session will be approximately 1 hour in length and will include interactive Q&A throughout. Please join us for this informative webinar!


White Paper – Oracle VM Template for MySQL Enterprise Edition

HA Provided by OVM

A new white paper is available that steps you though the benefits and the use of the Oracle VM Template for MySQL Enterprise Edition (also see yesterday’s press announcement). Get the white paper here.

As a reminder Oracle Virtual Manager provides a way to add High Availability to your MySQL deployment (this is separate from MySQL Replication and MySQL Cluster). The new OVM template provides a very convenient way to create one or more Virtual Machines that come pre-provisioned with OVM, Oracle Linux and MySQL Enterprise Edition as well as the scripts required to integrate MySQL into OVM’s HA features.


New – Oracle VM Template for MySQL Enterprise Edition

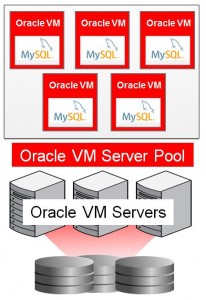
Oracle VM Template for MySQL Enterprise Edition

Oracle today announced the release of the “Oracle VM Template for MySQL Enterprise Edition” – you can read the press-release here.

There are a couple of ways to look at the benefits:

  • Provides a simple alternate High Availability solution for MySQL (i.e. rather than MySQL Replication or MySQL Cluster – although you can still set up replication to/from a MySQL Server installed this way)
  • A new, very simple way to get up and running with MySQL Enterprise – running on a complete stack that Oracle can provide support for

As the focus of this blog is normally MySQL Cluster and Replication, the HA attributes of this solution are probably those of most interest. When you download the template and then load it into Oracle Virtual Machine (OVM) Manager and fire it up you get the chance to flag that you want it to be run in a HA mode. What this means is that:

  • If the hardware, virtual machine, operating system or MySQL Server fail then the OVM Manager will recreate the VM on another physical server from the OVM Server Pool
  • For routine hardware maintenance you can tell OVM Manager to migrate a running VM to another physical server

Note that the data files are actually stored on shared storage under Oracle Cluster File System 2 (OCFS2) which is how a newly instantiated replacement VM can get up and running quickly. As the original hardware (or the MySQL Server instance, OS or VM) could still fail without warning the MySQL Storage Engine must be crash-safe and so this should be used with InnoDB rather than MyISAM.

The complete software line-up looks like this:

  • Oracle Linux 5 Update 6 with the Unbreakable Enterprise Kernel
  • Oracle VM 2.2.1
  • Oracle VM Manager 2.1.5
  • Oracle Cluster File System 2 (OCFS2)
  • MySQL Database 5.5.10 (Enterprise Edition) – InnoDB


Webinar: Delivering Scalable and Highly Available Session Management with MySQL Cluster

Update – the webinar replay is now available from http://www.mysql.com/news-and-events/on-demand-webinars/display-od-630.html?clusterdb

There is a free webinar today (31st May) covering the use of MySQL Cluster in session management – register for free here. The session starts at 9:00 am Pacific, 17:00 UK, 18:00 Central European Time.

As organizations seek to enhance their users’ web experience through personalization based on historic browsing and buying behaviors, session data is becoming more critical. Larger volumes of session data need to be managed and persisted in real-time, and so session management has become increasingly performance-intensive, while also demanding very high levels of availability to ensure a seamless customer experience. In these scenarios, it makes sense to evaluate the MySQL Cluster database.

This is a practical session, demonstrating how to manage PHP session data with MySQL Cluster, and includes:

  • Demands of session management
  • Brief review of MySQL Cluster architecture
  • Why MySQL Cluster is well placed to meet the demands from session management
  • Getting a session management solution up and running with PHP and MySQL Cluster
  • Performance optimization, including the latest enhancements to JOIN performance
  • Case studies


Webinar: MySQL Cluster, Scaling Web Databases with Auto-Partitioning and SQL/NoSQL Access

Scale-out with MySQL Cluster

Update: webinar replay is now available from http://event.on24.com/r.htm?e=311660&s=1&k=3DCFE1CB3E1CF3F0FD0969DC66D93989

On Thursday 26th May Mat Keep and I will be presenting a webinar on how MySQL Cluster can deliver linear scalability – together with some tips on how to achieve it. As always the webinar is free but you need to register here.


The session starts on Thu, May 26 at 17:00 UK time, 18:00 Central European Time, 09:00 Pacific.

This webinar will discuss best practices in scaling services on-demand for high volumes of reads and writes, and provide insight on the range of NoSQL and SQL access methods available to developers, specifically covering:

  • Automatic partitioning (sharding) for high scalability
  • On-line scaling of the cluster across commodity hardware
  • SQL and NoSQL interfaces, and what should be used when
  • On-line updating of schema design to accommodate rapidly evolving applications
  • Resources to get started


MySQL Cluster 7.1.13 Released


The binary version for MySQL Cluster 7.1.13 has now been made available at http://www.mysql.com/downloads/cluster/

A description of all of the changes (fixes) that have gone into MySQL Cluster 7.1.13 (compared to 7.1.10) can be found in the official MySQL Cluster documentation for Cluster 7.1.13, 7.1.12 & 7.1.11.


Delayed Replication in MySQL 5.6 Development Release

The new Development Release for MySQL 5.6 contains a great feature that our users have been asking for for a while (work log 344 first raised in 2010!) – delayed replication.

Stop mistake being propagated

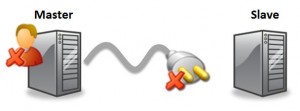
The concept (and as you’ll see the execution) is extremely simple. If a user makes a mistake on the master – such as dropping some critical tables – then we want to give them the opportunity to recover the situation by using the data held on one of the slaves. The problem is that the slave is busily trying to keep up with the master and in all likelihood will have dropped these tables before the user has time to pull the plug on the replication stream. What this feature does is give the DBA the option to introduce a configurable delay into the replication process so that they have time to cut it off before the mistake is propagated.

This blog explains how this works, how to set that up and then how to bring the slave up to date (to the point in time just before the mistake was made on the master).

MySQL Replication Implementation

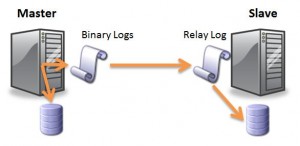
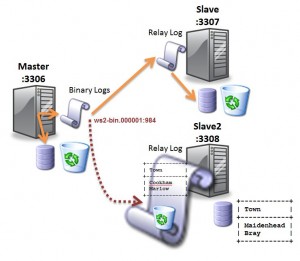
To understand how this is implemented, it helps to have a little bit of background on how MySQL replication is implemented. When a change is made on the master, it is applied to the master’s local disk copy and then written to the binary log. The change is then asynchronously (but normally immediately) copied from the master’s binary log to the relay log on the slave; from there an SQL thread on the slave will read the change from the relay log and apply it to the slave’s copy of the data.

This feature works by allowing the user to configure a delay between when the change is applied on the master and when that change is taken from the relay log and applied to the slave. Note that if the master fails during this delay period then the change is not lost as it is has already been safely recorded in the slave’s relay log.

Immediate & Delayed Replication

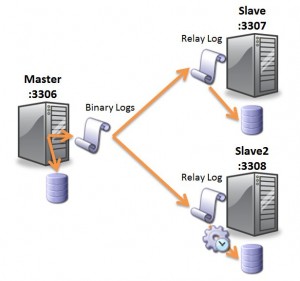
As the delay is implemented on the slave, you are free to use ‘real-time’ replication to one slave (to allow the fastest possible failover if the master fails) and delayed replication to a second slave to guard against user error. This is the setup that this post steps through.

For simplicity, all three MySQL Servers will be run on a single host but each uses a different port number as shown in the diagram. “slave” will apply changes as quickly as it can while “slave2” will introduce a delay when applying changes from its relay log.

Setting up the first slave is very standard:

master> CREATE USER repl_user@localhost;
master> GRANT REPLICATION SLAVE ON *.* TO 
  repl_user@localhost IDENTIFIED BY 'pw';
slave> CHANGE MASTER TO
 -> MASTER_HOST = 'localhost',
 -> MASTER_PORT = 3306,
 -> MASTER_USER = 'repl_user',
 -> MASTER_PASSWORD = 'pw';
slave> start slave;
When setting up the delayed slave, one extra parameter is included in the CHANGE MASTER command:
slave2> CHANGE MASTER TO
 -> MASTER_HOST = 'localhost',
 -> MASTER_PORT = 3306,
 -> MASTER_USER = 'repl_user',
 -> MASTER_PASSWORD = 'pw',
 -> MASTER_DELAY = 20;
slave2> START SLAVE;
The MASTER_DELAY parameter indicates the delay in seconds (here I’ve used 20 seconds – in a production environment you’d probably want to give your self much longer.
Prior to this, a simple table had already been created:
master> CREATE DATABASE clusterdb;USE clusterdb;
master> CREATE TABLE towns (Town VARCHAR(20));
Next we check that changes are immediately applied on slave while delayed on slave2:
master> REPLACE INTO towns VALUES ("Maidenhead"),("Bray");
slave> SELECT * FROM towns;
 +------------+
 | Town       |
 +------------+
 | Maidenhead |
 | Bray       |
 +------------+
slave2> SELECT * FROM towns;
 Empty set (0.00 sec)

slave2> SELECT * FROM towns;
 +------------+
 | Town       |
 +------------+
 | Maidenhead |
 | Bray       |
 +------------+
The next step is to simulate a user error; I add some more data to the table and then drop the table. Following on from that I stop the replication on slave2 before the mistake is applied:
master> REPLACE INTO towns VALUES ("Cookham"),("Marlow");
master> DROP TABLE towns;
slave> SELECT * FROM tables;
     ERROR 1146 (42S02): Table 'clusterdb.tables' doesn't exist
slave2> STOP SLAVE;
slave2> SELECT * FROM towns;
 +------------+
 | Town       |
 +------------+
 | Maidenhead |
 | Bray       |
 +------------+

Bring the Slave up to the Desired Point in Time

This is a good start, while slave has dropped the table, it still exists on slave2. Unfortunately, slave2 is missing the additions to the table that were made just before the mistake was made. The next step is to bring slave 2 almost up to date – stopping just before the table was dropped. To do this we need to find the position within the master’s binary log just before the table was dropped – this can be done using the SHOW BINLOG EVENTS command on the master. Once we have that position (file-name + position) we can tell slave 2 to catch up just to that point using START SLAVE UNTIL . Once that has been done, I check that the extra 2 inserts have been applied to slave2:

master> SHOW BINLOG EVENTSG
....
*************************** 10. row ***************************
 Log_name: ws2-bin.000001
 Pos: 842
 Event_type: Query
 Server_id: 1
 End_log_pos: 957
 Info: use `clusterdb`; REPLACE INTO towns VALUES ("Cookham"),("Marlow")
 *************************** 11. row ***************************
 Log_name: ws2-bin.000001
 Pos: 957
 Event_type: Xid
 Server_id: 1
 End_log_pos: 984
 Info: COMMIT /* xid=32 */
 *************************** 12. row ***************************
 Log_name: ws2-bin.000001
 Pos: 984
 Event_type: Query
 Server_id: 1
 End_log_pos: 1096
 Info: use `clusterdb`; DROP TABLE `towns` /* generated by server */
slave2> START SLAVE UNTIL
 -> MASTER_LOG_FILE='ws2-bin.000001',
 -> MASTER_LOG_POS=984;
slave2> SELECT * FROM towns;
 +------------+
 | Town       |
 +------------+
 | Maidenhead |
 | Bray       |
 | Cookham    |
 | Marlow     |
 +------------+

Success! Now slave2 contains exactly the data we need. After this it’s up to you what to do next; typically this could involve promoting slave2 to be the new master.

If you want to try this out for yourselves then you can download the MySQL 5.6 Milestone Development Release from dev.mysql.com (select the Development Maintenance Release sub-tab to get MySQL 5.6).


Feature Preview – Multi-Threaded Replication Slaves

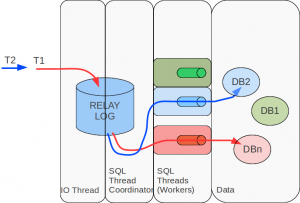
This week, MySQL released a feature-preview – the ability to have multiple threads on the slave so that it is better able to keep pace with the updates being applied on the master. To simplify potential sequencing issues, all updates for a particular database will be handled by the same thread – in other words you need to make sure that your application uses multiple databases in order to see the benefits.
Luís Soares (from the development team) has written a great Blog going into the details.


Sharing user credentials between MySQL Servers with Cluster

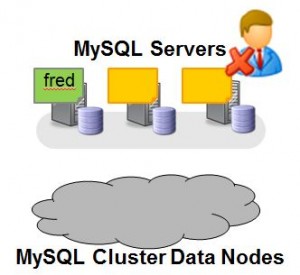
Fig. 1 User privileges stored in MyISAM

The Developer Release for MySQL Cluster 7.2 includes a new feature that allows the system data required for checking user access to be shared amongst all of your MySQL Servers. By default all of the tables holding these credentials are stored in MyISAM and so are local to that MySQL Server.

This can become painful to manage – every time you want to create a new user or change their permissions you need to repeat it on every server, miss one out and the user won’t be able to access that server (or will still be able to access it after you withdraw their privileges).

This is illustrated in Fig.1 – The user “fred” is created on one MySQL Server but when Fred attempts to connect to one of the MySQL Servers they’re blocked. This maybe what you wanted to happen but probably not.

In this post, we’ll see how to change this behaviour but first we’ll confirm the default behaviour.

Obviously, it makes sense to try this out for yourself and you can download the source or binaries from http://dev.mysql.com/downloads/cluster/ (select the sub-tab for the Development Milestone Release).

The first step is to run Cluster with multiple MySQL Servers – if you’re not comfortable with how to do this then refer to this post on how to distribute MySQL Cluster over multiple hosts.

Four mysql client connections will be used – one for root to connect to server 1; one for Fred to connect to server 1; one for root to connect to server 2 and one for Fred to try connecting to server 2.

So, let’s create Fred on server 1 and a table for him to access:

$ mysql -h 192.168.1.7 -P3306 -u root --prompt 'server1-root> '
server1-root> GRANT ALL ON *.* TO 'fred'@'192.168.1.7';
server1-root> CREATE DATABASE clusterdb; USE clusterdb;
server1-root> CREATE TABLE towns (id INT NOT NULL PRIMARY KEY,
  town VARCHAR(20)) ENGINE=NDBCLUSTER;
server1-root> REPLACE INTO towns VALUES (1,'Maidenhead'),(2, 'Reading');

Next we confirm that Fred can access this data when connecting through server 1:

$ mysql -h 192.168.1.7 -P3306 -u fred --prompt 'server1-fred> '
server1-fred> SELECT * FROM clusterdb.towns;
+----+------------+
| id | town       |
+----+------------+
|  1 | Maidenhead |
|  2 | Reading    |
+----+------------+

Now try the same thing from server 2:

$ mysql -h 192.168.1.7 -P3307 -u fred --prompt 'server2> '
server2-fred> SELECT * FROM clusterdb.towns;
ERROR 1142 (42000): SELECT command denied to user ''@'ws2.localdomain'
 for table 'towns'

What we need to do next is to run a script (as MySQL root) and then a stored procedure to convert 5 tables from the mysql database (“user”, “db”, “tables_priv”, “columns_priv” & “procs_priv”) from the MyISAM to the ndbcluster storage engine:

server1-root> SOURCE /usr/local/mysql/share/mysql/ndb_dist_priv.sql;
server1-root> CALL mysql.mysql_cluster_move_privileges();

We can confirm that the storage engine has changed, for example:

server1-root> SHOW CREATE TABLE mysql.userG
*************************** 1. row ***************************
      Table: userCreate Table: CREATE TABLE `user` (
  `Host` char(60) COLLATE utf8_bin NOT NULL DEFAULT '',
....
....
 ) ENGINE=ndbcluster DEFAULT CHARSET=utf8 COLLATE=utf8_bin COMMENT='Users
 and global privileges'

Note that “ENGINE=ndbcluster”.

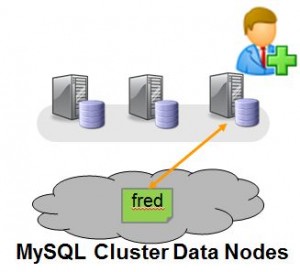
Fig. 2 User Privilege Tables Stored in MySQL Cluster

Now that these tables are stored in MySQL Cluster, they should be visible from all of the MySQL Servers. So now, whichever MySQL Server Fred attempts to connect through, that MySQL Server will fetch the privilege data from the shared data nodes rather than using local information and so Fred will get the same access rights. As our clusterdb.towns table was created using the ndbcluster storage engine as well, it is accessible from all servers and so Fred should now be able to see the contents of the table from server 2 as the access rights on server 2 now allow it. Note that the data already stored in those 5 mysql tables survived the migration from MyISAM to MySQL Cluster.

So the final test is to confirm that Fred really is allowed to get to this data from server 2:

$ mysql -h 192.168.1.7 -P3307 -u fred --prompt 'server2-fred>
server2-fred> SELECT * FROM clusterdb.towns;
+----+------------+
| id | town       |
+----+------------+
|  1 | Maidenhead |
|  2 | Reading    |
+----+------------+

Note that if “fred” were already connected to server2 then he would need to disconnect and reconnect.

Once server1 has been set up in this way, changes to the user privileges data can be made from any one of the mysql servers in the Cluster (not just server1) and they will be enforced by all of the MySQL Servers.

You can find the official documentation for this feature here.