Tag Archive for MySQL

MySQL Cluster 7.1.9 binaries released

The binary version for MySQL Cluster 7.1.9 has now been made available at http://www.mysql.com/downloads/cluster/

A description of all of the changes (fixes) that have gone into MySQL Cluster 7.1.9 (compared to 7.1.8) can be found in the official MySQL Cluster documentation. In addition, there is a great BLOG posting from Johan Anderson explaining how to use the new table added to ndbinfo to tune DiskPageBufferMemory when storing tables on disk.


MySQL Cluster 6.3.39 binaries released

The binary version for MySQL Cluster 6.3.39 has now been made available at http://www.mysql.com/downloads/cluster/

A description of all of the changes (fixes) that have gone into MySQL Cluster 6.3.39 (compared to 6.3.38) can be found in the official MySQL Cluster documentation.


MySQL (including Cluster) at the 2010 UK Oracle User Group Conference

The UK Oracle User Group Conference runs from 29th November through 1st December 2010 – the MySQL content is on Wednesday 1st at the ICC in Birmingham. This is a great chance for MySQL users to find out more on the latest developments and question some of the experts (both from inside and outside Oracle) and for Oracle users who don’t have experience with MySQL to discover what it’s all about.

The day starts with a keynote from Rich Mason (VP responsible for MySQL sales) at 8:45; I’ll be part of a MySQL panel at 9:50 and then Mat Keep and I will be presenting on MySQL Cluster at 14:15. In the Cluster session we’ll will introduce MySQL Cluster and cover the most important features of MySQL Cluster 7.1: ndbinfo; MySQL Cluster Connector/Java and other features that push the limits of MySQL Cluster into new workloads and communities.

ndbinfo presents real-time usage statistics from the MySQL Cluster data nodes as a series of SQL tables, enabling developers and administrators to monitor database performance and optimize their applications.

Designed for Java developers, the MySQL Cluster Connector for Java implements an easy-to-use and high performance native Java interface and OpenJPA plug-in that maps Java classes to tables stored in the MySQL Cluster database.

Finally, we’ll present some real-world case studies and explain some of the new capabilities that are currently in development.

Another session that’s likely to be suited to people interested in MySQL Cluster is a more general presentation on delivering High Availability with MySQL – presented by Mario Beck.

As you’d expect there are many more MySQL sessions to choose from – check the full schedule.

To register for just the MySQL sessions use the MySQL registration page, the full conference registration page is here.

Hope to see as many of you there as possible!


Monitoring MySQL Cluster with MySQL Enterprise Monitor

MySQL Enterprise Monitor with MySQL Cluster

A few months ago, I posted a walkthrough of how to extend MySQL Enterprise Monitor in order to monitor MySQL Cluster. The great news is that as of MySQL Enterprise Monitor 2.3 (available from Oracle E-Delivery since 1st November) this functionality is included in the core product and so there is no need to add the extra features in manually. Of course, that post might still be of interest if you want to further extend MySQL Enterprise Monitor.

This post briefly steps through the new (Cluster-specific) functionality but if you’re interested, why not try it for yourself and download the new MySQL Enterprise Monitor software from Oracle E-Delivery. If you like what you see then the good news is that if you take out a subscription for MySQL Cluster CGE (or buy a license) then this now also entitles you to use MySQL Enterprise Monitor.

There are two main aspects that have been extended to cover MySQL Cluster:

  • A new MySQL Cluster Advisor has been added. This Advisor is made up of a set of rules that check various aspects of the data nodes and raise alerts if a configurable threshold is exceeded
  • A set of new graphs have been added so that you can monitor the usage of key resources over time.

Note that MySQL Enterprise Monitor has no direct connection to the data nodes and so one or more of the MySQL Servers from the Cluster is effectively used as a proxy. There is nothing special for you to configure on the servers, behind the scenes, Enterprise Monitor is reading the contents of the ndbinfo database that was introduced in MySQL Cluster 7.1.

If using an older version of MySQL Cluster then you get less benefit from MySQL Enterprise Monitor but there is still some value in using it to monitor the MySQL Servers that are part of the cluster:

  • Use the Query Analyzer to keep track of how your applications access the database and troubleshoot performance issues
  • Monitor the state of the MySQL Server itself (number of client connections, CPU usage etc.)
  • Generate alerts when data nodes are out of service.

Schedule Cluster Rules Against the Servers

There is documentation covering installing and running the MySQL Enterprise Monitor service manager and agents and so I won’t repeat the steps here except to point out that you need one or more of the agents to be configured to monitor one or more of the MySQL Servers in your Cluster. Of course, you could monitor multiple MySQL Cluster deployments from the same dashboard – just make sure that you have an agent monitoring at least one MySQL Server from each one.

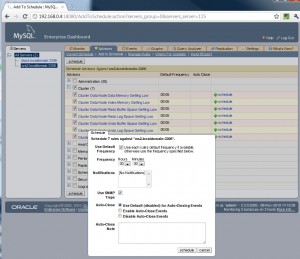
By default, none of the rules from the MySQL Cluster Advisor are scheduled against any of your servers and so the first thing you need to do is go to the “Advisors” tab and from their select “Add to Schedule”. Select the server(s) on the left and then check the radio button(s) against the whole Cluster advisor or against one or more of the rules within it and click the “schedule” button. You’ll then be given the option to override the default frequency that each rule is run before confirming the activation (scheduling) of the rule(s) for your server(s). This is also the point where you can indicate whether or not an SNMP Trap should be raised when the alert is raised/cleared (the destinations for the SNMP notifications can be set under the “Settings” tab).

Error scheduling rules against wrong version of MySQL Server

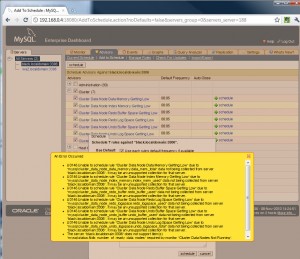
Note that if you try scheduling the Cluster Advisor rules against a MySQL Server that is not part of a MySQL Cluster 7.1 (or later) deployment they you will get errors indicating that the server cannot provide the required data.


MySQL Cluster Graphs

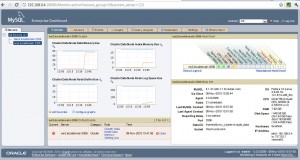
The new MySQL Cluster graphs are activated by default and you can view them from the “Graphs” tab but note that if there are no MySQL Cluster 7.1 servers in the list that you highlight on the left of the browser then the Cluster graphs will be hidden.


Customize Cluster Rule

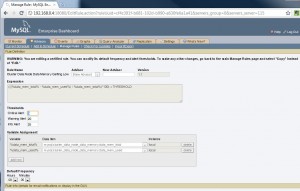
Note that there is still scope for simple customizations directly from the the MySQL Enterprise Monitor GUI. For example if you don’t think that the default thresholds are appropriate for your configuration then select “Manage Rules” within the “Advisors” tab and then click “edit” next to the rule in question – you then get the option to alter the threshold values.

As a final configuration step, go back to the “Monitor” tab and click on “edit favorites” to promote your favourite Cluster graphs to the home screen.


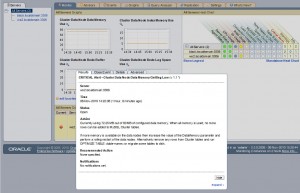
Details of Cluster alert

Any Critical alerts (including ones for the newly scheduled Cluster rules) will appear on the Monitor page – to see the Info and Warning alerts, select the “Events” tab. Clicking on any of these alerts will give you extra details and the opportunity to close the alert.


MySQL Cluster Manager 1.1 available!

As the title of this post suggests, MySQL Cluster Manager 1.1 is now available – but this actually has a double meaning:

  1. MySQL Cluster Manager 1.1 is GA (I’ll explain below the major improvements over 1.0)
  2. Everyone is now able to download and try it (without first having to purchase a license)!

This software is only available through commercial licenses (i.e. not GPL like the rest of Cluster) and until recently there was no way for anyone to try it out unless they had already bought MySQL Cluster CGE; this changed on Monday when the MySQL software became available through Oracle’s E-Delivery site. Now you can download the software and try it out for yourselves (just select “MySQL Database” as the product pack, select your platform, click “Go” and then scroll down to get the software).

So What is MySQL Cluster Manager?

MySQL Cluster Manager provides the ability to control the entire cluster as a single entity, while also supporting very granular control down to individual processes within the cluster itself.  Administrators are able to create and delete entire clusters, and to start, stop and restart the cluster with a single command.  As a result, administrators no longer need to manually restart each data node in turn, in the correct sequence, or to create custom scripts to automate the process.

MySQL Cluster Manager automates on-line management operations, including the upgrade, downgrade and reconfiguration of running clusters as well as adding nodes on-line for dynamic, on-demand scalability, without interrupting applications or clients accessing the database.  Administrators no longer need to manually edit configuration files and distribute them to other cluster nodes, or to determine if rolling restarts are required. MySQL Cluster Manager handles all of these tasks, thereby enforcing best practices and making on-line operations significantly simpler, faster and less error-prone.

MySQL Cluster Manager is able to monitor cluster health at both an Operating System and per-process level by automatically polling each node in the cluster.  It can detect if a process or server host is alive, dead or has hung, allowing for faster problem detection, resolution and recovery.

To deliver 99.999% availability, MySQL Cluster has the capability to self-heal from failures by automatically restarting failed Data Nodes, without manual intervention.  MySQL Cluster Manager extends this functionality by also monitoring and automatically recovering SQL and Management Nodes.  

How is it Implemented?
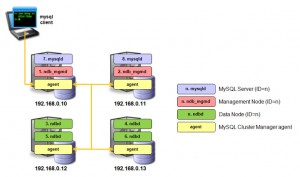
MySQL Cluster Manager Architecture

MySQL Cluster Manager is implemented as a series of agent processes that co-operate with each other to manage the MySQL Cluster deployment; one agent running on each host machine that will be running a MySQL Cluster node (process). The administrator uses the regular mysql command to connect to any one of the agents using the port number of the agent (defaults to 1862 compared to the MySQL Server default of 3306).

How is it Used?

When using MySQL Cluster Manager to manage your MySQL Cluster deployment, the administrator no longer edits the configuration files (for example config.ini and my.cnf); instead, these files are created and maintained by the agents. In fact, if those files are manually edited, the changes will be overwritten by the configuration information which is held within the agents. Each agent stores all of the cluster configuration data, but it only creates the configuration files that are required for the nodes that are configured to run on that host.

Similarly when using MySQL Cluster Manager, management actions must not be performed by the administrator using the ndb_mgm command (which directly connects to the management node meaning that the agents themselves would not have visibility of any operations performed with it).

When using MySQL Cluster Manager, the ‘angel’ processes are no longer needed (or created) for the data nodes, as it becomes the responsibility of the agents to detect the failure of the data nodes and recreate them as required. Additionally, the agents extend this functionality to include the management nodes and MySQL Server nodes.

Example 1: Create a Cluster from Scratch

The first step is to connect to one of the agents and then define the set of hosts that will be used for the Cluster:

$ mysql -h 192.168.0.10 -P 1862 -u admin -psuper --prompt='mcm> '
mcm> create site --hosts=192.168.0.10,192.168.0.11,192.168.0.12,192.168.0.13 mysite;

Next step is to tell the agents where they can find the Cluster binaries that are going to be used, define what the Cluster will look like (which nodes/processes will run on which hosts) and then start the Cluster:

mcm> add package --basedir=/usr/local/mysql_6_3_27a 6.3.27a;
mcm> create cluster --package=6.3.26
--processhosts=ndb_mgmd@192.168.0.10,ndb_mgmd@192.168.0.11,
ndbd@192.168.0.12,ndbd@192.168.0.13,ndbd@192.168.0.12,
ndbd@192.168.0.13,mysqld@192.168.0.10,mysqld@192.168.0.11 mycluster;
mcm> start cluster mycluster; 

Example 2: On-Line upgrade of a Cluster

A great example of how MySQL Cluster Manager can simplify management operations is upgrading the Cluster software. If performing the upgrade by hand then there are dozens of steps to run through which is time consuming, tedious and subject to human error (for example, restarting nodes in the wrong order could result in an outage). With MySQL Cluster Manager, it is reduced to two commands – define where to find the new version of the software and then perform the rolling, in-service upgrade:

mcm> add package --basedir=/usr/local/mysql_7_1_8 7.1.8;
mcm> upgrade cluster --package=7.1.8 mycluster;

Behind the scenes, each node will be halted and then restarted with the new version – ensuring that there is no loss of service.

What’s New in MySQL Cluster Manager 1.1

If you’ve previously tried out version 1.0 then the main improvements you’ll see in 1.1 are:

  • More robust; 1.0 was the first release and a lot of bug fixes have gone in since then
  • Optimized restarts – more selective about which nodes need to be restarted when making a configuration change
  • Automated On-line Add-node

MySQL Cluster Manager 1.1 – Automated On-Line Add-Node
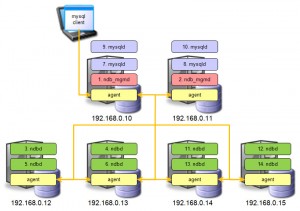
Automated On-Line Add-Node

Since MySQL Cluster 7.0 it has been possible to add new nodes to a Cluster while it is still in service; there are a number of steps involved and as with on-line upgrades if the administrator makes a mistake then it could lead to an outage.

We’ll now look at how this is automated when using MySQL Cluster Manager; the first step is to add any new hosts (servers) to the site and indicate where those hosts can find the Cluster software:

mcm> add hosts --hosts=192.168.0.14,192.168.0.15 mysite;
mcm> add package --basedir=/usr/local/mysql_7_1_8 --hosts=192.168.0.14,192.168.0.15 7_1_8;

The new nodes can then be added to the Cluster and then started up:

mcm> add process --processhosts=mysqld@192.168.0.10,mysqld@192.168.0.11,ndbd@192.168.0.14,
ndbd@192.168.0.15,ndbd@192.168.0.14,ndbd@192.168.0.15 mycluster;
mcm> start process --added mycluster; 

The Cluster has now been extended but you need to perform a final step from any of the MySQL Servers to repartition the existing Cluster tables to use the new data nodes:

mysql> ALTER ONLINE TABLE <table-name> REORGANIZE PARTITION;
mysql> OPTIMIZE TABLE <table-name>;

Where can I found out more?

There is a lot of extra information to help you understand what can be achieved with MySQL Cluster Manager and how to use it:



MySQL Cluster Demo from Oracle OpenWorld

If you weren’t able to attend Oracle OpenWorld or didn’t get chance to  visit the MySQL demo booths then you can watch a recording of the demo here. The video gives a brief description of MySQL Cluster and then dives into a series of demos showing MySQL Cluster’s ability to cope with a number of events without losing service – including node failure, on-line upgrades and on-line horizontal scaling.

To view a higher quality version click here.


Glimpse of the future – massively improved JOIN performance for MySQL Cluster

MySQL Cluster Push-Down Joins

A great chance to find out about the “SPJ” project that’s under way to improve the performance of complex table JOINs. A free webinar has been scheduled for Thursday, November 04 at 09:00 Pacific time (16:00 UK; 17:00 Central European Time) – just register for the webinar at mysql.com. Even if you can’t attend, by registering you’ll get an email telling you where to watch the replay shortly after the webinar.

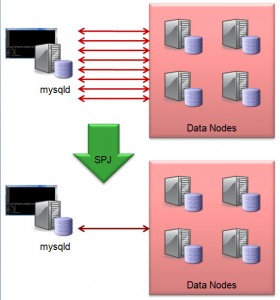
MySQL Cluster performance has always been extremely high and scalable when the work load is primarily primary key reads and write but complex JOINS (many tables in the JOIN and/or a large number of results from the first part of the query) have traditionally been much slower than when using other storage engines. Work is underway to address this and SPJ is the name we’ve been using.

Traditionally, JOINs have been performed as Nested Loop JOINs in the MySQL Server which is fine when all of the data is held there (e.g. MyISAM) but when the data is held externally (in Cluster’s case, in the data nodes) it can result in a massive amount of messaging. SPJ works by pushing the processing of JOINs down into the data nodes where they can be performed much more efficiently as the data is local.

As well as finding out about the implementation, you’ll also learn:

  • What queries benefit -> how you might tweak you application to get the biggest benefits
  • The kind of performance improvements you might expect to see
  • How to try the (pre-GA!) software for yourself.

Note that (as always) Oracle reserves the right to alter the timing and/or existence of new product releases.


New white paper – MySQL Replication – Enhancing Scalability and Availability with MySQL 5.5

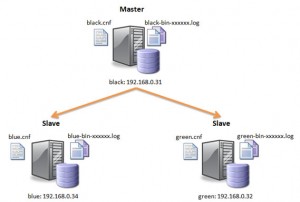
MySQL Replication from 1 Master to Multiple Slaves

A new white paper has been published that covers MySQL Replication – background information, how it works, how to use it and what’s new in MySQL 5.5. Simply register for the white paper at mysql.com and you’ll be sent your free copy.

The paper starts by covering the fundamental concepts behind replication such as the difference between synchronous and asynchronous replication and the idea behind semisynchronous replication.

It goes on to describe the common use-cases for replication – scaling out, high availability, geographic redundancy and offloading backups or analytics.

Various replication topologies are discussed from simple master-slave to multi-master rings.

As the title of the paper suggests, the paper covers the significant replication changes introduced in MySQL 5.5:

  • Semisynchronous replication: Improved resilience by having master wait for slave to persist events.
  • Slave fsync tuning & Automatic relay log recovery: Option to dictate when relay logs are written to disk rather than relying on default operating system behavior; set sync_relay_log=1 to ensure that no more than 1 statement or transaction is missing from the relay log after a crash. The slave can now recover from corrupted relay logs by requesting corrupt entries to be resent from the master. Three new options are introduced (sync-master-info, sync-relay-log and sync-relay-log-info)
  • Replication Heartbeat: Automatically checks the status of the connection between the master and the slave(s), allowing a more precise failure detection mechanism. Can detect loss of connection within milliseconds (configurable). Avoid unnecessary relay log rotation when the master is idle.
  • Per server replication filtering: When a server is removed from a replication ring, a surviving server can be selected to remove its outstanding replication messages once they’ve been applied by all servers.
  • Precise Slave Type Conversions: Allows different types to be used on the master and slave, with automatic type promotion and demotion when using row-based replication (already possible with statement-based replication)
  • Individual Log Flushing: Selectively flush server logs when using ‘FLUSH LOGS’ for greater control
  • Safe logging of mixed transactions: Replicate transactions containing both InnoDB and MyISAM changes

To be better able to use replication, it helps to understand the basics about how MySQL Replication has been implemented – for example the roles of the binary and relay logs and so this is covered.

Perhaps the most useful sections are those that actually walk through using MySQL Replication – specifically these activities:

  • Configuring, running and testing replication
  • Migrating from traditional asynchronous replication to semisynchronous replication
  • Administering & monitoring replication (including MySQL Enterprise Monitor)
  • Failover and recovery

Replication is a little different when using MySQL Cluster; most significantly because you can have multiple MySQL Servers and other application nodes modifying the same database but also because the domains where MySQL Cluster has been used have required extreme High Availability and so there are Cluster-unique features such as active-active replication with conflict detection and resolution. This paper isn’t focussed on MySQL Cluster but a summary of these differences is included.


MySQL Cluster 7.1.8 binaries released

The binary version for MySQL Cluster 7.1.8 has now been made available at http://www.mysql.com/downloads/cluster/

A description of all of the changes (fixes) that have gone into MySQL Cluster 7.1.8 (compared to 7.1.5) can be found in the official MySQL Cluster documentation.


Get MySQL Replication up and running in 5 minutes

MySQL Replication is incredibly simple to get up and running and this (short) post steps you through it.

Simple Master -> Slave Replication

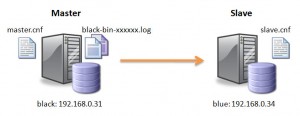
MySQL allows you to build up complex replication hierarchies, such as multi-master, chains of read slaves, backup databases at a remote site or any combination of these. This post focuses on a simple single master to single slave topology – the more complex solutions are built from this basic building block.

This post also makes the assumption that the 2 MySQL Servers have been installed but that there is no existing data in the master that needs to be copied to the slave – it’s not complex to add that extra requirement and it will be covered in a future post.

Server “black” (192.168.0.31) is to be our master and “blue” (192.168.0.34) the slave.

Step 1: Edit the configuration files & start the MySQL Servers

The first step in setting up replication involves editing the “my.cnf” file on the servers that will serve as the master and slave. A default is provided with the MySQL installation but in case there is already a production MySQL database running on these servers, we provide local configuration files “master.cnf” and “slave.cnf” that will be used when starting up the MySQL servers.

At a minimum we’ll want to add two options to the [mysqld] section of the master.cnf file:

  • log-bin: in this example we choose black-bin.log
  • server-id: in this example we choose 1. The server cannot act as a replication master unless binary logging is enabled. The server_id variable must be a positive integer value between 1 to 2^32

master.cnf:

[mysqld]
server-id=1
log-bin=black-bin.log
datadir=/home/billy/mysql/master/data
innodb_flush_log_at_trx_commit=1
sync_binlog=1

Note: For the greatest possible durability and consistency in a replication setup using InnoDB with transactions, you should also specify the innodb_flush_log_at_trx_commit=1, sync_binlog=1 options.

Next, you’ll need to add the server-id option to the [mysqld] section of the slave’s slave.cnf file. The server-id value, like the master_id value, must be a positive integer between 1 to 2^32, It is also necessary that the ID of the slave be different from the ID of the master. If you are setting up multiple slaves, each one must have a unique server-id value that differs from that of the master and from each of the other slaves.

slave.cnf:

[mysqld]
server-id=2
relay-log-index=slave-relay-bin.index
relay-log=slave-relay-bin
datadir=/home/billy/mysql/slave/data

Now, start the MySQL servers using the service manager or directly from the command line if not being run as a service:

[billy@black ~]$ mysqld --defaults-file=/home/billy/mysql/master/master.cnf &
[billy@blue ~]$ mysqld --defaults-file=/home/billy/mysql/slave/slave.cnf&

Step 2: Create Replication User

Create an account on the master server that the slave server can use to connect. This account must be given the REPLICATION SLAVE privilege:

[billy@black ~]$ mysql -u root --prompt='master> '
master> CREATE USER repl_user@192.168.0.34;
master> GRANT REPLICATION SLAVE ON *.* TO repl_user@192.168.0.34 IDENTIFIED BY 'billy';

Step 3: Initialize Replication

We are now ready to initialize replication on the slave; issue a CHANGE MASTER command:

slave> CHANGE MASTER TO MASTER_HOST='192.168.0.31',
 -> MASTER_USER='repl_user',
 -> MASTER_PASSWORD='billy',
 -> MASTER_LOG_FILE='',
 -> MASTER_LOG_POS=4;

Where:

  • MASTER_HOST: the IP or hostname of the master server, in this example blue or 192.168.0.31
  • MASTER_USER: this is the user we granted the REPLICATION SLAVE privilege to in Step 2, in this example, “repl_user”
  • MASTER_PASSWORD: this is the password we assigned to ”rep_user” in Step 2
  • MASTER_LOG_FILE: is an empty string (wouldn’t be empty if there were existing writes to be picked up from the master)
  • MASTER_LOG_POS: is 4 (would likely be different if there were existing writes to be picked up from the master)

Finally, start replication on the slave:

slave> start slave;

Step 4: Basic Checks

Now we are ready to perform a basic check to ensure that replication is indeed working. In this example we insert a row of data into the “simples” table on the master server and then verify that these new rows materialize on the slave server:

master> create database clusterdb;
master> create table clusterdb.simples (id int not null primary key) engine=ndb;
master> insert into clusterdb.simples values (999),(1),(2),(3);
slave> select * from clusterdb.simples;
 +-----+
 | id  |
 +-----+
 |   1 |
 |   2 |
 |   3 |
 | 999 |
 +-----+