Tag Archive for MySQL

MySQL Fabric now Generally Available – Automating High Availability and Sharding for MySQL

MySQL Fabric - High Availability and Scalability for MySQL
MySQL Fabric is a new framework that automates High Availability (HA) and/or sharding (scaling-out) for MySQL and it has just been declared Generally Available.

This post focuses on MySQL Fabric as a whole – both High Availability and scaling out (sharding). It starts with an introductions to HA and scaling out (by partitioning/sharding data) and how MySQL Fabric achieves it before going on to work through a full example of deploying HA with MySQL Fabric and then adding sharding on top.

Download and try MySQL Fabric now!

This post focuses on MySQL Fabric as a whole – both High Availability and scaling out (sharding). It starts with introductions to HA and scaling out (by partitioning/sharding data) and how MySQL Fabric achieves it before going on to work through a full example of deploying HA with MySQL Fabric and then adding sharding on top.

What MySQL Fabric Provides

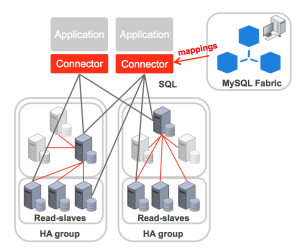
MySQL Fabric is built around an extensible framework for managing farms of MySQL Servers. Currently two features have been implemented – High Availability and scaling out using data sharding. Either of these features can be used in isolation or in combination.

Both features are implemented in two layers:

    • The mysqlfabric process which processes any management requests – whether received through the mysqlfabric command-line-interface (the manual for which can be found at http://dev.mysql.com/doc/mysql-utilities/1.4/en/fabric.html) or from another process via the supplied XML/RPC interface. When using the HA feature, this process can also be made responsible for monitoring the master server and initiating failover to promote a slave to be the new master should it fail. The state of the server farm is held in the state store (a MySQL database) and the mysqlfabric process is responsible for providing the state and routing information to the connectors.
    • MySQL Connectors are used by the application code to access the database(s), converting instructions from a specific programming language to the MySQL wire protocol, which is used to communicate with the MySQL Server processes. A ‘Fabric-aware’ connector stores a cache of the routing information that it has received from the mysqlfabric process and then uses that information to send transactions or queries to the correct MySQL Server. Currently the three supported Fabric-aware MySQL connectors are for PHP, Python and Java (and in turn the Doctrine and Hibernate Object-Relational Mapping frameworks). This approach means that the latency and potential bottleneck of sending all requests via a proxy can be avoided.

High Availability

High Availability (HA) refers to the ability for a system to provide continuous service – a system is available while that service can be utilized. The level of availability is often expressed in terms of the “number of nines” – for example, a HA level of 99.999% means that the service can be used for 99.999% of the time, in other words, on average, the service is only unavailable for 5.25 minutes per year (and that includes all scheduled as well as unscheduled down-time).

Different Points of High Availability

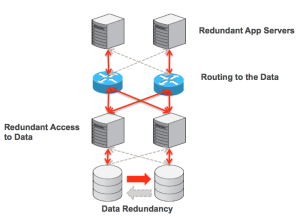
Layers in architecture where High Availability is needed

The figure shows the different layers in the system that need to be available for service to be provided.

At the bottom is the data that the service relies on. Obviously, if that data is lost then the service cannot function correctly and so it’s important to make sure that there is at least one extra copy of that data. This data can be duplicated at the storage layer itself but with MySQL, it’s most commonly replicated by the layer above – the MySQL Server using MySQL Replication. The MySQL Server provides access to the data – there is no point in the data being there if you can’t get at it! It’s a common misconception that having redundancy at these two levels is enough to have a HA system but you also need to look at the system from the top-down.

To have a HA service, there needs to be redundancy at the application layer; in itself this is very straight-forward, just load balance all of the service requests over a pool of application servers which are all running the same application logic. If the service were something as simple as a random number generator then this would be fine but most useful applications need to access data and as soon as you move beyond a single database server (for example because it needs to be HA) then a way is needed to connect the application server to the correct data source. In a HA system, the routing isn’t a static function, if one database server should fail (or be taken down for maintenance) the application should be directed instead to an alternate database. Some HA systems implement this routing function by introducing a proxy process between the application and the database servers; others use a virtual IP address which can be migrated to the correct server. When using MySQL Fabric, this routing function is implemented within the Fabric-aware MySQL connector library that’s used by the application server processes.

What MySQL Fabric Adds in Terms of High Availability

MySQL Fabric has the concept of a HA group which is a pool of two or more MySQL Servers; at any point in time, one of those servers is the Primary (MySQL Replication master) and the others are Secondaries (MySQL Replication slaves). The role of a HA group is to ensure that access to the data held within that group is always available.

While MySQL Replication allows the data to be made safe by duplicating it, for a HA solution two extra components are needed and MySQL Fabric provides these:

      • Failure detection and promotion – the MySQL Fabric process monitors the Primary within the HA group and should that server fail then it selects one of the Secondaries and promotes it to be the Primary (with all of the other slaves in the HA group then receiving updates from the new master). Note that the connectors can inform MySQL Fabric when they observe a problem with the Primary and the MySQL Fabric process uses that information as part of its decision making process surrounding the state of the servers in the farm.
      • Routing of database requests – When MySQL Fabric promotes the new Primary, it updates the state store and notifies the connectors so that they can refresh their caches with the updated routing information. In this way, the application does not need to be aware that the topology has changed and that writes need to be sent to a different destination.

Scaling Out – Sharding

When nearing the capacity or write performance limit of a single MySQL Server (or HA group), MySQL Fabric can be used to scale-out the database servers by partitioning the data across multiple MySQL Server “groups”. Note that a group could contain a single MySQL Server or it could be a HA group.

MySQL Fabric Architecture

The administrator defines how data should be partitioned/sharded between these servers; this is done by creating shard mappings. A shard mapping applies to a set of tables and for each table the administrator specifies which column from those tables should be used as a shard key (the shard key will subsequently be used by MySQL Fabric to calculate which shard a specific row from one of those tables should be part of). Because all of these tables use the same shard key and mapping, the use of the same column value in those tables will result in those rows being in the same shard – allowing a single transaction to access all of them. For example, if using the subscriber-id column from multiple tables then all of the data for a specific subscriber will be in the same shard. The administrator then defines how that shard key should be used to calculate the shard number:

      • HASH: A hash function is run on the shard key to generate the shard number. If values held in the column used as the sharding key don’t tend to have too many repeated values then this should result in an even partitioning of rows across the shards.
      • RANGE: The administrator defines an explicit mapping between ranges of values for the sharding key and shards. This gives maximum control to the user of how data is partitioned and which rows should be co-located.

When the application needs to access the sharded database, it sets a property for the connection that specifies the sharding key – the Fabric-aware connector will then apply the correct range or hash mapping and route the transaction to the correct shard.

If further shards/groups are needed then MySQL Fabric can split an existing shard into two and then update the state-store and the caches of routing data held by the connectors. Similarly, a shard can be moved from one HA group to another.

Note that a single transaction or query can only access a single shard and so it is important to select shard keys based on an understanding of the data and the application’s access patterns. It doesn’t always make sense to shard all tables as some may be relatively small and having their full contents available in each group can be beneficial given the rule about no cross-shard queries. These global tables are written to a ‘global group’ and any additions or changes to data in those tables are automatically replicated to all of the other groups. Schema changes are also made to the global group and replicated to all of the others to ensure consistency.

To get the best mapping, it may also be necessary to modify the schema if there isn’t already a ‘natural choice’ for the sharding keys.

Worked Example

The example that this post steps through starts by setting up MySQL Fabric itself and then uses it to manage HA using a group of MySQL Servers. An example application will store data in this new configuration. After that, the example will introduce shards to the server farm in order to scale out capacity and read/write performance.

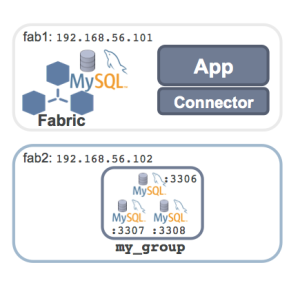
The following sections set up the sharded MySQL configuration shown here before running some (Python) code against – with queries and transactions routed to the correct MySQL Server.

Building the MySQL Fabric Framework

Note that this section is repeated from the earlier two posts and so can be skipped if you’ve already worked through one of them.

The machines being used already have MySQL 5.6 installed (though in a custom location) and so the only software pre-requisite is to install the MySQL connector for Python from the connector download page and MySQL Fabric (part of MySQL Utilities) from the MySQL Fabric download page:

[root@fab1 mysql ~]# rpm -i mysql-connector-python-1.2.2-1.el6.noarch.rpm
[root@fab1 mysql ~]# rpm -i mysql-utilities-1.4.3-1.el6.noarch.rpm

MySQL Fabric needs access to a MySQL Database to store state and routing information for the farm of servers; if there isn’t already a running MySQL Server instance that can be used for this then it’s simple to set one up:

[mysql@fab1 ~]$ mkdir myfab
[mysql@fab1 ~]$ cd myfab/
[mysql@fab1 myfab]$ mkdir data  
[mysql@fab1 myfab]$ cat my.cnf
[mysqld]
datadir=/home/mysql/myfab/data
basedir=/home/mysql/mysql
socket=/home/mysql/myfab/mysqlfab.socket
binlog-format=ROW
log-slave-updates=true
gtid-mode=on
enforce-gtid-consistency=true
master-info-repository=TABLE
relay-log-info-repository=TABLE
sync-master-info=1
port=3306
report-host=fab1
report-port=3306
server-id=1
log-bin=fab-bin.log
[mysql@fab1 mysql]$ scripts/mysql_install_db --basedir=/home/mysql/mysql/ \
    --datadir=/home/mysql/myfab/data/ 

2014-02-12 16:55:45 1298 [Note] Binlog end
2014-02-12 16:55:45 1298 [Note] InnoDB: FTS optimize thread exiting.
2014-02-12 16:55:45 1298 [Note] InnoDB: Starting shutdown...
2014-02-12 16:55:46 1298 [Note] InnoDB: Shutdown completed; log sequence number 1600607
2014-02-12 16:55:46 1298 [Note] /home/mysql/mysql//bin/mysqld: Shutdown complete

[mysql@fab1 ~]$ mysqld --defaults-file=/home/mysql/myfab/my.cnf &

MySQL Fabric needs to be able to access this state store and so a dedicated user is created (note that the fabric database hasn’t yet been created – that will be done soon using the mysqlfabric command):

[mysql@fab1 ~]$ mysql -h 127.0.0.1 -P3306 -u root -e "GRANT ALL ON fabric.* \
    TO fabric@localhost";

All of the management requests that we make for MySQL Fabric will be issued via the mysqlfabric command. This command is documented in the MySQL Fabric User Guide but sub-commands can be viewed from the terminal using the list-commands option:

[mysql@fab1 ~]$ mysqlfabric help commands
group activate              Activate failure detector for server(s) in a group.
group description           Update group's description.
group deactivate            Deactivate failure detector for server(s) in a
group.
group create                Create a group.
group remove                Remove a server from a group.
group add                   Add a server into group.
group health                Check if any server within a group has failed and report health information.
group lookup_servers        Return information on existing server(s) in a group.
group destroy               Remove a group.
group demote                Demote the current master if there is one.
group promote               Promote a server into master.
group lookup_groups         Return information on existing group(s).
dump fabric_nodes           Return a list of Fabric servers.
dump shard_index            Return information about the index for all mappings matching any of the patterns provided.
dump sharding_information   Return all the sharding information about the tables passed as patterns.
dump servers                Return information about servers.
dump shard_tables           Return information about all tables belonging to mappings matching any of the provided patterns.
dump shard_maps             Return information about all shard mappings matching any of the provided patterns.
manage teardown             Teardown Fabric Storage System.
manage stop                 Stop the Fabric server.
manage setup                Setup Fabric Storage System.
manage ping                 Check whether Fabric server is running or not.
manage start                Start the Fabric server.
manage logging_level        Set logging level.
server set_weight           Set a server's weight.
server lookup_uuid          Return server's uuid.
server set_mode             Set a server's mode.
server set_status           Set a server's status.
role list                   List roles and associated permissions
user add                    Add a new Fabric user.
user password               Change password of a Fabric user.
user list                   List users and their roles
user roles                  Change roles for a Fabric user  * protocol: Protocol of the user (for example 'xmlrpc') * roles: Comma separated list of roles, IDs or names (see `role list`)
user delete                 Delete a Fabric user.
threat report_error         Report a server error.
threat report_failure       Report with certantity that a server has failed or is unreachable.
sharding list_definitions   Lists all the shard mapping definitions.
sharding remove_definition  Remove the shard mapping definition represented by the Shard Mapping ID.
sharding move_shard         Move the shard represented by the shard_id to the destination group.
sharding disable_shard      Disable a shard.
sharding remove_table       Remove the shard mapping represented by the Shard Mapping object.
sharding split_shard        Split the shard represented by the shard_id into the destination group.
sharding create_definition  Define a shard mapping.
sharding add_shard          Add a shard.
sharding add_table          Add a table to a shard mapping.
sharding lookup_table       Fetch the shard specification mapping for the given table
sharding enable_shard       Enable a shard.
sharding remove_shard       Remove a Shard.
sharding list_tables        Returns all the shard mappings of a particular sharding_type.
sharding prune_shard        Given the table name prune the tables according to the defined sharding specification for the table.
sharding lookup_servers     Lookup a shard based on the give sharding key.
event trigger               Trigger an event.
event wait_for_procedures   Wait until procedures, which are identified through their uuid in a list and separated by comma, finish 
							their execution.

MySQL Fabric has its own configuration file (note that its location can vary depending on your platform and how MySQL Utilities were installed). The contents of this configuration file should be reviewed before starting the MySQL Fabric process (in this case, the mysqldump_program and mysqlclient_program settings needed to be changed as MySQL was installed in a user’s directory) and the MySQL Fabric management port was changed to 8080 and authentication for the management interface was disabled:

[root@fab1 mysql]# cat /etc/mysql/fabric.cfg
[DEFAULT]
prefix =
sysconfdir = /etc
logdir = /var/log

[logging]
url = file:///var/log/fabric.log
level = INFO

[storage]
auth_plugin = mysql_native_password
database = fabric
user = fabric
address = localhost:3306
connection_delay = 1
connection_timeout = 6
password =
connection_attempts = 6

[failure_tracking]
notification_interval = 60
notification_clients = 50
detection_timeout = 1
detection_interval = 6
notifications = 300
detections = 3
failover_interval = 0
prune_time = 3600

[servers]
password =
user = fabric

[connector]
ttl = 1

[protocol.xmlrpc]
disable_authentication = no
ssl_cert =
realm = MySQL Fabric
ssl_key =
ssl_ca =
threads = 5
user = admin
address = localhost:32274
password = admin

[executor]
executors = 5

[sharding]
mysqldump_program = /home/mysql/mysql/bin/mysqldump
mysqlclient_program = /home/mysql/mysql/bin/mysql

The final step before starting the MySQL Fabric process is to create the MySQL Fabric schema within the state store:

[root@fab1 mysql]# mysqlfabric manage setup --param=storage.user=fabric
[INFO] 1399476439.536728 - MainThread - Initializing persister: user \
	(fabric), server (localhost:3306), database (fabric).
[INFO] 1399476451.330008 - MainThread - Initial password for admin/xmlrpc \
	set
Password set for admin/xmlrpc from configuration file.
[INFO] 1399476451.333563 - MainThread - Password set for admin/xmlrpc \
	from configuration file.

An optional step is then to check for yourself that the schema is indeed there:

[mysql@fab1 ~]$ mysql --protocol=tcp -u root
Welcome to the MySQL monitor.  Commands end with ; or \g.
Your MySQL connection id is 5
Server version: 5.6.16-log MySQL Community Server (GPL)

Copyright (c) 2000, 2014, Oracle and/or its affiliates. All rights reserved.

Oracle is a registered trademark of Oracle Corporation and/or its
affiliates. Other names may be trademarks of their respective
owners.

Type 'help;' or '\h' for help. Type '\c' to clear the current input statement.

mysql> show databases;
+--------------------+
| Database           |
+--------------------+
| information_schema |
| fabric             |
| mysql              |
| performance_schema |
| test               |
+--------------------+
5 rows in set (0.00 sec)

mysql> use fabric;show tables;
Reading table information for completion of table and column names
You can turn off this feature to get a quicker startup with -A

Database changed
+-------------------+
| Tables_in_fabric  |
+-------------------+
| checkpoints       |
| error_log         |
| group_replication |
| groups            |
| permissions       |
| role_permissions  |
| roles             |
| servers           |
| shard_maps        |
| shard_ranges      |
| shard_tables      |
| shards            |
| user_roles        |
| users             |
+-------------------+
14 rows in set (0.00 sec)

The MySQL Fabric process can now be started; in this case the process will run from the terminal from which it’s started but the --daemonize option can be used to make it run as a daemon.

[mysql@fab1 ~]$ mysqlfabric manage start
[INFO] 1399476805.324729 - MainThread - Fabric node starting.
[INFO] 1399476805.327456 - MainThread - Initializing persister: user \
	(fabric), server (localhost:3306), database (fabric).
[INFO] 1399476805.335908 - MainThread - Initial password for admin/xmlrpc \
	set
Password set for admin/xmlrpc from configuration file.
[INFO] 1399476805.339028 - MainThread - Password set for admin/xmlrpc \
	from configuration file.
[INFO] 1399476805.339868 - MainThread - Loading Services.
[INFO] 1399476805.359542 - MainThread - Starting Executor.
[INFO] 1399476805.360668 - MainThread - Setting 5 executor(s).
[INFO] 1399476805.363478 - Executor-0 - Started.
[INFO] 1399476805.366553 - Executor-1 - Started.
[INFO] 1399476805.368680 - Executor-2 - Started.
[INFO] 1399476805.372392 - Executor-3 - Started.
[INFO] 1399476805.376179 - MainThread - Executor started.
[INFO] 1399476805.382025 - Executor-4 - Started.
[INFO] 1399476805.385570 - MainThread - Starting failure detector.
[INFO] 1399476805.389736 - XML-RPC-Server - XML-RPC protocol server \
	('127.0.0.1', 8080) started.
[INFO] 1399476805.390695 - XML-RPC-Server - Setting 5 XML-RPC session(s).
[INFO] 1399476805.393918 - XML-RPC-Session-0 - Started XML-RPC-Session.
[INFO] 1399476805.396812 - XML-RPC-Session-1 - Started XML-RPC-Session.
[INFO] 1399476805.399596 - XML-RPC-Session-2 - Started XML-RPC-Session.
[INFO] 1399476805.402650 - XML-RPC-Session-3 - Started XML-RPC-Session.
[INFO] 1399476805.405305 - XML-RPC-Session-4 - Started XML-RPC-Session.

If the process had been run as a daemon then it’s useful to be able to check if it’s actually running:

[mysql@fab1 ~]$ mysqlfabric manage ping
Command :
{ success     = True
  return      = True
  activities  =
}

Adding MySQL Servers to Create a HA Farm

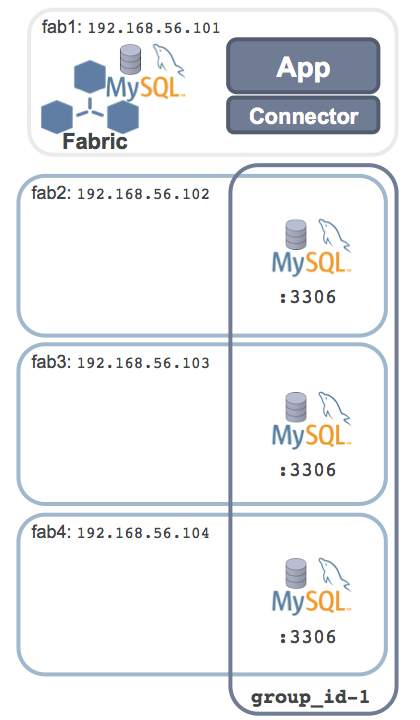
At this point, MySQL Fabric is up and running but it has no MySQL Servers to manage. This figure shows the what the configuration will look like once MySQL Servers have been added to create a HA server farm.

Single shard HA with MySQL Fabric

Three MySQL Servers will make up the managed HA group – each running on a different machine – these are the configuration files for each (there’s no detailed commentary as this is standard MySQL stuff):


[mysql@fab2 myfab]$ cat my2.cnf
[mysqld]
datadir=/home/mysql/myfab/data2
basedir=/home/mysql/mysql
socket=/home/mysql/myfab/mysqlfab2.socket
binlog-format=ROW
log-slave-updates=true
gtid-mode=on
enforce-gtid-consistency=true
master-info-repository=TABLE
relay-log-info-repository=TABLE
sync-master-info=1
port=3306
report-host=fab2
report-port=3306
server-id=20
log-bin=fab2-bin.log

[mysql@fab3 myfab]$ cat my3.cnf
[mysqld]
datadir=/home/mysql/myfab/data3
basedir=/home/mysql/mysql
socket=/home/mysql/myfab/mysqlfab3.socket
binlog-format=ROW
log-slave-updates=true
gtid-mode=on
enforce-gtid-consistency=true
master-info-repository=TABLE
relay-log-info-repository=TABLE
sync-master-info=1
port=3306
report-host=fab3
report-port=3306
server-id=30
log-bin=fab3-bin.log

[mysql@fab4 myfab]$ cat my4.cnf
[mysqld]
datadir=/home/mysql/myfab/data4
basedir=/home/mysql/mysql
socket=/home/mysql/myfab/mysqlfab4.socket
binlog-format=ROW
log-slave-updates=true
gtid-mode=on
enforce-gtid-consistency=true
master-info-repository=TABLE
relay-log-info-repository=TABLE
sync-master-info=1
port=3306
report-host=fab4
report-port=3306
server-id=40
log-bin=fab3-bin.log

These MySQL Servers can then be bootstrapped and started:

[mysql@fab2 myfab]$ mkdir data2
[mysql@fab3 myfab]$ mkdir data3
[mysql@fab4 myfab]$ mkdir data3

[mysql@fab2 mysql]$ scripts/mysql_install_db --basedir=/home/mysql/mysql/ \
    --defaults-file=/home/mysql/myfab/my2.cnf \
    --datadir=/home/mysql/myfab/data2/
[mysql@fab3 mysql]$ scripts/mysql_install_db --basedir=/home/mysql/mysql/ \
    --defaults-file=/home/mysql/myfab/my3.cnf \
    --datadir=/home/mysql/myfab/data3/
[mysql@fab4 mysql]$ scripts/mysql_install_db --basedir=/home/mysql/mysql/ \
    --defaults-file=/home/mysql/myfab/my4.cnf \
    --datadir=/home/mysql/myfab/data4/

[mysql@fab2 ~]$ mysqld --defaults-file=/home/mysql/myfab/my2.cnf &
[mysql@fab3 ~]$ mysqld --defaults-file=/home/mysql/myfab/my3.cnf &
[mysql@fab4 ~]$ mysqld --defaults-file=/home/mysql/myfab/my4.cnf &

[mysql@fab2 ~]$ mysql -h 127.0.0.1 -P3306 -u root -e "GRANT ALL ON *.* \
    TO fabric@'%'"
[mysql@fab3 ~]$ mysql -h 127.0.0.1 -P3306 -u root -e "GRANT ALL ON *.* \
    TO fabric@'%'"
[mysql@fab4 ~]$ mysql -h 127.0.0.1 -P3306 -u root -e "GRANT ALL ON *.* \
    TO fabric@'%'"
[mysql@fab2 ~]$ mysql -h 127.0.0.1 -P3306 -u root -e "GRANT ALL ON *.* \
    TO root@'%'"
[mysql@fab3 ~]$ mysql -h 127.0.0.1 -P3306 -u root -e "GRANT ALL ON *.* \
    TO root@'%'"
[mysql@fab4 ~]$ mysql -h 127.0.0.1 -P3306 -u root -e "GRANT ALL ON *.* \
    TO root@'%'"

At this point, the MySQL Fabric process (and its associate state store) is up and running, as are the MySQL Servers that will become part of the HA group. MySQL Fabric is now able to access and manipulate those MySQL Servers and so they can now be added to a HA group called group_id-1.

[mysql@fab1 myfab]$ mysqlfabric group create group_id-1
Procedure :
{ uuid        = 7e0c90ec-f81f-4ff6-80d3-ae4a8e533979,
  finished    = True,
  success     = True,
  return      = True,
  activities  =
}
[mysql@fab1 myfab]$ mysqlfabric group add group_id-1 \
    192.168.56.102:3306
Procedure :
{ uuid        = 073f421a-9559-4413-98fd-b839131ea026,
  finished    = True,
  success     = True,
  return      = True,
  activities  =
}
[mysql@fab1 myfab]$ mysqlfabric group add group_id-1 \
	192.168.56.103:3306
Procedure :
{ uuid        = b0f5b04a-27e6-46ce-adff-bf1c046829f7,
  finished    = True,
  success     = True,
  return      = True,
  activities  =
}
[mysql@fab1 myfab]$ mysqlfabric group add group_id-1 \
	192.168.56.104:3306
Procedure :
{ uuid        = 520d1a7d-1824-4678-bbe4-002d0bae5aaa,
  finished    = True,
  success     = True,
  return      = True,
  activities  =
}

The mysqlfabric command can then be used to confirm the list of servers that are part of the HA group:

[mysql@fab1 ~]$ mysqlfabric group lookup_groups
Command :
{ success     = True
  return      = [{'group_id': 'group_id-1', 'description': '', 'master_uuid': '', 'failure_detector': False}]
  activities  =
}

[mysql@fab1 ~]$ mysqlfabric group lookup_servers group_id-1
Command :
{ success     = True
  return      = [{'status': 'SECONDARY', 'server_uuid': \
  			'00f9831f-d602-11e3-b65e-0800271119cb', 'mode': 'READ_ONLY', \
  			'weight': 1.0, 'address': '192.168.56.104:3306'}, \
  		{'status': 'SECONDARY', 'server_uuid': \
  			'f6fe224e-d601-11e3-b65d-0800275185c2', 'mode': 'READ_ONLY', \
  			'weight': 1.0, 'address': '192.168.56.102:3306'}, 
  		{'status': 'SECONDARY', 'server_uuid': \
  			'fbb5c440-d601-11e3-b65d-0800278bafa8', 'mode': 'READ_ONLY', \
  			'weight': 1.0, 'address': '192.168.56.103:3306'}]
  activities  =
}

Note that all of the MySQL Servers are reported as being Secondaries (in other words, none of them is acting as the MySQL Replication master). The next step is to promote one of the servers to be the Primary; in this case the uuid of the server we want to promote is provided but that isn’t required – in which case MySQL Fabric will select one.

[mysql@fab1 myfab]$ mysqlfabric group promote group_id-1 \
	--slave_id 00f9831f-d602-11e3-b65e-0800271119cb
Procedure :
{ uuid        = c875371b-890c-49ff-b0a5-6bbc38be7097,
  finished    = True,
  success     = True,
  return      = True,
  activities  =
}
[mysql@fab1 myfab]$ mysqlfabric group lookup_servers group_id-1
Command :
{ success     = True
  return      = [
	{'status': 'PRIMARY', 'server_uuid': '00f9831f-d602-11e3-b65e-0800271119cb', \
	  	'mode': 'READ_WRITE', 'weight': 1.0, 'address': '192.168.56.104:3306'}, \
  	{'status': 'SECONDARY', 'server_uuid': 'f6fe224e-d601-11e3-b65d-0800275185c2', \
  		'mode': 'READ_ONLY', 'weight': 1.0, 'address': '192.168.56.102:3306'}, \
	{'status': 'SECONDARY', 'server_uuid': 'fbb5c440-d601-11e3-b65d-0800278bafa8', \
		'mode': 'READ_ONLY', 'weight': 1.0, 'address': '192.168.56.103:3306'}]
  activities  =
}

Note that fab4 is now showing as the Primary; any of the Secondary servers can also be queried to confirm that they are indeed MySQL replication slaves of the Primary.

[mysql@fab1 ~]$ mysql -h 192.168.56.103 -P3306 -u root -e "show slave status\G"
*************************** 1. row ***************************
               Slave_IO_State: Waiting for master to send event
                  Master_Host: 192.168.56.104
                  Master_User: fabric
                  Master_Port: 3306
                Connect_Retry: 60
              Master_Log_File: fab3-bin.000003
          Read_Master_Log_Pos: 487
               Relay_Log_File: fab3-relay-bin.000002
                Relay_Log_Pos: 695
        Relay_Master_Log_File: fab3-bin.000003
             Slave_IO_Running: Yes
            Slave_SQL_Running: Yes
              Replicate_Do_DB:
          Replicate_Ignore_DB:
           Replicate_Do_Table:
       Replicate_Ignore_Table:
      Replicate_Wild_Do_Table:
  Replicate_Wild_Ignore_Table:
                   Last_Errno: 0
                   Last_Error:
                 Skip_Counter: 0
          Exec_Master_Log_Pos: 487
              Relay_Log_Space: 898
              Until_Condition: None
               Until_Log_File:
                Until_Log_Pos: 0
           Master_SSL_Allowed: No
           Master_SSL_CA_File:
           Master_SSL_CA_Path:
              Master_SSL_Cert:
            Master_SSL_Cipher:
               Master_SSL_Key:
        Seconds_Behind_Master: 0
Master_SSL_Verify_Server_Cert: No
                Last_IO_Errno: 0
                Last_IO_Error:
               Last_SQL_Errno: 0
               Last_SQL_Error:
  Replicate_Ignore_Server_Ids:
             Master_Server_Id: 40
                  Master_UUID: 00f9831f-d602-11e3-b65e-0800271119cb
             Master_Info_File: mysql.slave_master_info
                    SQL_Delay: 0
          SQL_Remaining_Delay: NULL
      Slave_SQL_Running_State: Slave has read all relay log; waiting for the slave I/O \
      							thread to update it
           Master_Retry_Count: 86400
                  Master_Bind:
      Last_IO_Error_Timestamp:
     Last_SQL_Error_Timestamp:
               Master_SSL_Crl:
           Master_SSL_Crlpath:
           Retrieved_Gtid_Set: 00f9831f-d602-11e3-b65e-0800271119cb:1-2
            Executed_Gtid_Set: 00f9831f-d602-11e3-b65e-0800271119cb:1-2,\
            					fbb5c440-d601-11e3-b65d-0800278bafa8:1-2
                Auto_Position: 1

At this stage, the MySQL replication relationship is configured and running but there isn’t yet High Availability as MySQL Fabric is not monitoring the state of the servers – the final configuration step fixes that:

[mysql@fab1 ~]$ mysqlfabric group activate group_id-1
Procedure :
{ uuid        = 40a5e023-06ba-4e1e-93de-4d4195f87851,
  finished    = True,
  success     = True,
  return      = True,
  activities  =
}

Everything is now set up to detect if the Primary (master) should fail and in the event that it does, promote one of the Secondaries to be the new Primary. If using one of the MySQL Fabric-aware connectors (initially PHP, Python and Java) then that failover can be transparent to the application.

Run an Application Against the HA Farm

The code that follows shows how an application can accesses the new HA group – in this case, using the Python connector. First an application table is created:

[mysql@fab1 myfab]$ cat setup_table_ha.py
import mysql.connector
from mysql.connector import fabric

conn = mysql.connector.connect(
    fabric={"host" : "localhost", "port" : 32274, "username": "admin", \
    	"password" : "admin"},
    user="root", database="test", password="",
    autocommit=True
)

conn.set_property(mode=fabric.MODE_READWRITE, group="group_id-1")
cur = conn.cursor()
cur.execute(
"CREATE TABLE IF NOT EXISTS subscribers ("
"   sub_no INT, "
"   first_name CHAR(40), "
"   last_name CHAR(40)"
")"
) 

Note the following about that code sample:

      • The connector is provided with the address for the MySQL Fabric process localhost:32274 rather than any of the MySQL Servers
      • The mode property for the connection is set to fabric.MODE_READWRITE which the connector will interpret as meaning that the transaction should be sent to the Primary (as that’s where all writes must be executed so that they can be replicated to the Secondaries)
      • The group property is set to group_id-1 which is the name that was given to the single HA Group

This code can now be executed and then a check made on one of the Secondaries that the table creation has indeed been replicated from the Primary.

[mysql@fab1 myfab]$ python setup_table_ha.py
[mysql@fab1 myfab]$ mysql -h 192.168.56.103 -P3306 -u root \
    -e "use test;show tables"
+----------------+
| Tables_in_test |
+----------------+
| subscribers    |
+----------------+

The next step is to add some rows to the table:

[mysql@fab1 myfab]$ cat add_subs_ha.py
import mysql.connector
from mysql.connector import fabric

def add_subscriber(conn, sub_no, first_name, last_name):
    conn.set_property(group="group_id-1", mode=fabric.MODE_READWRITE)
    cur = conn.cursor()
    cur.execute(
        "REPLACE INTO subscribers VALUES (%s, %s, %s)",
        (sub_no, first_name, last_name)
        )

conn = mysql.connector.connect(
    fabric={"host" : "localhost", "port" : 32274, "username": "admin", \
    	"password" : "admin"},
    user="root", database="test", password="",
    autocommit=True
    )

conn.set_property(group="group_id-1", mode=fabric.MODE_READWRITE)

add_subscriber(conn, 72, "Billy", "Fish")
add_subscriber(conn, 500, "Billy", "Joel")
add_subscriber(conn, 1500, "Arthur", "Askey")
add_subscriber(conn, 5000, "Billy", "Fish")
add_subscriber(conn, 15000, "Jimmy", "White")
add_subscriber(conn, 17542, "Bobby", "Ball")
[mysql@fab1 myfab]$ python add_subs_ha.py
[mysql@fab1 myfab]$ mysql -h 192.168.56.103 -P3306 -u root \
    -e "select * from test.subscribers"
+--------+------------+-----------+
| sub_no | first_name | last_name |
+--------+------------+-----------+
|     72 | Billy      | Fish      |
|    500 | Billy      | Joel      |
|   1500 | Arthur     | Askey     |
|   5000 | Billy      | Fish      |
|  15000 | Jimmy      | White     |
|  17542 | Bobby      | Ball      |
+--------+------------+-----------+

And then the data can be retrieved (note that the mode parameter for the connection is set to fabric.MODE_READONLY and so the connector knows that it can load balance the requests across any MySQL Servers in the HA Group).

mysql@fab1 myfab]$ cat read_table_ha.py
import mysql.connector
from mysql.connector import fabric

def find_subscriber(conn, sub_no):
    conn.set_property(group="group_id-1", mode=fabric.MODE_READONLY)
    cur = conn.cursor()
    cur.execute(
        "SELECT first_name, last_name FROM subscribers "
        "WHERE sub_no = %s", (sub_no, )
        )
    for row in cur:
        print row

conn = mysql.connector.connect(
    fabric={"host" : "localhost", "port" : 32274, "username": "admin", \
    	"password" : "admin"},
    user="root", database="test", password="",
    autocommit=True
    )

find_subscriber(conn, 72)
find_subscriber(conn, 500)
find_subscriber(conn, 1500)
find_subscriber(conn, 5000)
find_subscriber(conn, 15000)
find_subscriber(conn, 17542)

[mysql@fab1 myfab]$ python read_table_ha.py
(u'Billy', u'Fish')
(u'Billy', u'Joel')
(u'Arthur', u'Askey')
(u'Billy', u'Fish')
(u'Jimmy', u'White')
(u'Bobby', u'Ball')

Note that if the Secondary servers don’t all have the same performance then you can skew the ratio for how many reads are sent to each one using the mysqlfabric server set_weight command – specifying a value between 0 and 1 (default is 1 for all servers). Additionally, the mysqlfabric server set_mode command can be used to specify if the Primary should receive some of the reads (READ_WRITE) or only writes (WRITE_ONLY).

The next section describes how this configuration can be extended to add scalability by sharding the table data (and it can be skipped if that isn’t needed).

Adding Scale-Out with Sharding

The example in this section builds upon the previous one by adding more servers in order to scale out the capacity and read/write performance of the database. The first step is to create a new group (which is named global-group in this example) – the Global Group is a special HA group that performs two critical functions:

      • Any data schema changes are applied to the Global Group and from there they will be replicated to each of the other HA Groups
      • If there are tables that contain data that should be replicated to all HA groups (rather than sharded) then any inserts, updates or deletes will be made on the Global Group and then replicated to the others. Those tables are referred to as global tables.

The following figure illustrates what the configuration will look like once the Global Group has been created.

MySQL Fabric - HA Group with Global Group

The global group will contain three MySQL Servers running on the same host (in a product environment they would be split over multiple machines) and so the first step is to configure, bootstrap and start those servers.

[mysql@fab2 myfab]$ cat my2.1.cnf
[mysqld]
datadir=/home/mysql/myfab/data2.1
basedir=/home/mysql/mysql
socket=/home/mysql/myfab/mysqlfab2.1.socket
binlog-format=ROW
log-slave-updates=true
gtid-mode=on
enforce-gtid-consistency=true
master-info-repository=TABLE
relay-log-info-repository=TABLE
sync-master-info=1
port=3316
report-host=fab2
report-port=3316
server-id=21
log-bin=fab2.1-bin.log

[mysql@fab2 myfab]$ cat my2.2.cnf
[mysqld]
datadir=/home/mysql/myfab/data2.2
basedir=/home/mysql/mysql
socket=/home/mysql/myfab/mysqlfab2.2.socket
binlog-format=ROW
log-slave-updates=true
gtid-mode=on
enforce-gtid-consistency=true
master-info-repository=TABLE
relay-log-info-repository=TABLE
sync-master-info=1
port=3317
report-host=fab2
report-port=3316
server-id=22
log-bin=fab2.2-bin.log

[mysql@fab2 myfab]$ cat my2.3.cnf
[mysqld]
datadir=/home/mysql/myfab/data2.3
basedir=/home/mysql/mysql
socket=/home/mysql/myfab/mysqlfab2.3.socket
binlog-format=ROW
log-slave-updates=true
gtid-mode=on
enforce-gtid-consistency=true
master-info-repository=TABLE
relay-log-info-repository=TABLE
sync-master-info=1
port=3318
report-host=fab2
report-port=3318
server-id=23
log-bin=fab2.3-bin.log
[mysql@fab2 myfab]$ mkdir data2.1
[mysql@fab2 myfab]$ mkdir data2.2
[mysql@fab2 myfab]$ mkdir data2.3

[mysql@fab2 mysql]$ scripts/mysql_install_db --basedir=/home/mysql/mysql/ \
    --defaults-file=/home/mysql/myfab/my2.1.cnf \
    --datadir=/home/mysql/myfab/data2.1/
[mysql@fab2 mysql]$ scripts/mysql_install_db --basedir=/home/mysql/mysql/ \
    --defaults-file=/home/mysql/myfab/my2.2.cnf \
    --datadir=/home/mysql/myfab/data2.2/
mysql@fab2 mysql]$ scripts/mysql_install_db --basedir=/home/mysql/mysql/ \
    --defaults-file=/home/mysql/myfab/my2.3.cnf \
    --datadir=/home/mysql/myfab/data2.3/

[mysql@fab2 ~]$ mysqld --defaults-file=/home/mysql/myfab/my2.1.cnf &
[mysql@fab2 ~]$ mysqld --defaults-file=/home/mysql/myfab/my2.2.cnf &
[mysql@fab2 ~]$ mysqld --defaults-file=/home/mysql/myfab/my2.3.cnf &

[mysql@fab2 ~]$ mysql -h 127.0.0.1 -P3316 -u root -e "GRANT ALL ON *.* \
    TO root@'%'"
[mysql@fab2 ~]$ mysql -h 127.0.0.1 -P3317 -u root -e "GRANT ALL ON *.* \
    TO root@'%'"
[mysql@fab2 ~]$ mysql -h 127.0.0.1 -P3318 -u root -e "GRANT ALL ON *.* \
    TO root@'%'"
[mysql@fab2 ~]$ mysql -h 127.0.0.1 -P3316 -u root -e "GRANT ALL ON *.* \
    TO fabric@'%'"
[mysql@fab2 ~]$ mysql -h 127.0.0.1 -P3317 -u root -e "GRANT ALL ON *.* \
    TO fabric@'%'"
[mysql@fab2 ~]$ mysql -h 127.0.0.1 -P3318 -u root -e "GRANT ALL ON *.* \
    TO fabric@'%'"

The Global Group is defined and populated with MySQL Servers and then a Primary is promoted in the following steps:

[mysql@fab1]$ mysqlfabric group create global-group
Procedure :
{ uuid        = 5f07e324-ec0a-42b4-98d0-46112f607143,
  finished    = True,
  success     = True,
  return      = True,
  activities  =
}

[mysql@fab1 ~]$ mysqlfabric group add global-group \
    192.168.56.102:3316
Procedure :
{ uuid        = ccf699f5-ba2c-4400-a8a6-f951e10d4315,
  finished    = True,
  success     = True,
  return      = True,
  activities  =
}
[mysql@fab1 ~]$ mysqlfabric group add global-group \
    192.168.56.102:3317
Procedure :
{ uuid        = 7c476dda-3985-442a-b94d-4b9e650e5dfe,
  finished    = True,
  success     = True,
  return      = True,
  activities  =
}
[mysql@fab1 ~]$ mysqlfabric group add global-group \
    192.168.56.102:3318
Procedure :
{ uuid        = 476fadd4-ca4f-49b3-a633-25dbe0ffdd11,
  finished    = True,
  success     = True,
  return      = True,
  activities  =
}

[mysql@fab1 ~]$ mysqlfabric group promote global-group
Procedure :
{ uuid        = e818708e-6e5e-4b90-aff1-79b0b2492c75,
  finished    = True,
  success     = True,
  return      = True,
  activities  =
}
[mysql@fab1 ~]$ mysqlfabric group lookup_servers global-group
Command :
{ success     = True
  return      = [
  	{'status': 'PRIMARY', 'server_uuid': '56a08135-d60b-11e3-b69a-0800275185c2',\
  		'mode': 'READ_WRITE', 'weight': 1.0, 'address': '192.168.56.102:3316'}, \
	{'status': 'SECONDARY', 'server_uuid': '5d5f5cf6-d60b-11e3-b69b-0800275185c2', \
		'mode': 'READ_ONLY', 'weight': 1.0, 'address': '192.168.56.102:3317'}, \
	{'status': 'SECONDARY', 'server_uuid': '630616f4-d60b-11e3-b69b-0800275185c2', \
		'mode': 'READ_ONLY', 'weight': 1.0, 'address': '192.168.56.102:3318'}]
  activities  =
}

As an application table has already been created within the original HA group, that will need to copied to the new Global Group:

mysql@fab1 myfab]$ mysqldump -d -u root --single-transaction \
    -h 192.168.56.102 -P3306 --all-databases > my-schema.sql
[mysql@fab1 myfab]$ mysql -h 192.168.56.102 -P3317 -u root \
    -e 'reset master'
[mysql@fab1 myfab]$ mysql -h 192.168.56.102 -P3317 -u root \
	< my-schema.sql
[mysql@fab1 ~]$ mysql -h 192.168.56.102 -P3317 -u root -e \
	'show create table test.subscribers\G'
*************************** 1. row ***************************
       Table: subscribers
Create Table: CREATE TABLE `subscribers` (
  `sub_no` int(11) DEFAULT NULL,
  `first_name` char(40) DEFAULT NULL,
  `last_name` char(40) DEFAULT NULL
) ENGINE=InnoDB DEFAULT CHARSET=latin1

A shard mapping is an entity that is used to define how certain tables should be sharded between a set of HA groups. It is possible to have multiple shard mappings but in this example, only one will be used. When defining the shard mapping, there are two key parameters:

      • The type of mapping – can be either HASH or RANGE
      • The global group that will be used

The commands that follow define the mapping and identify the index number assigned to this mapping (in this example – 3) – in fact that same index is recovered in two different ways: using the mysqlfabric command and then reading the data directly from the state store:

[mysql@fab1 ~]$ mysqlfabric sharding create_definition HASH global-group
Procedure :
{ uuid        = 78ea7209-b073-4d03-9d8b-bda92cc76f32,
  finished    = True,
  success     = True,
  return      = 1,
  activities  =
}

[mysql@fab1 ~]$ mysqlfabric sharding list_definitions
Command :
{ success     = True
  return      = [[1, 'HASH', 'global-group']]
  activities  =
}

[mysql@fab1 ~]$ mysql -h 127.0.0.1 -P3306 -u root \
	-e 'SELECT * FROM fabric.shard_maps'
+------------------+-----------+--------------+
| shard_mapping_id | type_name | global_group |
+------------------+-----------+--------------+
|                1 | HASH      | global-group |
+------------------+-----------+--------------+

The next step is to define what columns from which tables should be used as the sharding key (the value on which the HASH function is executed or is compared with the defined RANGEs). In this example, only one table is being sharded (the subscribers table with the sub_no column being used as the sharding key) but the command can simply be re-executed for further tables. Note that the identifier for the shard mapping (1) is passed on the command-line:

[mysql@fab1 ~]$ mysqlfabric sharding add_table 1 test.subscribers sub_no
Procedure :
{ uuid        = 446aadd1-ffa6-4d19-8d52-4683f3d7c998,
  finished    = True,
  success     = True,
  return      = True,
  activities  =
}

At this point, the shard mapping has been defined but no shards have been created and so the next step is to create a single shard and that shard will be stored in the existing HA group (group_id-1):

[mysql@fab1 ~]$ mysqlfabric sharding add_shard 1 group_id-1 --state=enabled
Procedure :
{ uuid        = 4efc038c-cd18-448d-be32-ca797c4c006f,
  finished    = True,
  success     = True,
  return      = True,
  activities  =
}

[mysql@fab1]$ mysql -h 127.0.0.1 -P3306 -u root \
    -e 'select * from fabric.shards'
+----------+------------+---------+
| shard_id | group_id   | state   |
+----------+------------+---------+
|        1 | group_id-1 | ENABLED |
+----------+------------+---------+

At this point, the database has technically been sharded but of course it offers no scalability as there is only a single shard. The steps that follow evolve that configuration into one containing two shards as shown in the following figure.

MySQL Fabric with HA and sharding

Another HA group (group_id-2) is created, from three newly created MySQL Servers then one of the servers is promoted to be the Primary:

[mysql@fab5 myfab]$ cat my5.cnf
[mysqld]
datadir=/home/mysql/myfab/data5
basedir=/home/mysql/mysql
socket=/home/mysql/myfab/mysqlfab5.socket
binlog-format=ROW
log-slave-updates=true
gtid-mode=on
enforce-gtid-consistency=true
master-info-repository=TABLE
relay-log-info-repository=TABLE
sync-master-info=1
port=3306
report-host=fab5
report-port=3306
server-id=50
log-bin=fab5-bin.log

[mysql@fab6 myfab]$ cat my6.cnf
[mysqld]
datadir=/home/mysql/myfab/data6
basedir=/home/mysql/mysql
socket=/home/mysql/myfab/mysqlfab6.socket
binlog-format=ROW
log-slave-updates=true
gtid-mode=on
enforce-gtid-consistency=true
master-info-repository=TABLE
relay-log-info-repository=TABLE
sync-master-info=1
port=3306
report-host=fab6
report-port=3306
server-id=60
log-bin=fab6-bin.log

[mysql@fab7 myfab]$ cat my7.cnf
[mysqld]
datadir=/home/mysql/myfab/data7
basedir=/home/mysql/mysql
socket=/home/mysql/myfab/mysqlfab7.socket
binlog-format=ROW
log-slave-updates=true
gtid-mode=on
enforce-gtid-consistency=true
master-info-repository=TABLE
relay-log-info-repository=TABLE
sync-master-info=1
port=3306
report-host=fab7
report-port=3306
server-id=70
log-bin=fab7-bin.log
[mysql@fab5 myfab]$ mkdir data5
[mysql@fab6 myfab]$ mkdir data6
[mysql@fab7 myfab]$ mkdir data7

[mysql@fab5 mysql]$ scripts/mysql_install_db --basedir=/home/mysql/mysql/ \
    --defaults-file=/home/mysql/myfab/my5.cnf \
    --datadir=/home/mysql/myfab/data5/
[mysql@fab6 mysql]$ scripts/mysql_install_db --basedir=/home/mysql/mysql/ \
    --defaults-file=/home/mysql/myfab/my6.cnf \
    --datadir=/home/mysql/myfab/data6/
[mysql@fab7 mysql]$ scripts/mysql_install_db --basedir=/home/mysql/mysql/ \
    --defaults-file=/home/mysql/myfab/my7.cnf \
    --datadir=/home/mysql/myfab/data7/

[mysql@fab5 ~]$ mysqld --defaults-file=/home/mysql/myfab/my5.cnf &
[mysql@fab6 ~]$ mysqld --defaults-file=/home/mysql/myfab/my6.cnf &
[mysql@fab7 ~]$ mysqld --defaults-file=/home/mysql/myfab/my7.cnf &

[mysql@fab5 ~]$ mysql -h 127.0.0.1 -P3306 -u root -e "GRANT ALL ON *.* \
    TO root@'%'"
[mysql@fab6 ~]$ mysql -h 127.0.0.1 -P3306 -u root -e "GRANT ALL ON *.* \
    TO root@'%'"
[mysql@fab7 ~]$ mysql -h 127.0.0.1 -P3306 -u root -e "GRANT ALL ON *.* \
    TO root@'%'"
[mysql@fab5 ~]$ mysql -h 127.0.0.1 -P3306 -u root -e "GRANT ALL ON *.* \
    TO fabric@'%'"
[mysql@fab6 ~]$ mysql -h 127.0.0.1 -P3306 -u root -e "GRANT ALL ON *.* \
    TO fabric@'%'"
[mysql@fab7 ~]$ mysql -h 127.0.0.1 -P3306 -u root -e "GRANT ALL ON *.* \
    TO fabric@'%'"
[mysql@fab1 ~]$ mysqlfabric group create group_id-2
Procedure :
{ uuid        = 4ec6237a-ca38-497c-b54d-73d1fa7bbe03,
  finished    = True,
  success     = True,
  return      = True,
  activities  =
}

[mysql@fab1 ~]$ mysqlfabric group add group_id-2 192.168.56.105:3306
Procedure :
{ uuid        = fe679280-81ed-436c-9b7f-3d6f46987492,
  finished    = True,
  success     = True,
  return      = True,
  activities  =
}
[mysql@fab1 ~]$ mysqlfabric group add group_id-2 192.168.56.106:3306
Procedure :
{ uuid        = 6fcf7e0c-c092-4d81-9898-448abf2b113c,
  finished    = True,
  success     = True,
  return      = True,
  activities  =
}
[mysql@fab1 ~]$ mysqlfabric group add group_id-2 192.168.56.107:3306
Procedure :
{ uuid        = 8e9d4fbb-58ef-470d-81eb-8d92813427ae,
  finished    = True,
  success     = True,
  return      = True,
  activities  =
}
[mysql@fab1 ~]$ mysqlfabric group promote group_id-2
Procedure :
{ uuid        = 21569d7f-93a3-4bdc-b22b-2125e9b75fca,
  finished    = True,
  success     = True,
  return      = True,
  activities  =
}

At this point, the new HA group exists but is missing the application schema and data. Before allocating a shard to the group, a reset master needs to be executed on the Primary for the group (this is required because changes have already been made on that server – if nothing else, to grant permissions for one or more users to connect remotely). The mysqlfabric group lookup_server command is used to first check which of the three servers is currently the Primary.

[mysql@fab1 ~]$ mysqlfabric group lookup_servers group_id-2
Command :
{ success     = True
  return      = [
  	{'status': 'PRIMARY', 'server_uuid': '10b086b5-d617-11e3-b6e7-08002767aedd', \
  		'mode': 'READ_WRITE', 'weight': 1.0, 'address': '192.168.56.105:3306'}, \
	{'status': 'SECONDARY', 'server_uuid': '5dc81563-d617-11e3-b6e9-08002717142f', \
		'mode': 'READ_ONLY', 'weight': 1.0, 'address': '192.168.56.106:3306'}, \
	{'status': 'SECONDARY', 'server_uuid': '83cae7b2-d617-11e3-b6ea-08002763b127', 'mode': 'READ_ONLY', 'weight': 1.0, 'address': '192.168.56.107:3306'}]
  activities  =
}
		
[mysql@fab1 myfab]$ mysql -h 192.168.56.105 -P3306 -uroot -e 'reset master'

Splitting the Shard

The next step is to split the existing shard, specifying the shard id (in this case 1) and the name of the HA group where the new shard will be stored:

[mysql@fab1]$ mysqlfabric sharding split_shard 1 group_id-2
Procedure :
{ uuid        = 4c559f6c-0b08-4a57-b095-364755636b7b,
  finished    = True,
  success     = True,
  return      = True,
  activities  =
}

Before looking at the application code changes that are needed to cope with the sharded data, a simple test can be run to confirm that the table’s existing data has indeed been split between the two shards:

[mysql@fab1]$ mysql -h 192.168.56.102 -P3306 -uroot \
    -e 'select * from test.subscribers'
+--------+------------+-----------+
| sub_no | first_name | last_name |
+--------+------------+-----------+
|    500 | Billy      | Joel      |
|   1500 | Arthur     | Askey     |
|   5000 | Billy      | Fish      |
|  17542 | Bobby      | Ball      |
+--------+------------+-----------+

[mysql@fab1]$ mysql -h 192.168.56.107 -P3306 -uroot \
    -e 'select * from test.subscribers'
+--------+------------+-----------+
| sub_no | first_name | last_name |
+--------+------------+-----------+
|     72 | Billy      | Fish      |
|  15000 | Jimmy      | White     |
+--------+------------+-----------+

The next example Python code adds some new rows to the subscribers table. Note that the tables property for the connection is set to test.subscribers and the key to the value of the sub_no column for that table – this is enough information for the Fabric-aware connector to choose the correct shard/HA group and then the fact that the mode property is set to fabric.MODE_READWRITE further tells the connector that the transaction should be sent to the Primary within that HA group.

 
[mysql@fab1 myfab]$ cat add_subs_shards2.py
import mysql.connector
from mysql.connector import fabric

def add_subscriber(conn, sub_no, first_name, last_name):
    conn.set_property(tables=["test.subscribers"], key=sub_no, \
    	mode=fabric.MODE_READWRITE)
    cur = conn.cursor()
    cur.execute(
        "REPLACE INTO subscribers VALUES (%s, %s, %s)",
        (sub_no, first_name, last_name)
        )

conn = mysql.connector.connect(
    fabric={"host" : "localhost", "port" : 32274, "username": "admin", \
    	"password" : "admin"},
    user="root", database="test", password="",
    autocommit=True
)

conn.set_property(tables=["test.subscribers"], scope=fabric.SCOPE_LOCAL)

add_subscriber(conn, 22, "Billy", "Bob")
add_subscriber(conn, 8372, "Banana", "Man")
add_subscriber(conn, 93846, "Bill", "Ben")
add_subscriber(conn, 5006, "Andy", "Pandy")
add_subscriber(conn, 15050, "John", "Smith")
add_subscriber(conn, 83467, "Tommy", "Cannon")
[mysql@fab1 myfab]$ python add_subs_shards2.py

[mysql@fab1 myfab]$ python add_subs_shards2.py

The mysql client can then be used to confirm that the new data has also been partitioned between the two shards/HA groups.

[mysql@fab1 myfab]$ mysql -h 192.168.56.103 -P3306 -uroot \
    -e 'select * from test.subscribers'
+--------+------------+-----------+
| sub_no | first_name | last_name |
+--------+------------+-----------+
|    500 | Billy      | Joel      |
|   1500 | Arthur     | Askey     |
|   5000 | Billy      | Fish      |
|  17542 | Bobby      | Ball      |
|     22 | Billy      | Bob       |
|   8372 | Banana     | Man       |
|  93846 | Bill       | Ben       |
|  15050 | John       | Smith     |
+--------+------------+-----------+

[mysql@fab1 myfab]$ mysql -h 192.168.56.107 -P3306 -uroot \
    -e 'select * from test.subscribers'
+--------+------------+-----------+
| sub_no | first_name | last_name |
+--------+------------+-----------+
|     72 | Billy      | Fish      |
|  15000 | Jimmy      | White     |
|   5006 | Andy       | Pandy     |
|  83467 | Tommy      | Cannon    |
+--------+------------+-----------+

Example Application Code (Includes Sharding)

The final example application code reads the row for each of the records that have been added, the key thing to note here is that the mode property for the connection has been set to fabric.MODE_READONLY so that the Fabric-aware Python connector knows that it can load balance requests over the Secondaries within the HA groups rather than sending everything to the Primary.

[mysql@fab1 myfab]$ cat read_table_shards2.py
import mysql.connector
from mysql.connector import fabric

def find_subscriber(conn, sub_no):
    conn.set_property(tables=["test.subscribers"], key=sub_no, mode=fabric.MODE_READONLY)
    cur = conn.cursor()
    cur.execute(
        "SELECT first_name, last_name FROM subscribers "
        "WHERE sub_no = %s", (sub_no, )
        )
    for row in cur:
        print row

conn = mysql.connector.connect(
    fabric={"host" : "localhost", "port" : 32274, "username": "admin", "password" : "admin"},
    user="root", database="test", password="",
    autocommit=True
    )

find_subscriber(conn, 22)
find_subscriber(conn, 72)
find_subscriber(conn, 500)
find_subscriber(conn, 1500)
find_subscriber(conn, 8372)
find_subscriber(conn, 5000)
find_subscriber(conn, 5006)
find_subscriber(conn, 93846)
find_subscriber(conn, 15000)
find_subscriber(conn, 15050)
find_subscriber(conn, 17542)
find_subscriber(conn, 83467)
[mysql@fab1 myfab]$ python read_table_shards2.py
(u'Billy', u'Bob')
(u'Billy', u'Fish')
(u'Billy', u'Joel')
(u'Arthur', u'Askey')
(u'Banana', u'Man')
(u'Billy', u'Fish')
(u'Andy', u'Pandy')
(u'Bill', u'Ben')
(u'Jimmy', u'White')
(u'John', u'Smith')
(u'Bobby', u'Ball')
(u'Tommy', u'Cannon')

Current Limitations

The initial version of MySQL Fabric is designed to be simple, robust and able to scale to thousands of MySQL Servers. This approach means that this version has a number of limitations, which are described here:

      • Sharding is not completely transparent to the application. While the application need not be aware of which server stores a set of rows and it doesn’t need to be concerned when that data is moved, it does need to provide the sharding key when accessing the database.
      • All transactions and queries need to be limited in scope to the rows held in a single shard, together with the global (non-sharded) tables. For example, Joins involving multiple shards are not supported.
      • Because the connectors perform the routing function, the extra latency involved in proxy-based solutions is avoided but it does mean that Fabric-aware connectors are required – at the time of writing these exist for PHP, Python and Java
      • The MySQL Fabric process itself is not fault-tolerant and must be restarted in the event of it failing. Note that this does not represent a single-point-of-failure for the server farm (HA and/or sharding) as the connectors are able to continue routing operations using their local caches while the MySQL Fabric process is unavailable.

MySQL Fabric Architecture & Extensibility

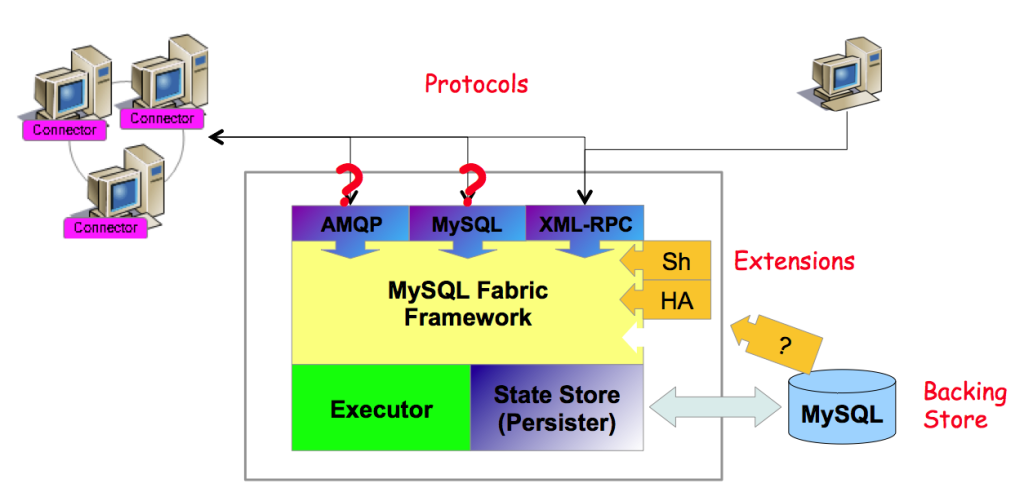
MySQL Fabric has been architected for extensibility at a number of levels. For example, in the first release the only option for implementing HA is based on MySQL Replication but in future releases we hope to add further options (for example, MySQL Cluster). We also hope to see completely new applications around the managing of farms of MySQL Servers – both from Oracle and the wider MySQL community.

The following diagram illustrates how new applications and protocols can be added using the pluggable framework.

MySQL Fabric - Extensible Architecture

Next Steps

We really hope that people try out MySQL Fabric and let us know how you get on; one way is to comment on this post, another is to post to the MySQL Fabric forum or if you think you’ve found a bug then raise a bug report.


MySQL Cluster Manager 1.3.1 released

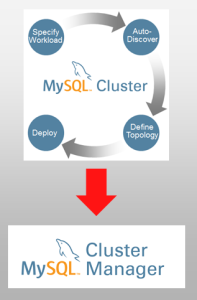
MySQL Cluster Manager logoMySQL Cluster Manager 1.3.1 is now available to download from My Oracle Support and soon from the Oracle Software Delivery Cloud.

Details are available in the the MCM 1.3.1 Release Notes .

Documentation is available here.


MySQL Cluster 7.1.31 Released

MySQL Cluster LogoThe binary and source versions of MySQL Cluster 7.1.31 have now been made available at http://www.mysql.com/downloads/cluster/.

A description of all of the changes (fixes) that have gone into MySQL Cluster 7.1.31 (compared to 7.1.30) is available from the 7.1.31 Change log.


MySQL Replication – Multi-Threaded Slave just got a whole lot faster

MySQL Replication Logo
A new MySQL MySQL 5.7 Multi-threaded slave labs load has now been published on MySQL Labs. This represents a signifficant step in the process of speeding up the processing of replication events on the slave – letting it keep up with the master.

The original implementation of MTS made a simple assumption about what events could safely be applied in parallel (with no dependency on the ordering). That assumption was that different schemas had no dependencies on each other and so if you had 5 schemas then one event from each schema could be applied in parallel (this is described in MySQL 5.6 GA – Replication Enhancements). This approach delivered a much higher throughput on the slave but only if you were using multiple schemas – perfect for many deployments (such as multi-tenant systems) but if you only had a single database then it didn’t help.

Last year we released a new version which removed that dependency on multiple schemas – allowing events to be applied to the same schema in parallel. For this implementation the new assumption was that if a set of transactions were part of the same binlog group commit on the master then the locking on the master has already determined that they’re indepent of each other and so that same set of events can be applied in parallel on the slave.

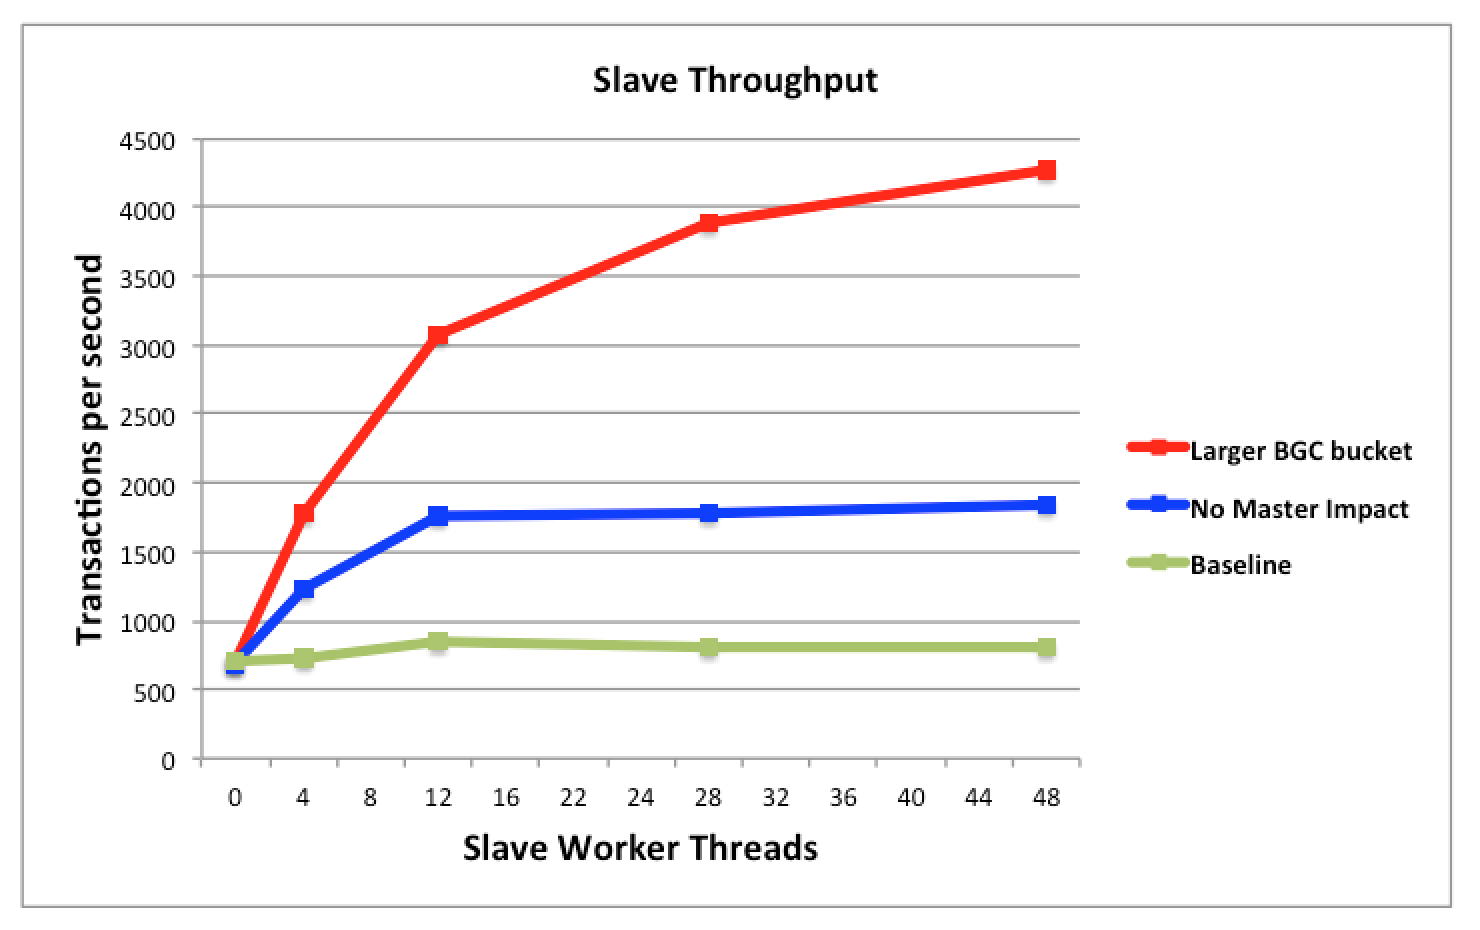
The latest enhancement is to allow the user to tune how many transactions are likely to be in each of those BGC buckets. This is done at the expense of delaying commits on the master and can be controlled by specifying the longest time that the system should wait (binlog-group-commit-delay) and the maximum number of transactions that should be committed together (binlog-group-commit-count). Initial benchmark results are very possitive – a 6X throughput (if willing to tolerate a small impact to the latency on the master) or 3X with no impact to the master.

Multi-Threaded slave performance gains
This is a feature where the mileage will definitely vary depending on your application and how you tune these two new parameters and so I’d certainly recommend that you try it out for yourselves. As always we’re anxious to get your feedback – for example through comments on this post or on the MySQL Replication forum.


MySQL Cluster 7.4.0 Labs Release

MySQL Cluster LogoThe first version of MySQL Cluster 7.4 has now been released on MySQL Labs. Note that labs loads are not suitable for production use (in fact they’re even less mature than Development Milestone Releases); their purpose is to give users a chance to see what’s in the works, try it for themselves and then provide feedback. Having read that, if you’d like to try it out then Download MySQL Cluster 7.4 from MySQL Labs.

The focus of this first Cluster 7.4 load is performance and data node restart times.

Performance

MySQL Cluster 7.4 Sysbench Read-OnlyMySQL Cluster was designed from the outset to be a distributed, in-memory database and has been deployed that way for many, many years (it’s interesting to see that the idea of in-memory databases has now really come into vogue with excitement around new arrivals on the scene such as Hekaton). Not surprisingly when people are considering MySQL Cluster, performance and scalability are key features (High Availability is another) and so performance improvements are always a key focus of every release and MySQL CLuster 7.4 is no exception.

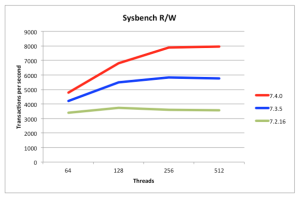
MySQL Cluster 7.4 Sysbench Read/WriteThe graphs show what’s already been acheived with Read Only Sysbench showing a 47% increase in throughput and a 38% improvement for the Read/Write benchmark. Even better improvements are seen when configuring the data nodes to use even more threads. For those not familiar with Sysbench, you should realise that each of the transactions involves quite a lot of work: 10 Primary Key lookups, 5 different types of scans where we fetch 100 records (normal select through ordered index followed by oder by, group by and so forth).

Restart Times

While less glamorous than performance, the time taken for a data node to restart can make a huge difference to how easy it is to manage your cluster. As the size and activity of the database increases, the restart time for a single data node will go up, if you then multiply that time by the number of data nodes you have, maintenance activities can start to take longer than you’d like.

This first MySQL Cluster 7.4 labs makes some signifficant improvements to the restart times – mostly by allowing more of the work to be done in parallel.


Advanced MySQL Replication Architectures and Latest Developments – On-Demand webinar + Q&A

MySQL Replication Logo
We recently hosted a live webinar covering advanced MySQL Replication topics as well as the latest developments. The webinar charts and replay are now available here. Below, you’ll find the questions raised by the audience together with the responses given.

More details on what was covered…

The biggest Web sites in the world rely on MySQL Replication to scale-out and provide High Availability for their data. Extend your knowledge of how MySQL Replication works and what you can achieve with it; join us for this technical webinar to explore some of the more advanced replication architectures as well as some of the latest product developments:

  • Replication topologies, including master-slave, circular and multi-master
  • Load balancing and query splitting
  • Data aggregation with multi-source replication
  • Global Transaction IDs and auto-failover with recovery
  • Getting the best replication throughput
  • Heterogeneous replication with the Binlog API

Questions & Answers

  • Is the server_uuid constant in the lifetime of a MySQL server?: Yes, server_uuid it’s persisted in a file in the data_dir.
  • How are the servers syncronized after a failure?: When slave connects to master it will inform master which GTIDs it already has, (whether just received or actually or applied), and the master will send what is missing.
  • Are all the features being described available now in the latest community MySQL version?: Everything that is described is available to the community. Some features are currently in Development Milestone or labs releases but that is made clear in the charts.
  • What is the maximum number of Slaves per Master and are there restrictions to the distance between Master and Slave?: There is no maximum number of slaves per master, that value depends on hardware and workload. There is an overhead on the master for each of the slaves (though this is reducing); you always have the option of replicating to another one or MySQL Servers and then use them as replication masters to fan out to many more slaves (those servers can even use the Black Hole storage engine so that they don’t even store the data. No distance limits, but with longer distances the network latency will increase. If using the default asynchronous replication, this latency has not effect other than possibly the slave(s) running slightly further behind but if using semi-synchronous replication then the transactions will take longer to commit.
  • Is there a maximum number of worker threads that can be configured, or is it just dependient on your server hardware?: The maximum number of worker thread is 1024, but the real limitation is hardware.
  • Is there a form of automatic client rerouting as a result of Switch/Failover?: Yes – MySQL Fabric which is also covered in this session.
  • what’s the resolution of the timestamp?: Replication timestamp resolution is microseconds.
  • Are all of these replication features available in both Synchronous and Asynchronous modes?: There is no synchronous mode, but they all work with both asynchronous and semi-synchronous replication.
  • Why is semi-sync replication only available as plugin? It makes it harder to setup with the present restrictions.: By implementing features as plugins, we can evolve the software faster by implementing them in new modules rather than in the large, complex MySQL Server code base. It also means that we can iterate more frequently as it doesn’t need to be tied to a MySQL Server release.
  • Does semi-synchronous replication wait for all slaves or just a single one?: You can specify how many slaves need to respond with the rpl_semi_sync_master_wait_slave_count option.
  • In case of one master one slave, where slave can overtake master role in case of crash. Won’t it introduce split-brain scenario ? Does mysql have rollback settings in case of master crash?: Monitoring tools should ensure that the master has crashed crashed, or if it suspects that it became irresponsible then it should kill the master before performing the failover. Alternatively, take a look at MySQL Fabric.
  • For now I have impression that if I want clients to automatically load balance read & writes between masters/slaves then I should do this using mysql proxy. Is this still the best practice?: What language are you using – this functionality is built into some connectors (for exampe for PHP and Java)? Alternatively you could look at MySQL Fabric or hardware or software load ballancers.
  • How are autoincrement columns handled in MySQL Fabric when you have mulitiple HA Groups?: The first thing to point out is that an auto-increment column cannot be used as the sharding key. You can use auto_increment_increment and auto_increment_offset to make sure that you don’t repeat values on different shards (e.g. if you have 2 shards then odd values coule be on one and even on the other.
  • Is MySQL Fabric queried for every transaction or query (and so becomes a single-point-of-falire)?: No, the connectors hold a cache of the routing data and so will use that rather than constantly querying the MySQL Fabric process.
  • Does the Replication include DDL changes, not just DML?: Yes it does.
  • How do I scale out write operation in MySQL 5.6: That’s where MySQL Fabric comes in, when we reach the write saturation point on master.
  • Is NDB storage engine is good option for write operation scale out?: It can be a great solution but it will depend on how your data is structured and accessed. Take a look at theMySQL Cluster Evaluation Guide – Designing, Evaluating and Benchmarking MySQL Cluster as this will help you figure out if MySQL Cluster (NDB) is going to be the right option for your application
  • But fabric still in beta version right?: Correct – it isn’t ready for production yet (at the time of writing this is true but be sure to check if you’re reading this laster!).
  • Are the benchmarks of sync_binlog done with SSD or HDD machines?: SSD – see this blog post. Should we expect the same results with HDDs?: Yes, but with different orders of magnitude. Note that all benchmarks were made with SSDs, so we are comparing equal hardware on 5.5 and 5.6.


MySQL Fabric – adding Scaling to MySQL

MySQL Fabric - High Availability and Scalability for MySQL

MySQL Fabric is a new framework that adds High Availability (HA) and/or scaling-out for MySQL. This is the second in a series of posts on the new MySQL Fabric framework; the first article (MySQL Fabric – adding High Availability to MySQL) explained how MySQL Fabric can deliver HA and then stepped through all of the steps to configure and use it.

This post focuses on using MySQL Fabric to scale out both reads and writes across multiple MySQL Servers. It starts with an introduction to scaling out (by partitioning/sharding data) and how MySQL Fabric achieves it before going on to work through a full example of configuring sharding across a farm of MySQL Servers together with the code that the application developer needs to write in order to exploit it. Note that at the time of writing, MySQL Fabric is not yet GA but is available as a public alpha.

Scaling Out – Sharding

When nearing the capacity or write performance limit of a single MySQL Server (or HA group), MySQL Fabric can be used to scale-out the database servers by partitioning the data across multiple MySQL Server “groups”. Note that a group could contain a single MySQL Server or it could be a HA group.

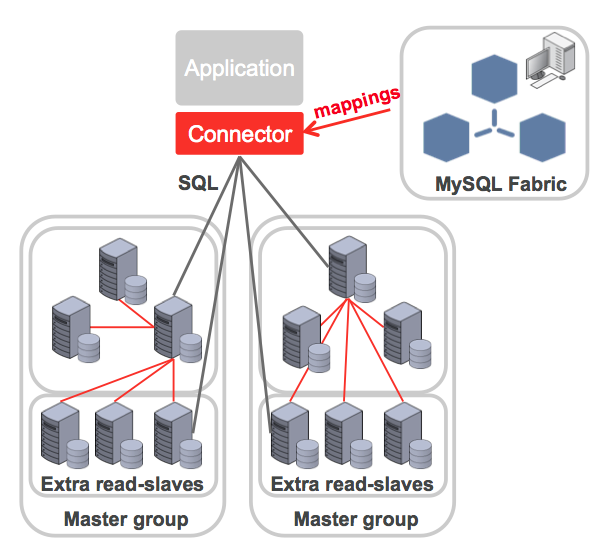
MySQL Fabric cluster

The administrator defines how data should be partitioned/sharded between these servers; this is done by creating shard mappings. A shard mapping applies to a set of tables and for each table the administrator specifies which column from those tables should be used as a shard key (the shard key will subsequently be used by MySQL Fabric to calculate which shard a specific row from one of those tables should be part of). Because all of these tables use the same shard key and mapping, the use of the same column value in those tables will result in those rows being in the same shard – allowing a single transaction to access all of them. For example, if using the subscriber-id column from multiple tables then all of the data for a specific subscriber will be in the same shard. The administrator then defines how that shard key should be used to calculate the shard number:

  • HASH: A hash function is run on the shard key to generate the shard number. If values held in the column used as the sharding key don’t tend to have too many repeated values then this should result in an even partitioning of rows across the shards.
  • RANGE: The administrator defines an explicit mapping between ranges of values for the sharding key and shards. This gives maximum control to the user of how data is partitioned and which rows should be co-located.

When the application needs to access the sharded database, it sets a property for the connection that specifies the sharding key – the Fabric-aware connector will then apply the correct range or hash mapping and route the transaction to the correct shard.

If further shards/groups are needed then MySQL Fabric can split an existing shard into two and then update the state-store and the caches of routing data held by the connectors. Similarly, a shard can be moved from one HA group to another.

Note that a single transaction or query can only access a single shard and so it is important to select shard keys based on an understanding of the data and the application’s access patterns. It doesn’t always make sense to shard all tables as some may be relatively small and having their full contents available in each group can be beneficial given the rule about no cross-shard queries. These global tables are written to a ‘global group’ and any additions or changes to data in those tables are automatically replicated to all of the other groups. Schema changes are also made to the global group and replicated to all of the others to ensure consistency.

To get the best mapping, it may also be necessary to modify the schema if there isn’t already a ‘natural choice’ for the sharding keys.

Worked Example

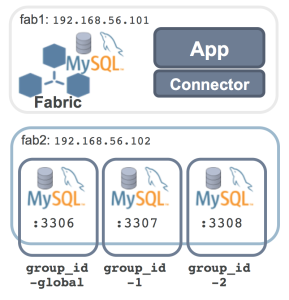
The following steps set up the sharded MySQL configuration shown here before running some (Python) code against – with queries and transactions routed to the correct MySQL Server.

Building the Sharded MySQL Server Farm

Sharding using MySQL Fabric

The machines being used already have MySQL 5.6 installed (though in a custom location) and so the only software pre-requisite is to install the MySQL connector for Python from the “Development Releases” tab from the connector download page and MySQL Fabric (part of MySQL Utilities) from the “Development Releases” tab on the MySQL Utilities download page:

[root@fab1 mysql ~]# rpm -i mysql-connector-python-1.2.0-1.el6.noarch.rpm
[root@fab1 mysql ~]# rpm -i mysql-utilities-1.4.1-1.el6.noarch.rpm

MySQL Fabric needs access to a MySQL Database to store state and routing information for the farm of servers; if there isn’t already a running MySQL Server instance that can be used for this then it’s simple to set one up:

[mysql@fab1 ~]$ mkdir myfab
[mysql@fab1 ~]$ cd myfab/
[mysql@fab1 myfab]$ mkdir data  
[mysql@fab1 myfab]$ cat my.cnf
[mysqld]
datadir=/home/mysql/myfab/data
basedir=/home/mysql/mysql
socket=/home/mysql/myfab/mysqlfab.socket
binlog-format=ROW
log-slave-updates=true
gtid-mode=on
enforce-gtid-consistency=true
master-info-repository=TABLE
relay-log-info-repository=TABLE
sync-master-info=1
port=3306
report-host=fab1
report-port=3306
server-id=1
log-bin=fab-bin.log

[mysql@fab1 mysql]$ scripts/mysql_install_db --basedir=/home/mysql/mysql/ \
    --datadir=/home/mysql/myfab/data/ 

2014-02-12 16:55:45 1298 [Note] Binlog end
2014-02-12 16:55:45 1298 [Note] InnoDB: FTS optimize thread exiting.
2014-02-12 16:55:45 1298 [Note] InnoDB: Starting shutdown...
2014-02-12 16:55:46 1298 [Note] InnoDB: Shutdown completed; log sequence number 1600607
2014-02-12 16:55:46 1298 [Note] /home/mysql/mysql//bin/mysqld: Shutdown complete

[mysql@fab1 ~]$ mysqld --defaults-file=/home/mysql/myfab/my.cnf &

MySQL Fabric needs to be able to access this state store and so a dedicated user is created (note that the fabric database hasn’t yet been created – that will be done soon using the mysqlfabric command):

[mysql@fab1 ~]$ mysql -h 127.0.0.1 -P3306 -u root -e "GRANT ALL ON fabric.* \
    TO fabric@localhost";

All of the management requests that we make for MySQL Fabric will be issued via the mysqlfabric command. This command is documented in the MySQL Fabric User Guide but sub-commands can be viewed from the terminal using the list-commands option:

[mysql@fab1 /]$ mysqlfabric list-commands
group activate                   Activate a group.
group import_topology            Try to figure out the replication topology 
                                 and import it into the state store.
group deactivate                 Deactivate a group.
group create                     Create a group.
group remove                     Remove a server from a group.
group add                        Add a server into group.
group lookup_servers             Return information on existing server(s) in a 
                                 group.
group check_group_availability   Check if any server within a group has failed 
                                 and report health information.
group destroy                    Remove a group.
group demote                     Demote the current master if there is one.
group promote                    Promote a server into master.
group lookup_groups              Return information on existing group(s).
group description                Update group's description.
manage list-commands             List the possible commands.
manage help                      Give help on a command.
manage teardown                  Teardown Fabric Storage System.
manage stop                      Stop the Fabric server.
manage setup                     Setup Fabric Storage System.
manage ping                      Check whether Fabric server is running or not.
manage start                     Start the Fabric server.
manage logging_level             Set logging level.
server set_weight                Set a server's weight which determines the 
                                 likelihood of a server being chosen by a 
                                 connector to process transactions or by the 
                                 high availability service to replace a failed 
                                 master.
server lookup_uuid               Return server's uuid.
server set_mode                  Set a server's mode which determines whether 
                                 it can process read-only, read-write or both 
                                 transaction types.
server set_status                Set a server's status.
sharding move                    Move the shard represented by the shard_id to 
                                 the destination group.
sharding lookup_servers          Lookup a shard based on the give sharding key.
sharding disable_shard           Disable a shard.
sharding remove_mapping          Remove the shard mapping represented by the 
                                 Shard Mapping object.
sharding list_mappings           Returns all the shard mappings of a 
                                 particular sharding_type.
sharding add_mapping             Add a table to a shard mapping.
sharding add_shard               Add a shard.
sharding list_definitions        Lists all the shard mapping definitions.
sharding enable_shard            Enable a shard.
sharding remove_shard            Remove a Shard.
sharding prune_shard             Given the table name prune the tables 
                                 according to the defined sharding 
                                 specification for the table.
sharding lookup_mapping          Fetch the shard specification mapping for the 
                                 given table
sharding split                   Split the shard represented by the shard_id 
                                 into the destination group.
sharding define                  Define a shard mapping.
event trigger                    Trigger an event.
event wait_for_procedures        Wait until procedures, which are identified 
                                 through their uuid in a list and separated by
                                 comma, finish their execution.
store dump_shard_maps            Return information about all shard mappings 
                                 matching any of the provided patterns.
store dump_shard_index           Return information about the index for all 
                                 mappings matching any of the patterns 
                                 provided.
store dump_servers               Return information about all servers.
store dump_sharding_information  Return all the sharding information about the 
                                 tables passed as patterns.
store dump_shard_tables          Return information about all tables belonging 
                                 to mappings matching any of the provided 
                                 patterns.
store lookup_fabrics             Return a list of Fabric servers.

MySQL Fabric has its own configuration file (note that it’s location can vary depending on your platform and how MySQL Utilities were installed). The contents of this configuration file should be reviewed before starting the MySQL Fabric process (in this case, the mysqldump_program and mysqldump_program settings needed to be changed as MySQL was installed in a user’s directory):

[root@fab1 mysql]# cat /etc/mysql/fabric.cfg
[DEFAULT]
prefix =
sysconfdir = /etc/mysql
logdir = /var/log

[logging]
url = file:///var/log/fabric.log
level = INFO

[storage]
database = fabric
user = fabric
address = localhost:3306
connection_delay = 1
connection_timeout = 6
password =
connection_attempts = 6

[connector]
ttl = 1

[protocol.xmlrpc]
threads = 5
address = localhost:8080

[executor]
executors = 5

[sharding]
mysqldump_program = /home/mysql/mysql/bin/mysqldump
mysqlclient_program = /home/mysql/mysql/bin/mysql

The final step before starting the MySQL Fabric process is to create the MySQL Fabric schema within the state store:

[mysql@fab1 ~]$ mysqlfabric manage setup --param=storage.user=fabric
[INFO] 1392298030.100127 - MainThread - Initializing persister: \
    user (fabric), server (localhost:3306), database (fabric).

An optional step is then to check for yourself that the schema is indeed there:

[mysql@fab1 ~]$ mysql --protocol=tcp -u root
Welcome to the MySQL monitor.  Commands end with ; or \g.
Your MySQL connection id is 5
Server version: 5.6.16-log MySQL Community Server (GPL)

Copyright (c) 2000, 2014, Oracle and/or its affiliates. All rights reserved.

Oracle is a registered trademark of Oracle Corporation and/or its
affiliates. Other names may be trademarks of their respective
owners.

Type 'help;' or '\h' for help. Type '\c' to clear the current input statement.

mysql> show databases;
+--------------------+
| Database           |
+--------------------+
| information_schema |
| fabric             |
| mysql              |
| performance_schema |
| test               |
+--------------------+
5 rows in set (0.00 sec)

mysql> use fabric;show tables;
Reading table information for completion of table and column names
You can turn off this feature to get a quicker startup with -A

Database changed
+-------------------+
| Tables_in_fabric  |
+-------------------+
| checkpoints       |
| group_replication |
| groups            |
| servers           |
| shard_maps        |
| shard_ranges      |
| shard_tables      |
| shards            |
+-------------------+
8 rows in set (0.00 sec)

The MySQL Fabric process can now be started; in this case the process will run from the terminal from which it’s started but the --daemonize option can be used to make it run as a daemon.

[mysql@fab1 ~]$ mysqlfabric manage start
[INFO] 1392298245.888881 - MainThread - Fabric node starting.
[INFO] 1392298245.890465 - MainThread - Initializing persister: user (fabric), server (localhost:3306), database (fabric).
[INFO] 1392298245.890926 - MainThread - Loading Services.
[INFO] 1392298245.898459 - MainThread - Starting Executor.
[INFO] 1392298245.899056 - MainThread - Setting 5 executor(s).
[INFO] 1392298245.900439 - Executor-1 - Started.
[INFO] 1392298245.901856 - Executor-2 - Started.
[INFO] 1392298245.903146 - Executor-0 - Started.
[INFO] 1392298245.905488 - Executor-3 - Started.
[INFO] 1392298245.908283 - MainThread - Executor started.
[INFO] 1392298245.910308 - Executor-4 - Started.
[INFO] 1392298245.936954 - MainThread - Starting failure detector.
[INFO] 1392298245.938200 - XML-RPC-Server - XML-RPC protocol server \
    ('127.0.0.1', 8080) started.
[INFO] 1392298245.938614 - XML-RPC-Server - Setting 5 XML-RPC session(s).
[INFO] 1392298245.940895 - XML-RPC-Session-0 - Started XML-RPC-Session.
[INFO] 1392298245.942644 - XML-RPC-Session-1 - Started XML-RPC-Session.
[INFO] 1392298245.947016 - XML-RPC-Session-2 - Started XML-RPC-Session.
[INFO] 1392298245.949691 - XML-RPC-Session-3 - Started XML-RPC-Session.
[INFO] 1392298245.951678 - XML-RPC-Session-4 - Started XML-RPC-Session.

If the process had been run as a daemon then it’s useful to be able to check if it’s actually running:

[mysql@fab1 ~]$ mysqlfabric manage ping
Command :
{ success     = True
  return      = True
  activities  =
}

At this point, MySQL Fabric is up and running but it has no MySQL Servers to manage. As shown in the earlier diagram, three MySQL Servers will run on a single machine. Each of those MySQL Servers will need their own configuration settings to make sure that there are no resource conflicts – the steps are shown here but without any detailed commentary as this is standard MySQL stuff:

[mysql@fab2 myfab]$ cat my1a.cnf
[mysqld]
datadir=/home/mysql/myfab/data1a
basedir=/home/mysql/mysql
socket=/home/mysql/myfab/mysqlfab1a.socket
binlog-format=ROW
log-slave-updates=true
gtid-mode=on
enforce-gtid-consistency=true
master-info-repository=TABLE
relay-log-info-repository=TABLE
sync-master-info=1
port=3306
report-host=fab2
report-port=3306
server-id=11
log-bin=fab1a-bin.log

[mysql@fab2 myfab]$ cat my1b.cnf
[mysqld]
datadir=/home/mysql/myfab/data1b
basedir=/home/mysql/mysql
socket=/home/mysql/myfab/mysqlfab1b.socket
binlog-format=ROW
log-slave-updates=true
gtid-mode=on
enforce-gtid-consistency=true
master-info-repository=TABLE
relay-log-info-repository=TABLE
sync-master-info=1
port=3307
report-host=fab2
report-port=3307
server-id=12
log-bin=fab1b-bin.log

[mysql@fab2 myfab]$ cat my1c.cnf
[mysqld]
datadir=/home/mysql/myfab/data1c
basedir=/home/mysql/mysql
socket=/home/mysql/myfab/mysqlfab1c.socket
binlog-format=ROW
log-slave-updates=true
gtid-mode=on
enforce-gtid-consistency=true
master-info-repository=TABLE
relay-log-info-repository=TABLE
sync-master-info=1
port=3308
report-host=fab2
report-port=3308
server-id=13
log-bin=fab1c-bin.log

[mysql@fab2 myfab]$ mkdir data1a
[mysql@fab2 myfab]$ mkdir data1b
[mysql@fab2 myfab]$ mkdir data1c

[mysql@fab2 mysql]$ scripts/mysql_install_db --basedir=/home/mysql/mysql/ \
    --defaults-file=/home/mysql/myfab/my1a.cnf \
    --datadir=/home/mysql/myfab/data1a/
[mysql@fab2 mysql]$ scripts/mysql_install_db --basedir=/home/mysql/mysql/ \
    --defaults-file=/home/mysql/myfab/my1a.cnf \
    --datadir=/home/mysql/myfab/data1b/
[mysql@fab2 mysql]$ scripts/mysql_install_db --basedir=/home/mysql/mysql/ \
    --defaults-file=/home/mysql/myfab/my1a.cnf \
    --datadir=/home/mysql/myfab/data1c/

[mysql@fab2 ~]$ mysqld --defaults-file=/home/mysql/myfab/my1a.cnf &
[mysql@fab2 ~]$ mysqld --defaults-file=/home/mysql/myfab/my1b.cnf &
[mysql@fab2 ~]$ mysqld --defaults-file=/home/mysql/myfab/my1c.cnf &

[mysql@fab2 ~]$ mysql -h 127.0.0.1 -P3306 -u root -e "GRANT ALL ON *.* \
    TO root@'%'""
[mysql@fab2 ~]$ mysql -h 127.0.0.1 -P3307 -u root -e "GRANT ALL ON *.* \
    TO root@'%'""
[mysql@fab2 ~]$ mysql -h 127.0.0.1 -P3308 -u root -e "GRANT ALL ON *.* \
    TO root@'%'""

At this point, the MySQL Fabric process (and its associate state store) is up and running, as are the MySQL Servers that will become part of the Fabric server farm. The next step is to define the groups (and assign a server to each one); the mappings that will be used to map from shard keys to shards and then finally the shards themselves.

The first group that’s created is the global group group_id-global which is where all changes to the data schema or to the global tables (those tables that are duplicated in every group rather than being sharded) are sent and then replicated to all of the other groups.

[mysql@fab1 ~]$ mysqlfabric group create group_id-global
Procedure :
{ uuid        = 721888b2-f604-4001-94c9-5911e1a198b3,
  finished    = True,
  success     = True,
  return      = True,
  activities  =
}

After that, the two groups that will contain the sharded table data are created – group_id-1&group_id-2.

[mysql@fab1 ~]$ mysqlfabric group create group_id-1
Procedure :
{ uuid        = 02f0a99d-5444-4f5b-b5df-b500de5a2d96,
  finished    = True,
  success     = True,
  return      = True,
  activities  =
}
[mysql@fab1 ~]$ mysqlfabric group create group_id-2
Procedure :
{ uuid        = fb8c3638-7b2b-4106-baac-3531a4606792,
  finished    = True,
  success     = True,
  return      = True,
  activities  =
}

The three groups have now been created but they’re all empty and so the next step is to assign a single MySQL Server to each one.

[mysql@fab1 ~]$ mysqlfabric group add group_id-global 192.168.56.102:3306 root ""
Procedure :
{ uuid        = 9d851625-f488-4e9a-b18f-bfb952a18be6,
  finished    = True,
  success     = True,
  return      = True,
  activities  =
}

[mysql@fab1 ~]$ mysqlfabric group add group_id-1 192.168.56.102:3307 root ""    
Procedure :
{ uuid        = 1e0230ce-2309-4a11-92a4-4bf9f11061c3,
  finished    = True,
  success     = True,
  return      = True,
  activities  =
}

[mysql@fab1 ~]$ mysqlfabric group add group_id-2 192.168.56.102:3308 root ""
Procedure :
{ uuid        = cf5cd7ae-cf47-4c10-b68d-867fbff3c597,
  finished    = True,
  success     = True,
  return      = True,
  activities  =
}

Optionally, the mysqlfabric command can then be used to confirm this configuration.

[mysql@fab1 ~]$ mysqlfabric group lookup_groups
Command :
{ success     = True
  return      = [['group_id-1'], ['group_id-2'], ['group_id-global']]
  activities  =
}

[mysql@fab1 ~]$ mysqlfabric group lookup_servers group_id-global
Command :
{ success     = True
  return      = [['57dc7afc-957d-11e3-91a8-08002795076a', \
    '192.168.56.102', False, 'SECONDARY']]
  activities  =
}
[mysql@fab1 ~]$ mysqlfabric group lookup_servers group_id-1
Command :
{ success     = True
  return      = [['9c08ecd6-94b9-11e3-8cab-08002795076a', \
  '192.168.56.102:3307', False, 'SECONDARY']]
  activities  =
}
[mysql@fab1 ~]$ mysqlfabric group lookup_servers group_id-2
Command :
{ success     = True
  return      = [['a4a963a1-94b9-11e3-8cac-08002795076a', \
  '192.168.56.102:3308', False, 'SECONDARY']]
  activities  =
}

Even though each of these groups contains a single server, it’s still necessary to promote those servers to be Primaries so that the Fabric-aware connectors will send writes to them.

[mysql@fab1 ~]$ mysqlfabric group promote group_id-global
Procedure :
{ uuid        = fd29b5f9-97dc-4189-a7df-2d98b230a124,
  finished    = True,
  success     = True,
  return      = True,
  activities  =
}
[mysql@fab1 ~]$ mysqlfabric group promote group_id-1
Procedure :
{ uuid        = a00e1a42-3a07-4539-a86b-1f9ac8284d27,
  finished    = True,
  success     = True,
  return      = True,
  activities  =
}
[mysql@fab1 ~]$ mysqlfabric group promote group_id-2
Procedure :
{ uuid        = 32663313-8b6d-427b-8516-87539d712606,
  finished    = True,
  success     = True,
  return      = True,
  activities  =
}

[mysql@fab1 ~]$ mysqlfabric group lookup_servers group_id-1
Command :
{ success     = True
  return      = [['9c08ecd6-94b9-11e3-8cab-08002795076a', \
    '192.168.56.102:3307', True, 'PRIMARY']]
  activities  =
}
[mysql@fab1 ~]$ mysqlfabric group lookup_servers group_id-2
Command :
{ success     = True
  return      = [['a4a963a1-94b9-11e3-8cac-08002795076a', \
    '192.168.56.102:3308', True, 'PRIMARY']]
  activities  =
}
[mysql@fab1 ~]$ mysqlfabric group lookup_servers group_id-global
Command :
{ success     = True
  return      = [['57dc7afc-957d-11e3-91a8-08002795076a', \
    '192.168.56.102', True, 'PRIMARY']]
  activities  =
}

Shard mappings are used to map shard keys to shards and they can be based on ranges or on a hash of the shard key – in this example, a single mapping will be created and it will be based on ranges. When creating the shard mapping, the name of the global group must be supplied – in this case group_id-global.

[mysql@fab1 ~]$ mysqlfabric sharding define RANGE group_id-global
Procedure :
{ uuid        = d201b476-6ca2-4fd9-a3b2-619552b5fcd2,
  finished    = True,
  success     = True,
  return      = 1,
  activities  =
}

From the return code, you can observe that the ID given to the shard mapping is 1 – that can optionally be confirmed by checking the meta data in the state store:

[mysql@fab1 ~]$ mysql --protocol=tcp -ufabric -e \
    "SELECT * FROM test.shard_maps"   
+------------------+-----------+-----------------+
| shard_mapping_id | type_name | global_group    |
+------------------+-----------+-----------------+
|                1 | RANGE     | group_id-global |
+------------------+-----------+-----------------+

The next step is to define the sharding key for each of the tables that we want to be partitioned as part of this mapping. In fact, this example is only sharding one table test.subscribers but the command can be repeated for multiple tables. The name of the column to be used as the sharding key must also be supplied (in this case sub_no) as must the ID for the shard mapping (which we’ve just confirmed is 1).

[mysql@fab1 myfab]$ mysqlfabric sharding add_mapping 1 test.subscribers sub_no
Procedure :
{ uuid        = 5ae7fe49-2c99-42d2-890a-8ee00c142719,
  finished    = True,
  success     = True,
  return      = True,
  activities  =
}

Again, the state store can be checked to confirm that this has been set up correctly.

[mysql@fab1 ~]$ mysql --protocol=tcp -ufabric -e \
    "SELECT * FROM test.shard_tables"   
+------------------+------------------+-------------+
| shard_mapping_id | table_name       | column_name |
+------------------+------------------+-------------+
|                1 | test.subscribers | sub_no      |
+------------------+------------------+-------------+

The next step is to define the shards themselves. In this example, all values of sub_no from 1-9999 will be mapped to the first shard (which will be associated with group_id-1) and from 10000 and up to the second shard (group_id-2). Again the shard mapping ID (1) must also be provided.

[mysql@fab1 ~]$ mysqlfabric sharding add_shard 1 group_id-1 ENABLED 1
Procedure :
{ uuid        = 21b5c976-31ab-432b-8bf3-f19a84b2ed47,
  finished    = True,
  success     = True,
  return      = True,
  activities  =
}
[mysql@fab1 ~]$ mysqlfabric sharding add_shard 1 group_id-2 ENABLED 10000
Procedure :
{ uuid        = f837bded-825c-46a5-8edb-fe4557c53417,
  finished    = True,
  success     = True,
  return      = True,
  activities  =
}

Example Application Code

Now that the MySQL Fabric farm is up and running we can start running some code against it. There are currently Fabric-aware connectors for PHP, Python and Java – for this post, Python is used.

Note that while they must make some minor changes to work with the sharded database, they don’t need to care about what servers are part of the farm, what shards exist or where they’re located – this is all handled by MySQL Fabric and the Fabric-aware connectors. What they do need to do is provide the hints needed by the connector to figure out where to send the query or transaction.

The first piece of example code will create the subscribers table within the test database. Most of this is fairly standard and so only the MySQL Fabric-specific pieces will be commented on:

  • The fabric module from mysql.com is included
  • The application connects to MySQL Fabric rather than any of the MySQL Servers ({"host" : "localhost", "port" : 8080})
  • The scope property for the connection is set to fabric.SCOPE_GLOBAL – in that way the operations are sent to the global group by the connector so that the schema changes will be replicated to all servers in the HA group (the same would be true if writing to a non-sharded (global) table).
[mysql@fab1 myfab]$ cat setup_table_shards.py
import mysql.connector
from mysql.connector import fabric

conn = mysql.connector.connect(
    fabric={"host" : "localhost", "port" : 8080},
    user="root", database="test", password="",
    autocommit=True
    )

conn.set_property(tables=["test.subscribers"], scope=fabric.SCOPE_GLOBAL)
cur = conn.cursor()
cur.execute(
    "CREATE TABLE IF NOT EXISTS subscribers ("
    "   sub_no INT, "
    "   first_name CHAR(40), "
    "   last_name CHAR(40)"
    ")"
    )

The code can then be executed:

[mysql@fab1 myfab]$ python setup_table_shards.py

The next piece of application code adds some records to the test.subscribers table. To ensure that the connector can route the transactions to the correct group, the following properties are set for the connection: scope is set to fabric.SCOPE_LOCAL (i.e. not global); tables is set to "test.subscribers" which allows the connector to select the correct mapping and key is set to the value of the sub_no being used for the row in the current transaction so that the connector can perform a range test on it to find the correct shard. The mode property is also set to fabric.MODE_READWRITE (if [HA groups]:(http://www.clusterdb.com/mysql-fabric/mysql-fabric-adding-high-availability-to-mysql “MySQL Fabric – adding High Availability to MySQL”) were being used then this would tell the connector to send the transaction to the primary).

[mysql@fab1 myfab]$ cat add_subs_shards.py
import mysql.connector
from mysql.connector import fabric

def add_subscriber(conn, sub_no, first_name, last_name):
    conn.set_property(tables=["test.subscribers"], key=sub_no, \
        mode=fabric.MODE_READWRITE)
    cur = conn.cursor()
    cur.execute(
        "REPLACE INTO subscribers VALUES (%s, %s, %s)",
        (sub_no, first_name, last_name)
        )

# Address of the Fabric node, rather than the actual MySQL Server.
conn = mysql.connector.connect(
    fabric={"host" : "localhost", "port" : 8080},
    user="root", database="test", password="",
    autocommit=True
    )

conn.set_property(tables=["test.subscribers"], scope=fabric.SCOPE_LOCAL)

add_subscriber(conn, 72, "Billy", "Fish")
add_subscriber(conn, 500, "Billy", "Joel")
add_subscriber(conn, 1500, "Arthur", "Askey")
add_subscriber(conn, 5000, "Billy", "Fish")
add_subscriber(conn, 15000, "Jimmy", "White")
add_subscriber(conn, 17542, "Bobby", "Ball")

This application code is then run and then the servers from each of the groups queried to confirm that the data has been sharded as expected (based on the 0-9999 and 10000+ range definition).

[mysql@fab1 myfab]$ python add_subs_shards.py

[mysql@fab1 myfab]$ mysql -h 192.168.56.102 -P3307 -uroot –e 'SELECT * \
    FROM test.subscribers'
+--------+------------+-----------+
| sub_no | first_name | last_name |
+--------+------------+-----------+
|     72 | Billy      | Fish      |
|    500 | Billy      | Joel      |
|   1500 | Arthur     | Askey     |
|   5000 | Billy      | Fish      |
+--------+------------+-----------+
[mysql@fab1 myfab]$ mysql -h 192.168.56.102 -P3308 -uroot -e 'SELECT * \
    FROM test.subscribers'
+--------+------------+-----------+
| sub_no | first_name | last_name |
+--------+------------+-----------+
|  15000 | Jimmy      | White     |
|  17542 | Bobby      | Ball      |
+--------+------------+-----------+

The final piece of application code reads back the rows. Note that in this case the connection’s mode property is set to fabric.READONLY which tells the connector that if [HA groups]:(http://www.clusterdb.com/mysql-fabric/mysql-fabric-adding-high-availability-to-mysql “MySQL Fabric – adding High Availability to MySQL”) were being used then the queries could be sent to any of the Secondaries.

[mysql@fab1 myfab]$ cat read_table_shards.py
import mysql.connector
from mysql.connector import fabric

def find_subscriber(conn, sub_no):
    conn.set_property(tables=["test.subscribers"], key=sub_no, \
        mode=fabric.MODE_READONLY)
    cur = conn.cursor()
    cur.execute(
        "SELECT first_name, last_name FROM subscribers "
        "WHERE sub_no = %s", (sub_no, )
        )
    for row in cur:
        print rows

conn = mysql.connector.connect(
    fabric={"host" : "localhost", "port" : 8080},
    user="root", database="test", password="",
    autocommit=True
    )

find_subscriber(conn, 72)
find_subscriber(conn, 500)
find_subscriber(conn, 1500)
find_subscriber(conn, 5000)
find_subscriber(conn, 15000)
find_subscriber(conn, 17542)
[mysql@fab1 myfab]$ python read_table_shards.py
(u'Billy', u'Fish')
(u'Billy', u'Joel')
(u'Arthur', u'Askey')
(u'Billy', u'Fish')
(u'Jimmy', u'White')
(u'Bobby', u'Ball')

MySQL Fabric Architecture & Extensibility

MySQL Fabric has been architected for extensibility at a number of levels. For example, in the first release the only option for implementing HA is based on MySQL Replication but in future releases we hope to add further options (for example, MySQL Cluster). We also hope to see completely new applications around the managing of farms of MySQL Servers – both from Oracle and the wider MySQL community.

The following diagram illustrates how new applications and protocols can be added using the pluggable framework.

MySQL Fabric - Extensible Architecture

Next Steps

We really hope that people try out MySQL Fabric and let us know how you get on; one way is to comment on this post, another is to post to the MySQL Fabric forum or if you think you’ve found a bug then raise a bug report.


MySQL Fabric – adding High Availability to MySQL

MySQL Fabric - High Availability and Scalability for MySQL

MySQL Fabric is a new framework that adds High Availability (HA) and/or scaling-out for MySQL. MySQL Fabric achieves scale-out by managing the sharding of table data between multiple MySQL Servers and then having Fabric-aware connectors route queries and transactions to the correct locations – scaling-out will be the subject of a future post and the rest of this article is focused on using MySQL Fabric for HA. It starts with an introduction to HA and how MySQL Fabric delivers it before going on to work through a full example of configuring a HA farm of MySQL Servers together with the code that the application developer needs to write in order to exploit it. Note that at the time of writing, MySQL Fabric is not yet GA but is available as a public alpha.

High Availability – Introduction

High Availability (HA) refers to the ability for a system to provide continuous service – a system is available while that service can be utilized. The level of availability is often expressed in terms of the “number of nines” – for example, a HA level of 99.999% means that the service can be used for 99.999% of the time, in other words, on average, the service is only unavailable for 5.25 minutes per year (and that includes all scheduled as well as unscheduled down-time).

Layers in architecture where High Availability is needed

The figure shows the different layers in the system that need to be available for service to be provided.

At the bottom is the data that the service relies on. Obviously, if that data is lost then the service cannot function correctly and so it’s important to make sure that there is at least one extra copy of that data. This data can be duplicated at the storage layer itself but with MySQL, it’s most commonly replicated by the layer above – the MySQL Server using MySQL Replication. The MySQL Server provides access to the data – there is no point in the data being there if you can’t get at it! It’s a common misconception that having redundancy at these two levels is enough to have a HA system but you also need to look at the system from the top-down.

To have a HA service, there needs to be redundancy at the application layer; in itself this is very straight-forward, just load balance all of the service requests over a pool of application servers which are all running the same application logic. If the service were something as simple as a random number generator then this would be fine but most useful applications need to access data and as soon as you move beyond a single database server (for example because it needs to be HA) then a way is needed to connect the application server to the correct data source. In a HA system, the routing isn’t a static function, if one database server should fail (or be taken down for maintenance) the application should be directed instead to an alternate database. Some HA systems implement this routing function by introducing a proxy process between the application and the database servers; others use a virtual IP address which can be migrated to the correct server. When using MySQL Fabric, this routing function is implemented within the Fabric-aware MySQL connector library that’s used by the application server processes.

MySQL Fabric delivers HA by adding a management and monitoring layer on top of MySQL Replication together with a set of Fabric-aware MySQL Connectors that route writes (and consistent reads) to the current master.

MySQL Fabric has the concept of a HA group which is a pool of two or more MySQL Servers; at any point in time, one of those servers is the Primary (MySQL Replication master) and the others are Secondaries (MySQL Replication slaves). The role of a HA group is to ensure that access to the data held within that group is always available.

Example MySQL Fabric HA Group

While MySQL Replication allows the data to be made safe by duplicating it, for a HA solution two extra components are needed and MySQL Fabric provides these:

  • Failure detection and promotion – the MySQL Fabric process monitors the Primary within the HA group and should that server fail then it selects one of the Secondaries and promotes it to be the Primary (with all of the other slaves in the HA group then receiving updates from the new master). Note that the connectors can inform MySQL Fabric when they observe a problem with the Primary and the MySQL Fabric process uses that information as part of its decision making process surrounding the state of the servers in the farm.
  • Routing of database requests – When MySQL Fabric promotes the new Primary, it updates the state store and notifies the connectors so that they can refresh their caches with the updated routing information. In this way, the application does not need to be aware that the topology has changed and that writes need to be sent to a different destination.

Worked Example

The following steps set up the HA MySQL configuration shown here before running some (Python) code against it and then finally the killing the Primary (replication Master) and observing that one of the slaves is automatically promoted.

Note that this configuration isn’t really HA as all of the MySQL Servers in the HA Group are actually running on the same machine; this configuration has been chosen for this post to illustrate that you can experiment with MySQL Fabric using a small number of machines (in fact, the MySQL Fabric process and its state store (another MySQL Server) could have been run on that same machine). Later posts will use more machines to demonstrate more realistic deployment topologies.

Building the HA MySQL Server Farm

The machines being used already have MySQL 5.6 installed (though in a custom location) and so the only software pre-requisite is to install the MySQL connector for Python from the “Development Releases” tab from the connector download page and MySQL Fabric (part of MySQL Utilities) from the “Development Releases” tab on the MySQL Utilties download page:

[root@fab1 mysql ~]# rpm -i mysql-connector-python-1.2.0-1.el6.noarch.rpm
[root@fab1 mysql ~]# rpm -i mysql-utilities-1.4.1-1.el6.noarch.rpm

MySQL Fabric needs access to a MySQL Database to store state and routing information for the farm of servers; if there isn’t already a running MySQL Server instance that can be used for this then it’s simple to set one up:

[mysql@fab1 ~]$ mkdir myfab
[mysql@fab1 ~]$ cd myfab/
[mysql@fab1 myfab]$ mkdir data  
[mysql@fab1 myfab]$ cat my.cnf
[mysqld]
datadir=/home/mysql/myfab/data
basedir=/home/mysql/mysql
socket=/home/mysql/myfab/mysqlfab.socket
binlog-format=ROW
log-slave-updates=true
gtid-mode=on
enforce-gtid-consistency=true
master-info-repository=TABLE
relay-log-info-repository=TABLE
sync-master-info=1
port=3306
report-host=fab1
report-port=3306
server-id=1
log-bin=fab-bin.log

[mysql@fab1 mysql]$ scripts/mysql_install_db --basedir=/home/mysql/mysql/ \
    --datadir=/home/mysql/myfab/data/ 

2014-02-12 16:55:45 1298 [Note] Binlog end
2014-02-12 16:55:45 1298 [Note] InnoDB: FTS optimize thread exiting.
2014-02-12 16:55:45 1298 [Note] InnoDB: Starting shutdown...
2014-02-12 16:55:46 1298 [Note] InnoDB: Shutdown completed; log sequence number 1600607
2014-02-12 16:55:46 1298 [Note] /home/mysql/mysql//bin/mysqld: Shutdown complete

[mysql@fab1 ~]$ mysqld --defaults-file=/home/mysql/myfab/my.cnf &

MySQL Fabric needs to be able to access this state store and so a dedicated user is created (note that the fabric database hasn’t yet been created – that will be done soon using the mysqlfabric command):

[mysql@fab1 ~]$ mysql -h 127.0.0.1 -P3306 -u root -e "GRANT ALL ON fabric.* \
    TO fabric@localhost";

All of the management requests that we make for MySQL Fabric will be issued via the mysqlfabric command. This command is documented in the MySQL Fabric User Guide but sub-commands can be viewed from the terminal using the list-commands option:

[mysql@fab1 /]$ mysqlfabric list-commands
group activate                   Activate a group.
group import_topology            Try to figure out the replication topology 
                                 and import it into the state store.
group deactivate                 Deactivate a group.
group create                     Create a group.
group remove                     Remove a server from a group.
group add                        Add a server into group.
group lookup_servers             Return information on existing server(s) in a 
                                 group.
group check_group_availability   Check if any server within a group has failed 
                                 and report health information.
group destroy                    Remove a group.
group demote                     Demote the current master if there is one.
group promote                    Promote a server into master.
group lookup_groups              Return information on existing group(s).
group description                Update group's description.
manage list-commands             List the possible commands.
manage help                      Give help on a command.
manage teardown                  Teardown Fabric Storage System.
manage stop                      Stop the Fabric server.
manage setup                     Setup Fabric Storage System.
manage ping                      Check whether Fabric server is running or not.
manage start                     Start the Fabric server.
manage logging_level             Set logging level.
server set_weight                Set a server's weight which determines the 
                                 likelihood of a server being chosen by a 
                                 connector to process transactions or by the 
                                 high availability service to replace a failed 
                                 master.
server lookup_uuid               Return server's uuid.
server set_mode                  Set a server's mode which determines whether 
                                 it can process read-only, read-write or both 
                                 transaction types.
server set_status                Set a server's status.
sharding move                    Move the shard represented by the shard_id to 
                                 the destination group.
sharding lookup_servers          Lookup a shard based on the give sharding key.
sharding disable_shard           Disable a shard.
sharding remove_mapping          Remove the shard mapping represented by the 
                                 Shard Mapping object.
sharding list_mappings           Returns all the shard mappings of a 
                                 particular sharding_type.
sharding add_mapping             Add a table to a shard mapping.
sharding add_shard               Add a shard.
sharding list_definitions        Lists all the shard mapping definitions.
sharding enable_shard            Enable a shard.
sharding remove_shard            Remove a Shard.
sharding prune_shard             Given the table name prune the tables 
                                 according to the defined sharding 
                                 specification for the table.
sharding lookup_mapping          Fetch the shard specification mapping for the 
                                 given table
sharding split                   Split the shard represented by the shard_id 
                                 into the destination group.
sharding define                  Define a shard mapping.
event trigger                    Trigger an event.
event wait_for_procedures        Wait until procedures, which are identified 
                                 through their uuid in a list and separated by
                                 comma, finish their execution.
store dump_shard_maps            Return information about all shard mappings 
                                 matching any of the provided patterns.
store dump_shard_index           Return information about the index for all 
                                 mappings matching any of the patterns 
                                 provided.
store dump_servers               Return information about all servers.
store dump_sharding_information  Return all the sharding information about the 
                                 tables passed as patterns.
store dump_shard_tables          Return information about all tables belonging 
                                 to mappings matching any of the provided 
                                 patterns.
store lookup_fabrics             Return a list of Fabric servers.

MySQL Fabric has its own configuration file (note that it’s location can vary depending on your platform and how MySQL Utilities were installed). The contents of this configuration file should be reviewed before starting the MySQL Fabric process (in this case, the mysqldump_program and mysqldump_program settings needed to be changed as MySQL was installed in a user’s directory):

[root@fab1 mysql]# cat /etc/mysql/fabric.cfg
[DEFAULT]
prefix =
sysconfdir = /etc/mysql
logdir = /var/log

[logging]
url = file:///var/log/fabric.log
level = INFO

[storage]
database = fabric
user = fabric
address = localhost:3306
connection_delay = 1
connection_timeout = 6
password =
connection_attempts = 6

[connector]
ttl = 1

[protocol.xmlrpc]
threads = 5
address = localhost:8080

[executor]
executors = 5

[sharding]
mysqldump_program = /home/mysql/mysql/bin/mysqldump
mysqlclient_program = /home/mysql/mysql/bin/mysql

The final step before starting the MySQL Fabric process is to create the MySQL Fabric schema within the state store:

[mysql@fab1 ~]$ mysqlfabric manage setup --param=storage.user=fabric
[INFO] 1392298030.100127 - MainThread - Initializing persister: \
    user (fabric), server (localhost:3306), database (fabric).

An optional step is then to check for yourself that the schema is indeed there:

[mysql@fab1 ~]$ mysql --protocol=tcp -u root
Welcome to the MySQL monitor.  Commands end with ; or \g.
Your MySQL connection id is 5
Server version: 5.6.16-log MySQL Community Server (GPL)

Copyright (c) 2000, 2014, Oracle and/or its affiliates. All rights reserved.

Oracle is a registered trademark of Oracle Corporation and/or its
affiliates. Other names may be trademarks of their respective
owners.

Type 'help;' or '\h' for help. Type '\c' to clear the current input statement.

mysql> show databases;
+--------------------+
| Database           |
+--------------------+
| information_schema |
| fabric             |
| mysql              |
| performance_schema |
| test               |
+--------------------+
5 rows in set (0.00 sec)

mysql> use fabric;show tables;
Reading table information for completion of table and column names
You can turn off this feature to get a quicker startup with -A

Database changed
+-------------------+
| Tables_in_fabric  |
+-------------------+
| checkpoints       |
| group_replication |
| groups            |
| servers           |
| shard_maps        |
| shard_ranges      |
| shard_tables      |
| shards            |
+-------------------+
8 rows in set (0.00 sec)

The MySQL Fabric process can now be started; in this case the process will run from the terminal from which it’s started but the --daemonize option can be used to make it run as a daemon.

[mysql@fab1 ~]$ mysqlfabric manage start
[INFO] 1392298245.888881 - MainThread - Fabric node starting.
[INFO] 1392298245.890465 - MainThread - Initializing persister: user (fabric), server (localhost:3306), database (fabric).
[INFO] 1392298245.890926 - MainThread - Loading Services.
[INFO] 1392298245.898459 - MainThread - Starting Executor.
[INFO] 1392298245.899056 - MainThread - Setting 5 executor(s).
[INFO] 1392298245.900439 - Executor-1 - Started.
[INFO] 1392298245.901856 - Executor-2 - Started.
[INFO] 1392298245.903146 - Executor-0 - Started.
[INFO] 1392298245.905488 - Executor-3 - Started.
[INFO] 1392298245.908283 - MainThread - Executor started.
[INFO] 1392298245.910308 - Executor-4 - Started.
[INFO] 1392298245.936954 - MainThread - Starting failure detector.
[INFO] 1392298245.938200 - XML-RPC-Server - XML-RPC protocol server \
    ('127.0.0.1', 8080) started.
[INFO] 1392298245.938614 - XML-RPC-Server - Setting 5 XML-RPC session(s).
[INFO] 1392298245.940895 - XML-RPC-Session-0 - Started XML-RPC-Session.
[INFO] 1392298245.942644 - XML-RPC-Session-1 - Started XML-RPC-Session.
[INFO] 1392298245.947016 - XML-RPC-Session-2 - Started XML-RPC-Session.
[INFO] 1392298245.949691 - XML-RPC-Session-3 - Started XML-RPC-Session.
[INFO] 1392298245.951678 - XML-RPC-Session-4 - Started XML-RPC-Session.

If the process had been run as a daemon then it’s useful to be able to check if it’s actually running:

[mysql@fab1 ~]$ mysqlfabric manage ping
Command :
{ success     = True
  return      = True
  activities  =
}

At this point, MySQL Fabric is up and running but it has no MySQL Servers to manage. As shown in the earlier diagram, three MySQL Servers will run on a single machine. Each of those MySQL Servers will need their own configuration settings to make sure that there are no resource conflicts – the steps are shown here but without any detailed commentary as this is standard MySQL stuff:

[mysql@fab2 myfab]$ cat my1a.cnf
[mysqld]
datadir=/home/mysql/myfab/data1a
basedir=/home/mysql/mysql
socket=/home/mysql/myfab/mysqlfab1a.socket
binlog-format=ROW
log-slave-updates=true
gtid-mode=on
enforce-gtid-consistency=true
master-info-repository=TABLE
relay-log-info-repository=TABLE
sync-master-info=1
port=3306
report-host=fab2
report-port=3306
server-id=11
log-bin=fab1a-bin.log

[mysql@fab2 myfab]$ cat my1b.cnf
[mysqld]
datadir=/home/mysql/myfab/data1b
basedir=/home/mysql/mysql
socket=/home/mysql/myfab/mysqlfab1b.socket
binlog-format=ROW
log-slave-updates=true
gtid-mode=on
enforce-gtid-consistency=true
master-info-repository=TABLE
relay-log-info-repository=TABLE
sync-master-info=1
port=3307
report-host=fab2
report-port=3307
server-id=12
log-bin=fab1b-bin.log

[mysql@fab2 myfab]$ cat my1c.cnf
[mysqld]
datadir=/home/mysql/myfab/data1c
basedir=/home/mysql/mysql
socket=/home/mysql/myfab/mysqlfab1c.socket
binlog-format=ROW
log-slave-updates=true
gtid-mode=on
enforce-gtid-consistency=true
master-info-repository=TABLE
relay-log-info-repository=TABLE
sync-master-info=1
port=3308
report-host=fab2
report-port=3308
server-id=13
log-bin=fab1c-bin.log

[mysql@fab2 myfab]$ mkdir data1a
[mysql@fab2 myfab]$ mkdir data1b
[mysql@fab2 myfab]$ mkdir data1c

[mysql@fab2 mysql]$ scripts/mysql_install_db --basedir=/home/mysql/mysql/ \
    --defaults-file=/home/mysql/myfab/my1a.cnf \
    --datadir=/home/mysql/myfab/data1a/
[mysql@fab2 mysql]$ scripts/mysql_install_db --basedir=/home/mysql/mysql/ \
    --defaults-file=/home/mysql/myfab/my1a.cnf \
    --datadir=/home/mysql/myfab/data1b/
[mysql@fab2 mysql]$ scripts/mysql_install_db --basedir=/home/mysql/mysql/ \
    --defaults-file=/home/mysql/myfab/my1a.cnf \
    --datadir=/home/mysql/myfab/data1c/

[mysql@fab2 ~]$ mysqld --defaults-file=/home/mysql/myfab/my1a.cnf &
[mysql@fab2 ~]$ mysqld --defaults-file=/home/mysql/myfab/my1b.cnf &
[mysql@fab2 ~]$ mysqld --defaults-file=/home/mysql/myfab/my1c.cnf &

[mysql@fab2 ~]$ mysql -h 127.0.0.1 -P3306 -u root -e "GRANT ALL ON *.* \
    TO root@'%'""
[mysql@fab2 ~]$ mysql -h 127.0.0.1 -P3307 -u root -e "GRANT ALL ON *.* \
    TO root@'%'""
[mysql@fab2 ~]$ mysql -h 127.0.0.1 -P3308 -u root -e "GRANT ALL ON *.* \
    TO root@'%'""

Now that the MySQL Servers are configured and up and running it’s possible to create the new HA Group (my_group and add the three new MySQL Server instances to it):

[mysql@fab1 ~]$ mysqlfabric group create my_group
Procedure :
{ uuid        = 3dadcedf-a402-420d-8496-03cb5c17c1b3,
  finished    = True,
  success     = True,
  return      = True,
  activities  =
}

[mysql@fab1 ~]$ mysqlfabric group add my_group 192.168.56.102:3306 root ''
Procedure :
{ uuid        = 2d996228-2a05-490a-9f32-10bea383d72d,
  finished    = True,
  success     = True,
  return      = True,
  activities  =
}
[mysql@fab1 ~]$ mysqlfabric group add my_group 192.168.56.102:3307 root ''
Procedure :
{ uuid        = 00bacfe8-ffc0-4c3c-bf06-d9f991ff2ba2,
  finished    = True,
  success     = True,
  return      = True,
  activities  =
}
[mysql@fab1 ~]$ mysqlfabric group add my_group 192.168.56.102:3308 root ''
Procedure :
{ uuid        = 08b7bc0f-0224-4241-8efb-7d73fc50ad09,
  finished    = True,
  success     = True,
  return      = True,
  activities  =
}

The mysqlfabric command can then be used to confirm that the HA group now contains the three servers but that they’re all still tagged as being Secondaries (in other words there is no MySQL Replication master):

[mysql@fab1 ~]$ mysqlfabric group lookup_servers my_group
Command :
{ success     = True
  return      = [['926546e1-94b9-11e3-8cab-08002795076a', \
    '192.168.56.102:3306', False, 'SECONDARY'], \
    ['9c08ecd6-94b9-11e3-8cab-08002795076a', \
        '192.168.56.102:3307', \
        False, 'SECONDARY'],\
    ['a4a963a1-94b9-11e3-8cac-08002795076a', \
        '192.168.56.102:3308', \
        False, 'SECONDARY']]
  activities  =
}

[mysql@fab1 ~]$ mysqlfabric group check_group_availability my_group
Command :
{ success     = True
  return      = {'926546e1-94b9-11e3-8cab-08002795076a': 
        {'is_master': False, 'status': 'SECONDARY', 'is_alive': True, \
        'threads': {'is_configured': False}},\
    'a4a963a1-94b9-11e3-8cac-08002795076a': \
        {'is_master': False, 'status': 'SECONDARY', \
        'is_alive': True, 'threads': {'is_configured': False}},\
    '9c08ecd6-94b9-11e3-8cab-08002795076a': \
        {'is_master': False, 'status': 'SECONDARY', \
        'is_alive': True, 'threads': {'is_configured': False}}}
  activities  =
}

mysqlfabric group promote is used to promote one of the servers within the my_group HA group to be the Primary/master:

[mysql@fab1 ~]$ mysqlfabric group promote my_group
Procedure :
{ uuid        = 8c1d888e-8120-4be3-8ff6-1e9a810179fd,
  finished    = True,
  success     = True,
  return      = True,
  activities  =
}

Note that it would have been possible to include the uuid of the specific MySQL Server that should be promoted but as none was specified, the best way to know which was selected is to query the state information:

[mysql@fab1 ~]$ mysqlfabric group lookup_servers my_group
Command :
{ success     = True
  return      = [['926546e1-94b9-11e3-8cab-08002795076a', \
        '192.168.56.102:3306', True, 'PRIMARY'],\
    ['9c08ecd6-94b9-11e3-8cab-08002795076a', '192.168.56.102:3307', \
        False, 'SECONDARY'],\
    ['a4a963a1-94b9-11e3-8cac-08002795076a', '192.168.56.102:3308', \
        False, 'SECONDARY']]
  activities  =
}

As an extra step, we can confirm that one of the other servers is indeed acting as a replication slave to the master:

[mysql@fab1 ~]$ mysql -h 192.168.56.102 -P3307 -u root -e "SHOW SLAVE STATUS\G"
*************************** 1. row ***************************
               Slave_IO_State: Waiting for master to send event
                  Master_Host: 192.168.56.102
                  Master_User: root
                  Master_Port: 3306
                Connect_Retry: 60
              Master_Log_File: fab1a-bin.000003
          Read_Master_Log_Pos: 314
               Relay_Log_File: fab2-relay-bin.000002
                Relay_Log_Pos: 524
        Relay_Master_Log_File: fab1a-bin.000003
             Slave_IO_Running: Yes
            Slave_SQL_Running: Yes
              Replicate_Do_DB:
          Replicate_Ignore_DB:
           Replicate_Do_Table:
       Replicate_Ignore_Table:
      Replicate_Wild_Do_Table:
  Replicate_Wild_Ignore_Table:
                   Last_Errno: 0
                   Last_Error:
                 Skip_Counter: 0
          Exec_Master_Log_Pos: 314
              Relay_Log_Space: 727
              Until_Condition: None
               Until_Log_File:
                Until_Log_Pos: 0
           Master_SSL_Allowed: No
           Master_SSL_CA_File:
           Master_SSL_CA_Path:
              Master_SSL_Cert:
            Master_SSL_Cipher:
               Master_SSL_Key:
        Seconds_Behind_Master: 0
Master_SSL_Verify_Server_Cert: No
                Last_IO_Errno: 0
                Last_IO_Error:
               Last_SQL_Errno: 0
               Last_SQL_Error:
  Replicate_Ignore_Server_Ids:
             Master_Server_Id: 11
                  Master_UUID: 926546e1-94b9-11e3-8cab-08002795076a
             Master_Info_File: mysql.slave_master_info
                    SQL_Delay: 0
          SQL_Remaining_Delay: NULL
      Slave_SQL_Running_State: Slave has read all relay log; waiting for the slave I/O thread to update it
           Master_Retry_Count: 86400
                  Master_Bind:
      Last_IO_Error_Timestamp:
     Last_SQL_Error_Timestamp:
               Master_SSL_Crl:
           Master_SSL_Crlpath:
           Retrieved_Gtid_Set: 926546e1-94b9-11e3-8cab-08002795076a:1
            Executed_Gtid_Set: 926546e1-94b9-11e3-8cab-08002795076a:1,
9c08ecd6-94b9-11e3-8cab-08002795076a:1
                Auto_Position: 1
1 row in set (0.01 sec)

The final step in configuring the HA system is to have MySQL Fabric start monitoring the servers so that it can promote a new Primary (and send new routing information to the connectors) in the event that the current Primary should fail:

[mysql@fab1 ~]$ mysqlfabric group activate my_group
Procedure :
{ uuid        = 2fea76ce-bc6a-4cd3-84ed-fbe3b75128a9,
  finished    = True,
  success     = True,
  return      = True,
  activities  =
}

Example Application Code

Now it’s the turn of the application developer to start using the new HA database server. Note that while they must make some minor changes to work with the HA group, they don’t need to care about what servers are part of the group or which of them is currently the Primary – this is all handled transparently by MySQL Fabric and the Fabric-aware connectors.

The first piece of example code will create the subscribers table within the test database and add a single subscriber record. Most of this is fairly standard and so only the MySQL Fabric-specific pieces will be commented on:

  • The fabric module from mysql.com is included
  • The application connects to MySQL Fabric rather than any of the MySQL Servers ({"host" : "localhost", "port" : 8080})
  • The mode property for the connection is set to fabric.MODE_READWRITE – in that way the operations are sent to the Primary server by the connector so that the changes will be replicated to all servers in the HA group.
[mysql@fab1 myfab]$ cat setup_table.py
import mysql.connector
from mysql.connector import fabric

def add_subscriber(conn, sub_no, first_name, last_name):
    conn.set_property(group="my_group", mode=fabric.MODE_READWRITE)
    cur = conn.cursor()
    cur.execute(
        "REPLACE INTO subscribers VALUES (%s, %s, %s)",
        (sub_no, first_name, last_name)
        )

conn = mysql.connector.connect(
    fabric={"host" : "localhost", "port" : 8080},
    user="root", database="test", password="",
    autocommit=True
    )

conn.set_property(group="my_group", mode=fabric.MODE_READWRITE)
cur = conn.cursor()
cur.execute(
    "CREATE TABLE IF NOT EXISTS subscribers ("
    "   sub_no INT, "
    "   first_name CHAR(40), "
    "   last_name CHAR(40)"
    ")"
    )

cur.execute(
    "DELETE FROM subscribers"
    )

add_subscriber(conn, 72, "Billy", "Fish")

This code can then be run:

[mysql@fab1 myfab]$ python setup_table.py

To check that everything has worked as expected, one of the slave servers can be checked to confirm that the table and data is there:

[mysql@fab2 ~]$ mysql -h 127.0.0.1 -P3308 -u root -e 'SELECT * \
    FROM test.subscribers'
+--------+------------+-----------+
| sub_no | first_name | last_name |
+--------+------------+-----------+
|     72 | Billy      | Fish      |
+--------+------------+-----------+

The next piece of code can then be run to read the record back. The main thing to note in this sample is the connection’s mode property is set to fabric.MODE_READONLY which means that the connector is free to send the query to one of the slaves (optionally, you can configure MySQL Fabric to include the master in the connector’s round-robin algorithm).

[mysql@fab1 myfab]$ cat read_table.py
import mysql.connector
from mysql.connector import fabric

def find_subscriber(conn, sub_no):
    conn.set_property(group="my_group", mode=fabric.MODE_READONLY)
    cur = conn.cursor()
    cur.execute(
        "SELECT first_name, last_name FROM subscribers "
        "WHERE sub_no = %s", (sub_no, )
        )
    for row in cur:
        print row

conn = mysql.connector.connect(
    fabric={"host" : "localhost", "port" : 8080},
    user="root", database="test", password="",
    autocommit=True
    )

find_subscriber(conn, 72)

This script can then be executed to retrieve the data:

[mysql@fab1 myfab]$ python read_table.py
(u'Billy', u'Fish')

Testing Automatic Failover

The final stage is to check that things work as planned when the Primary server stops; in other words:

  • MySQL Fabric will make one of the slaves be the new master
  • MySQL Fabric will update the state/routing data to reflect the new Primary server
  • The Fabric-aware connector is informed of the change, updates its cache and routes to the correct Primary

Before stopping a MySQL Server, we can confirm which one is currently the Primary before shutting it down:

[mysql@fab1 myfab]$ mysqlfabric group lookup_servers my_group
Command :
{ success     = True
  return      = [['926546e1-94b9-11e3-8cab-08002795076a', \
    '192.168.56.102:3306', True, 'PRIMARY'],\
  ['9c08ecd6-94b9-11e3-8cab-08002795076a', '192.168.56.102:3307', \
    False, 'SECONDARY'],\
  ['a4a963a1-94b9-11e3-8cac-08002795076a', '192.168.56.102:3308', \
    False, 'SECONDARY']]
  activities  =
}

[mysql@fab2 ~]$ mysqladmin -h 127.0.0.1 -P3306 -u root shutdown

The mysqlfabric command can then be used to confirm the state change (promotion of a new Primary server):

[mysql@fab1 myfab]$ mysqlfabric group lookup_servers my_group
Command :
{ success     = True
  return      = [['926546e1-94b9-11e3-8cab-08002795076a', \
        '192.168.56.102:3306', False, 'FAULTY'],\
    ['9c08ecd6-94b9-11e3-8cab-08002795076a', \
        '192.168.56.102:3307', True, 'PRIMARY'],\
    ['a4a963a1-94b9-11e3-8cac-08002795076a', \
        '192.168.56.102:3308', False, 'SECONDARY']]
  activities  =
}

The following code reads the data but because it sets the mode property to fabric.MODE_READWRITE the connector will send the query to the Primary (this is how you can ensure that reads are not accessing stale data from a slave):

[mysql@fab1 myfab]$ cat read_table2.py
import mysql.connector
from mysql.connector import fabric

def find_subscriber(conn, sub_no):
    conn.set_property(group="my_group", mode=fabric.MODE_READWRITE)
    cur = conn.cursor()
    cur.execute(
        "SELECT first_name, last_name FROM subscribers "
        "WHERE sub_no = %s", (sub_no, )
        )
    for row in cur:
        print row
conn = mysql.connector.connect(
    fabric={"host" : "localhost", "port" : 8080},
    user="root", database="test", password="",
    autocommit=True
    )

find_subscriber(conn, 72)
[mysql@fab1 myfab]$ python read_table.py
(u'Billy', u'Fish')

Typically, the failed MySQL Server would be recovered and then it makes sense to add it back into the HA group:

[mysql@fab2 ~]$ mysqld --defaults-file=myfab/my1a.cnf&

[mysql@fab1 myfab]$ mysqlfabric server set_status \
    926546e1-94b9-11e3-8cab-08002795076a SPARE my_group
Procedure :
{ uuid        = 2b6e9a93-6f1f-4ed4-944b-21ddd41df337,
  finished    = True,
  success     = True,
  return      = True,
  activities  =
}

[mysql@fab1 myfab]$ mysqlfabric server set_status \
    926546e1-94b9-11e3-8cab-08002795076a SECONDARY my_group
Procedure :
{ uuid        = 2e7aa916-f099-42f0-b79b-f0d25cadb3f3,
  finished    = True,
  success     = True,
  return      = True,
  activities  =
}

[mysql@fab1 myfab]$ mysqlfabric group check_group_availability my_group
Command :
{ success     = True
  return      = {'926546e1-94b9-11e3-8cab-08002795076a': {'is_master': False,\
    'status': 'SECONDARY', 'is_alive': True, 'threads': {}},\
  'a4a963a1-94b9-11e3-8cac-08002795076a': {'is_master': False, \
    'status': 'SECONDARY', 'is_alive': True, 'threads': {}},\
  '9c08ecd6-94b9-11e3-8cab-08002795076a': {'is_master': True, \
    'status': 'PRIMARY', 'is_alive': True, 'threads': {}}}
  activities  =
}

MySQL Fabric Architecture & Extensibility

MySQL Fabric has been architected for extensibility at a number of levels. For example, in the first release the only option for implementing HA is based on MySQL Replication but in future releases we hope to add further options (for example, MySQL Cluster). We also hope to see completely new applications around the managing of farms of MySQL Servers – both from Oracle and the wider MySQL community.

The following diagram illustrates how new applications and protocols can be added using the pluggable framework.

MySQL Fabric - Extensible Architecture

Next Steps

We really hope that people try out MySQL Fabric and let us know how you get on; one way is to comment on this post, another is to post to the MySQL Fabric forum or if you think you’ve found a bug then raise a bug report.


Advanced MySQL Replication Architectures and Latest Developments – free webinar

MySQL Replication Logo
This Thursday (20th March 2014) we’ll be hosted a free webinar covering advanced MySQL Replication topics as well as the latest developments. As always, the webinar is free but you need to register here – even if you can’t join live, you’ll then be sent a link to the replay.

More details on what to expect…

The biggest Web sites in the world rely on MySQL Replication to scale-out and provide High Availability for their data. Extend your knowledge of how MySQL Replication works and what you can achieve with it; join us for this technical webinar to explore some of the more advanced replication architectures as well as some of the latest product developments:

  • Replication topologies, including master-slave, circular and multi-master
  • Load balancing and query splitting
  • Data aggregation with multi-source replication
  • Global Transaction IDs and auto-failover with recovery
  • Getting the best replication throughput
  • Heterogeneous replication with the Binlog API

WHO:

  • Andrew Morgan, Principal MySQL Product Manager
  • Lars Thalmann, Director, MySQL Replication, Backup and Connectors

WHEN:

  • Thu, Mar 20: 09:00 Pacific time (America)
  • Thu, Mar 20: 10:00 Mountain time (America)
  • Thu, Mar 20: 11:00 Central time (America)
  • Thu, Mar 20: 12:00 Eastern time (America)
  • Thu, Mar 20: 13:00 São Paulo time
  • Thu, Mar 20: 16:00 UTC
  • Thu, Mar 20: 16:00 Western European time
  • Thu, Mar 20: 17:00 Central European time
  • Thu, Mar 20: 18:00 Eastern European time
  • Thu, Mar 20: 21:30 India, Sri Lanka
  • Fri, Mar 21: 00:00 Singapore/Malaysia/Philippines time
  • Fri, Mar 21: 00:00 China time
  • Fri, Mar 21: 01:00 日本
  • Fri, Mar 21: 03:00 NSW, ACT, Victoria, Tasmania (Australia)


MySQL cluster management – webinar replay available

Migrating from MySQL Cluster Auto-Installer to MCM
Thomas Nielsen and I recently presented a webinar explaining the latest developments in managing MySQL Cluster. In case you weren’t able to attend (or wanted to refresh your memory) then the webinar replay and charts are now available.

As a reminder, this webinar covered what’s new in MySQL Cluster Manager 1.3 which recently went GA.

By their very nature, clustered environments involve more efforts and resources to administer than standalone systems and this holds true for MySQL Cluster, the database designed for web-scale throughput with carrier-grade availability.

The MySQL Cluster Auto-Installer guides you through defining and running a well configured MySQL Cluster database – combining auto-discovery of platform resources with built-in best practices in an intuitive web-based GUI.

MySQL Cluster Manager (available as part of the commercial MySQL Cluster Carrier Grade Edition) simplifies the ongoing management of MySQL Cluster by automating common management tasks, delivering higher administration productivity and enhancing cluster agility. Tasks that used to take 46 commands can be reduced to just one! These tasks include configuration, starting & stopping the cluster, upgrades and backup/restore and new for MCM 1.3, import a running Cluster.

These webinars are always a good opportunity to get your questions answered; here’s a catch up of the Q&A from this session:

  • One of the biggest problems I am faced with is that many common applications heavily rely on the InnoDB or MyISAM – storage engines.So I am concerned about different behaviors of them compared to the NDB.This is something that we’ve been working to address – for example, JOINs in MySQL are now a lot faster and MySQL Cluster now supports Foreign Keys.
  • What about transaction – Handling, Locking mechanisms, or even changes in supported statements which are related to instance – managment rather then being part of DDL, DML, or DQL? Yes, MySQL Cluster (NDB) is slightly different in these respects, mostly due to its real-time heritage and distributed nature.
  • Is the MySQL – Cluster auto-installer restricted to specific operating system distributions or versions? No, the auto-installer works on all platforms supported by MySQL Cluster
  • I hope there will be a white paper about the differences as this is the major reason why I am not changing to NDB right now after I changed from many – databases-in-one-instance to a one-database-per-instance approeach. There are a couple of resources available today: Reference Manual comparing InnoDB and MySQL Cluster and the MySQL Cluster Evaluation Guide
  • In the creation of the site in MySQL Cluster Manager can hosts be specified using the IPv6 addresses or it’s IPv4-based only? At the moment, MCM only supports IPv4 addresses.
  • Are performance criteria for the restoring of nodes in a cluster available? I’m not aware of performance benchmarks for a database restore but they’re fairly fast as they happen at the data node level (and so for example there’s no need to go through SQL). You can also configure high degrees of parallelism for the restore so that many records are restored at once.