Tag Archive for mongodb

Building a collaborative iOS Minesweeper game with Realm

Realm-Sweeper. Writing a multiplayer iOS Minesweeper game using SwiftUI and Realm

I wanted to build an app that we could use at events to demonstrate Realm Sync. It needed to be fun to interact with, and so a multiplayer game made sense. Tic-tac-toe is too simple to get excited about. I’m not a game developer and so Call Of Duty wasn’t an option. Then I remembered Microsoft’s Minesweeper.

Minesweeper was a Windows fixture from 1990 until Windows 8 relegated it to the app store in 2012. It was a single-player game, but it struck me as something that could be a lot of fun to play with others. Some family beta-testing of my first version while waiting for a ferry proved that it did get people to interact with each other (even if most interactions involved shouting, “Which of you muppets clicked on that mine?!”).

Family sat around a table, all playing the Realm-Sweeper game on their iPhones

You can download the back end and iOS apps from the Realm-Sweeper repo, and get it up and running in a few minutes if you want to play with it.

This article steps you through some of the key aspects of setting up the backend Realm app, as well as the iOS code. Hopefully, you’ll see how simple it is and try building something for yourself. If anyone’s looking for ideas, then Sokoban could be interesting.

Prerequisites

The Minesweeper game

The gameplay for Minesweeper is very simple.

You’re presented with a grid of gray tiles. You tap on a tile to expose what’s beneath. If you expose a mine, game over. If there isn’t a mine, then you’ll be rewarded with a hint as to how many mines are adjacent to that tile. If you deduce (or guess) that a tile is covering a mine, then you can plant a flag to record that.

You win the game when you correctly flag every mine and expose what’s behind every non-mined tile.

What Realm-Sweeper adds

Minesweeper wasn’t designed for touchscreen devices; you had to use a physical mouse. Realm-Sweeper brings the game into the 21st century by adding touch controls. Tap a tile to reveal what’s beneath; tap and hold to plant a flag.

Minesweeper was a single-player game. All people who sign into Realm-Sweeper with the same user ID get to collaborate on the same game in real time.

Animation of two iPhones. As a user taps a tile on one device, the change appears almost instantly on the other

You also get to configure the size of the grid and how many mines you’d like to hide.

The data model

I decided to go for a simple data model that would put Realm sync to the test.

Each game is a single document/object that contains meta data (score, number of rows/columns, etc.) together with the grid of tiles (the board):

Data model for the Game Class

This means that even a modestly sized grid (20×20 tiles) results in a Game document/object with more than 2,000 attributes.

Every time you tap on a tile, the Game object has to be synced with all other players. Those players are also tapping on tiles, and those changes have to be synced too. If you tap on a tile which isn’t adjacent to any mines, then the app will recursively ripple through exposing similar, connected tiles. That’s a lot of near-simultaneous changes being made to the same object from different devices—a great test of Realm’s automatic conflict resolution!

The backend Realm app

If you don’t want to set this up yourself, simply follow the instructions from the repo to import the app.

If you opt to build the backend app yourself, there are only two things to configure once you create the empty Realm app:

  1. Enable email/password authentication. I kept it simple by opting to auto-confirm new users and sticking with the default password-reset function (which does nothing).
  2. Enable partitioned Realm sync. Set the partition key to partition and enable developer mode (so that the schema will be created automatically when the iOS app syncs for the first time).

The partition field will be set to the username—allowing anyone who connects as that user to sync all of their games.

You can also add sync rules to ensure that a user can only sync their own games (in case someone hacks the mobile app). I always prefer using Realm functions for permissions. You can add this for both the read and write rules:

{
  "%%true": {
    "%function": {
      "arguments": [
        "%%partition"
      ],
      "name": "canAccessPartition"
    }
  }
}

The canAccessPartition function is:

exports = function(partition) {
  const user = context.user.data.email;
  return partition === user;
};

The iOS app

I’d suggest starting by downloading, configuring, and running the app—just follow the instructions from the repo. That way, you can get a feel for how it works.

This isn’t intended to be a full tutorial covering every line of code in the app. Instead, I’ll point out some key components.

As always with Realm and MongoDB, it all starts with the data…

Model

There’s a single top-level Realm Object—Game:

class Game: Object, ObjectKeyIdentifiable {
    @Persisted(primaryKey: true) var _id: ObjectId
    @Persisted var numRows = 0
    @Persisted var numCols = 0
    @Persisted var score = 0
    @Persisted var startTime: Date? = Date()
    @Persisted var latestMoveTime: Date?
    @Persisted var secondsTakenToComplete: Int?
    @Persisted var board: Board?
    @Persisted var gameStatus = GameStatus.notStarted
    @Persisted var winningTimeInSeconds: Int?
    …
}

Most of the fields are pretty obvious. The most interesting is board, which contains the grid of tiles:

class Board: EmbeddedObject, ObjectKeyIdentifiable {
    @Persisted var rows = List<Row>()
    @Persisted var startingNumberOfMines = 0
    ... 
}

row is a list of Cells:

class Row: EmbeddedObject, ObjectKeyIdentifiable {
    @Persisted var cells = List<Cell>()
    ...
}

class Cell: EmbeddedObject, ObjectKeyIdentifiable {
    @Persisted var isMine = false
    @Persisted var numMineNeigbours = 0
    @Persisted var isExposed = false
    @Persisted var isFlagged = false
    @Persisted var hasExploded = false
    ...
}

The model is also where the ~~business~~ game logic is implemented. This means that the views can focus on the UI. For example, Game includes a computed variable to check whether the game has been solved:

var hasWon: Bool {
    guard let board = board else { return false }
    if board.remainingMines != 0 { return false }

    var result = true

    board.rows.forEach() { row in
        row.cells.forEach() { cell in
            if !cell.isExposed && !cell.isFlagged {
                result = false
                return
            }
        }
        if !result { return }
    }
    return result
}

Views

As with any SwiftUI app, the UI is built up of a hierarchy of many views.

Screen capture from Xcode showing the hierarchy of views making up the RealmSweeper UI

Here’s a quick summary of the views that make up Real-Sweeper:

ContentView is the top-level view. When the app first runs, it will show the LoginView. Once the user has logged in, it shows GameListView instead. It’s here that we set the Realm Sync partition (to be the username of the user that’s just logged in):

if username == "" {
    LoginView(username: $username)
} else {
    GameListView()
        .environment(\.realmConfiguration, realmApp.currentUser!.configuration(partitionValue: username))
        .navigationBarItems(leading: realmApp.currentUser != nil ? LogoutButton(username: $username) : nil)
}

ContentView also includes the LogoutButton view.

LoginView allows the user to provide a username and password:

Screen capture of the login view. Fields to enter username and password. Checkbox to indicate that you're registering a new user. Button to login,

Those credentials are then used to register or log into the backend Realm app:

func userAction() {
    Task {
        do {
            if newUser {
                try await realmApp.emailPasswordAuth.registerUser(
                    email: email, password: password)
            }
            let _ = try await realmApp.login(
                    credentials: .emailPassword(email: email, password: password))
            username = email
        } catch {
            errorMessage = error.localizedDescription
        }
    }
}

GameListView reads the list of this user’s existing games.

@ObservedResults(Game.self, 
    sortDescriptor: SortDescriptor(keyPath: "startTime", ascending: false)) var games

It displays each of the games within a GameSummaryView. If you tap one of the games, then you jump to a GameView for that game:

NavigationLink(destination: GameView(game: game)) {
    GameSummaryView(game: game)
}

GameListView, Screen capture of a list of games, together with buttons to logout, set settings, or create a new game

Tap the settings button and you’re sent to SettingsView.

Tap the “New Game” button and a new Game object is created and then stored in Realm by appending it to the games live query:

private func createGame() {
    numMines = min(numMines, numRows * numColumns)
    game = Game(rows: numRows, cols: numColumns, mines: numMines)
    if let game = game {
        $games.append(game)
    }
    startGame  = true
}

SettingsView lets the user choose the number of tiles and mines to use:

SettingsView. Steppers to set the number of rows, columns, and mines

If the user uses multiple devices to play the game (e.g., an iPhone and an iPad), then they may want different-sized boards (taking advantage of the extra screen space on the iPad). Because of that, the view uses the device’s UserDefaults to locally persist the settings rather than storing them in a synced realm:

@AppStorage("numRows") var numRows = 10
@AppStorage("numColumns") var numColumns = 10
@AppStorage("numMines") var numMines = 15

GameSummaryView displays a summary of one of the user’s current or past games.

GameSummaryView. Screen capture of view containing the start and completion times + emoji for the status of the game

GameView shows the latest stats for the current game at the top of the screen:

GameStatusView. Screen capture showing remaining mines, status of the game (smiling emoji) and elapsed time

It uses the LEDCounter and StatusButton views for the summary.

Below the summary, it displays the BoardView for the game.

LEDCounter displays the provided number as three digits using a retro LED font:

CounterView – 3 red LED numbers

StatusButton uses a ZStack to display the symbol for the game’s status on top of a tile image:

StatusButton. Smiling emoji in front of a gray tile

The view uses SwiftUI’s GeometryReader function to discover how much space is available so that it can select an appropriate font size for the symbol:

GeometryReader { geo in
    Text(status)
        .font(.system(size: geo.size.height * 0.7))
}

BoardView displays the game’s grid of tiles:

BoardView. A grid of tiles. Some tiles have been removed, revealing colored numbers. One tile contains a red flag

Each of the tiles is represented by a CellView view.

When a tile is tapped, this view exposes its contents:

.onTapGesture() {
    expose(row: row, col: col)
}

On a tap-and-hold, a flag is dropped:

.onLongPressGesture(minimumDuration: 0.1) {
    flag(row: row, col: col)
}

When my family tested the first version of the app, they were frustrated that they couldn’t tell whether they’d held long enough for the flag to be dropped. This was an easy mistake to make as their finger was hiding the tile at the time—an example of where testing with a mouse and simulator wasn’t a substitute for using real devices. It was especially frustrating as getting it wrong meant that you revealed a mine and immediately lost the game. Fortunately, this is easy to fix using iOS’s haptic feedback:

func hapticFeedback(_ isSuccess: Bool) {
    let generator = UINotificationFeedbackGenerator()
    generator.notificationOccurred(isSuccess ? .success : .error)
}

You now feel a buzz when the flag has been dropped.

CellView displays an individual tile:

CellView. Tile containing a crossed out red flag

What’s displayed depends on the contents of the Cell and the state of the game. It uses four further views to display different types of tile: FlagView, MineCountView, MineView, and TileView.

FlagView

FlagView. 2 Tiles, both containing a flag, one shows the  flag crossed out

MineCountView

MineCountView, 6 gray tiles. One is empty the others containing numbers 1 through 5, each in a different color

MineView

MineView. Two tiles containing mines, one with a gray background, one with a red background

TileView

TileView. A single gray tile

Conclusion

Realm-Sweeper gives a real feel for how quickly Realm is able to synchronize data over the internet.

I intentionally avoided optimizing how I updated the game data in Realm. When you see a single click exposing dozens of tiles, each cell change is an update to the Game object that needs to be synced.

GIF showing changes in one game board appearing in near-realtime in the game board on a different device

Note that both instances of the game are running in iPhone simulators on an overworked Macbook in England. The Realm backend app is running in the US—that’s a 12,000 km/7,500 mile round trip for each sync.

I took this approach as I wanted to demonstrate the performance of Realm synchronization. If an app like this became super-popular with millions of users, then it would put a lot of extra strain on the backend Realm app.

An obvious optimization would be to condense all of the tile changes from a single tap into a single write to the Realm object. If you’re interested in trying that out, just fork the repo and make the changes. If you do implement the optimization, then please create a pull request. (I’d probably add it as an option within the settings so that the “slow” mode is still an option.)

Got questions? Ask them in our Community forum.


Using Realm Flexible Sync in Your App—an iOS Tutorial

Introduction

We recently announced the release of the Realm Flexible Sync preview—an opportunity for developers to take it for a spin and give us feedback. That article provided an overview of the benefits of flexible sync and how it works. TL;DR: You typically don’t want to sync the entire backend database to every device—whether for capacity or security concerns. Realm Flexible Sync lets the developer provide queries to control exactly what the mobile app asks to sync, together with backend rules to ensure users can only access the data that they’re entitled to.

This post builds on that introduction by showing how to add flexible sync to the RChat mobile app. I’ll show how to configure the Realm backend app, and then what code needs adding to the mobile app.

Everything you see in this tutorial can be found in the flex-sync branch of the RChat repo.

Prerequisites

The RChat App

RChat is a messaging app. Users can add other users to a chat room and then share messages, images, and location with each other.

Screen capture video of running the RCha App on 2 different iOS simulators. Two users join a chat room and send messages to each other

All of the user and chat message data is shared between instances of the app via Realm Sync.

There’s a common Realm backend app. There are frontend apps for iOS and Android. This post focuses on the backend and the iOS app.

Configuring the Realm Backend App

The backend app contains a lot of functionality that isn’t connected to the sync functionality, and so I won’t cover that here. If you’re interested, then check out the original RChat series.

As a starting point, you can install the app. I’ll then explain the parts connected to Realm Sync.

Import the Backend Realm App

  1. If you don’t already have one, create a MongoDB Atlas Cluster, keeping the default name of Cluster0. The Atlas cluster must be running MongoDB 5.0 or later.
  2. Install the Realm CLI and create an API key pair.
  3. Download the repo and install the Realm app:
git clone https://github.com/ClusterDB/RChat.git
git checkout flex-sync
cd RChat/RChat-Realm/RChat
realm-cli login --api-key <your new public key> --private-api-key <your new private key>
realm-cli import # Then answer prompts, naming the app RChat

  1. From the Atlas UI, click on the Realm logo and you will see the RChat app. Open it and copy the App Id. You’ll need to use this before building the iOS app.

Screen capture of how to copy the Realm App ID in the Realm UI

How Flexible Sync is Enabled in the Back End

Schema

The schema represents how the data will be stored in MongoDB Atlas **and*- what the Swift (and Kotlin) model classes must contain.

Each collection/class requires a schema. If you enable Realm’s “Developer Mode” option, then Realm will automatically define the schema based on your Swift or Kotlin model classes. In this case, your imported Realm App includes the schemas, and so developer mode isn’t needed. You can view the schemas by browsing to the “Schema” section in the Realm UI:

Screen capture of schema section of the Realm UI

You can find more details about the schema/model in Building a Mobile Chat App Using Realm – Data Architecture, but note that for flexible sync (as opposed to the original partition-based sync), the partition field has been removed.

We’re interested in the schema for three collections/model-classes:

User:

{
  "bsonType": "object",
  "properties": {
    "_id": {
      "bsonType": "string"
    },
    "conversations": {
      "bsonType": "array",
      "items": {
        "bsonType": "object",
        "properties": {
          "displayName": {
            "bsonType": "string"
          },
          "id": {
            "bsonType": "string"
          },
          "members": {
            "bsonType": "array",
            "items": {
              "bsonType": "object",
              "properties": {
                "membershipStatus": {
                  "bsonType": "string"
                },
                "userName": {
                  "bsonType": "string"
                }
              },
              "required": [
                "membershipStatus",
                "userName"
              ],
              "title": "Member"
            }
          },
          "unreadCount": {
            "bsonType": "long"
          }
        },
        "required": [
          "unreadCount",
          "id",
          "displayName"
        ],
        "title": "Conversation"
      }
    },
    "lastSeenAt": {
      "bsonType": "date"
    },
    "presence": {
      "bsonType": "string"
    },
    "userName": {
      "bsonType": "string"
    },
    "userPreferences": {
      "bsonType": "object",
      "properties": {
        "avatarImage": {
          "bsonType": "object",
          "properties": {
            "_id": {
              "bsonType": "string"
            },
            "date": {
              "bsonType": "date"
            },
            "picture": {
              "bsonType": "binData"
            },
            "thumbNail": {
              "bsonType": "binData"
            }
          },
          "required": [
            "_id",
            "date"
          ],
          "title": "Photo"
        },
        "displayName": {
          "bsonType": "string"
        }
      },
      "required": [],
      "title": "UserPreferences"
    }
  },
  "required": [
    "_id",
    "userName",
    "presence"
  ],
  "title": "User"
}

User documents/objects represent users of the app.

Chatster:

{
  "bsonType": "object",
  "properties": {
    "_id": {
      "bsonType": "string"
    },
    "avatarImage": {
      "bsonType": "object",
      "properties": {
        "_id": {
          "bsonType": "string"
        },
        "date": {
          "bsonType": "date"
        },
        "picture": {
          "bsonType": "binData"
        },
        "thumbNail": {
          "bsonType": "binData"
        }
      },
      "required": [
        "_id",
        "date"
      ],
      "title": "Photo"
    },
    "displayName": {
      "bsonType": "string"
    },
    "lastSeenAt": {
      "bsonType": "date"
    },
    "presence": {
      "bsonType": "string"
    },
    "userName": {
      "bsonType": "string"
    }
  },
  "required": [
    "_id",
    "presence",
    "userName"
  ],
  "title": "Chatster"
}

Chatster documents/objects represent a read-only subset of instances of User documents. Chatster is needed because there’s a subset of User data that we want to make accessible to all users. E.g., I want everyone to be able to see my username, presence status, and avatar image, but I don’t want them to see which chat rooms I’m a member of.

Realm Sync lets you control which users can sync which documents, but it doesn’t let you sync just a subset of a document’s fields. That’s why Chatster is needed. I’m looking forward to when Realm Sync permissions allow me to control access on a per-field (rather than per-document/class) basis. At that point, I can remove Chatster from the app.

ChatMessage:

{
  "bsonType": "object",
  "properties": {
    "_id": {
      "bsonType": "string"
    },
    "author": {
      "bsonType": "string"
    },
    "authorID": {
      "bsonType": "string"
    },
    "conversationID": {
      "bsonType": "string"
    },
    "image": {
      "bsonType": "object",
      "properties": {
        "_id": {
          "bsonType": "string"
        },
        "date": {
          "bsonType": "date"
        },
        "picture": {
          "bsonType": "binData"
        },
        "thumbNail": {
          "bsonType": "binData"
        }
      },
      "required": [
        "_id",
        "date"
      ],
      "title": "Photo"
    },
    "location": {
      "bsonType": "array",
      "items": {
        "bsonType": "double"
      }
    },
    "text": {
      "bsonType": "string"
    },
    "timestamp": {
      "bsonType": "date"
    }
  },
  "required": [
    "_id",
    "authorID",
    "conversationID",
    "text",
    "timestamp"
  ],
  "title": "ChatMessage"
}

There’s a ChatMessage document object for every message sent to any chat room.

Flexible Sync Configuration

You can view and edit the sync configuration by browsing to the “Sync” section of the Realm UI:

Enabling Realm Flexible Sync in the Realm UI

For this deployment, I’ve selected the Atlas cluster to use. That cluster must be running MongoDB 5.0 or later. At the time of writing, MongoDB 5.0 isn’t available for shared clusters (including free-tier M0 instances)—that’s expected to change very soon, possibly by the time that you’re reading this.

You must specify which fields the mobile app can use in its sync filter queries. Without this, you can’t refer to those fields in your sync queries or permissions. You are currently limited to 10 fields.

Scrolling down, you can see the sync permissions:

Screenshot of a JSON document representing sync permissions in the Realm UI

The UI has flattened the permissions JSON document; here’s a version that’s easier to read:

{
   "rules": {
       "User": [
           {
               "name": "anyone",
               "applyWhen": {},
               "read": {
                   "_id": "%%user.id"
               },
               "write": {
                   "_id": "%%user.id"
               }
           }
       ],
       "Chatster": [
           {
               "name": "anyone",
               "applyWhen": {},
               "read": true,
               "write": false
           }
       ],
       "ChatMessage": [
           {
               "name": "anyone",
               "applyWhen": {},
               "read": true,
               "write": {
                   "authorID": "%%user.id"
               }
           }
       ]
   },
   "defaultRoles": [
       {
           "name": "all",
           "applyWhen": {},
           "read": {},
           "write": {}
       }
   ]
}

The rules component contains a sub-document for each of our collections. Each of those sub-documents contain an array of roles. Each role contains:

  • The name of the role, this should be something that helps other developers understand the purpose of the role (e.g., “admin,” “owner,” “guest”).
  • applyWhen, which defines whether the requesting user matches the role or not. Each of our collections have a single role, and so applyWhen is set to {}, which always evaluates to true.
  • A read rule—how to decide whether this user can view a given document. This is where our three collections impose different rules:
    • A user can read and write to their own User object. No one else can read or write to it.
    • Anyone can read any Chatster document, but no one can write to them. Note that these documents are maintained by database triggers to keep them consistent with their associated User document.
    • The author of a ChatMessage is allowed to write to it. Anyone can read any ChatMessage. Ideally, we’d restrict it to just members of the chat room, but permissions don’t currently support arrays—this is another feature that I’m keen to see added.

Adding Realm Flexible Sync to the iOS App

As with the back end, the iOS app is too big to cover in its entirety in this post. I’ll explain how to build and run the app and then go through the components relevant to Realm Flexible Sync.

Configure, Build, and Run the RChat iOS App

You’ve already downloaded the repo containing the iOS app, but you need to change directory before opening and running the app:

cd ../../RChat-iOS
pod install
open RChat.xcodeproj

Update RChatApp.swift with your Realm App Id (you copied that from the Realm UI when configuring your backend Realm app). In Xcode, select your device or simulator before building and running the app (⌘R). Select a second device or simulator and run the app a second time (⌘R).

On each device, provide a username and password and select the “Register new user” checkbox:
iOS screenshot of registering a new user through the RChat app

Once registered and logged in on both devices, you can create a new chat room, invite your second user, and start sharing messages and photos. To share location, you first need to enable it in the app’s settings.

Key Pieces of the iOS App Code

The Model

You’ve seen the schemas that were defined for the “User,” “Chatster,” and “ChatMessage” collections in the back end Realm app. Each of those collections has an associated Realm Object class in the iOS app. Sub-documents map to embedded objects that conform to RealmEmbeddedObject:

UML diagram showing the User, Chatster, and ChatMessage classes—together with their embedded classes

Let’s take a close look at each of these classes:

User Class

UML diagram showing the User class—together with its embedded classes

class User: Object, ObjectKeyIdentifiable {
   @Persisted(primaryKey: true) var _id = UUID().uuidString
   @Persisted var userName = ""
   @Persisted var userPreferences: UserPreferences?
   @Persisted var lastSeenAt: Date?
   @Persisted var conversations = List<Conversation>()
   @Persisted var presence = "On-Line"
}

class UserPreferences: EmbeddedObject, ObjectKeyIdentifiable {
   @Persisted var displayName: String?
   @Persisted var avatarImage: Photo?
}

class Photo: EmbeddedObject, ObjectKeyIdentifiable {
   @Persisted var _id = UUID().uuidString
   @Persisted var thumbNail: Data?
   @Persisted var picture: Data?
   @Persisted var date = Date()
}

class Conversation: EmbeddedObject, ObjectKeyIdentifiable {
   @Persisted var id = UUID().uuidString
   @Persisted var displayName = ""
   @Persisted var unreadCount = 0
   @Persisted var members = List<Member>()
}

class Member: EmbeddedObject, ObjectKeyIdentifiable {
   @Persisted var userName = ""
   @Persisted var membershipStatus = "User added, but invite pending"
}

Chatster Class

UML diagram showing the Chatster class—together with its embedded class

class Chatster: Object, ObjectKeyIdentifiable {
   @Persisted(primaryKey: true) var _id = UUID().uuidString // This will match the _id of the associated User
   @Persisted var userName = ""
   @Persisted var displayName: String?
   @Persisted var avatarImage: Photo?
   @Persisted var lastSeenAt: Date?
   @Persisted var presence = "Off-Line"
}

class Photo: EmbeddedObject, ObjectKeyIdentifiable {
   @Persisted var _id = UUID().uuidString
   @Persisted var thumbNail: Data?
   @Persisted var picture: Data?
   @Persisted var date = Date()
}

ChatMessage Class

UML diagram showing the ChatMessage class—together with its embedded class

class ChatMessage: Object, ObjectKeyIdentifiable {
   @Persisted(primaryKey: true) var _id = UUID().uuidString
   @Persisted var conversationID = ""
   @Persisted var author: String? // username
   @Persisted var authorID: String
   @Persisted var text = ""
   @Persisted var image: Photo?
   @Persisted var location = List<Double>()
   @Persisted var timestamp = Date()
}

class Photo: EmbeddedObject, ObjectKeyIdentifiable {
   @Persisted var _id = UUID().uuidString
   @Persisted var thumbNail: Data?
   @Persisted var picture: Data?
   @Persisted var date = Date()
}

Accessing Synced Realm Data

Any iOS app that wants to sync Realm data needs to create a Realm App instance, providing the Realm App ID so that the Realm SDK can connect to the backend Realm app:

let app = RealmSwift.App(id: "rchat-xxxxx") // TODO: Set the Realm application ID

When a SwiftUI view (in this case, LoggedInView) needs to access synced data, the parent view must flag that flexible sync will be used. It does this by passing the Realm configuration through the SwiftUI environment:

LoggedInView(userID: $userID)
   .environment(\.realmConfiguration,
               app.currentUser!.flexibleSyncConfiguration())

LoggedInView can then access two variables from the SwiftUI environment:

struct LoggedInView: View {
   ...
   @Environment(\.realm) var realm
   @ObservedResults(User.self) var users

The users variable is a live query containing all synced User objects in the Realm. But at this point, no User documents have been synced because we haven’t subscribed to anything.

That’s easy to fix. We create a new function (setSubscription) that’s invoked when the view is opened:

struct LoggedInView: View {
   ...
   @Binding var userID: String?
   ...
   var body: some View {
       ZStack {
           ...
       }
       .onAppear(perform: setSubscription)
   }

   private func setSubscription() {
       let subscriptions = realm.subscriptions
       subscriptions.write {
           if let currentSubscription = subscriptions.first(named: "user_id") {
               print("Replacing subscription for user_id")
               currentSubscription.update(toType: User.self) { user in
                   user._id == userID!
               }
           } else {
               print("Appending subscription for user_id")
               subscriptions.append(QuerySubscription<User>(name: "user_id") { user in
                   user._id == userID!
               })
           }
       }
   }
}

Subscriptions are given a name to make them easier to work with. I named this one user_id.

The function checks whether there’s already a subscription named user_id. If there is, then the function replaces it. If not, then it adds the new subscription. In either case, the subscription is defined by passing in a query that finds any User documents/objects where the _id field matches the current user’s ID.

The subscription should sync exactly one User object to the realm, and so the code for the view’s body can work with the first object in the results:

struct LoggedInView: View {
   ...
   @ObservedResults(User.self) var users
   @Binding var userID: String?
   ...
   var body: some View {
       ZStack {
           if let user = users.first {
               ...
               ConversationListView(user: user)
               ...
           }
       }
       .navigationBarTitle("Chats", displayMode: .inline)
       .onAppear(perform: setSubscription)
   }
}

Other views work with different model classes and sync queries. For example, when the user clicks on a chat room, a new view is opened that displays all of the ChatMessages for that conversation:

struct ChatRoomBubblesView: View {
   ...
   @ObservedResults(ChatMessage.self, sortDescriptor: SortDescriptor(keyPath: "timestamp", ascending: true)) var chats
   @Environment(\.realm) var realm
   ...
   var conversation: Conversation?
   ...
   var body: some View {
       VStack {
           ...
       }
       .onAppear { loadChatRoom() }
   }

   private func loadChatRoom() {
       ...
       setSubscription()
       ...
   }

   private func setSubscription() {
       let subscriptions = realm.subscriptions
       subscriptions.write {
           if let conversation = conversation {
               if let currentSubscription = subscriptions.first(named: "conversation") {
                   currentSubscription.update(toType: ChatMessage.self) { chatMessage in
                       chatMessage.conversationID == conversation.id
                   }
               } else {
                   subscriptions.append(QuerySubscription<ChatMessage>(name: "conversation") { chatMessage in
                       chatMessage.conversationID == conversation.id
                   })
               }
           }
       }
   }
}

In this case, the query syncs all ChatMessage objects where the conversationID matches the id of the Conversation object passed to the view.

The view’s body can then iterate over all of the matching, synced objects:

struct ChatRoomBubblesView: View {
...
   @ObservedResults(ChatMessage.self,
       sortDescriptor: SortDescriptor(keyPath: "timestamp", ascending: true)) var chats
   ...
   var body: some View {
       ...
       ForEach(chats) { chatMessage in
           ChatBubbleView(chatMessage: chatMessage,
                           authorName: chatMessage.author != user.userName ? chatMessage.author : nil,
                           isPreview: isPreview)
       }
       ...
   }
}

As it stands, there’s some annoying behavior. If you open conversation A, go back, and then open conversation B, you’ll initially see all of the messages from conversation A. The reason is that it takes a short time for the updated subscription to replace the ChatMessage objects in the synced Realm. I solve that by explicitly removing the subscription (which purges the synced objects) when closing the view:

struct ChatRoomBubblesView: View {
   ...
   @Environment(\.realm) var realm
   ...
   var body: some View {
       VStack {
           ...
       }
       .onDisappear { closeChatRoom() }
   }

   private func closeChatRoom() {
       clearSubscription()
       ...
   }

   private func clearSubscription() {
       print("Leaving room, clearing subscription")
       let subscriptions = realm.subscriptions
       subscriptions.write {
           subscriptions.remove(named: "conversation")
       }
   }
}

I made a design decision that I’d use the same name (“conversation”) for this view, regardless of which conversation/chat room it’s working with. An alternative would be to create a unique subscription whenever a new chat room is opened (including the ID of the conversation in the name). I could then avoid removing the subscription when navigating away from a chat room. This second approach would come with two advantages:

  1. The app should be more responsive when navigating between chat rooms (if you’d previously visited the chat room that you’re opening).
  2. You can switch between chat rooms even when the device isn’t connected to the internet.

The disadvantages of this approach would be:

  1. The app could end up with a lot of subscriptions (and there’s a cost to them).
  2. The app continues to store all of the messages from any chat room that you’ve ever visited from this device. That consumes extra device storage and network bandwidth as messages from all of those rooms continue to be synced to the app.

A third approach would be to stick with a single subscription (named “conversations”) that matches every ChatMessage object. The view would then need to apply a filter on the resulting ChatMessage objects so it only displayed those for the open chat room. This has the same advantages as the second approach, but can consume even more storage as the device will contain messages from all chat rooms—including those that the user has never visited.

Note that a different user can log into the app from the same device. You don’t want that user to be greeted with someone else’s data. To avoid that, the app removes all subscriptions when a user logs out:

struct LogoutButton: View {
   ...
   @Environment(\.realm) var realm


   var body: some View {
       Button("Log Out") { isConfirming = true }
       .confirmationDialog("Are you that you want to logout",
                           isPresented: $isConfirming) {
           Button("Confirm Logout", role: .destructive, action: logout)
           Button("Cancel", role: .cancel) {}
       }
       .disabled(state.shouldIndicateActivity)
   }

   private func logout() {
       ...
       clearSubscriptions()
       ...
   }

   private func clearSubscriptions() {
       let subscriptions = realm.subscriptions
       subscriptions.write {
           subscriptions.removeAll()
       }
   }
}

Conclusion

In this article, you’ve seen how to include Realm Flexible Sync in your mobile app. I’ve shown the code for Swift, but the approach would be the same when building apps with Kotlin, Javascript, or .NET.

This is a preview release and we want your feedback.

Realm Flexible Sync will evolve to include more query and permission operators. Up next, we’re looking to expose array operators (that would allow me to add tighter restrictions on who can ask to read which chat messages). We’ll also enable querying on embedded documents.

Another feature I’d like to see is to limit which fields from a document get synced to a given user. This could allow the removal of the Chatster collection, as it’s only there to provide a read-only view of a subset of User fields to other users.

Want to suggest an enhancement or up-vote an existing request? The most effective way is through our feedback portal.

Got questions? Ask them in our Community forum.


Realm-Swift Type Projections

Introduction

Realm natively provides a broad set of data types, including Bool, Int, Float, Double, String, Date, ObjectID, List, Mutable Set, enum, Map, …

But, there are other data types that many of your iOS apps are likely to use. As an example, if you’re using Core Graphics, then it’s hard to get away without using types such as CGFloat, CGPoint, etc. When working with SwiftUI, you use the Color struct when working with colors.

A typical design pattern is to persist data using types natively supported by Realm, and then use a richer set of types in your app. When reading data, you add extra boilerplate code to convert them to your app’s types. When persisting data, you add more boilerplate code to convert your data back into types supported by Realm.

That works fine and gives you complete control over the type conversions. The downside is that you can end up with dozens of places in your code where you need to make the conversion.

Type projections still give you total control over how to map a CGPoint into something that can be persisted in Realm. But, you write the conversion code just once and then forget about it. The Realm-Swift SDK will then ensure that types are converted back and forth as required in the rest of your app.

The Realm-Swift SDK enables this by adding two new protocols that you can use to extend any Swift type. You opt whether to implement CustomPersistable or the version that’s allowed to fail (FailableCustomPersistable):

protocol CustomPersistable {
   associatedtype PersistedType
   init(persisted: PersistedType)
   var persistableValue: PersistedType { get }
}
protocol FailableCustomPersistable {
   associatedtype PersistedType
   init?(persisted: PersistedType)
   var persistableValue: PersistedType { get }
}

In this post, I’ll show how the Realm-Drawing app uses type projections to interface between Realm and Core Graphics.

Prerequisites

The Realm-Drawing App

Realm-Drawing is a simple, collaborative drawing app. If two people log into the app using the same username, they can work on a drawing together. All strokes making up the drawing are persisted to Realm and then synced to all other instances of the app where the same username is logged in.

Animated screen captures showing two iOS devices working on the same drawing

It’s currently iOS-only, but it would also sync with any Android drawing app that is connected to the same Realm back end.

Using Type Projections in the App

The Realm-Drawing iOS app uses three types that aren’t natively supported by Realm:

  • CGFloat
  • CGPoint
  • Color (SwiftUI)

In this section, you’ll see how simple it is to use type projections to convert them into types that can be persisted to Realm and synced.

Realm Schema (The Model)

An individual drawing is represented by a single Drawing object:

class Drawing: Object, ObjectKeyIdentifiable {
   @Persisted(primaryKey: true) var _id: ObjectId
   @Persisted var name = UUID().uuidString
   @Persisted var lines = RealmSwift.List<Line>()
}

A Drawing contains a List of Line objects:

class Line: EmbeddedObject, ObjectKeyIdentifiable {
   @Persisted var lineColor: Color
   @Persisted var lineWidth: CGFloat = 5.0
   @Persisted var linePoints = RealmSwift.List<CGPoint>()
}

It’s the Line class that uses the non-Realm-native types.

Let’s see how each type is handled.

CGFloat

I extend CGFloat to conform to Realm-Swift’s CustomPersistable protocol. All I needed to provide was:

  • An initializer to convert what’s persisted in Realm (a Double) into the CGFloat used by the model
  • A method to convert a CGFloat into a Double:
extension CGFloat: CustomPersistable {
   public typealias PersistedType = Double
   public init(persistedValue: Double) { self.init(persistedValue) }
   public var persistableValue: Double { Double(self) }
}

The view can then use lineWidth from the model object without worrying about how it’s converted by the Realm SDK:

context.stroke(path, with: .color(line.lineColor),
   style: StrokeStyle(
       lineWidth: line.lineWidth,
       lineCap: .round, l
       ineJoin: .round
   )
)

CGPoint

CGPoint is a little trickier, as it can’t just be cast into a Realm-native type. CGPoint contains the x and y coordinates for a point, and so, I create a Realm-friendly class (PersistablePoint) that stores just that—x and y values as Doubles:

public class PersistablePoint: EmbeddedObject, ObjectKeyIdentifiable {
   @Persisted var x = 0.0
   @Persisted var y = 0.0

   convenience init(_ point: CGPoint) {
       self.init()
       self.x = point.x
       self.y = point.y
   }
}

I implement the CustomPersistable protocol for CGPoint by mapping between a CGPoint and the x and y coordinates within a PersistablePoint:

extension CGPoint: CustomPersistable {
   public typealias PersistedType = PersistablePoint   
   public init(persistedValue: PersistablePoint) { self.init(x: persistedValue.x, y: persistedValue.y) }
   public var persistableValue: PersistablePoint { PersistablePoint(self) }
}

SwiftUI.Color

Color is made up of the three RGB components plus the opacity. I use the PersistableColor class to persist a representation of Color:

public class PersistableColor: EmbeddedObject {
   @Persisted var red: Double = 0
   @Persisted var green: Double = 0
   @Persisted var blue: Double = 0
   @Persisted var opacity: Double = 0

   convenience init(color: Color) {
       self.init()
       if let components = color.cgColor?.components {
           if components.count >= 3 {
               red = components[0]
               green = components[1]
               blue = components[2]
           }
           if components.count >= 4 {
               opacity = components[3]
           }
       }
   }
}

The extension to implement CustomPersistable for Color provides methods to initialize Color from a PersistableColor, and to generate a PersistableColor from itself:

extension Color: CustomPersistable {
   public typealias PersistedType = PersistableColor

   public init(persistedValue: PersistableColor) { self.init(
       .sRGB,
       red: persistedValue.red,
       green: persistedValue.green,
       blue: persistedValue.blue,
       opacity: persistedValue.opacity) }

   public var persistableValue: PersistableColor {
       PersistableColor(color: self)
   }
}

The view can then use selectedColor from the model object without worrying about how it’s converted by the Realm SDK:

context.stroke(
   path,
   with: .color(line.lineColor),
   style: StrokeStyle(lineWidth:
   line.lineWidth,
   lineCap: .round,
   lineJoin: .round)
)

Conclusion

Type projections provide a simple, elegant way to convert any type to types that can be persisted and synced by Realm.

It’s your responsibility to define how the mapping is implemented. After that, the Realm SDK takes care of everything else.

Please provide feedback and ask any questions in the Realm Community Forum.


Using Maps and Location Data in Your SwiftUI (+Realm) App

Introduction

Embedding Apple Maps and location functionality in SwiftUI apps used to be a bit of a pain. It required writing your own SwiftUI wrapper around UIKit code—see these examples from the O-FISH app:

If you only need to support iOS14 and later, then you can forget most of that messy code 😊. If you need to support iOS13—sorry, you need to go the O-FISH route!

iOS14 introduced the Map SwiftUI view (part of Mapkit) allowing you to embed maps directly into your SwiftUI apps without messy wrapper code.

This article shows you how to embed Apple Maps into your app views using Mapkit’s Map view. We’ll then look at how you can fetch the user’s current location—with their permission, of course!

Finally, we’ll see how to store the location data in Realm in a format that lets MongoDB Realm sync it to MongoDB Atlas. Once in Atlas, you can add a geospatial index and use MongoDB Charts to plot the data on a map—we’ll look at that too.

Most of the code snippets have been extracted from the RChat app. That app is a good place to see maps and location data in action. Building a Mobile Chat App Using Realm – The New and Easier Way is a good place to learn more about the RChat app—including how to enable MongoDB Realm Sync.

Prerequisites

  • Realm-Cocoa 10.8.0+ (may work with some 10.7.X versions)
  • iOS 14.5+ (Mapkit was introduced in iOS 14.0 and so most features should work with earlier iOS 14.X versions)
  • XCode12+

How to Add an Apple Map to Your SwiftUI App

To begin, let’s create a simple view that displays a map, the coordinates of the center of that map, and the zoom level:

Gif of scrolling around an embedded Apple Map and seeing the reported coordinates changing

With Mapkit and SwiftUI, this only takes a few lines of code:

import MapKit
import SwiftUI

struct MyMapView: View {
    @State private var region: MKCoordinateRegion = MKCoordinateRegion(
        center: CLLocationCoordinate2D(latitude: MapDefaults.latitude, longitude: MapDefaults.longitude),
        span: MKCoordinateSpan(latitudeDelta: MapDefaults.zoom, longitudeDelta: MapDefaults.zoom))

    private enum MapDefaults {
        static let latitude = 45.872
        static let longitude = -1.248
        static let zoom = 0.5
    }

    var body: some View {
        VStack {
            Text("lat: \(region.center.latitude), long: \(region.center.longitude). Zoom: \(region.span.latitudeDelta)")
            .font(.caption)
            .padding()
            Map(coordinateRegion: $region,
                interactionModes: .all,
                showsUserLocation: true)
        }
    }
}

Note that showsUserLocation won’t work unless the user has already given the app permission to use their location—we’ll get to that.

region is initialized to a starting location, but it’s updated by the Map view as the user scrolls and zooms in and out.

Adding Bells and Whistles to Your Maps (Pins at Least)

Pins can be added to a map in the form of “annotations.” Let’s start with a single pin:

Embedded Apple Map showing a red pin

Annotations are provided as an array of structs where each instance must contain the coordinates of the pin. The struct must also conform to the Identifiable protocol:

struct MyAnnotationItem: Identifiable {
    var coordinate: CLLocationCoordinate2D
    let id = UUID()
}

We can now create an array of MyAnnotationItem structs:

let annotationItems = [
    MyAnnotationItem(coordinate: CLLocationCoordinate2D(
        latitude: MapDefaults.latitude,
        longitude: MapDefaults.longitude))]

We then pass annotationItems to the MapView and indicate that we want a MapMarker at the contained coordinates:

Map(coordinateRegion: $region,
    interactionModes: .all,
    showsUserLocation: true,
    annotationItems: annotationItems) { item in
        MapMarker(coordinate: item.coordinate)
    }

That gives us the result we wanted.

What if we want multiple pins? Not a problem. Just add more MyAnnotationItem instances to the array.

All of the pins will be the same default color. But, what if we want different colored pins? It’s simple to extend our code to produce this:

Embedded Apple Map showing red, yellow, and plue pins at different locations

Firstly, we need to extend MyAnnotationItem to include an optional color and a tint that returns color if it’s been defined and “red” if not:

struct MyAnnotationItem: Identifiable {
    var coordinate: CLLocationCoordinate2D
    var color: Color?
    var tint: Color { color ?? .red }
    let id = UUID()
}

In our sample data, we can now choose to provide a color for each annotation:

let annotationItems = [
    MyAnnotationItem(
        coordinate: CLLocationCoordinate2D(
            latitude: MapDefaults.latitude,
            longitude: MapDefaults.longitude)),
    MyAnnotationItem(
        coordinate: CLLocationCoordinate2D(
            latitude: 45.8827419,
            longitude: -1.1932383),
        color: .yellow),
    MyAnnotationItem(
        coordinate: CLLocationCoordinate2D(
            latitude: 45.915737,
            longitude: -1.3300991),
        color: .blue)
]

The MapView can then use the tint:

Map(coordinateRegion: $region,
    interactionModes: .all,
    showsUserLocation: true,
    annotationItems: annotationItems) { item in
    MapMarker(
        coordinate: item.coordinate,
        tint: item.tint)
}

If you get bored of pins, you can use MapAnnotation to use any view you like for your annotations:

Map(coordinateRegion: $region,
    interactionModes: .all,
    showsUserLocation: true,
    annotationItems: annotationItems) { item in
    MapAnnotation(coordinate: item.coordinate) {
        Image(systemName: "gamecontroller.fill")
            .foregroundColor(item.tint)
    }
}

This is the result:

Apple Map showing red, yellow and blue game controller icons at different locations on the map

You could also include the name of the system image to use with each annotation.

This gist contains the final code for the view.

Finding Your User’s Location

Asking for Permission

Apple is pretty vocal about respecting the privacy of their users, and so it shouldn’t be a shock that your app will have to request permission before being able to access a user’s location.

The first step is to add a key-value pair to your Xcode project to indicate that the app may request permission to access the user’s location, and what text should be displayed in the alert. You can add the pair to the “Info.plist” file:

Privacy - Location When In Use Usage Description : We'll only use your location when you ask to include it in a message

Screenshot from Xcode showing the key-value pair for requesting permission for the app to access the user's location

Once that setting has been added, the user should see an alert the first time that the app attempts to access their current location:

iPhone screenshot – app is requesting permission to access the user's location

Accessing Current Location

While Mapkit has made maps simple and native in SwiftUI, the same can’t be said for location data.

You need to create a SwiftUI wrapper for Apple’s Core Location functionality. There’s not a lot of value in explaining this boilerplate code—just copy this code from RChat’s LocationHelper.swift file, and paste it into your app:

import CoreLocation

class LocationHelper: NSObject, ObservableObject {

    static let shared = LocationHelper()
    static let DefaultLocation = CLLocationCoordinate2D(latitude: 45.8827419, longitude: -1.1932383)

    static var currentLocation: CLLocationCoordinate2D {
        guard let location = shared.locationManager.location else {
            return DefaultLocation
        }
        return location.coordinate
    }

    private let locationManager = CLLocationManager()

    private override init() {
        super.init()
        locationManager.delegate = self
        locationManager.desiredAccuracy = kCLLocationAccuracyBest
        locationManager.requestWhenInUseAuthorization()
        locationManager.startUpdatingLocation()
    }
}

extension LocationHelper: CLLocationManagerDelegate {
    func locationManager(_ manager: CLLocationManager, didUpdateLocations locations: [CLLocation]) { }

    public func locationManager(_ manager: CLLocationManager, didFailWithError error: Error) {
        print("Location manager failed with error: \(error.localizedDescription)")
    }

    public func locationManager(_ manager: CLLocationManager, didChangeAuthorization status: CLAuthorizationStatus) {
        print("Location manager changed the status: \(status)")
    }
}

Once added, you can access the user’s location with this simple call:

let location = LocationHelper.currentLocation

Store Location Data in Your Realm Database

The Location Format Expected by MongoDB

Realm doesn’t have a native type for a geographic location, and so it’s up to us how we choose to store it in a Realm Object. That is, unless we want to synchronize the data to MongoDB Atlas using MongoDB Realm Sync, and go on to use MongoDB’s geospatial functionality.

To make the best use of the location data in Atlas, we need to add a geospatial index to the field (which we’ll see how to do soon.) That means storing the location in a supported format. Not all options will work with Realm Sync (e.g., it’s not guaranteed that attributes will appear in the same order in your Realm Object and the synced Atlas document). The most robust approach is to use an array where the first element is longitude and the second is latitude:

location: [<longitude>, <latitude>]

Your Realm Object

The RChat app gives users the option to include their location in a chat message—this means that we need to include the location in the ChatMessage Object:

@objcMembers class ChatMessage: Object, ObjectKeyIdentifiable {
  …
    let location = List<Double>()
  …
    convenience init(author: String, text: String, image: Photo?, location: [Double] = []) {
        ...
    location.forEach { coord in
            self.location.append(coord)
      }
        ...
        }
    }
   ….
}

The location array that’s passed to that initializer is formed like this:

let location = LocationHelper.currentLocation
self.location = [location.longitude, location.latitude]

Location Data in Your Backend MongoDB Realm App

The easiest way to create your backend MongoDB Realm schema is to enable Development Mode—that way, the schema is automatically generated from your Swift Realm Objects.

This is the generated schema for our “ChatMessage” collection:

{
    "bsonType": "object",
    "properties": {
      "_id": {
        "bsonType": "string"
      },
      ...
      "location": {
        "bsonType": "array",
        "items": {
          "bsonType": "double"
        }
      }
    },
    "required": [
      "_id",
      ...
    ],
    "title": "ChatMessage"
}

This is a document that’s been created from a synced Realm ChatMessage object:

Screen capture of an Atlas document, which includes an array named location

Adding a Geospatial Index in Atlas

Now that you have location data stored in Atlas, it would be nice to be able to work with it—e.g., running geospatial queries. To enable this, you need to add a geospatial index to the location field.

From the Atlas UI, select the “Indexes” tab for your collection and click “CREATE INDEX”:

Atlas screen capture of creating a new index

You should then configure a 2dsphere index:

Atlas screen capture of creating a new 2dsphere index

Most chat messages won’t include the user’s location and so I set the sparse option for efficiency.

Note that you’ll get an error message if your ChatMessage collection contains any documents where the value in the location attribute isn’t in a valid geospatial format.

Atlas will then build the index. This will be very quick, unless you already have a huge number of documents containing the location field. Once complete, you can move onto the next section.

Plotting Your Location Data in MongoDB Charts

MongoDB Charts is a simple way to visualize MongoDB data. You can access it through the same UI as Realm and Atlas. Just click on the “Charts” button:

Atlas screen capture of MongoDB Charts button

The first step is to click the “Add Data Source” button:

Charts screen capture of adding a new data source

Select your Atlas cluster:

Charts screen capture of adding Atlas cluster as a data source

Select the RChat.ChatMessage collection:

Charts screen capture of selecting the ChatMessage collection in the RChat database

Click “Finish.” You’ll be taken to the default Dashboards view, which is empty for now. Click “Add Dashboard”:

Charts screen capture of adding a new dashboard

In your new dashboard, click “ADD CHART”:

Charts screen capture of adding a new chart

Configure your chart as shown here by:
– Setting the chart type to “Geospatial” and the sub-type to “Scatter.”
– Dragging the “location” attribute to the coordinates box.
– Dragging the “author” field to the “Color” box.

Charts screen capture of configuring a new chart

Once you’ve created your chart, you can embed it in web apps, etc. That’s beyond the scope of this article, but check out the MongoDB Charts docs if you’re interested.

Conclusion

SwiftUI makes it easy to embed Apple Maps in your SwiftUI apps. As with most Apple frameworks, there are extra maps features available if you break out from SwiftUI, but I’d suggest that the simplicity of working with SwiftUI is enough incentive for you to avoid that unless you have a compelling reason.

Accessing location information from within SwiftUI still feels a bit of a hack, but in reality, you cut and paste the helper code once, and then you’re good to go.

By storing the location as a [longitude, latitude] array (List) in your Realm database, it’s simple to sync it with MongoDB Atlas. Once in Atlas, you have the full power of MongoDB’s geospatial functionality to work your location data.

If you have questions, please head to our developer community website where the MongoDB engineers and the MongoDB community will help you build your next big idea with MongoDB.


Realm Partitioning Strategies

I’ve just released a new article – Realm Partitioning Strategies.

Realm partitioning can be used to control what data is synced to each mobile device, ensuring that your app is efficient, performant and secure. This article will help you pick the right partitioning strategy for your app.

MongoDB Realm Sync stores the superset of your application data in the cloud using MongoDB Atlas. The simplest strategy is that every instance of your mobile app contains the full database, but that quickly consumes a lot of space on the users’ devices and makes the app slow to start while it syncs all of the data for the first time.
Alternative strategies include partitioning by:

  • User
  • Group/team/store
  • Chanel/room/topic
  • Geographic region
  • Bucket of time
  • Any combination of these

The article discusses all of those strategies so that you adopt one, or craft a different strategy that’s customized to your app’s needs.


Accessing Realm Data on iOS using Realm Studio

The Realm Mobile Database makes it much faster to develop mobile applications. MongoDB Realm Studio is a desktop GUI that lets you view, manipulate, and import data held within your mobile app’s Realm database. I’ve just published a new article (Accessing Realm Data on iOS using Realm Studio) which steps through how to track down the locations of your iOS Realm database files, open them in Realm Studio, view the data, and make changes.


Building a Mobile Chat App Using Realm – Data Architecture

I’ve just built an iOS chat app using SwiftUI, Realm, and Realm Sync. I decided on a chat app as it makes an interesting case study for designing a data model and controlling who can access what data:

  • A chat message needs to be viewable by all members of a chat room and no one else.
  • New messages must be pushed to the chat room for all online members in real-time.
  • The app should notify a user that there are new messages even when they don’t have that chat room open.
  • Users should be able to observe the “presence” of other users (e.g., whether they’re currently logged into the app).
  • There’s no limit on how many messages users send in a chat room, and so the data structures must allow them to grow indefinitely.

Because this app’s data model (and the decisions taken when designing) serve as a great starting point for many different types of apps, I wrote it up in this HowTo article.

You can download all of the code from the GitHub repo.

Checkout Building a Mobile Chat App Using Realm – Data Architecture for all of the details.


Building an iOS app with Realm, SwiftUI, & Combine

I’m relatively new to building iOS apps (a little over a year’s experience), and so I prefer using the latest technologies that make me a more productive developer. That means my preferred app stack looks like this:
In 🔥 Out ❄️
Swift Objective C
SwiftUI UIKit
Combine RxSwift
Realm Core Data
MongoDB Realm Sync (where needed) Home-baked cross-platform data sync
I built a simple, distributed task management app on that stack, and wrote it up in “Build Your First iOS Mobile App Using Realm, SwiftUI, & Combine”. To continue my theme on being productive, I borrowed heavily from MongoDB’s official iOS Swift tutorial: You can download all of the code for the front end app from the GitHub repo. Checkout Build Your First iOS Mobile App Using Realm, SwiftUI, & Combine for all of the details.


How to create Dynamic Custom Roles with MongoDB Stitch

None of us want to write lots of code to control what data each user can access. In most cases, you can set up your data access controls in seconds by using Stitch’s built-in templates, e.g., “Users can read and write their own data” or “Users can read and write their own data. Users that belong to a sharing list can read that data”. Stitch also lets you create custom roles that you tailor to your application and schema – this post creates such a rule, querying a second collection when deciding whether to allow a user to insert a document.

The application is a troll-free timeline where you can only tag another user in a post if that user has labeled you as a trusted friend. I’ve already created a database called safeplace for the collections.

The users collection includes a list of usernames for their trusted friends (peopleWhoCanTagMe):

{
    "_id" : ObjectId("5c9273127558d01d93f53dc0"),
    "username" : "alovelace",
    "name" : {
        "first" : "Ada",
        "last" : "Lovelace"
    },
    "peopleWhoCanTagMe" : [
        "jeckert",
        "jmauchly"
    ]
}

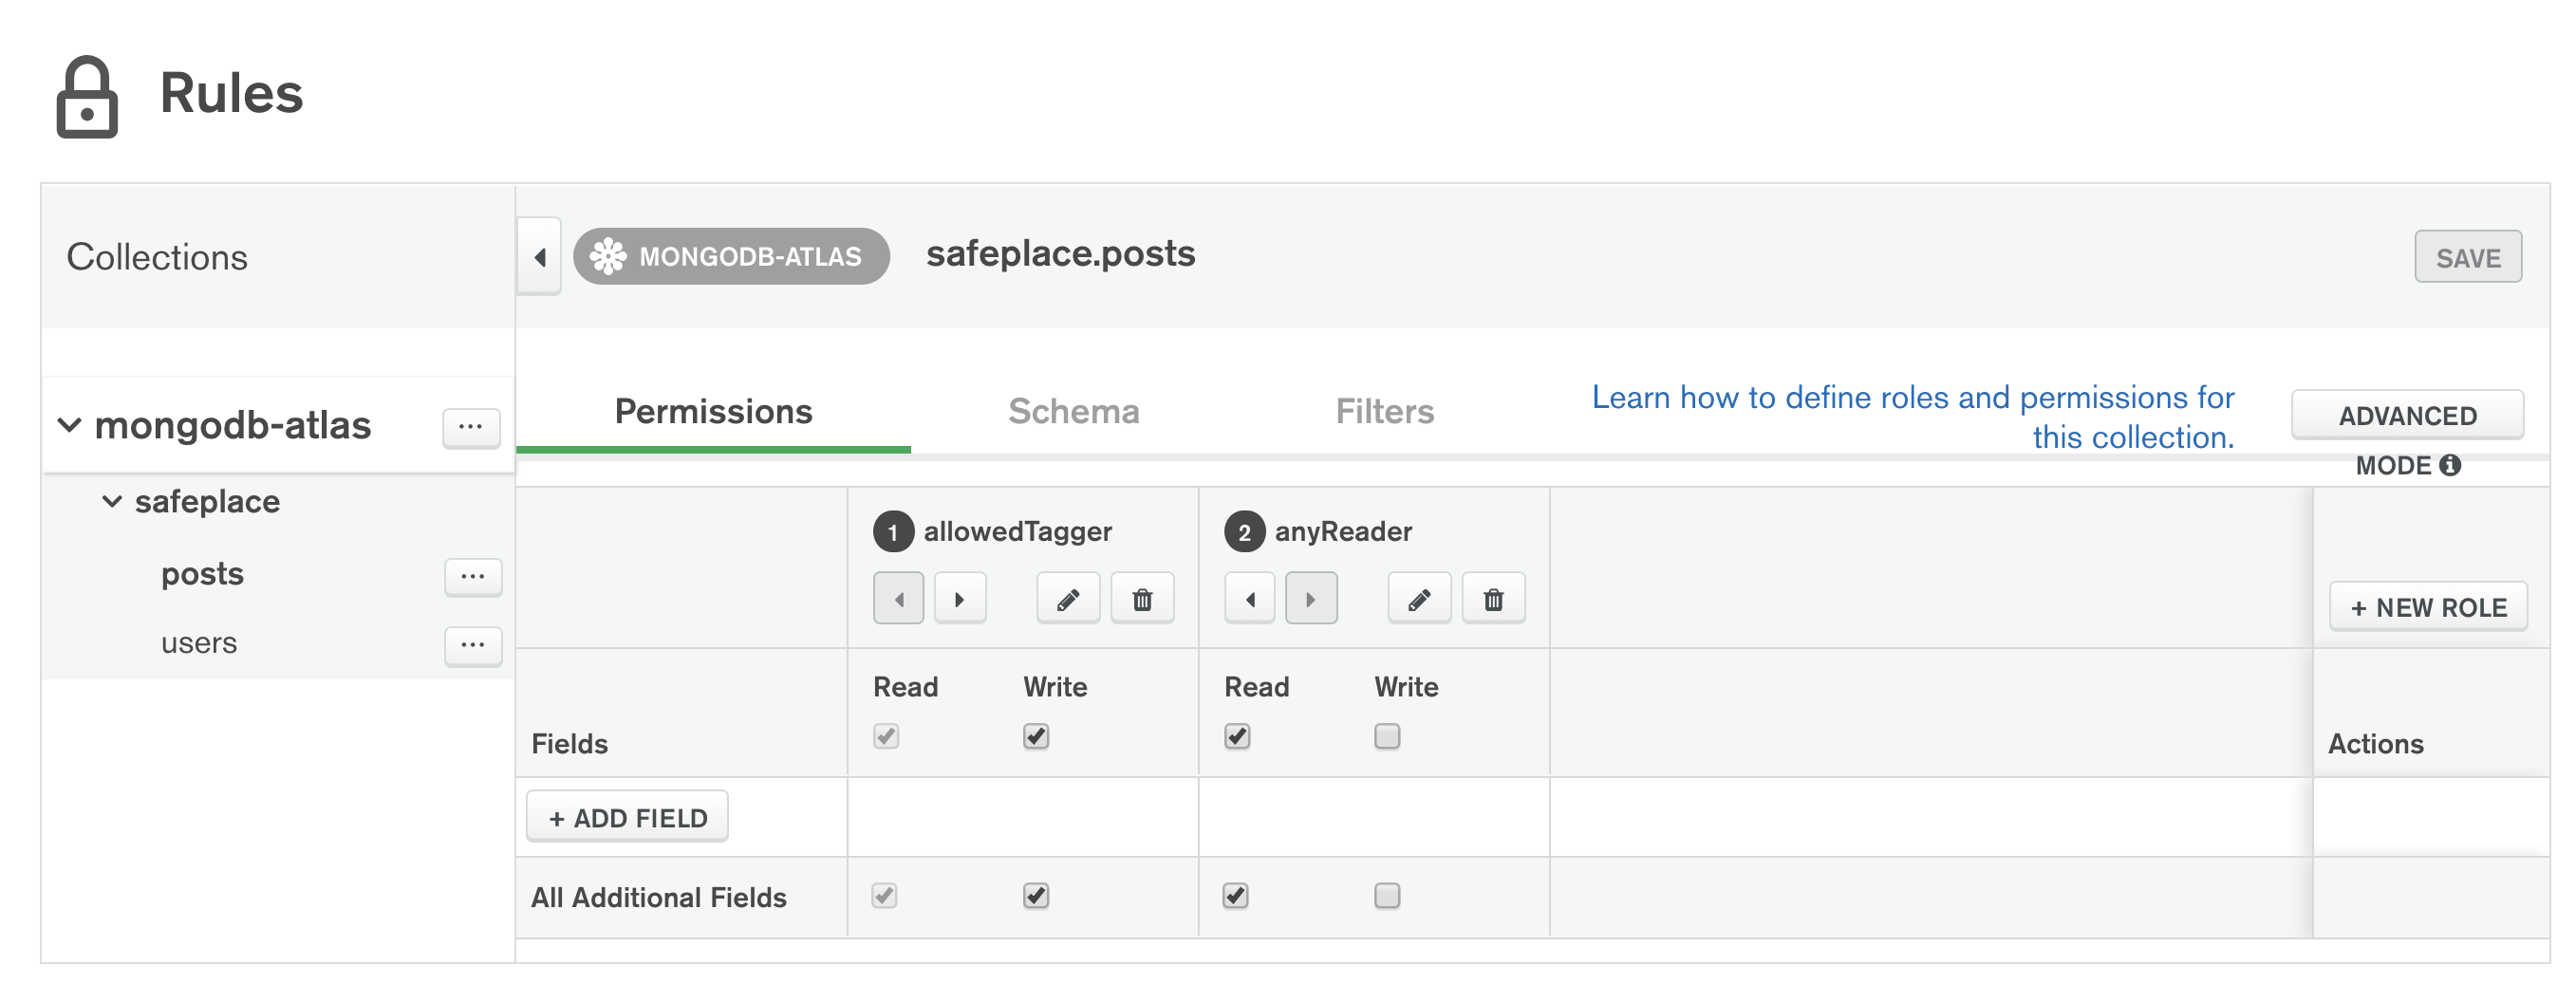
You then need to create a data access rule for the posts collection, consisting of 2 roles, which Stitch evaluates in sequence:

Creating custom roles for Stitch data access control rules

The second, anyReader, role lets anyone read any post, but the role we care about is allowedTagger which controls what the application can write to the collection.

The allowedTagger role is defined using this JSON expression:

{
  "%%true": {
    "%function": {
      "name": "canTheyTag",
      "arguments": [
        "%%root.poster",
        "%%root.tagged"
      ]
    }
  }
}

%%root represents the document that the user is attempting to insert. The poster and tagged attributes of the document to be written are the usernames of the author and their claimed friend. The JSON expression passes them as parameters to a Stitch function named canTheyTag:

exports = function(poster, tagged){
  var collection = context.services.get("mongodb-atlas")
    .db("safeplace").collection("users");
  return collection.findOne({username: tagged})
  .then ( userDoc => { 
    return (userDoc.peopleWhoCanTagMe.indexOf(poster) > -1);
  }).catch( e => { console.log(e); return false; }); 
};

This searches the users collection for the tagged user and then checks that the poster’s username appears in the peopleWhoCanTagMe array in the retrieved document.

You can test this new rule using the mongo shell (courtesy of Stitch’s MongoDB Connection String feature). Initially, I’m not included in Ada’s list of friends and so trying to tag her in a post fails:

db.posts.insert({ 
    poster: "amorgan", 
    tagged: "alovelace", 
    post: "Just sent you a pull request" })

WriteCommandError({ "ok" : 0, "errmsg" : "insert not permitted" })

The logs show that the insert didn’t match our customer role but that it did match the second (anyReader), but that inserts aren’t allowed for that role:

Logs:
[
  "uncaught promise rejection: StitchError: insert not permitted"
]
Error:
role anyReader does not have insert permission
Stack Trace:
StitchError: insert not permitted
{
  "name": "insertOne",
  "service": "mongodb-atlas"
}
Compute Used: 936719 bytes•ms

Ada then adds me as a trusted friend:

db.users.update(
    {username: "alovelace"}, 
    {$push: {peopleWhoCanTagMe: "amorgan"}}
)

My second attempt to tag her in a post succeeds:

db.posts.insert({
    poster: "amorgan", 
    tagged: "alovelace", 
    post: "Just sent you a pull request" })

WriteResult({ "nInserted" : 1 })

I recently had someone ask me how to implement “traditional database roles” using Stitch, i.e. an administrator explicitly defines which user ids belong to a specific role, and then use that role to determine whether they can access a collection. You can use this same approach for that use case – have a collection that assigns users to roles and then find the user id in that collection from a Stitch function that’s used in roles for the collections you want to protect. You could then optimize the rules by including the users’ roles as an attribute in their authentication token – but I’ll save that for a future post!


Replace tedious coding with MongoDB Stitch and public APIs

Most apps and websites contain much functionality that’s tedious to implement and has been done thousands of times before. MongoDB Stitch takes care of a lot of these chores – for example, making it simple to interact with third-party APIs. This post explains how I used Stitch to do just that that this week.

I recently described how I ported my legacy website to Stitch. After reading that post, one of our Paris Solution Architects spotted that there was a bug in how I was validating phone numbers in my forms (specific to France’s dialling plan). I was about to go into my code to tweak the regular expressions to cope with French phone numbers. However, what if there was another country with odd rules? What if the rules changed?

It then struck me that this is precisely the kind of chore that I should use Stitch to replace – being an expert in regular expressions and country-specific dialling plans wasn’t going to make the experience any better for my users, and so I should contract it out to “someone” else.

A quick Google later, and I’d settled on the NumVerify service which provides an API to validate phone numbers and add some extra information such as the type of line and the same number in full international format.

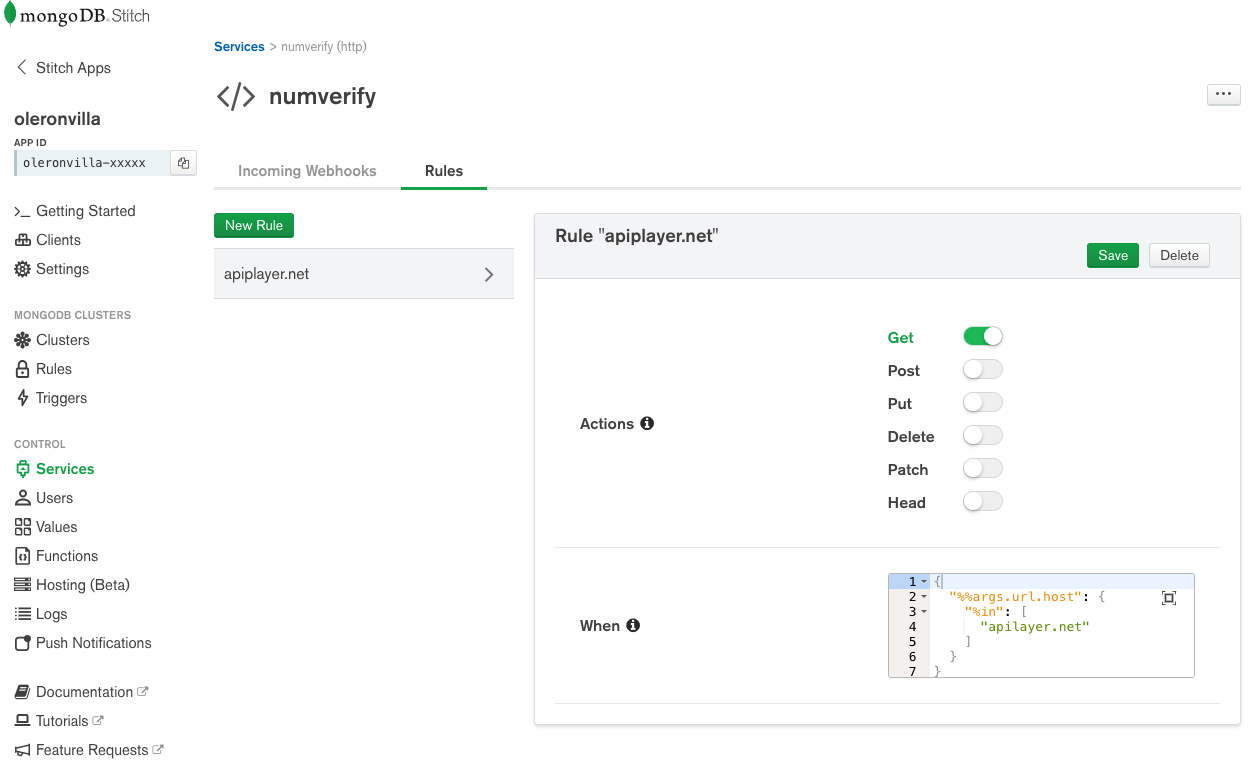
To access the NumVerify API, I needed to create a Stitch HTTP service. I named the service apiplayer.net and created a rule to allow the service to access the required domain (apiplayer.net) using GET requests:

Creating an HTTP Service rule in MongoDB Stitch to access REST APIs

Then I can call use that service from a new Stitch Function (verifyPhoneNumber):

exports = function(phoneNumber){
  const APIKey = context.values.get("numverifyAPIKey");
  const http = context.services.get("numverify");
  const url = "http://apilayer.net/api/validate?access_key=" + APIKey + "&number=" + phoneNumber + "&country_code=&format=1";
  var validationResults;

  return http.get({"url": url})
  .then((resp) => {
      const result = EJSON.parse(resp.body.text());
      if (result.valid) {
        console.log(result.international_format);
        return result;
      } else {
        console.log(result.number + " is not a valid phone number");
        return {valid: false};
      }
    },
    (error) => {
      console.log("Verification failed: " + error);
      return {valid: false};
    }
  );
};

Note that numverifyAPIKey is a Stitch Value that I’ve set to the API key I received when registering with NumVerify.

A typical (successful) result from this function looks like:

{
  "valid": true,
  "number": "448449808001",
  "local_format": "08449808001",
  "international_format": "+448449808001",
  "country_prefix": "+44",
  "country_code": "GB",
  "country_name": "United Kingdom of Great Britain and North",
  "location": "",
  "carrier": "",
  "line_type": "special_services"
}

The JavaScript running in the browser now executes the Stitch Function:

function validatePhone (inputField, helpText) {
  return new Promise(function(resolve, reject) {
    if (!validateNonEmpty (inputField, helpText)) {resolve(false)} else {
      const client = stitch.Stitch.defaultAppClient;
      client.callFunction("verifyPhoneNumber", [inputField.value]).then(
      result => {
        if (result.valid) {
          inputField.value = result.international_format;
          resolve(true);
        } else {
          helpText.innerHTML = 
            '<span class="english_material" lang="en">Phone number is invalid."</span>\
             <span class="french_material" lang="fr">Le numéro de téléphone est invalide.</span>';
             resolve(false);
        }
      }),(
      error => {
        helpText.innerHTML = 
          '<span class="english_material" lang="en">Phone number validation failed, but you can submit anyway."</span>\
           <span class="french_material" lang="fr">La validation du numéro de téléphone a échoué, mais vous pouvez quand même soumettre.</span>';
        // Not going to reject the form request just because the cloud service
        // is unavailable
        resolve(true);
      });
    }
  })   
}

NumVerify is as flexible as possible in accepting phone numbers in different formats. It also sets the resulting international_format field to a fully formatted international number – I use that to replace the user-provided number in the form, ensuring that all numbers stored in Atlas are in the same format. In one swoop, I’ve ripped out my spaghetti regular expression code, made the validations more robust, and added a new feature (normalizing the phone numbers before I store them) – result!

See the results at stitch.oleronvilla.com, but please don’t judge my code, I still need to delegate a lot more to Stitch and other services!

Creating your first Stitch app? Start with one of the Stitch tutorials.

Want to learn more about MongoDB Stitch? Read the white paper.